
Suositut kategoriat
Etsitkö tiettyä lankaa?


Kommentit / Kysymykset (60)
![]() Catherine kirjoitti:
Catherine kirjoitti:
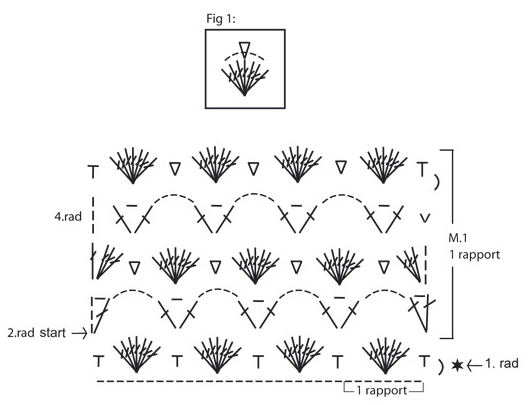
Bonjour, Je ne comprends absolument rien aux lignes 2 et 4 du diagramme...serait-il possible d'avoir plus d'explications? Merci
29.01.2013 - 09:47DROPS Design vastasi:
Bonjour Catherine, rang 2: 4 ml, 1B dans la même m, *5 ml, sauter le groupe de B et dans la ms suiv : 1 B, 1 ml, 1B*. R3 :3ml, 3B dans la même m,*1 ms dans la ml du r2 + dans la 4ème B du groupe de B, 1 groupe de B dans la ml suiv*. R4 :3 ml, *1B,1ml,1B dans la ms, 5 ml*. Répétez de *-* tous les rangs. Bon crochet !
29.01.2013 - 09:58
![]() DROPS Design kirjoitti:
DROPS Design kirjoitti:
Ashlee - that symbol is just a bent dash that is the symbol for a chain st taking you to next row.
09.06.2010 - 18:41
![]() Ashlee kirjoitti:
Ashlee kirjoitti:
Ok, I took a break from this pattern, cleared my head and started again, it's working wonderfully. Only problem is there is a symbol in the M1 that doesn't have an explanation. On the 5th row (top) of the diagram, there's a comma looking thing in the first step, no where in the instructions can I find that.
08.06.2010 - 19:25
![]() DROPS Design kirjoitti:
DROPS Design kirjoitti:
You are supposed to have 5 chains go over the 7 tc (US dc), then in next dc work 1 tc, ch 1, 1 tc, then chain 5 and so on.
26.02.2010 - 17:48
![]() Ashlee kirjoitti:
Ashlee kirjoitti:
I understand that the pattern is in a different language and the english translation is above but in the diagram...the second row doesn't add up to me. If the 2 tc at the dc are right next to each other (as shown) there there should be at least 7 chains...there's only 5...or am I supposed to have 5 chains go over the 7tcs? I don't get it. And is that right? 5 chains over the 7 with no attachment? I'm sorry...I really don't get it.
26.02.2010 - 17:18
![]() DROPS Design kirjoitti:
DROPS Design kirjoitti:
Hej, Enligt diagram skall börjar du 4. rad i vänster sida, då ser du att varvet blir lika i början och slutet.
29.01.2010 - 12:21
![]() Camilla kirjoitti:
Camilla kirjoitti:
Jag älskar detta mönster och väskan blir otroligt söt. Undrar dock över 4.rad i M.1 rapport. Varvet påbörjas med 3 luftmaskor och avslutas med en smygmaska. Då blir ju varvet olika i början och slutet. Har jag missuppfattat mönstret? Vore tacksam för vägledning.
16.01.2010 - 13:53
![]() DROPS Design kirjoitti:
DROPS Design kirjoitti:
If you don't get the patterns to work, we would like to ask you to go to the retailer where you bought the yarn. Our retailers are there to give you help when you don’t know how to continue. If you have bought original Garnstudio yarn, you can be sure that you have bought yarn from a shop that are specialized on DROPS patterns, and you have also supported our work with our webpages.
21.05.2008 - 17:31
![]() Jen kirjoitti:
Jen kirjoitti:
The diagram is really hard to understand, is there anyone who has completed this bag that could explain it in simpler instructions. I see the translation and know what each of the symbols represents, but I don't understand how to put it all together.
21.05.2008 - 17:27
![]() DROPS Design kirjoitti:
DROPS Design kirjoitti:
The translations for the Diagrams for all Garnstudio patterns are included within the text of the Pattern itself. If you look immediately above the diagram, you will find lines starting with an = sign. These are the translations, and they are given in the same vertical order as the chart symbols within the diagram.
14.04.2008 - 16:29
|
||||||||||||||||||||||
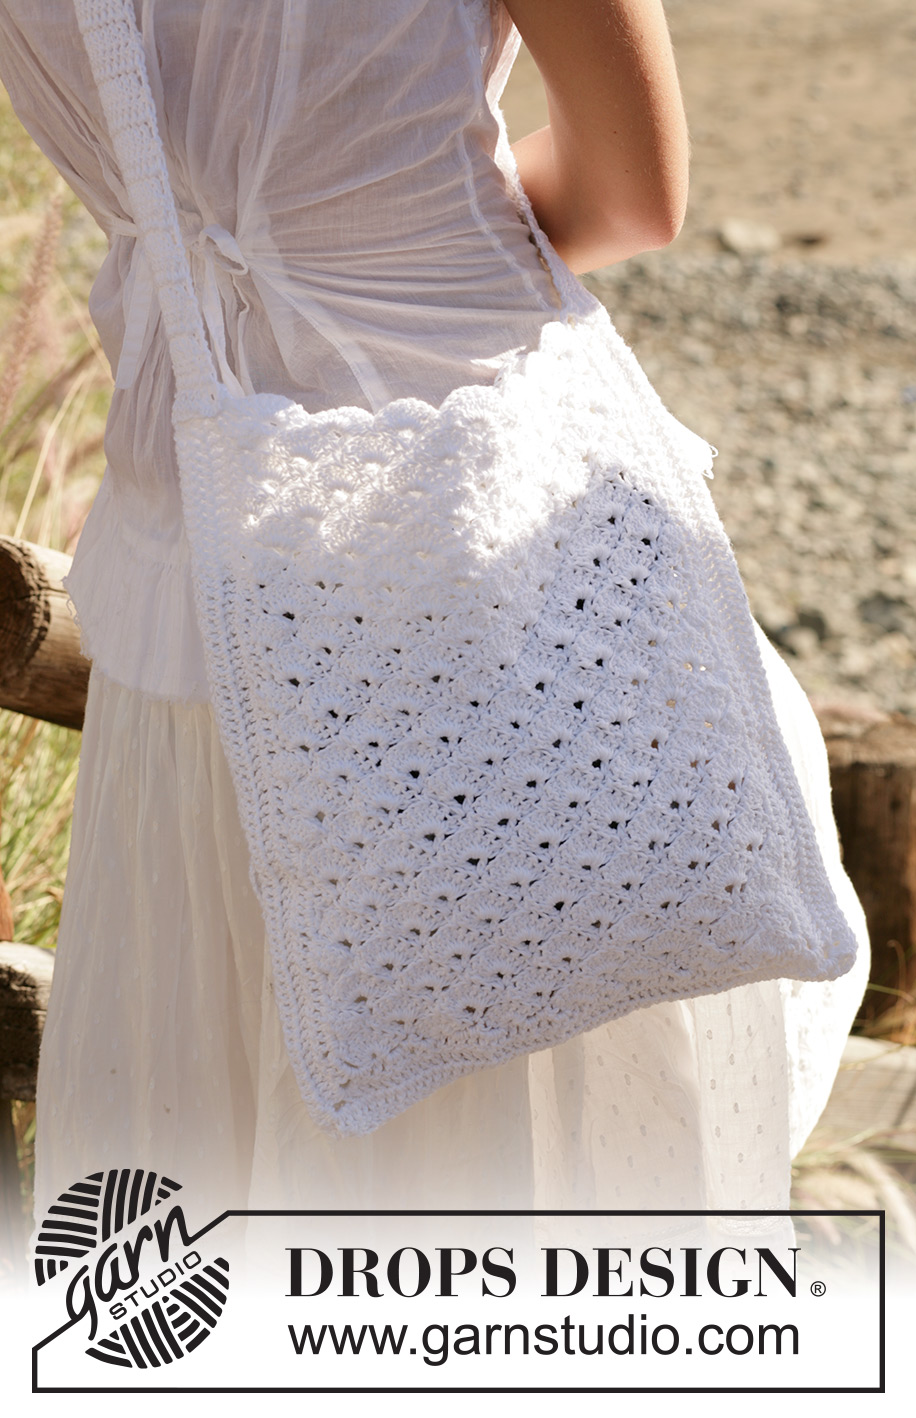
White Honey Comb#whitehoneycombbag |
||||||||||||||||||||||
|
|
||||||||||||||||||||||
DROPS virkattu laukku ”Bomull-Lin”-langasta
DROPS 99-24 |
||||||||||||||||||||||
|
Mallivirkkaus: Katso piirros M.1. Virkkausinfo: 1 mallikerta = 8 kjs. Jos haluat leveämmän laukun, virkkaa jokaiseen ylimääräiseen mallikertaan 8 ylimääräistä kjs. Jokaisen p-krs:n ensimmäinen p korvataan 3:lla kjs:lla. Voit halutessasi virkata reunus olkahihnan ympäri näin: * virkkaa 6 p remmin samaan s:aan, jätä 2 cm väliin, 1 ks, jätä 2 cm väliin *, toista *-*. Laukku: Laukku virkataan 2:ssa osassa, etu- ja takaosa. Etuosa: Virkkaa koukulla nro 4 ja Bomull-Lin-langalla 58 kjs (sis. 1 kjs kääntymiseen) - lue Virkkausinfo yllä! Virkkaa 1 ks 2. kjs:aan, * jätä 3 kjs väliin, 7 p seuraavaan kjs:aan, jätä 3 kjs väliin, 1 ks seuraavaan kjs:aan *, toista *-* yht. 7 kertaa. Jatka virkkaamalla M.1:n mukaan. Katkaise lanka ja päättele langanpää kun työn korkeus on n. 33 cm (sopeuta kokonaisen mallikerran jälkeen). Virkkaa 3 krs p:itä - muista Virkkausinfo - pitkin alareunaa ja sivuihin. Virkkaa kulmiin näin: 1 p, 3 kjs, 1 p. Takaosa: Virkkaa kuten etuosa. Olkahihna: Virkkaa 12 kjs (sis. 3 kjs kääntymiseen) - lue Virkkausinfo! Virkkaa 1 p jokaiseen kjs:aan ja sitten 1 p jokaiseen p:seen = 10 p. Virkkaa p:itä kunnes hihnan pituus on n. 80 cm. Katkaise lanka ja päättele langanpää. Viimeistely: Ompele laukku yhteen alareunasta ja sivuista. Kiinnitä olkahihna kummankin sivun ylimpänä olevaan p-osaan. |
||||||||||||||||||||||
Ruutupiirroksen selitykset |
||||||||||||||||||||||
|
||||||||||||||||||||||
 |
||||||||||||||||||||||
Oletko tehnyt tämän mallin?Tägää tällöin kuviasi #dropspattern #whitehoneycombbag tai lähetä kuvat #dropsfan galleriaan. Tarvitsetko apua tämän ohjeen kanssa?Löydät 4 ohjevideota, kommentteja/kysymyksiä ja muuta osoitteessa www.garnstudio.com © 1982-2026 DROPS Design A/S. Pidätämme kaikki oikeudet. Tämä tiedosto ja kaikki sen alatiedostot on suojattu tekijänoikeuslailla. Lue lisää siitä, mitä voit tehdä ohjeillamme, verkkosivujemme jokaisen ohjeen alaosasta. |
||||||||||||||||||||||


DROPS Design on toiminut neule- ja virkkausalalla yli 40 vuotta ja meillä on yksi kaikkein laajin valikoima ilmaisia ohjeita verkossa - käännettynä 17 kielelle. Tänään meiltä löytyy 324 lehteä ja 12290 ohjetta - joista 11706 ohjetta on käännetty suomeksi.
Työskentelemme ahkerasti, jotta voisimme antaa teille kaikkein parhaimpia neule- ja virkkausohjeita, inspiraatiota ja neuvoja sekä korkealaatuisia lankoja todella edulliseen hintaan! Haluaisitko käyttää ohjeitamme muuhun kuin henkilökohtaiseen käyttöön? Voit lukea säännöistä ohjeiden Tekijänoikeus -tekstissä, joka löytyy kaikkien ohjeidemme alapuolelta. Hauskoja hetkiä käsitöiden parissa!
Lisää kommentti ohjeeseen DROPS 99-24
Haluamme mielellämme kuulla mielipiteesi tästä ohjeesta!
Mikäli haluat esittää kysymyksen, valitse oikea kategoria alla olevasta valikosta - tällä tavoin saat vastauksen nopeammin. Pakolliset kentät on merkitty tähdellä *.