
Suositut kategoriat
Etsitkö tiettyä lankaa?


Kommentit / Kysymykset (27)
![]() Cecile Vandenborre kirjoitti:
Cecile Vandenborre kirjoitti:
Zou graag dat patroon willen bestellen vind het heel mooi en wil het proberen het te breien bedankt groetjes Cecile
20.02.2025 - 07:32
![]() Gre Minnaert kirjoitti:
Gre Minnaert kirjoitti:
Mooie spencer ik vraag me af of de armsgaten niet te wijd zijn
03.02.2025 - 19:55
![]() Monique Gallardo kirjoitti:
Monique Gallardo kirjoitti:
Le modèle de ce gilet est très beau. Modèle que je cherchais... Merci pour partage...
14.11.2024 - 21:40
![]() Brigid kirjoitti:
Brigid kirjoitti:
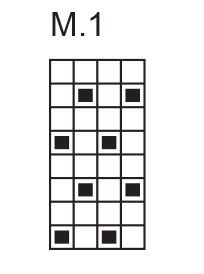
It's still unclear to me. one surface is mostly knit stiches (smoother texture), and one surface is mostly purl (bumpy texture) which is the right side and which is the wrong side? Thank you
13.11.2024 - 11:25DROPS Design vastasi:
Dear Brigid, the right side is the side where you work alternately (K1, P1) - you can add a marker on this side of piece to remember that's the right side. Happy knitting!
13.11.2024 - 17:06
![]() Brigid kirjoitti:
Brigid kirjoitti:
When knitting the ridge M.1, every second row is entirely knit stitches. Are these knit rows on the right side or the wrong side of the piece ? Thank you
12.11.2024 - 23:38DROPS Design vastasi:
Dear Brigid, M.1 is a kind of seed/moss stitch, so start from RS with row 1: (K1, P1) repeat from (to), Row2: purl all stitches, Row 3: (P1, K1) repeat from (to), Row 4: purl all stitches. Repeat these 4 rows. Happy knitting!
13.11.2024 - 08:05
![]() Brigid kirjoitti:
Brigid kirjoitti:
Does the back of this also have the texture, or is it just stocking stitch?
07.10.2024 - 15:42DROPS Design vastasi:
Dear Brigid, back piece is here worked entirely in stocking stitch, only front pieces are worked in moss/seed stitch. Happy knitting!
07.10.2024 - 16:08
![]() Ellen kirjoitti:
Ellen kirjoitti:
How do you do the bind off on the right front piece after casting on the stitches?
04.09.2024 - 15:51DROPS Design vastasi:
Hi Ellen, The text should say to decrease, not bind off, inside the 1 edge stitch by the armhole. Decrease by working 2 stitches together after working the edge stitch. Happy knitting!
05.09.2024 - 06:41
![]() Teresa Soza kirjoitti:
Teresa Soza kirjoitti:
Please, I need a more detalles instruction for the increases in the L side at the beginning of front
04.08.2024 - 22:02DROPS Design vastasi:
Dear Mrs Soza, for the right front piece you will increase on the right side of piece (1 time on every row, 2 times on every other row) - either at the beg of row from RS or at the end of row from WS; and at the same time increase on the left side of piece = at the end of every row from RS. Happy knitting!
05.08.2024 - 08:14
![]() Bärbel Grabsch kirjoitti:
Bärbel Grabsch kirjoitti:
Hallo, was ist mit den Zunahmen in jeder Reihe gemeint? Bezieht sich das nur auf Hinreihen oder muss in Hin-und Rückreihen zugenommen werden? Vor den Randmaschen und nach den Randmaschen? Ich habe schon einige Teile nach euren Anleitungen gestrickt, komne diesmal aber irgendwie nicht zurecht. Liebe Grüße Bärbel
17.07.2024 - 16:32DROPS Design vastasi:
Liebe Bärbel, wenn in jeder Reihe zugenommen werden soll, dann sind auch die Rück-Reihen gemeint (also Hin- UND Rück-Reihen). Die Zunahmen arbeiten Sie direkt neben der Randmasche (die Randmasche bleibt immer ganz außen am Rand). Gutes Gelingen weiterhin!
22.07.2024 - 10:16
![]() Alison kirjoitti:
Alison kirjoitti:
How do you increase for the bottom? I don't understand which rows to increase on (size small). Also, how do you work the ridge pattern on each side?
10.07.2024 - 16:57DROPS Design vastasi:
Dear Alison, Increase as follows in the first row: 1 edge stitch, increase 1, work 1 stitch (according to M.1), increase 2 stitches, 1 edge stitch. Increase the stitch after the first edge stitch "two rows yes and on the third one no" and repeat. Increase 2 stitches before the last edge stitch " two rows yes, one no, one yes, one no" and repeat. Ridge = 2 rows in garter stitch. So the stitches over which you work the ridge means that you always knit these stitches. Happy knitting!
15.07.2024 - 01:00
|
|||||||
Tropical Oceania |
|||||||
 |
 |
||||||
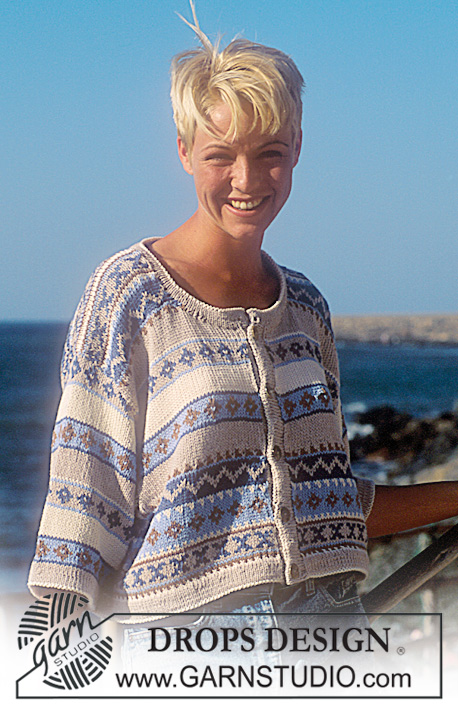
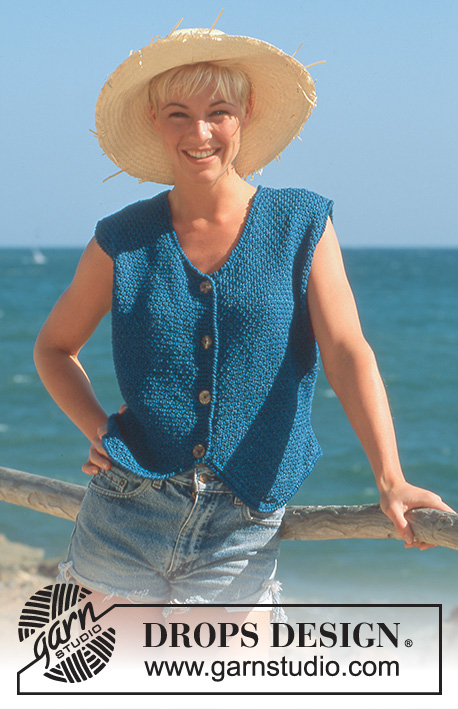
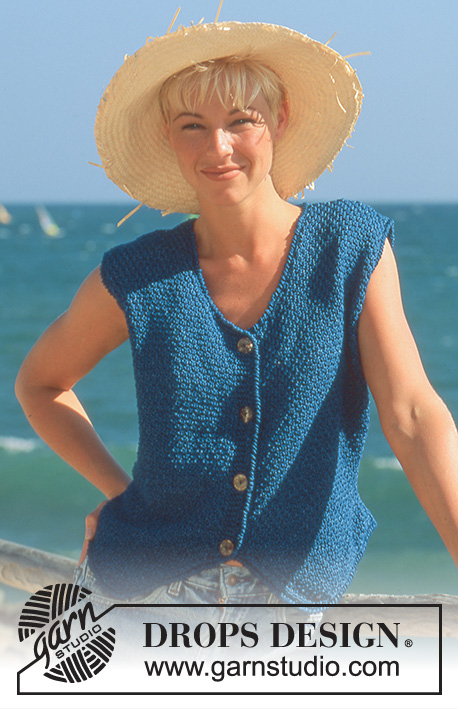
Merihenkinen DROPS liivi ”Muskat Soft” -langasta
DROPS 41-7 |
|||||||
|
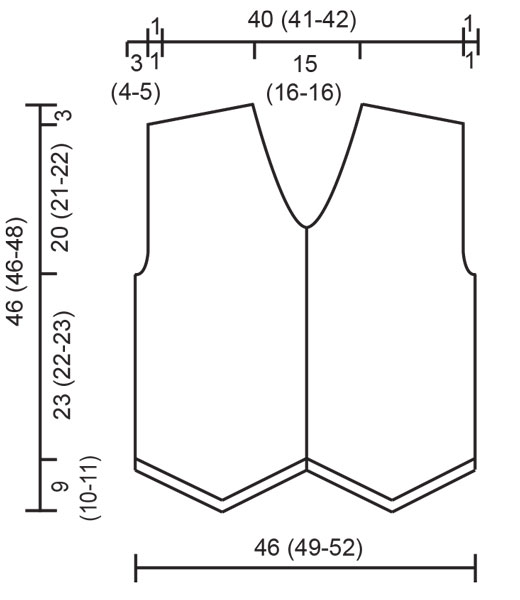
AINAOIKEINNEULE tasona: Neulo kaikki kerrokset oikein. NAPINLÄPI: Kun etureunan pituus on 1 (1-1) cm, 10 (10-11) cm, 19 (19-20) cm ja 28 (28-30) cm, tee oikeaan etukappaleeseen napinlävet. 1 napinläpi = päätä 3. ja 4. s ja luo seuraavalla krs:lla päätettyjen silmukoiden tilalle 2 s. OIKEA ETUKAPPALE: Luo 3 s puikoille nro 4 indigonsinisellä langalla ja neulo mallineuletta piirroksen M.1 mukaisesti. Tee SAMALLA kummankin reunan reunasilmukan sisäpuolelle lisäykset seuraavasti: Oikeassa reunassa (= etureunassa): Koko S: Lisää vuorotellen joka krs ja joka 2. krs 14 (15-16) x 1 s. Koot M+L: Lisää vuorotellen joka krs, joka 2. krs ja joka 2. krs 14 (15-16) x 1 s. Vasemmassa reunassa: Lisää 13 (14-15) x 2 s koissa S+M: Vuorotellen joka krs, joka 2. krs ja joka 2. krs, ja koossa L: Joka 2. krs = 43 (46-49) s. Työn pituus on n. 9 (10-11) cm. Kaikki mitat otetaan jatkossa tästä. Luo vasempaan reunaan 1 s saumanvaraksi ja luo oikeaan reunaan 5 s (= etureuna) = 49 (52-55) s (sis. 1 reunas saumanvaraksi). Etureunan 5 s:lla neulotaan ainaoikeaa lopulliseen mittaan asti. Tee oikeaan reunaan napinlävet (ks. selitys yllä). Kavenna vasemman reunan reunasilmukan sisäpuolella vuorotellen joka krs, joka 2. krs ja joka 2. krs: 7 (7-7) x 1 s = 42 (45-48) s (sis. 1 reunas). Kun työn pituus on 5 (5-5) cm, lisää vasemman reunan reunasilmukan sisäpuolelle joka 4. krs: 10 (10-10) x 1 s = 52 (55-58) s (sis. 1 reunas). Kun työn pituus on 23 (22-23) cm, päätä vasemmasta reunasta kädentietä varten joka 2. krs: 3 (3-4) x 2 s ja 1 (3-3) x 1 s = 45 (46-47) s. Kun työn pituus on 29 (29-31) cm, päätä oikeasta reunasta pääntietä varten joka 2. krs: 1 x 5 (6-6) s, 3 x 2 s, 4 x 1 s ja sitten joka 4. krs: 5 x 1 s. Samanaikaisesti kun työn pituus on 43 (43-45) cm, päätä sivusta olkaa varten joka 2. krs: 3 x 6 s. Päätä sitten loput 7 (7-8) s. Työn pituus on n. 46 (46-48) cm (koko pituus sis. halkio = n. 55 (56-59) cm.) VASEN ETUKAPPALE: Neulo oikean etukappaleen peilikuvaksi, mutta ilman napinläpiä. TAKAKAPPALE: Luo 88 (94-100) s (sis. 1 reunas kummassakin reunassa saumanvaraksi) puikoille nro 4 indigonsinisellä langalla. Neulo sileää neuletta ja kavenna SAMALLA kummankin reunan reunasilmukan sisäpuolella vuorotellen joka krs, joka 2. krs ja joka 2. krs: 7 (7-7) x 1 s = 74 (80-86) s (sis. 2 reunas). Kun työn pituus on 5 (5-5) cm, lisää kummankin reunan reunasilmukan sisäpuolelle joka 4. krs: 10 (10-10) x 1 s = 94 (100-106) s. Kun työn pituus on 23 (22-23) cm, päätä kummastakin reunasta kädenteitä varten joka 2. krs: 3 (3-4) x 2 s ja 1 (3-3) x 1 s = 80 (82-84) s. Kun työn pituus on 43 (43-45) cm, päätä sivusta olkaa varten joka 2. krs: 3 x 6 s. Päätä sitten loput 7 (7-8) s. Samanaikaisesti kun työn pituus on 44 (44-46) cm, päätä keskimmäiset 26 (28-28) s pääntietä varten ja neulo molemmat puolet erikseen. Päätä seuraavalla krs:lla vielä 2 s pääntien reunasta. Työn pituus on n. 46 (46-48). Neulo pääntien toinen puoli vastaavasti. VIIMEISTELY: Ompele olkasaumat ja sivusaumat. Virkkaa työn oikealta puolelta 1 krs ks:ita indigonsinisellä langalla ja koukulla nro 4 seuraavasti: 30 s takakappaleen pääntien reunaan, 38 s V-aukon reunaan, 55 s etureunaan, 28 s kärjen etureunaan, 30 s kärjen toiseen reunaan, 70 s takakappaleeseen. Virkkaa sitten 1 krs rapuvirkkausta (= ks:ita vasemmalta oikealle). Rapuvirkkaus voidaan tehdä myös seuraavasti: *Vie koukku alla olevaan ks:aan, ota lanka koukulle ja vedä s n. 2 cm:n korkuiseksi, kierrä virkkuukoukku 360 astetta vastapäivään, ota lanka koukulle ja vedä lanka molempien koukulla olevien silmukoiden läpi*. Toista *-*. Toista näitä 2 krs:ta kädenteiden reunoissa = n. 85 s. Kiinnitä napit. |
|||||||
Ruutupiirroksen selitykset |
|||||||
|
|||||||
 |
|||||||
 |
|||||||
Oletko tehnyt tämän mallin?Tägää tällöin kuviasi #dropspattern tai lähetä kuvat #dropsfan galleriaan. Tarvitsetko apua tämän ohjeen kanssa?Löydät 17 ohjevideota, kommentteja/kysymyksiä ja muuta osoitteessa www.garnstudio.com © 1982-2026 DROPS Design A/S. Pidätämme kaikki oikeudet. Tämä tiedosto ja kaikki sen alatiedostot on suojattu tekijänoikeuslailla. Lue lisää siitä, mitä voit tehdä ohjeillamme, verkkosivujemme jokaisen ohjeen alaosasta. |
|||||||


DROPS Design on toiminut neule- ja virkkausalalla yli 40 vuotta ja meillä on yksi kaikkein laajin valikoima ilmaisia ohjeita verkossa - käännettynä 17 kielelle. Tänään meiltä löytyy 324 lehteä ja 12239 ohjetta - joista 11636 ohjetta on käännetty suomeksi.
Työskentelemme ahkerasti, jotta voisimme antaa teille kaikkein parhaimpia neule- ja virkkausohjeita, inspiraatiota ja neuvoja sekä korkealaatuisia lankoja todella edulliseen hintaan! Haluaisitko käyttää ohjeitamme muuhun kuin henkilökohtaiseen käyttöön? Voit lukea säännöistä ohjeiden Tekijänoikeus -tekstissä, joka löytyy kaikkien ohjeidemme alapuolelta. Hauskoja hetkiä käsitöiden parissa!
Lisää kommentti ohjeeseen DROPS 41-7
Haluamme mielellämme kuulla mielipiteesi tästä ohjeesta!
Mikäli haluat esittää kysymyksen, valitse oikea kategoria alla olevasta valikosta - tällä tavoin saat vastauksen nopeammin. Pakolliset kentät on merkitty tähdellä *.