Como ler os diagamas de croché

Um diagrama de croché consiste em símbolos. 1 símbolo = 1 ponto – a definição do símbolo explica que tipo de ponto é/como é feito. O diagrama mostra todos os pontos vistos pelo direito da peça (excepto indicação em contrário).

Um diagrama de croché usual tem este aspecto:

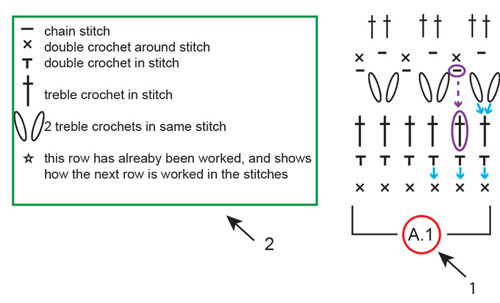
1: 1. A.1 é o nome do diagrama e refere-se ao diagrama completo – dento das quatro linhas. Tudo o que está dentro das quatro linhas é 1 repetição do diagrama.
2: 2. Esta é a definição do símbolo, que explica como cada ponto é feito.
Flechas azuis: O símbolo é trabalhado no ou à volta do ponto directamente abaixo no diagrama. Por vezes, trabalham-se vários pontos no/à volta do mesmo ponto.
Flechas e elipses ovais roxas: Nem todos os pontos se fazem como, por exemplo: por vezes, faz-se uma corrente e salta-se o ponto abaixo dessa corrente.

Um diagrama de croché lê-se de forma contrária à que lê normalmente: da direita para a esquerda, de baixo para cima. Por outras palavras: começa no símbolo do canto inferior direito e trabalha em direcção ao lado esquerdo e para cima (ver as setas a VERMELHO no diagrama abaixo).

Se tem de fazer várias repetições de um diagrama (ou seja, se tem de ser repetido várias vezes na carreira), trabalhar até ao fim da carreira e começar novamente pelo primeiro símbolo da carreira.

Em idas e voltas:

Quando trabalha em idas e voltas, as carreiras ímpares são feitas pelo direito da peça e as carreiras pares são feitas pelo avesso da peça. Quando trabalha peloa vesso, o diagrama deverá ser lido em sentido contrário: da esquerda para a direita (ver flecha vermelha pelo direito e a flecha azul pelo avesso abaixo).

A carreira começa geralmente por um determinado número de pontos corrente – número equivalente à altura do ponto seguinte – e estão incluídos para lhe assegurar que começar pelo topo do ponto seguinte (ver círculos verdes abaixo). Se os pontos correntes estão incluídos no diagrama (tal como neste exempl) todos os pontos são trabalhados exactamente como aparecem. Por vezes, o ponto fantasia inclui DICA CROCHÉ no início das instruções escritas, o que lhe dirá quantos pontos corrente deve fazer no início de cada carreira e se esses pontos corrente substituem o primeiro ponto da carreira (ou se são adicionais). Se os pontos corrente NÃO estão incluídos no diagrama: seguir as instruções dadas em DICA CROCHÉ.
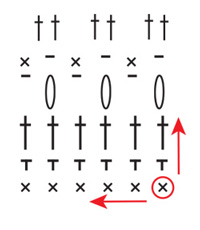
Em redondo:

Quando se trabalha em redondo, todas as carreiras são trabalhados pelo direito da peça: da direita para a esquerda (ver as flechas vermelhas abaixo). De que forma a carreira começa e termina é algo muitas vezes mostrado num diagrama próprio (ver A.2 abaixo – quadrado verde). Da mesma forma como quando se trabalha em idas e voltas, a carreira começa com um determinado número de pontos corrente, equivalente à altura do ponto seguinte. No fim da carreira, geralmente, une-se o princípio e o fim da carreira com um ponto baixíssimo no último dos pontos corrente do princípio dessa mesma carreira (ver quadrado azul abaixo). Por outras palavras: os pontos correntes em A.2 = o princípio da carreira, enquanto que o ponto baixíssimo em A.2 = o fim da carreira.

Se tem de trabalhar várias repetições do diagrama (A.1) (ou seja, se é repetido várias vezes na carreira) trabalha-se até ao último ponto e, depois, começa-se novamente no primeiro ponto na mesma carreira de A.1. NOTA: neste exemplo, SÓ se repete A.1 - A.2 mostra como se trabalha o princípio e o fim da carreira.

Vários diagramas diferentes trabalhados consecutivamente na carreira:

Se está a trabalhar vários diagramas diferentes, um após o outro, na mesma carreira, trabalhar da seguinte maneira: Trabalhar a 1.ª carreira do diagrama 1, continuar com a 1.ª carreira do diagrama 2, depois, com a 1.ª carreira do diagrama 3, etc. NÃO SE ESQUEÇA: se estiver a trabalhar em idas e voltass, os diagramas terão de ser trabalhados em sentido contrário pelo avesso – ou seja: começar pelo diagrama 3, depois, o diagram 2 e, por fim, o diagram 1. São também trabalhados em sentido contrário, com habitualmente.

Diagramas circulares:

Quando se trabalha um círculo e se começa pelo centro em direcção aos lados, isso geralmente é mostrado num diagrama circular. O diagrama pode mostrar o círculo inteiro – neste caso, cada símbolo é trabalhado exactamente como aparece, ou, então, o diagrama pode apresentar uma parte de um círculo que é depois repetido um determinado número de vezes para formar um círculo inteiro.

Círculo inteiro:

Num diagrama de círculo inteiro começa-se pelo símbolo que está no centro desse círculo: geralmente é um pequeno aro que representa um determinado número de pontos corrente, fechado, depois, com um ponto baixíssimo (ver círculo vermelho abaixo). Da mesma forma, quando se trabalha em redondo, a carreira começa com um determinado número de pontos corrente (equivalente à altura do símbolo seguinte) e termina com um ponto baixíssimo no último desses pontos corrente – ou seja: equivalente a A.2 no nosso exemplo anterior (ver quadrado azul) - NOTA: quando os pontos corrente são mostrados no diagrama, eles NÃO substituem qualquer um dos outros símbolos, e cada símbolo é trabalhado exactamente como aparece. Se os pontos corrente SUBSTITUEM qualquer ponto, isso terá sido retirado do diagrama.

Trabalha-se no sentido contrário do dos ponteiros do relógio: da direita para a esquerda, 1 símbolo após o outro (ver flecha vermelha abaixo). Os pontos da primeira carreira geralmente trabalham-se À VOLTA DO aro de pontos corrente, o que significa que passa a agulha de croché pelo interior do aro, apanha o fio e passa-o pelo mesmo aro (trabalhando, depois, o ponto como de costume) – Não trabalha o ponto EM qualquer um dos pontos corrente, mas, sim, À VOLTA do aro formado pelos pontos corrente. No fim da carreira, unir o princípio e o fim com um ponto baixíssimo e começar a trabalhar a segunda carreira do diagrama: a segunda carreira mais próxima do centro (ver flecha verde).

Parte de um círculo:

Se o diagrama é apenas uma parte de um círculo, isso é porque essa parte se repete um determinado número de vezes em redondo para formar um círculo inteiro. Começa-se pelo símbolo da parte de baixo (ver círculo vermelho) e trabalha-se da mesma maneira como para um CÍRCULO INTEIRO, mas A.2 será repetido um determinado número de vezes em redondo. Da mesma forma de que quando se trabalha em redondo, geralmente, há um diagrama separado para ilustrar como a carreira começa e termina (ver quadrado azul de A.1 abaixo). Começa-se o diagrama pela carreira mais próxima do aro de pontos corrente, na parte de baixo do diagrama, trabalha-se o(s) ponto(s) corrente de A.1, depois, o(s) símbolo(s) de A.2 (na primeira carreira é apenas 1 símbolo) e repetem-se o(s) símbolo(s) de A.2 no número de vezes indicado nas instruções escritas do ponto fantasia.

No fim da carreira une-se em redondo com o ponto baixíssimo de A.1. Quando a primeira carreira está feita, continuar com a carreira seguinte: a segunda carreira mais próxima do aro de pontos corrente (ver flecha verde abaixo).

Diagramas quadrados / diagramas às cores:

Alguns diagramas de croché são mostrados num quadrado, em que 1 quadrado = 1 ponto. Qual o tipo de ponto que deve trabalhar, geralmente, é explicado nas instruções escritas do modelo, enquanto que o propósito do diagrama é mostrar com que cores os pontos são trabalhados (ver círculo vermelho abaixo = definição do símbolo).

Trabalha conforme explicado acima, dependendo de se trabalhar EM IDAS E VOLTAS, EM REDONDO ou um DIAGRAMA CIRCULAR.

Comentários (140)

Eliana Valenzuela wrote:

Muchas gracias, por mostrar sus tejidos son muy hermosos y muy explicativos, soy principiante cen tejido a crochet y me encanta. En esta cuarentena por el covil 19, estoy tejiendo y sobre todo a mi nieta de 4 años, un abrazó a la distancia.

27.04.2020 - 10:22:

Mary Kselman wrote:

Is there a step-by-step step pattern for drops pattern 171-21? Or a video? I love this jacket, but al finding it difficult to follow the diagram. Please help.

17.04.2020 - 00:50:

Marcy wrote:

Sad fact that due to visual learning disabilities suffered by millions of us, ALL your patterns are completely UNACCESSIBLE. Thank you for this "tutorial" but it is like GIBBERISH when people such as myself, cannot possibly make sense of the charts. I've tried reading your tutorial, watched videos, even paid to attend a class in a local yarn shop. I'm no closer to being able to use them. I paid someone to "translate" a pattern. There are other sources for patterns and yarn I'll use.

24.03.2020 - 23:25:

Mrs Blair wrote:

Do I build the diagram up or around?

14.03.2020 - 21:37:

DROPS Design answered:

Dear Mrs Blair, diagrams are usually worked bottom up, and repeated in the round - to get a more detailed answer please ask your question on the pattern you are working on. Thanks for your comprehension!

16.03.2020 - 10:40:

Pamela Goulden wrote:

Please have the lady crocheted on HGTV crochet the Flair for Spring # 632 demonstrate how to crochet this sweater. Thank you.

29.02.2020 - 02:57:

Pamela Goulden wrote:

Please give me row by row crochet instructions for pattern #w- 632. I’ve watched the video but still get confused with the symbols. I know how to crochet but not good at following diagrams. Help!

26.02.2020 - 10:43:

DROPS Design answered:

Dear Mrs Goulden, we are unfortunately not able to re-write all diagrams used in that pattern, this lesson should be able to help you to understand how to crochet a diagram - please contact your DROPS store - even per mail or telephone - or any crochet forum for any individual assistance. Thanks for your comprehension. Happy crocheting!

27.02.2020 - 10:10:

Linda Harding wrote:

Please could you print your patterns with UK written instructions - I have tried to understand the diagrams but just can’t understand them despite repeated attempts. Do you have a video that shows step by step how to follow a diagram?

08.01.2020 - 18:39:

DROPS Design answered:

Dear Mrs Harding, The DROPS patterns are knitted and crocheted by thousands and thousands of people  around the world. We understand however that in certain countries, with different knitting/crochet traditions than Scandinavia, our patterns might be written in a way that differs from what some are used to. But of course we want everyone to understand our patterns, so that’s why we have created an extensive library of tutorial videos as well as step by step lessons that explain how to follow the techniques we use and how to read the diagrams in our patterns. If you have a doubt about how to read a specific pattern make sure to leave a comment in that pattern so that we can help you.

09.01.2020 - 10:30:

Nona Soft wrote:

I have a question in pattern number 205_4 it is a sweater I can't understand how to work A1 in two stitches and repeat A2 over 32 how can I work I can't understand how to follow the diagram is A2 has increase??? Or not I hope you help me

23.12.2019 - 12:51:

DROPS Design answered:

Dear Mrs Soft, 205-4 is a knitting pattern; did you mean this one or any other one? You are welcome to ask your question in the comment sections of the pattern you are working on, it can be that way easier to help you. Happy crocheting!

02.01.2020 - 16:41:

Colleen wrote:

On my diagram for 195-14 on A1 two vertical dashes and I don’t know what stitch they are? Please help

03.12.2019 - 04:02:

DROPS Design answered:

Dear Colleen, if you think of the 2 dashes at the beg of row with sc (US-crochet) in A.2 there you have to work 2 chains, then 1 sc (US-crochet) in next stitch. Happy crocheting!

03.12.2019 - 13:05:

Elaine wrote:

I would like to know if you can print the pattern for the Drops Design Lily Pad round crochet rug (152-25). I cannot follow diagrams and would love to crochet this beautiful rug......Thank you in advance for your help.....Elaine

26.11.2019 - 18:31:

DROPS Design answered:

Dear Elaine, we only have diagram to this pattern, you will find above how to read them - see here. Happy crocheting!

27.11.2019 - 08:59:

Isidora Saldana wrote:

How can I get your videos to play. They\'re not working

04.11.2019 - 15:51:

DROPS Design answered:

Dear Mrs Saldana, Please make sure you have installed the newest version of Adobe Flash Player. If the problem persists, please take a look at Vimeo's FAQ. You can also find our videos on our You Tube Channel. Happy crocheting!

05.11.2019 - 10:53:

NATASHA COLE wrote:

There are a lot of Drops patterns I have ready in my stash to crochet but each time I get started I abandon them because I really do not understand how to read your patterns with the diagrams. Can you please do a video tutorial to explain how to follow crochet patterns that have the additional diagrams. For example the Escapade cardigan has multiple diagrams.

24.10.2019 - 18:25:

DROPS Design answered:

Dear Mrs Cole, when there are several diagrams to follow on a same row you can cut them and put them together in a montage so that you can follow them as explained under Several different diagrams worked consecutively on the row/round:. Your DROPS store will also be able to assist you reading diagrams, even per mail or telephone. Happy crocheting!

25.10.2019 - 10:14:

Aimee wrote:

Som total nybegynder i hækling søgte jeg info på 'Hvordan læses diagrammer'. Er det muligt at få symbolforklaringen på dansk, da jeg ikke har styr på de engelske navne for hæklemasker.

19.10.2019 - 12:45:

DROPS Design answered:

Hei Aimee. Ja, du kan finne alt på dansk. Velg den engelske side til "How to read crochet diagrams" (må være på den engelske side ettersom du skal oversette fra engelsk til dansk) og velg "Dictionary" til høyre (eller helt nederst på siden). Skriv inn ordet du vil oversette, f.eks "chain stitch". Det vil da komme opp en forklaring på hva en chain stitch er, på engelsk, men scroll litt ned og du ser oversettelser på mange språk. Klikk på Dansk og "luftmaske" , du vil da få en forklaring på hva en luftmaske er på dansk. God Fornøyelse!

21.10.2019 - 09:18:

Judy Lane wrote:

Hi I think I have figured out the pattern for the tangy squares but am having difficulty with round 2!!!! I am not sure about the symbol for the treble crochet around ch st/ch sp/ch st ring - it is obvious in round one because you work in to the ring.

05.09.2019 - 17:31:

DROPS Design answered:

Dear Mrs Lane, could you please ask your question under the pattern you are working on? It would be easier to help you when looking at the diagram you are working on. Thanks for your comprehension!

06.09.2019 - 08:37:

Heather wrote:

Could you please start giving written patterns also, I have a very hard time with the diagrams. I love all your crochet patterns and would love to make them but with my eyesight I have such a rough time.

15.08.2019 - 09:44:

DROPS Design answered:

Dear Heather, The DROPS patterns are knitted and crocheted by thousands and thousands of people  around the world. We understand however that in certain countries, with different knitting/crochet traditions than Scandinavia, our patterns might be written in a way that differs from what some are used to. But of course we want everyone to understand our patterns, so that’s why we have created an extensive library of tutorial videos as well as step by step lessons that explain how to follow the techniques we use and how to read the diagrams in our patterns. Give them a try!

15.08.2019 - 10:56:

Patricia Williams wrote:

The diagram, I have never followed a diagram. Is there a tutorial I can watch and do for the Sand Voyage Summer hat, please? I'm having a rough time trying to understand the diagram. Once I finished the sc rounds, what/where do i begin the vertical stitches?

18.06.2019 - 00:04:

DROPS Design answered:

Dear Mrs Williams, in this pattern you will start reading the diagram A.1 at the bottom corner on the right side (the row after the star), then crochet every row from the right towards the left following the symbol explained in diagram key. Happy crocheting!

18.06.2019 - 08:53:

Marianne wrote:

Har virkelig ledt efter sådan en tutorial i lang tid. Tak for hjælpen! :)

16.05.2019 - 12:47:

Sandra McCarthy wrote:

Pattern # w-767. I have read the complete pattern. I understand the instructions for the bag. I don't understand the Work A.2 over each repeat of A.1. I did reread the crochet info and am still confused. Also in the diagram what is the arrow saying? Start on the second row (of the diagram) working up and the bottom row (below the arrow) is worked as the third row after the top row.

16.04.2019 - 20:15:

DROPS Design answered:

Dear Mrs McCarthy, did you manage to work A.2 with the answer on your question you asked on the pattern? Remember also you can get individual assistance contacting your DROPS store, even per mail or telephone. Happy crocheting!

23.04.2019 - 16:25:

Inga wrote:

Gibt es diese Übersicht auch für Strickanleitungen?

20.03.2019 - 19:18:

DROPS Design answered:

Liebe Inga, hier finden Sie, wie man Strickdiagram liest. Viel Spaß beim stricken!

21.03.2019 - 10:08:

Katarina Hahn Persson wrote:

Hej jag vet inte hur jag skall läsa diagrammet till mönster nr. Drops 187-2. Tacksam för hjälp. // Katarina

18.03.2019 - 21:07:

DROPS Design answered:

Hej Katarina, första varvet i diagrammet består av stolpar och det har du redan virkat enligt mönstret. Varv 2 i diagrammet består av växelvis 1 lm och 1 stolpe i varannan stolpe varvet ut. Varv 3 består av 2 stolpar i varje lm från varvet innan. Fråga också gärna i butiken där du har köpt garnet. Lycka till :)

06.05.2019 - 08:59:

Deixe um comentário ou uma pergunta acerca desta lição

O seu email não será publicado. Os campos obrigatórios estão assinalados com um *