How to read knitting diagrams

A knitting diagram consists of squares. 1 square = 1 stitch - the symbol definition provide information on how the stitch is worked. The diagram shows all stitches seen from the right side (unless otherwise specified).

A diagram looks like this:

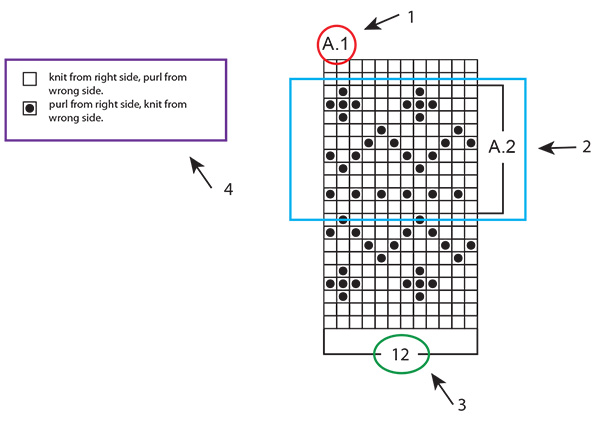
  1. A.1 is the name of the diagram, and refer to the entire diagram.
  2. A.2 is only the part of the diagram within the square brackets.
  3. This number refers to the number of stitches on the 1st row of the diagram.
  4. This is the symbol definition: it explains how each stitch is worked, or in what colour (in multicoloured patterns).

You read a knitting diagram completely opposite to how you would normally read: from right to left, from bottom to top. In other words: you start with the symbol in the bottom right corner, and work your way leftwards and upwards (see RED in diagram below). If you are supposed to start at a different point/with a different stitch, will this be specified - for example: the different sizes can start at different places in the same diagram (see BLUE box below).

If you are supposed to work several repeats of a diagram (ie: work the same diagram several times in width) you’ll work until the end of the diagram row, and start again with the first stitch for the next repeat.

Back and forth:

When working back and forth, every other row will be worked from the right side and every other row will be worked from the wrong side. Since the diagram shows all stitches seen from the right side, you’ll have to work it in opposite way when working from the wrong side (see BLUE arrows in diagram below): you read the row from left to right, knit stitches are purled, and purl stitches are knit etc (this will often be specified in symbol definition: “knit from right side, purl from wrong side”).

In the round:

When working in the round all rounds are worked from the right side, and the diagram is read solely from right to left. When starting a new round, simply start working the first symbol on the next row in diagram.

Several different diagrams worked consecutively on the row/round:

If you’re working several different diagrams after each other on the same row/round, work as follows: Work 1st row in diagram 1, continue with 1st row in diagram 2, then 1st row in diagram 3 etc. REMEMBER: if you’re working back and forth, the diagram will have to be worked in the opposite order from the wrong side - ie: start with diagram 3, then diagram 2 and lastly diagram 1. They are also worked in opposite way as usual.

In the pattern this can be written as follows: “work A.1, A.2, A.3 a total of 1-1-2-3-4 times”. This means that you first work A.1, then A.2 and finally you repeat A.3 a total of 1-1-2-3-4 times (depending on your size). It is ONLY A.3 that is repeated, A.1 and A.2 are worked 1 time each.

When stitch count doesn’t match whole repeats of diagram:

Sometimes the stitch count is not divisible with full/whole repeats of the diagram in width. For example: A.1 covers 12 stitches and is to be repeated over 40 stitches. In this case you will work 3 full repeats of A.1 (=36 stitches), and then work the first 4 stitches in the diagram over the remaining stitches (see RED line below). This is usually the case where the diagram is a repetitive pattern, so that regardless of working full repeats, the pattern will still be consistent.

Comments (608)

Jo-Ann Driedger-Kinash wrote:

I am knitting the jacket Drops Design City Stride. After following the diagram It would appear that the Fisherman’s knit design is every second row which puts one in the front and one in the back. What am I doing wrong

05.04.2023 - 15:00:

DROPS Design answered:

Dear Jo-Ann, since it's worked every 2nd row, it's worked always on an odd-numbered row, which are always worked on the right side. So the Fisherman's knit is always on the right side. Happy knitting!

06.04.2023 - 20:24:

Jo-Ann Driedger-Kinash wrote:

I am knitting Drops Design pattern City Stride knitted jacket. Following the diagram as written it would appear that the Fisherman’s knit pattern is every second row which looks to me when the sweater is put together one rib is on the front the other on the back. What am I doing wrong?

05.04.2023 - 14:53:

DROPS Design answered:

Dear Jo-Ann, since it's worked every 2nd row, it's worked always on an odd-numbered row, which are always worked on the right side. So the Fisherman's knit is always on the right side. Happy knitting!

06.04.2023 - 20:24:

Jo-Ann Driedger-Kinash wrote:

I am knitting Drops Design cardigan City Stride. If I follow the diagram as printed it would appear that the Fisherman’s Knit design does not end up on each side of the front. It seems to be every second row. What am I doing wrong?

05.04.2023 - 14:47:

DROPS Design answered:

Dear Jo-Ann, since it's worked every 2nd row, it's worked always on an odd-numbered row, which are always worked on the right side. So the Fisherman's knit is always on the right side. Happy knitting!

06.04.2023 - 20:24:

Barbara wrote:

Per un lavoro top down il diagramma si legge dal basso verso l'alto o dall'alto verso il basso?

03.04.2023 - 09:12:

DROPS Design answered:

Buonasera Barbara, i diagrammi si leggono sempre dal basso verso l'alto. Buon lavoro!

04.04.2023 - 22:30:

Vera Grønneberg wrote:

DROPS Design: Modell u-079-bn Diagram: har strikket 12 rader. Nå deler diagrammet seg. Hvordan skal jeg tolke det? Hva gjør jeg?

30.03.2023 - 09:45:

DROPS Design answered:

Hei Vera. Når du har kommet til 12. rad (alle like), fortsetter du på 13. rad når du strikker A.1a, 1.rad når du strikker A.1b, 13.rad når du strikker A.1c, 1.rad når du strikker A.1d og 13. rad når du strikker A.1e. Altså, hver gang du har kommet på "toppen" av et av diagrammene, starter du på 1.rad igjen, slik at de gjentas i høyden. mvh DROPS Design

14.04.2023 - 08:21:

Danielle Leclerc wrote:

Je fais le modèle 39-7, répéter la section B de la ligne 1 ça va mais répéter la ligne 3 de la section B qui semble chevaucher À et B et B et C me pose un problème. Avec vous un truc ou une information pour m’aider ?

28.03.2023 - 04:52:

DROPS Design answered:

Bonjour Mme Leclerc, au 3ème rang, tricotez la dernière maille de A avec les 2 premières mailles du 1er B (on a toujours 3 m dans A: 1 m end, 1 jeté, 1 m end), puis tricotez la dernière maille de B avec les 2 premières mailles du B suivant, et, à la fin du point ajouré, avec les 2 premières mailles de C. Bon tricot!

28.03.2023 - 10:35:

Catherine wrote:

I’m knitting Sweet Gleam cardi. Does A3= knit,yo knit,yo,knit(3 stitches become 5) A5=purl,yo,purl,purl(3 stitches become 4)? Your help would be much appreciated

28.03.2023 - 04:14:

DROPS Design answered:

Dear Catherine, yes that's correct, that's how both diagrams will be read. Happy knitting!

28.03.2023 - 10:34:

Jerri Plumridge wrote:

In the Golde Fall jumper DROPS 205-37 it says to work A2 over 5 stitches, yet it shows 8 stitches in chart. It shows 2 purl, yo, k,yo, k, yo,p. Same with A1. How is that 5 stitches? Please help?

25.03.2023 - 02:58:

DROPS Design answered:

Dear Jerri, the yarn overs do not count as stitches. They are worked between stitches. So, in truth, you are working over 5 stitches: purl 2, (yarn over), knit, (yarn over), knit, (yarn over), purl. On the next round you will work over these yarn overs and then they will count as stitches. Happy knitting!

26.03.2023 - 18:34:

Mary Crawford wrote:

I have answered my own question. On the third row you do a slip 1, knit 2 together, pass the slip stitch over, losing 1 stitch! Over the row you lose three stitches and this is why you have three black squares. I really do not like charts. Thank you garn studio for all your lovely free patterns.

19.03.2023 - 10:06:

M Crawford wrote:

Stroll in the park booties I would also like to know how the black squares on the chart are worked? You say to skip these stitches and also refer to no stitch, so how does that work? I note the yarn is trailed over the front of some worked stitches, but really cannot fathom how this is done. Haas anyone got a written explanation? It would be so much easier!

19.03.2023 - 09:42:

DROPS Design answered:

Dear M Crawford, black squares are there to help make a more 3D representation of the charts, so they correspond to the space occupied by stitches that have been decreased or cast off on previous rows. Happy knitting!

19.03.2023 - 18:28:

Maria Collinge wrote:

What do the little black squares in the beginning of the charts mean on the pattern 186-29? A1b (S-M-L) shows 4 of the squares and chart A1b for XL-XXL-XXXL shows 6 black squares at the beginning of some of the rows.

19.03.2023 - 02:59:

DROPS Design answered:

Dear Maria, the squares mean nothing in this case. The important thing is the arrow besides them, which marks the rows of the charts where you will work the increases of the yoke. Happy knitting!

19.03.2023 - 19:01:

Lamiaud wrote:

Comment je tricote le diagramme du tour de cou modele 214-21 car je ne sais pas dans quel sens se tricote. merci de me répondre

13.03.2023 - 20:05:

DROPS Design answered:

Bonjour Mme Lamiaud, sauf exception clairement indiquée dans les explications, tous les diagrammes se lisent de bas en haut, autrement dit, tricotez le diagramme A.1 en commençant par répéter les 2 mailles, augmentez comme indiqué dans le diagramme, vous aurez 6 m dans chaque A.1 quand le diagramme sera terminé. Bon tricot!

14.03.2023 - 10:24:

Gaubert Myriam wrote:

Bonjour, pour un diagramme dois je lire le rang 1 de droite a gauche pour l'endroit et ce même rang de gauche a droite pour le rang 2 (envers) ? Je tricote le modèle 241-29 trip to provence, lorsqu'il est écrit "*A.2, 5-6-7 mailles jersey *, tricoter 2 fois de *-* au total, A.2, 10-12-14 mailles jersey, A.3, 5-6-6 mailles jersey" dois je au total tricoter 3 fois A.2 sur le rang? Merci pour votre réponse. J'espère avoir été claire. Myriam

11.03.2023 - 17:50:

DROPS Design answered:

Bonjour Myriam, tout à fait, les rangs sur l'endroit se lisent de droite à gauche et ceux sur l'envers de gauche à droite (les rangs avec jetés et diminutions seront toujours sur l'endroit). En tricotant ainsi, vous tricoterez effectivement 3 fois A.2 au total en largeur , avec 10-12-14 m jersey avant le 1er A.2 et après le dernier A.2 et 5-6-7 m jersey entre chaque A.2. Bon tricot!

20.03.2023 - 16:03:

Ann-Sofie wrote:

Jeg er ved at strikke New Land Cardigan DROPS 232-10. Jeg har strikket den første række i bærestykket (retsiden), og er gået fra 111 masker til 119 (str. M). Men når jeg strikker vrangsiden i næste række, bliver det kun til 115 masker. Der er dermed 4 masker i mønsteret, som jeg ikke kan regne ud, hvor de er, eller skal strikkes?

09.03.2023 - 21:56:

Paula wrote:

Mandala drops200-20\r\nVraag: patroon heen gaande nld. volgens beschrijving. rechts naar links \r\nTeruggaande nld. ???????????\r\nZoals de steken zich voordoen of volgens patroon terug van Links naar rechts

09.03.2023 - 20:53:

DROPS Design answered:

Dag Paula,

Je leest de heengaande naald inderdaad van rechts naar links en je begint dus rechts onder in het telpatroon. De teruggaande naald lees je weer terug, omdat je heen en weer breit, dus van links naar rechts. Bij de uitleg van de symbolen staat aangegeven hoe je de steken op de goede, dan wel op de verkeerde kant breit.

12.03.2023 - 12:07:

Bernadette Gendebien Bernadette wrote:

Je ne comprend pas la grille A1 et A2 du modele sk-001-bn ? Faut il la commencer par le bas ou le haut ? E comment arriver au nombre de mailles indiquées car je ne vois pas autant d'augmentations . ? Merci d'avance

08.03.2023 - 01:06:

DROPS Design answered:

Bonjour Mme Gendebien, les diagrammes se lisent de bas en haut, de droite à gauche sur l'endroit et de gauche à droite sur l'envers. Pour le gilet "Agnes", vous tricotez ainsi sur l'endroit: 5 m point mousse, tricotez la maille de A.1, répétez ensuite 13 à 15 fois A.2 en largeur (cf taille) et terminez par 5 m point mousse. En même temps, augmentez dans les diagrammes comme indiqué (ovale noir = jeté tricoté torse au rang suivant), on va passer de 6 à 16 m ou de 7 à 18 m dans chaque A.2 en fonction de la taille. Bon tricot!

08.03.2023 - 09:50:

Bernadette Gendebien Bernadette wrote:

Je ne comprend rien au diagramme du modèle sk-001-bn, en effet que signifie la simple ligne d'une maille et ou situe-t-on ce diagramme dans le tricot ?

07.03.2023 - 15:47:

DROPS Design answered:

Bonjour Mme Gendebien, pensez-vous au diagramme A.1 qui se compose d'une seule maille? On le tricote juste après la bordure devant sur l'endroit (avant de répéter A.2), il permet que les motifs soient ainsi symétriques. Bon tricot!

08.03.2023 - 09:51:

VINET Roseline wrote:

Bonjour, Pourquoi je n'ai jamais le dessin du diagramme, ni le patron du modèle et ce, quel que soit le modèle. Dans la leçon "lire des diagrammes tricot" même problème. Merci de votre attention.

06.03.2023 - 11:27:

DROPS Design answered:

Bonjour Mme Vinet, cette leçon explique comment lire un diagramme, mais ce ne sont que des généralités, pour chaque modèle, il faut se référer au diagramme en bas de page et à sa légende juste au-dessus. Si j'ai mal compris votre question, je m'en excuse, n'hésitez pas à la reformuler. Merci pour votre compréhension.

07.03.2023 - 10:43:

Eynard Monique wrote:

Comment connaitre la taille du pull à réaliser ? S, M, L, X , L ? Y a t il des mesures a prendre pour que cela corresponde bien aux tailles que vous indiquez? Merci bonne journée.

04.03.2023 - 08:51:

DROPS Design answered:

Bonjour Mme Eynard, mesurez un vêtement similaire que vous avez et dont vous aimez la forme et comparez ces mesures à celles du schéma que vous trouvez à la fin des explications, ceci vous permettra de trouver la taille à suivre. Plus d'infos ici. Bon tricot!

06.03.2023 - 11:02:

Eva wrote:

Sjal 229-7. 4 p: løft 1 maske over på høyre pinne som om den skulle strikkes rett, strikk 1 maske rett og løft den løse masken over masken som ble strikket, Deretter: strikk 1 maske rett og løft den ytterste maske fra høyre pinne over masken som ble strikket. Så: 1 maske rett. Så kommer det som er uforståelig: strikk 1.kast rett og slipp 2.kast av pinnen uten å strikke det. Hvilke kast??

03.03.2023 - 18:55:

Leave a comment or question to this lesson

Your email address will not be published. Required fields are marked *.