DROPS Super Sale · POUPE 30% em 5 aconchegantes fios de lã

Como ler os diagamas de croché

Um diagrama de croché consiste em símbolos. 1 símbolo = 1 ponto – a definição do símbolo explica que tipo de ponto é/como é feito. O diagrama mostra todos os pontos vistos pelo direito da peça (excepto indicação em contrário).

Um diagrama de croché usual tem este aspecto:
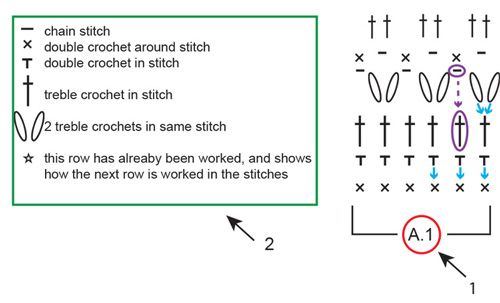
1: 1. A.1 é o nome do diagrama e refere-se ao diagrama completo – dento das quatro linhas. Tudo o que está dentro das quatro linhas é 1 repetição do diagrama.
2: 2. Esta é a definição do símbolo, que explica como cada ponto é feito.
Flechas azuis: O símbolo é trabalhado no ou à volta do ponto directamente abaixo no diagrama. Por vezes, trabalham-se vários pontos no/à volta do mesmo ponto.
Flechas e elipses ovais roxas: Nem todos os pontos se fazem como, por exemplo: por vezes, faz-se uma corrente e salta-se o ponto abaixo dessa corrente.

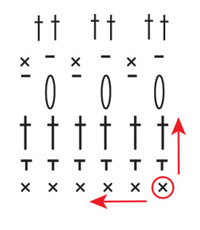
Um diagrama de croché lê-se de forma contrária à que lê normalmente: da direita para a esquerda, de baixo para cima. Por outras palavras: começa no símbolo do canto inferior direito e trabalha em direcção ao lado esquerdo e para cima (ver as setas a VERMELHO no diagrama abaixo).

Se tem de fazer várias repetições de um diagrama (ou seja, se tem de ser repetido várias vezes na carreira), trabalhar até ao fim da carreira e começar novamente pelo primeiro símbolo da carreira.
Em idas e voltas:

Quando trabalha em idas e voltas, as carreiras ímpares são feitas pelo direito da peça e as carreiras pares são feitas pelo avesso da peça. Quando trabalha peloa vesso, o diagrama deverá ser lido em sentido contrário: da esquerda para a direita (ver flecha vermelha pelo direito e a flecha azul pelo avesso abaixo).

A carreira começa geralmente por um determinado número de pontos corrente – número equivalente à altura do ponto seguinte – e estão incluídos para lhe assegurar que começar pelo topo do ponto seguinte (ver círculos verdes abaixo). Se os pontos correntes estão incluídos no diagrama (tal como neste exempl) todos os pontos são trabalhados exactamente como aparecem. Por vezes, o ponto fantasia inclui DICA CROCHÉ no início das instruções escritas, o que lhe dirá quantos pontos corrente deve fazer no início de cada carreira e se esses pontos corrente substituem o primeiro ponto da carreira (ou se são adicionais). Se os pontos corrente NÃO estão incluídos no diagrama: seguir as instruções dadas em DICA CROCHÉ.

Em redondo:

Quando se trabalha em redondo, todas as carreiras são trabalhados pelo direito da peça: da direita para a esquerda (ver as flechas vermelhas abaixo). De que forma a carreira começa e termina é algo muitas vezes mostrado num diagrama próprio (ver A.2 abaixo – quadrado verde). Da mesma forma como quando se trabalha em idas e voltas, a carreira começa com um determinado número de pontos corrente, equivalente à altura do ponto seguinte. No fim da carreira, geralmente, une-se o princípio e o fim da carreira com um ponto baixíssimo no último dos pontos corrente do princípio dessa mesma carreira (ver quadrado azul abaixo). Por outras palavras: os pontos correntes em A.2 = o princípio da carreira, enquanto que o ponto baixíssimo em A.2 = o fim da carreira.

Se tem de trabalhar várias repetições do diagrama (A.1) (ou seja, se é repetido várias vezes na carreira) trabalha-se até ao último ponto e, depois, começa-se novamente no primeiro ponto na mesma carreira de A.1. NOTA: neste exemplo, SÓ se repete A.1 - A.2 mostra como se trabalha o princípio e o fim da carreira.

Vários diagramas diferentes trabalhados consecutivamente na carreira:

Se está a trabalhar vários diagramas diferentes, um após o outro, na mesma carreira, trabalhar da seguinte maneira: Trabalhar a 1.ª carreira do diagrama 1, continuar com a 1.ª carreira do diagrama 2, depois, com a 1.ª carreira do diagrama 3, etc. NÃO SE ESQUEÇA: se estiver a trabalhar em idas e voltass, os diagramas terão de ser trabalhados em sentido contrário pelo avesso – ou seja: começar pelo diagrama 3, depois, o diagram 2 e, por fim, o diagram 1. São também trabalhados em sentido contrário, com habitualmente.

Diagramas circulares:

Quando se trabalha um círculo e se começa pelo centro em direcção aos lados, isso geralmente é mostrado num diagrama circular. O diagrama pode mostrar o círculo inteiro – neste caso, cada símbolo é trabalhado exactamente como aparece, ou, então, o diagrama pode apresentar uma parte de um círculo que é depois repetido um determinado número de vezes para formar um círculo inteiro.

Círculo inteiro:

Num diagrama de círculo inteiro começa-se pelo símbolo que está no centro desse círculo: geralmente é um pequeno aro que representa um determinado número de pontos corrente, fechado, depois, com um ponto baixíssimo (ver círculo vermelho abaixo). Da mesma forma, quando se trabalha em redondo, a carreira começa com um determinado número de pontos corrente (equivalente à altura do símbolo seguinte) e termina com um ponto baixíssimo no último desses pontos corrente – ou seja: equivalente a A.2 no nosso exemplo anterior (ver quadrado azul) - NOTA: quando os pontos corrente são mostrados no diagrama, eles NÃO substituem qualquer um dos outros símbolos, e cada símbolo é trabalhado exactamente como aparece. Se os pontos corrente SUBSTITUEM qualquer ponto, isso terá sido retirado do diagrama.

Trabalha-se no sentido contrário do dos ponteiros do relógio: da direita para a esquerda, 1 símbolo após o outro (ver flecha vermelha abaixo). Os pontos da primeira carreira geralmente trabalham-se À VOLTA DO aro de pontos corrente, o que significa que passa a agulha de croché pelo interior do aro, apanha o fio e passa-o pelo mesmo aro (trabalhando, depois, o ponto como de costume) – Não trabalha o ponto EM qualquer um dos pontos corrente, mas, sim, À VOLTA do aro formado pelos pontos corrente. No fim da carreira, unir o princípio e o fim com um ponto baixíssimo e começar a trabalhar a segunda carreira do diagrama: a segunda carreira mais próxima do centro (ver flecha verde).

Parte de um círculo:

Se o diagrama é apenas uma parte de um círculo, isso é porque essa parte se repete um determinado número de vezes em redondo para formar um círculo inteiro. Começa-se pelo símbolo da parte de baixo (ver círculo vermelho) e trabalha-se da mesma maneira como para um CÍRCULO INTEIRO, mas A.2 será repetido um determinado número de vezes em redondo. Da mesma forma de que quando se trabalha em redondo, geralmente, há um diagrama separado para ilustrar como a carreira começa e termina (ver quadrado azul de A.1 abaixo). Começa-se o diagrama pela carreira mais próxima do aro de pontos corrente, na parte de baixo do diagrama, trabalha-se o(s) ponto(s) corrente de A.1, depois, o(s) símbolo(s) de A.2 (na primeira carreira é apenas 1 símbolo) e repetem-se o(s) símbolo(s) de A.2 no número de vezes indicado nas instruções escritas do ponto fantasia.

No fim da carreira une-se em redondo com o ponto baixíssimo de A.1. Quando a primeira carreira está feita, continuar com a carreira seguinte: a segunda carreira mais próxima do aro de pontos corrente (ver flecha verde abaixo).

Diagramas quadrados / diagramas às cores:

Alguns diagramas de croché são mostrados num quadrado, em que 1 quadrado = 1 ponto. Qual o tipo de ponto que deve trabalhar, geralmente, é explicado nas instruções escritas do modelo, enquanto que o propósito do diagrama é mostrar com que cores os pontos são trabalhados (ver círculo vermelho abaixo = definição do símbolo).

Trabalha conforme explicado acima, dependendo de se trabalhar EM IDAS E VOLTAS, EM REDONDO ou um DIAGRAMA CIRCULAR.

Comentários (161)

Country flag Maria Randerly Cunha Feitosa escreveu:

Excelente. Muito obrigado

06.01.2021 - 00:51

Country flag Maj-Britt Poulsen escreveu:

Hej Jeg er helt vild med modellen JANIS - bluse med rude i Paris. Og vil gerne hækle den. Jeg kan ikke finde ud af at tyde diagrammer og vil spørge om ikke jeg kan finde opskriften på video. Håber du kan hjælpe mig. Godt nytår ☺

01.01.2021 - 15:57

DROPS Design respondeu:

Hei Maj-Britt. Ja, dette er virkelig en flott modell. Til denne modellen er det laget 2 hjelpevideoer, Hjelp til Halsfellingen og Hvordan hekle A.3. Å lage en video til hele genseren er dessverre ikke mulig, men håper hjelpevideoene og andre generelle videoer du finner under modellen kan hjelpe deg. God Fornøyelse!

11.01.2021 - 09:08

Country flag Hilde - Igjen escreveu:

Jeg skal begynne på 2. omg og der står det "= omg med fm/lm" - skal det da kun hekles fm og lm på denne omgangen - før jeg går videre?

29.12.2020 - 12:34

DROPS Design respondeu:

Hei Hilde. I 2. omgang skal det kun hekles fastmasker og luftmasker. Om du ser på diagram A.1 (og A.2) hekles det en omgang med bare fastmasker og luftmasker, mens neste omgang hekles det kun staver (her økes det også i A.2). Altså alle omganger med partall, der hekles det kun fastmasker og luftmasker, mens omganger med oddetall hekles det kun staver. God Fornøyelse!

11.01.2021 - 08:56

Country flag Hilde escreveu:

Gjelder Misty Mountain bærestykke:Når jeg skal hekle 2. omg og det står "hekle A1 over de første 10 stavene", så betyr ved det at jeg skal hekle 1. raden på A1over det de første stavene? Etter 2. omg: "repeter A1 i høyden og øk som vist i A2 samtidig økes det jevnt fordelt slik:" Blir dette starten på 3. omg? Har heklet mye - men dette mønsteret er ikke lett å forstå!

18.12.2020 - 16:34

DROPS Design respondeu:

Hei Hilde. 1. omgang i diagram A.1 og A.2 er forklart i oppskriftsteksten, den har også en stjerne markert i diagrammet (*). Når du har heklet 1. omgang har du 84 staver (str. S) og du starter nå på 2. omgang på diagram A.1 og A.2 (fastmasker og luftmasker). På 3. omgang hekler du kun staver og da økes det også når du hekler A.2. På 4. omgang hekles det fastmasker og luftmasker igjen, mens på 5. omgang hekles det kun staver og her økes det igjen (i A.2). Når du har heklet A.1 1 gang i høyden repeteres A.1 i høyden. God Fornøyelse!

11.01.2021 - 08:07

Country flag L H escreveu:

Do you have your heart pattern written out. I can follow a written pattern but have a hard time with a diagram better. Thank you

09.12.2020 - 16:34

DROPS Design respondeu:

Dear LH, could you please ask your question on the pattern you would like to work? If there is only a diagram under the pattern page without any written explanation, this means there is only a diagram, but there might be a video showing how to crochet this pattern. Happy crocheting!

10.12.2020 - 09:30

Country flag Leanne escreveu:

I need 183 stitches but am not sure where to add the extra stitches across the 155 that form the pattern, eg where do I add the extra 18 stitches to make 108 across the 90 that make up A.3a (3 repeats)? I presume 6 in each repeat but am not sure whether to add all 6 to the start of the A.3a row, the end or whatever. There are 2 chain stitches amongst the trebles in this row and I'm not sure where they should be positioned in relation to the extra stitches that I need to include. Thank you.

26.10.2020 - 00:47

DROPS Design respondeu:

Dear Leanne, could you please ask your question under the pattern you are working on? It will be then much easier for us to get the correct reference to help you. Thanks for your comprehension. Happy crocheting!

26.10.2020 - 13:37

Country flag Ursula Pereyra escreveu:

Gracias por las explicaciones!!!, son de gran ayuda recien me inicié en este maravilloso mundo y gracias a sus patrones y explicaciones estoy tejiendo, Gracias!!! Estoy maravillada y sorprendida de mis logros!!!

17.10.2020 - 15:05

Country flag Patricia Bailey escreveu:

A4,5,9 how many times then the next bit how many times ... totally confusing pattern, I ripped it out

03.10.2020 - 11:24

DROPS Design respondeu:

Dear Mrs Bailey, could you please ask your question in the question section of the pattern you are working on? This would help us to be able to assist you - remember to add the size worked as well as the part of the pattern you are stuck. Thanks for your comprehension!

05.10.2020 - 13:25

Country flag Nikki escreveu:

Hi I have a crochet pattern here which I believe is one of your older ones as couldn’t find it on your site, but I need help following the diagram. I have horizontal lines in different lengths with no meaning, apart from the small one meaning a chain stitch. I say its your pattern as Drops Alpaca and Drops cotton viscose is used from the garn studios. I need help with this please. I can’t see a way of using photos to show you.. Thank you Nikki

16.08.2020 - 10:13

DROPS Design respondeu:

Dear Nikki, could you please ask your question in the "question" section of this pattern? It would be much easier for us to help you when we also can see the diagram and the diagram key. Thanks for your comprehension. Happy crocheting!

17.08.2020 - 10:25

Country flag Angela Jane Charles escreveu:

You have a diagram of crochet stitches at the top, but in the pattern I am doing, I have 1) a stitch that appears in the diagram for the Fraction of a circle above: an upright line with a solid circle near the top. 2) two stitches that appear in the Full circle diagram: a solid oval and an outline oval with two solid dots in it. I can't find any step-by-step instruction on how to make these stitches, and the description in my pattern is not clear enough. Could you help me please?

02.08.2020 - 16:32

DROPS Design respondeu:

Dear Mrs Charles, could you please post your question under the pattern you are working on? It would be much easier for us to explain you. Thanks for your comprehension. Happy knitting!

03.08.2020 - 09:03

Country flag Mary escreveu:

Thank you for the comprehensive explanations of different types of diagrams.

28.07.2020 - 01:42

Country flag Samantha escreveu:

I brought this pattern because it states it has a tutorial video. Cant find it. Not very happy

26.06.2020 - 07:41

DROPS Design respondeu:

Dear Samantha, all our patterns are free - you are not supposed to buy them. There are videos for every patterns showing the different techniques used - but not all patterns do have their single videos - this page explains how to read a diagram. Feel free to ask your question in the pattern page or contact directly the store where you bought the yarn for any individual assistance. Happy crocheting!

26.06.2020 - 07:58

Country flag Kloe escreveu:

Hi! Is it me or the pattern is weirdly written? At the end of a row, I'm used to do a slip stitch followed by a single crochet stitch, turn my work and start the next row. Now, you just turn and turn in the anticlockwise all the time? Is it because of the pattern at the beginning? Thanks in advance!

21.06.2020 - 23:50

DROPS Design respondeu:

Dear Kloe, this is the method how to work diagrams - there might be some difference from a pattern to another, these would then be explained in the pattern - feel free to ask your question on the pattern you are working on to be sure. Happy crocheting!

22.06.2020 - 09:19

Country flag Claire Menyuk escreveu:

This is the first Drops pattern I am trying, and I feel completely confused by your diagrams. I am making 177-24. You say to work A.1b, then A.3 over the next 45 treble crochets, but they both not only go across, but up as well. Does this mean, I repeat the pattern for 6 rows up? You offer no videos of how to work these patterns. I'm so frustrated, I'm ready to give up before even starting.

12.06.2020 - 20:55

DROPS Design respondeu:

Dear Mrs Menyuk, A.1b shows how to start the rows, then you repeat 5 times the 9 sts in diagram A.3 in width (9 sts x 5 = over the next 45 sts). Happy crocheting!

15.06.2020 - 10:44

Country flag Connie escreveu:

It would be nice if your video's had sound, explaining as she/he went along

06.06.2020 - 21:45

DROPS Design respondeu:

Dear Connie, Our videos do not have sound because we are a worldwide company and our videos are watched by people around the world, speaking different languages, many of whom do not understand English. We have therefore written instructions to accompany our videos, Happy crocheting!

08.06.2020 - 09:45

Country flag Cynthia escreveu:

I bought DROPS pattern 190-21 (CA Dream top), and I’m really struggling with the diagrams. Do you offer them written out in English anywhere, or have some helpful resources I can use? I watched the linked video, and still have a lot of questions.

03.06.2020 - 07:25

DROPS Design respondeu:

Dear Cynthia, there is only diagrams to this pattern, with the help of this lesson you should be able to understand how to follow the diagrams, please feel free to ask your question in the pattern or request individual assistance from the store where you bought the yarn and remember our patterns are free, you were not supposed to buy it. Happy crocheting!

03.06.2020 - 07:42

Country flag Guadalupe escreveu:

Por favor, me encantaría hacer este poncho serena, pero me cuesta entender el paso a paso. Tendrán otra forma de poder estudiarlo?? Muchas gracias. Espero su respuesta

26.05.2020 - 00:09

Country flag Maria De Rose escreveu:

I am working a crochet pattern from a UK magazine. The written instruction tells me to continue the pattern using the chart for rows 3-61, however the chart rows shown begin at row 56. (The first 2 rows are completed using treble crochets). I consider myself an experienced crocheter but these instructions have somewhat stumped me. I also checked other pages and the back of the magazine but there are no other instructions.

25.05.2020 - 17:46

DROPS Design respondeu:

Dear Mrs De Rose, exept if this pattern is a DROPS pattern published on our website, I'm afraid we will not be able to help you there since we might not know the pattern. You are welcome to contact your yarn store for any individual asssitance, they will be able to assist you with the pattern. Happy crocheting!

26.05.2020 - 09:19

Country flag Patrizia escreveu:

Buongiorno posso chiedere perche il lavoro mi si sposta e sembra inclinato verso destra cioe le righe non sono perfettamente dritte in verticale ?graie per l'aiuto

13.05.2020 - 09:32

DROPS Design respondeu:

Buongiorno Patrizia, all'inizio del giro lavora le catenelle indicate per girare? Buon lavoro!

04.06.2020 - 10:32

Country flag Leyla escreveu:

Jag ska nu virka filten \\\"Sleepy times\\\" Drops baby 29-15 och tittar på diagrammet den är i A1, A2, A3 och A4 men mellan varje sektion så finns det en tjock linje som skiljevägg. Är det för att man ska veta när A1 slutar och A2 börjar? I vilket fall: är det så att i denna beskrivning så är rad 1-3 endast stolpar varvet ut i 3 varv? Det som förvirrar mig är att stolparna i A1 och A4 sitter täta däremot stolparna i A3 sitter isär. Betyder detta något?

08.05.2020 - 08:02

DROPS Design respondeu:

Hej Leyla, ja det er for at vise hvor du starter med de forskellige diagrammer. Det kan være en god ide at sætte en markør i hver overgang, til du er inde i mønsteret. God fornøjelse!

08.05.2020 - 13:43

Deixe um comentário ou uma pergunta acerca desta lição

O seu email não será publicado. Os campos obrigatórios estão assinalados com um *