
Popular categories
Looking for a yarn?


|
|||||||||||||||||||
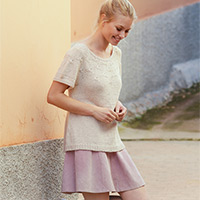
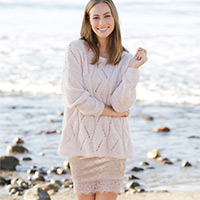
Lantern River Jacket |
|||||||||||||||||||
 |
 |
||||||||||||||||||
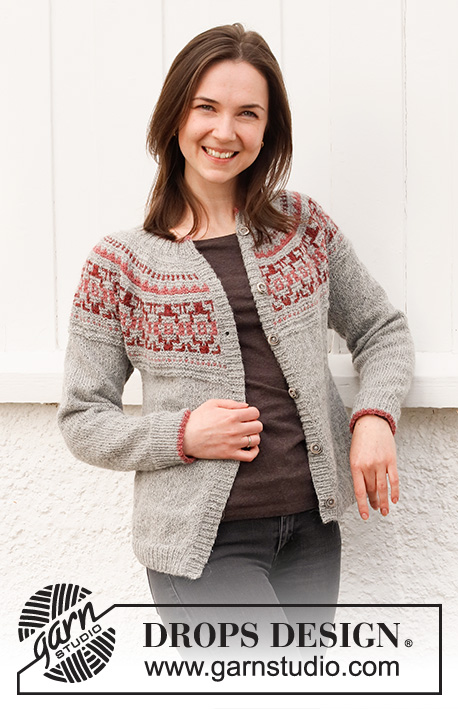
Knitted jacket in DROPS Alpaca. The piece is worked top down with round yoke and mosaic pattern in garter stitch on the yoke. Sizes S - XXXL.
DROPS 217-19 |
|||||||||||||||||||
|
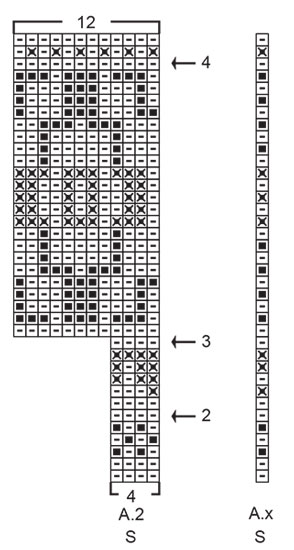
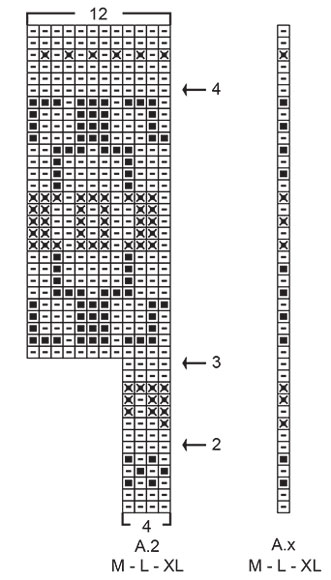
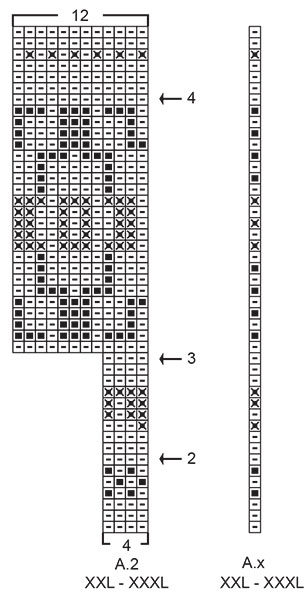
------------------------------------------------------- EXPLANATIONS FOR THE PATTERN: ------------------------------------------------------- RIDGE/GARTER STITCH (worked back and forth): Knit all rows. 1 ridge in height = Knit 2 rows. ELEVATION: To make the neck slightly higher at the back on the round yoke, you can work an elevation as described below. Skip this section if you do not want an elevation. Insert 1 marker in the middle of the row. Start from the right side with light grey and knit 12-13-13-14-14-15 stitches past the marker, turn, tighten the strand and purl 24-26-26-28-28-30 stitches back. Turn, tighten the strand and knit 36-39-39-42-42-45 stitches, turn, tighten the strand and purl 48-52-52-56-56-60 stitches back. Turn, tighten the strand and knit 60-65-65-70-70-75 stitches, turn, tighten the strand and purl 72-78-78-84-84-90 stitches back. Turn, tighten the strand and knit 84-91-91-98-98-105 stitches, turn, tighten the strand and purl 96-104-104-112-112-120 stitches back. Turn, tighten the strand and knit to the end of the row, turn, tighten the strand and purl 1 row back (edge stitches are worked in garter stitch). Then work YOKE as described below. INCREASE TIP-1 (evenly spaced): All increases worked from the right side! To work out how to increase evenly, count the total number of stitches on the needle (e.g. 107 stitches) minus the edge stitches (e.g. 2 stitches) and divide the remaining stitches by the number of increases to be made (e.g. 35) = 3. In this example, increase by making 1 yarn over after each 3rd stitch. Do not increase on bands. On the next row (wrong side) knit the yarn overs twisted to avoid holes. Do not increase on the edge stitches. INCREASE TIP-2 (for sides of body): All increases are worked from the right side! Start 3 stitches before the marker thread, make 1 yarn over, knit 6 (marker thread sits between these 6 stitches) make 1 yarn over (= 2 stitches increased at each marker thread). On the next row purl the yarn overs twisted to avoid holes. Then work the new stitches in stockinette stitch. DECREASE TIP (for mid under sleeve): Start 3 stitches before the marker thread, knit 2 together, knit 2 (marker thread sits between these 2 stitches), slip 1 stitch as if to knit, knit 1 and pass the slipped stitch over the knitted stitch (= 2 stitches decreased). BINDING-OFF TIP: To avoid the bind-off edge being tight you can bind off with a larger size needle. If the edge is still tight, make 1 yarn over after approx. each 4th stitch at the same time as binding off; the yarn overs are bind off as normal stitches. PATTERN: See diagrams A.1 to A.3. Choose diagram for your size (applies to A.x and A.2). NOTE: The mosaic patterns (A.x and A.2) have their own description below. MOSAIC PATTERN: See diagrams A.x and A.2 and read the technique below. Each row in A.x and A.2 represents 2 rows; i.e. from the right side, the diagram is worked from right to left and from the wrong side the SAME row is worked from left to right = 1 ridge. On all rows from the right side, keep the strand at the back of the piece (on the wrong side) when a stitch is slipped. On all rows from the wrong side, keep the strand in front of the piece (on the wrong side) when a stitch is slipped. It is important that the strands are not tight at the back of the piece – rather allow them to be a little loose. To keep better control of the pattern, you can insert a marker between each pattern-repeat of A.2. A.x = help square – this square is not worked, but shows how the pattern-row is to be worked (read more below). A.2 = 1 pattern-repeat On the 1-colored rows in the diagram, work 1 ridge back and forth over all stitches without slipping any of the stitches. On each pattern-row in A.2 which has a black square in A.x (light maroon), all light maroon stitches in A.2 are knitted and all light grey stitches are slipped as described above. On each pattern-row in A.2 which has a small line in A.x (light grey), all light grey stitches in A.2 are knitted and all light maroon/old rose stitches are slipped as described above. On each pattern-row in A.2 which has an x in A.x (old rose), all old rose stitches in A.2 are knitted and all light grey stitches are slipped as described above. ------------------------------------------------------- START THE PIECE HERE: ------------------------------------------------------- JACKET – SHORT OVERVIEW OF THE PIECE: The neck, yoke and body are worked back and forth with circular needle from mid front and top down. The yoke is worked in mosaic pattern. It is important to follow the diagram carefully. The whole pattern is worked in garter stitch, but not in normal garter stitch; the colored pattern is achieved by slipping stitches. Read description in MOSAIC PATTERN before starting! The sleeves are worked in the round with double pointed needles/short circular needle, top down. The bands are worked to finish. NECK: Cast on 117-123-126-129-135-141 stitches (including 6 band stitches on each side towards mid front) with circular needle size 3 mm = US 2,5 and old rose. Purl 1 row. The next row is worked as follows from the right side: 1 edge stitch in GARTER STITCH – read description above, * knit 1, purl 2 *, work from *-* until there are 2 stitches left on the row, knit 1 and finish with 1 edge stitch in garter stitch. Change to light grey and continue the rib until the neck measures 3 cm = 1⅛". The next row is worked as follows from the right side: Bind off the first 6 stitches, make 1 yarn over, knit the next 105-111-114-117-123-129 stitches and increase, at the same time, 35-37-38-43-49-51 stitches evenly spaced over these stitches – read INCREASE TIP-1 and work rib as before over the last 6 stitches. Turn the piece, bind off the first 6 stitches, make 1 yarn over (on next row, knit yarn over twisted to avoid hole) and purl the rest of the stitches, apart from the yarn overs which are purled twisted (avoids holes) and the edge stitches (the outermost stitch on each side of the piece) which are worked in garter stitch = 142-150-154-162-174-182 stitches. Insert 1 marker inside the edge stitch at the beginning of the row. You can now work an ELEVATION in the back of the neck – read description above. If you do not want an elevation, go straight to YOKE. The yoke is measured from the marker on the neck. YOKE: Change to circular needle size 3.5 mm = US 4. The first row is worked as follows from the right side: 1 edge stitch in garter stitch, work A.1 until there is 1 stitch left on the row and finish with 1 edge stitch in garter stitch. Continue this pattern. REMEMBER THE KNITTING GAUGE! AT THE SAME TIME on the row marked with arrow-1 in A.1, increase 45-45-49-53-57-65 stitches evenly spaced = 187-195-203-215-231-247 stitches. When A.1 has been completed, work MOSAIC PATTERN – read description above, as follows from the right side: Work 1 edge stitch in garter stitch with light grey, see symbol in A.x (the symbol explains how to work the colors on the row – the symbol is not to be worked itself), work A.2 until there are 2 stitches left on the row (= 46-48-50-53-57-61 repeats of 4 stitches), work the first stitch in A.2 so the pattern begins and ends in the same way on both sides, and finish with 1 edge stitch in garter stitch in light grey. Continue this pattern; remember that 1 row in the diagram represents 1 ridge (2 rows; 1 row from the right side and 1 row from the wrong side). AT THE SAME TIME on each row marked with an arrow in A.2, increase stitches evenly spaced as described below – remember INCREASE TIP-1. Arrow-2: Increase 44-48-52-56-60-64 stitches evenly spaced = 231-243-255-271-291-311 stitches (there is now room for 57-60-63-67-72-77 repeats of A.2 with 4 stitches). Arrow-3: Increase 36-48-60-68-72-76 stitches evenly spaced = 267-291-315-339-363-387 stitches (there is now room for 22-24-26-28-30-32 repeats of A.2 with 12 stitches). Arrow-4: Increase 40-40-44-52-56-62 stitches evenly spaced = 307-331-359-391-419-449 stitches. When A.2 has been completed, work the rest of the piece with light grey. Work A.3 with 1 edge stitch in garter stitch on each side – AT THE SAME TIME on the row marked with arrow-5 in A.3 increase 23-23-27-35-35-41 stitches evenly spaced = 330-354-386-426-454-490 stitches. When A.3 has been completed, work stockinette stitch with 1 edge stitch in garter stitch on each side. When the yoke measures 20-22-24-25-27-29 cm = 8"-8¾"-9½"-9¾"-10⅝"-11⅜" from the marker on the neck, divide it for the body and sleeves on the next row as follows: Work 49-53-57-63-68-75 stitches as before (= front piece), place the next 68-72-80-88-92-96 stitches on 1 thread for the sleeve and cast on 6-6-8-8-10-10 new stitches on the needle (= in side under the sleeve), work 96-104-112-124-134-148 stitches in stockinette stitch (= back piece), place the next 68-72-80-88-92-96 stitches on 1 thread for the sleeve and cast on 6-6-8-8-10-10 new stitches on the needle (= in side under the sleeve) and work the last 49-53-57-63-68-75 stitches as before (= front piece). Body and sleeves are finished separately. BODY: = 206-222-242-266-290-318 stitches. Insert 1 marker thread 52-56-61-67-73-80 stitches in from each side (= sides of body). There are 102-110-120-132-144-158 stitches between threads on the back piece. Allow the threads to follow your work onwards; they will be used when increasing in the sides. Work stockinette stitch back and forth, with 1 edge stitch in garter stitch on each side. When the piece measures 5 cm = 2" from the division, increase 1 stitch on each side of both marker threads – read INCREASE TIP-2 (= 4 stitches increased). Increase like this every 6 cm = 2⅜" a total of 4 times = 222-238-258-282-306-334 stitches. Continue working until the piece measures 27 cm = 10⅝" from the division in all sizes. There is approx. 4 cm = 1½" left to finished length; you can try the jacket on and work to desired length. Knit 1 row from the right side where you increase 66-71-78-84-90-101 stitches evenly spaced = 288-309-336-366-396-435 stitches (this is done to avoid the rib being tight). Change to circular needle size 3 mm = US 2,5 and work as follows from the wrong side: 1 edge stitch in garter stitch, * purl 1, knit 2 *, work from *-* until there are 2 stitches left on the row, purl 1 and finish with 1 edge stitch in garter stitch. Continue this rib for 4 cm = 1½". Bind off with knit over knit and purl over purl – read BINDING-OFF TIP! The jacket measures approx. 54-56-58-60-62-64 cm = 21¼"-22"-22¾"-23⅝"-24⅜"-25¼" from the shoulder down. SLEEVE: Place the 68-72-80-88-92-96 stitches from the thread on the one side of the piece on double pointed needles/short circular needle size 3.5 mm = US 4 and knit up 1 stitch in each of the 6-6-8-8-10-10 stitches cast on under the sleeve = 74-78-88-96-102-106 stitches. Insert a marker thread in the middle of the 6-6-8-8-10-10 stitches under the sleeve. Allow the thread to follow your work onwards; it will be used when decreasing under the sleeve. Start at the marker thread and work stockinette stitch in the round. When the piece measures 3-3-3-3-2-1 cm = 1⅛"-1⅛"-1⅛"-1⅛"-¾"-⅜" from the division, decrease 2 stitches mid under the sleeve – read DECREASE TIP. Decrease like this every 3-2½-2-1½-1½-1½ cm = 1⅛"-1"-¾"-½"-½"-½" a total of 12-13-16-19-21-21 times = 50-52-56-58-60-64 stitches. Continue working until the sleeve measures 38-37-35-35-33-32 cm = 15"-14½"-13¾"-13¾"-13"-12½" from the division. There is approx. 6 cm = 2⅜" left to finished length; you can try the jacket on and work to desired length. NOTE: Shorter measurements in larger sizes due to wider shoulders and longer yoke. Knit 1 round where you increase 13-14-16-17-18-20 stitches evenly spaced = 63-66-72-75-78-84 stitches. Change to double pointed needles size 3 mm = US 2,5 and work rib (= knit 1, purl 2) for 5½ cm = 2⅛". Change to old rose and work 2 more rounds of rib. Bind off with knit over knit and purl over purl – remember BINDING-OFF TIP! The sleeve measures approx. 44-43-41-41-39-38 cm = 17¼"-17"-16⅛"-16⅛"-15¼"-15" from the division. Work the other sleeve in the same way. LEFT BAND: Knit up from the right side approx. 120 to 140 stitches along the left front piece inside the 1 edge stitch, using circular needle size 3 mm = US 2,5 and light grey. Purl 1 row from the wrong side where you increase evenly to 147-153-159-162-168-174 stitches (number of stitches divisible by 3). The next row is worked as follows from the right side: 1 edge stitch in garter stitch, * knit 1, purl 2 *, work from *-* until there are 2 stitches left on the row, knit 1 and finish with 1 edge stitch in garter stitch. Continue this rib for 2½ = 1" to 3 cm = 1⅛" (match the length to the width of the bind-off stitches on the neck). Bind off with knit over knit and purl over purl. RIGHT BAND: Work in the same way as the left band but after 1 cm = ⅜" work 6-6-7-7-8-8 buttonholes evenly spaced. The top buttonhole is worked in the transition between the neck and the yoke and the bottom buttonhole approx. 2 = ¾" to 4 cm = 1½" from the bottom edge. It is neatest to work the buttonholes in a purled section (seen from the right side). 1 BUTTONHOLE = purl 2 together and make 1 yarn over. On the next row knit the yarn over to leave a hole. ASSEMBLY: Sew the bands to the neck at the top of the front pieces – sew inside the 1 edge stitch on the band. Sew the buttons onto the left band. |
|||||||||||||||||||
Diagram explanations |
|||||||||||||||||||
|
|||||||||||||||||||
|
|||||||||||||||||||
|
|||||||||||||||||||
|
|||||||||||||||||||

|
|||||||||||||||||||
|
Have you made this or any other of our designs? Tag your pictures in social media with #dropsdesign so we can see them! Do you need help with this pattern?You'll find tutorial videos, a Comments/Questions area and more by visiting the pattern on garnstudio.com. © 1982-2024 DROPS Design A/S. We reserve all rights. This document, including all its sub-sections, has copyrights. Read more about what you can do with our patterns at the bottom of each pattern on our site. |
|||||||||||||||||||

With over 40 years in knitting and crochet design, DROPS Design offers one of the most extensive collections of free patterns on the internet - translated to 17 languages. As of today we count 304 catalogs and 11422 patterns - 11417 of which are translated into English (US/in).
We work hard to bring you the best knitting and crochet have to offer, inspiration and advice as well as great quality yarns at incredible prices! Would you like to use our patterns for other than personal use? You can read what you are allowed to do in the Copyright text at the bottom of all our patterns. Happy crafting!
Comments / Questions (11)
Betyr det at mønsterA1 blir 16 omganger?
18.01.2022 - 11:43DROPS Design answered:
Hei Rødø. Nei, ikke A.1. Mosaikkmønsteret (A.x og A.2) har egen forklaring i oppskriften, les - MOSAIKKMØNSTER. Hver rad i A.x og A.2 tilsvarer 2 pinner. mvh DROPS Design
18.01.2022 - 13:47Bonjour. J'ai bien compris le principe pour tricoter le point mosaïque, seulement comment faire le point de lisière en gris clair de chaque côté ? Faut il faire glisser le fil tout le long du rang en même temps que l'on glisse les mailles!? Merci.
10.12.2021 - 01:53DROPS Design answered:
Bonjour Sandrine, tricotez les mailles lisières avec la couleur du rang indiquée dans A.x, autrement dit, les mailles lisières ne seront pas toujours en gris clair, mais tricotées dans la couleur du rang indiquée par A.2. Bon tricot!
10.12.2021 - 08:46Bonjour. L'échantillon se fait il avec l'aiguille circulaire n°3 ou 3,5? Merci.
06.12.2021 - 15:34DROPS Design answered:
Bonjour Sandrine, l'échantillon se tricote avec l'aiguille circulaire 3,5, celle utilisée pour le point mousse/mosaïque et le jersey. Bon tricot!
07.12.2021 - 06:57Reduslim uomo Rodneyhox
04.09.2021 - 01:53Come perdere la pancia Rodneyhox
02.09.2021 - 14:07L’etoile dans A1. et A3 veut dire quoi?
30.03.2021 - 03:33DROPS Design answered:
Bonjour Line, l'etoile signifie 1 maille endroit sur l'envers. Bon tricot!
30.03.2021 - 11:33Hej, Det står att alla maskor i rader med enfärgade rutor skall stickas rätstickning fram och tillbaka. Menas det då att de enfärgade rutorna i A1 är två rätstickade rader? Mvh Elisabet
10.03.2021 - 21:17Het youtube filmpje van mozaiekbreien was heel duidelijk maar ik loop toch vast in het patroon! Ik begrijp dat 1 blokje twee naalden is. Bij patroon A.2 loop ik al meteen vast. Bij de vierde ribbel moet ik beginnen met een roze afhaling ( na de kantsteek) maar er staat een grijze steek op de naald. Ook verder in het patroon kom ik dat tegen. Wat begrijp ik verkeerd?
12.01.2021 - 18:10DROPS Design answered:
Dag Lilian,
Bij de vierder ribbel staat in A.x een horizontaal streepje en dat betekent dat je alle lichtgrijze steken in A.2 recht moet breien en alle roze steken af moet halen. Hierbij gaat het niet om de roze of grijze steken van de vorige naald, maar van de huidige naald. Omdat bij een roze steek van de huidige naald een grijze steek van de vorige naald op je linker naald staat is dat wat verwarrend. Het klopt dus dat je een grijze steek af moet halen.
17.01.2021 - 12:11Tack för svar, men det blir inte rätt ändå i diagrammet. Jag valde att sticka vanliga rillepinner och ta bort några varv. Jag har läst beskrivningen noga flera gånger och så även min mamma. Jag har stickat i över 40 och och hon i över 60 och vi har aldrig sett en så konstig beskrivning.
16.12.2020 - 13:59På varv 9 i diagrammen ( gör L och A.2) går det ju inte lyfta 3 mörk blush när man bara stickat 1 mörk blush på varv 8. Ska man sticka med både ljusgrå och blush? Har stickat i 45 år och har aldrig sett en så dumt konstruerad beskrivning av hur man gör. Rörigt!! Skriv i den ordning man ska göra istället!
06.12.2020 - 00:19DROPS Design answered:
Hei Ansa. Litt usikker på hvor det blir feil hos deg, men husk at hver rad i A.x og A.2 tilsvarer 2 pinner. Altså 1 rad i diagrammet = 2 pinner (fra retten strikkes diagrammet fra høyre mot venstre, og fra vrangen strikkes SAMME rad fra venstre mot høyre = 1 rille). Husk å lese forklaringen til Mosaikkmønster før det strikkes. mvh DROPS design
16.12.2020 - 12:09