
Popular categories
Looking for a yarn?


|
||||||||||||||||||||||
Blue Spruce |
||||||||||||||||||||||
 |
 |
|||||||||||||||||||||
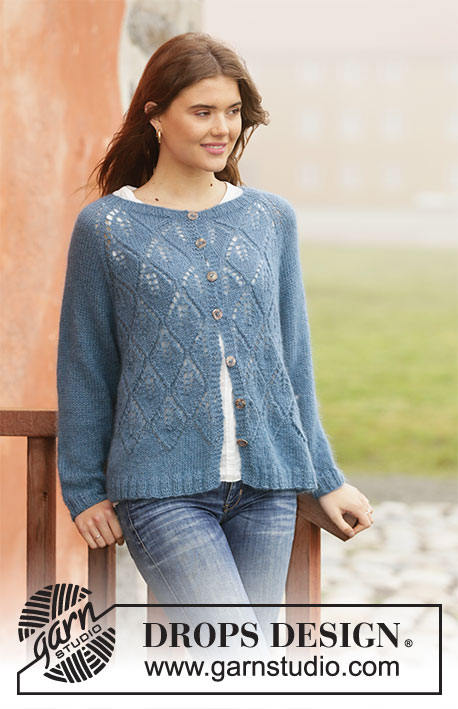
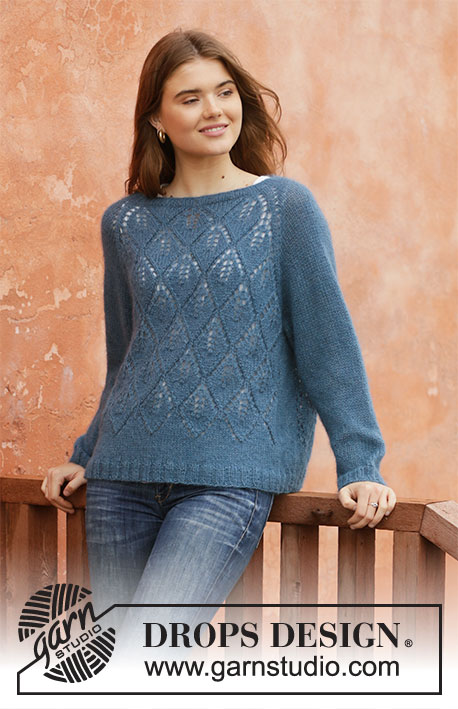
Knitted jumper with raglan in DROPS Alpaca and DROPS Kid-Silk. The piece is worked top down with lace pattern. Sizes S - XXXL.
DROPS 205-16 |
||||||||||||||||||||||
|
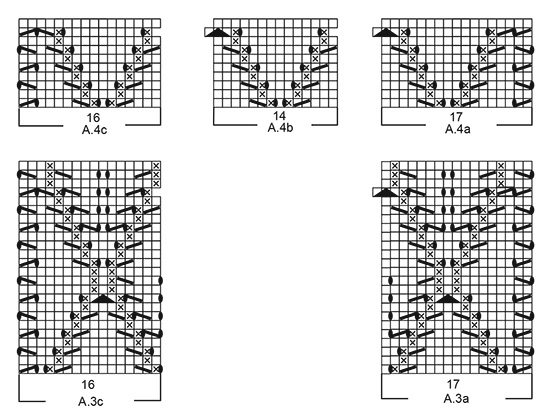
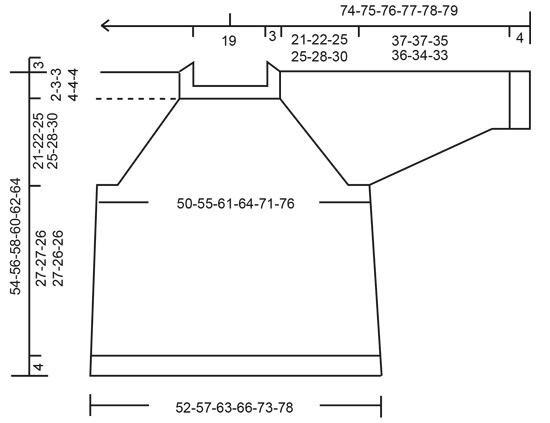
------------------------------------------------------- EXPLANATIONS FOR THE PATTERN: ------------------------------------------------------- PATTERN: See diagrams A.1 to A.4. Find your size in the diagrams. INCREASE TIP-1 (evenly spaced): To work out how to increase evenly, count the total number of stitches on the needle (e.g. 76 stitches) and divide by the number of increases to be made (e.g. 6) = 12.6. In this example, increase by making 1 yarn over after alternately each 12th and 13th stitch. On the next round knit the yarn overs twisted to avoid holes. INCREASE TIP-2 (for sides of body): Work until there is 1 stitch left before the marker thread, make 1 yarn over, knit 2 (marker thread sits between these 2 stitches) make 1 yarn over. On the next round knit the yarn overs twisted to avoid holes. Then work the new stitches in stocking stitch (= 4 increased stitches on the round). RAGLAN (for sleeves): Increase 1 stitch on each side of the sleeve inside the marker thread and 1 knitted stitch (= 4 stitches increased on round + the stitches which are increased in the diagrams on the front and back pieces). Increase 1 stitch by making 1 yarn over. On the next round knit the yarn overs twisted to avoid holes. Then work the new stitches in stocking stitch. DECREASE TIP (for sleeves): Decrease 1 stitch on each side of the marker thread as follows: Work until there are 3 stitches left before the marker thread, knit 2 together, knit 2 (marker thread sits between these 2 stitches), slip 1 stitch as if to knit, knit 1 and pass the slipped stitch over the knitted stitch. ------------------------------------------------------- START THE PIECE HERE: ------------------------------------------------------- JUMPER – SHORT OVERVIEW OF THE PIECE: The neck, yoke and body are worked in the round with circular needle, from the transition between the left sleeve and the back piece, top down. The yoke is divided for body and sleeves and the body continued in the round with circular needle. The sleeves are worked in the round with short circular needle/double pointed needles, top down. NECK: Cast on 76-80-84-88-88-92 stitches with circular needle size 4 mm and 1 strand Alpaca + 1 strand Kid-Silk (= 2 strands). Knit 1 round, then work rib (= knit 2 / purl 2) for 3 cm. Knit 1 round where you increase 6-6-2-2-2-2 stitches evenly spaced – read INCREASE TIP-1 = 82-86-86-90-90-94 stitches. Knit 1 round (yarn overs knitted twisted). Change to circular needle size 5 mm and insert 1 marker at the beginning of the round (in the transition between left sleeve and back piece); the yoke is measured from this marker! YOKE: Now work pattern as follows: Work A.1a over the first 3 stitches, A.1b over the next 28 stitches (= 2 repeats in width), A.1c over the next 2 stitches, insert a marker thread here (= in the transition between back piece and right sleeve), knit 1, make 1 yarn over, knit 6-8-8-10-10-12, make 1 yarn over, knit 1, insert a marker thread here (= in the transition between right sleeve and front piece), work A.1a over the next 3 stitches, A.1b over the next 28 stitches (= 2 repeats in width), A.1c over the next 2 stitches, insert a marker thread here (= in the transition between front piece and left sleeve), knit 1, make 1 yarn over, knit 6-8-8-10-10-12, make 1 yarn over, knit 1. There is now 1 marker thread in each transition between body and sleeves (= 4 marker threads – allow them to follow your work onwards). In addition to the increases in the diagrams, you have increased 1 stitch on each side of the sleeves to RAGLAN – read description above. REMEMBER THE KNITTING TENSION!! Continue this pattern in the round and increase to raglan on the sleeves every 2nd round 18-19-22-21-20-20 more times and then every 4th round 2-2-2-3-5-6 times (= a total of 21-22-25-25-26-27 increases on each side of each sleeve). When A.1a to A.1c have been completed in height, continue the pattern in the same way (i.e. work A.1a and A.1c towards the raglan on the sides of the front and back pieces, leaf pattern as before between these diagrams on the front and back pieces and stocking stitch on the sleeves) until you have worked 36-46-48-48-48-48 rounds of pattern in height and there are 75-85-89-89-89-89 stitches on the front and back pieces. There are now 3-4-4-4-5-5 leaves along the raglan. Continue in the different sizes as follows: Size M: Continue the leaf pattern in the same way, but towards the marker threads in each raglan (on front and back pieces) work pattern A.2 (i.e., do not increase any more stitches to raglan). There are 85 stitches on the front and back pieces. When you have worked up to and including the arrow in the diagram (and all the increases on the sleeves are finished), there are 278 stitches on the needle. The piece should measure approx. 22 cm. If the piece is shorter than this continue working leaf pattern to the correct length (without further increases to raglan). Sizes S, L, XL, XXL and XXXL: Continue the leaf pattern in the same way, but towards the marker threads in each raglan (on front and back pieces) work pattern as shown in A.2a and A.2c (do not work new leaves towards raglan but work stocking stitch and in sizes L, XL, XXL and XXXL a small lace pattern between the outermost leaf and the increases to raglan as shown in A.2a/A.2c). When all the increases are finished there are 81-95-97-105-109 stitches on the front and back pieces. When you have worked up to and including the arrow in the diagram (and all the increases on the sleeves are finished) there are 262-310-318-338-354 stitches on the needle. The piece should measure approx. 21-25-25-28-30 cm. If the piece is shorter than this continue working leaf pattern to the correct length (without further increases to raglan). ALL SIZES: Now work the next round (= the round after the round with the arrow) as follows: Work the first 81-85-95-97-106-112 stitches (= back piece), place the next 50-54-60-62-62-62 stitches on a thread for the sleeve and cast on 4-8-8-12-14-14 new stitches on the needle (= in side under sleeve), work the next 81-85-95-97-107-115 stitches (= front piece), place the next 50-54-60-62-62-62 stitches on a thread for the sleeve and cast on 4-8-8-12-14-14 new stitches on the needle (= in side under sleeve). In sizes XXL and XXXL there are 1-3 stitches left on the round. Knit these stitches – they belong to the back piece = 81-85-95-97-107-115 stitches on the back piece. Cut the strand. Body and sleeves are finished separately. THE PIECE IS NOW MEASURED FROM HERE! BODY: There are 170-186-206-218-242-258 stitches on the body. Insert a marker thread in the middle of the 4-8-8-12-14-14 stitches cast on under each sleeve (= 2-4-4-6-7-7 new stitches on each side of the thread). Start at one of the marker threads and work as follows – NOTE: The pattern should fit over the pattern from the yoke; adjust so you start on the right round in the diagrams: *Knit 12-2-7-10-9-13, work A.3a over the next 17 stitches, leaf pattern as before over the next 28-56-56-56-70-70 stitches (= 2-4-4-4-5-5 repeats), A.3c over the next 16 stitches, knit 12-2-7-10-9-13 (marker thread here) *, work from *-* 1 more time on the round. AT THE SAME TIME when the piece measures 4 cm increase 2 stitches in each side – read INCREASE TIP-2. Repeat the increase when the piece measures 12 cm = 178-194-214-226-250-266 stitches. When the piece measures approx. 17-16-14-13-15-14 cm – adjust so you finish after a round like round 12 in A.1b, there is approx. 5 cm of pattern left and 5-6-7-9-6-7 cm left of stocking stitch before the rib at the bottom of the piece. Now work A.4a over A.3a, A.4c over A.3c and A.4b over A.1b. When the diagrams have been completed in height, work stocking stitch until the body measures 27-27-26-27-26-26 cm. Knit 1 round where you increase 26-30-34-34-38-42 stitches evenly spaced = 204-224-248-260-288-308 stitches. Change to circular needle size 4 mm and work rib (= knit 2 / purl 2) for 4 cm. Cast off with knit over knit and purl over purl. The jumper measures approx. 54-56-58-60-62-64 cm from the shoulder down. SLEEVE: Place the 50-54-60-62-62-62 stitches from the thread on the one side of the piece on short circular needle/double pointed needles size 5 mm and knit up 1 stitch in each of the 4-8-8-12-14-14 stitches cast on under the sleeve = 54-62-68-74-76-76 stitches. Insert a marker thread in the middle of the new stitches (2-4-4-6-7-7 new stitches on each side of the thread). Work stocking stitch in the round. When the sleeve measures 4 cm, decrease 2 stitches under the sleeve – read DECREASE TIP. Decrease like this every 3½-2½-2-1½-1½-1½ cm a total of 9-13-15-17-17-16 times = 36-36-38-40-42-44 stitches. When the sleeve measures 37-37-35-36-34-33 cm, knit 1 round where you increase 4-4-6-4-6-4 stitches evenly spaced = 40-40-44-44-48-48 stitches. Change to double pointed needles size 4 mm and work rib (= knit 2 / purl 2) for 4 cm. Cast off with knit over knit and purl over purl. Work the other sleeve in the same way. |
||||||||||||||||||||||
Diagram explanations |
||||||||||||||||||||||
|
||||||||||||||||||||||
|
||||||||||||||||||||||

|
||||||||||||||||||||||

|
||||||||||||||||||||||
|
||||||||||||||||||||||
|
Have you made this or any other of our designs? Tag your pictures in social media with #dropsdesign so we can see them! Do you need help with this pattern?You'll find tutorial videos, a Comments/Questions area and more by visiting the pattern on garnstudio.com. © 1982-2024 DROPS Design A/S. We reserve all rights. This document, including all its sub-sections, has copyrights. Read more about what you can do with our patterns at the bottom of each pattern on our site. |
||||||||||||||||||||||


With over 40 years in knitting and crochet design, DROPS Design offers one of the most extensive collections of free patterns on the internet - translated to 17 languages. As of today we count 304 catalogues and 11422 patterns - 11422 of which are translated into English (UK/cm).
We work hard to bring you the best knitting and crochet have to offer, inspiration and advice as well as great quality yarns at incredible prices! Would you like to use our patterns for other than personal use? You can read what you are allowed to do in the Copyright text at the bottom of all our patterns. Happy crafting!
Comments / Questions (38)
Pääntien jälkeen kun aloitetaan kaaviot niin onko siinä virhe? Miten teen kolmen silmukan mallikerrasta (A1a) 17s ja 14 silmukan mallikerrasta (A1b) 16s? USAn versiossa on neuvottu toisella tapaa eli ensin 3s kaaviota A1a ja sen jälkeen kaksi kertaa 14s kaavio A1b. Onko se oikein?
25.12.2019 - 17:47DROPS Design answered:
Hei, tämä ohje on nyt päivitetty ja myös piirrokset ovat uudet.
09.01.2020 - 14:20Hvis jeg vil strikke i garngruppe C i stedet for A+A, hvor meget skal jeg så bruge? Jeg vil strikke i den største størrelse. Vh Cecilie
02.12.2019 - 16:17DROPS Design answered:
Hei Cecilie! Du vil trenge rundt 350g garn fra garngruppe C, men bruk gjerne vår garnkalkulator for å regne ut den eksakte mengden du trenger. Lykke til!
03.12.2019 - 08:07Yritin ottaa mallipiirrosta ulos mutta ei anna
14.11.2019 - 10:11Olá \r\nGostaria de fazer este modelo com um fio Do grupo B, frios Karisma. Podem ajudar-me quanto aos tamanhos? Fiz o modelo Early May casaco no tamanho M.\r\nObrigada
09.11.2019 - 15:34Ik ben deze trui beginnen breien en ik heb ondertussen de pas zo goed als af. Maar nu merk ik dat de kraag een stuk smaller is dan op het model. Ik weet dat dit kan gebeuren maar ik vroeg me toch af of hier achteraf nog iets aan te doen is.
27.10.2019 - 20:47DROPS Design answered:
Dag Ives,
Je zou het kledingstuk achteraf heel voorzichtig op kunnen persen door het op de strijkplank te leggen, een vochtige (thee)doek erover heen en dan voorzichtig met een hete strijkbout deppen. LET OP: doe dit heel voorzichtig, anders kun je de structuur van het garen en ajourpatroon vernielen.
30.10.2019 - 11:12I think I have solved the problem. To set up stitches for yoke instead of :work A.1a over the first 17 stitches it should read work a.1 over fist 3 stitches and A1.b over next 14. Likewise: work A.1b over the next 16 stitches should read work Al.c over next 14 and A1.b over following 2 stitches. Please let me know if this is right!! That's what I have decided to do so far.
28.09.2019 - 11:24DROPS Design answered:
Dear Mar, you will work A.1a (= 3 sts), then repeat A.1b (= 14 sts) a total of 2 times in width (= over the next 28 sts), then A.1c (= 2 sts), ie you will have worked: 3+28+2= 33 sts as shown in diagram and have increased 2 stitches: 1 stitch in A.1a (= there are now 4 sts after 1st row), and 1 st in A.1c (= there are now 3 sts after 1st row). Happy knitting!
30.09.2019 - 08:23I am having problems with this pattern. I have knitted the neck band and now I am about to start the yoke. I understand that the front and back sections are to be knitted starting with A1.a and I assume that you start at the bottom of the diagram and work upwards. This diagram starts with 3 stitches not 17. The same occurs with Al.c which starts with 2 stitches. Neither is there an arrow for Sizes S and M. I am completely lost. Which diagrams do I follow to start the front and back panels?
27.09.2019 - 23:44Buongiorno, nelle spiegazioni del modello in italiano mancano i diagrammi grafici.
27.09.2019 - 15:03DROPS Design answered:
Buongiorno Ilaria. Il testo del modello verrà corretto e completato con la descrizione del diagramma quanto prima. Buon lavoro!
27.09.2019 - 15:34Bonjour, j'aime beaucoup ce modèle et envisage de le réaliser, Mais je souhaiterais le réaliser avec d'autres qualités. (une seule laine) Pouvez-vous m'indiquer laquelle ? Merci. Cordialement C. COUSIN
18.09.2019 - 14:40DROPS Design answered:
Bonjour Mme Cousin, vous pouvez remplacer 2 fils du groupe A (= ici 1 fil Alpaca + 1 fil Kid-Silk) par 1 fil du groupe C - vous trouverez ici plus d'infos sur les alternatives. Bon tricot!
18.09.2019 - 14:51Merci encore de vos réponses et de votre disponibilité. J'ai hâte de le commencer...
13.09.2019 - 12:14