
Popular categories
Looking for a yarn?


|
||||||||||||||||||||||
Blue Spruce |
||||||||||||||||||||||
 |
 |
|||||||||||||||||||||
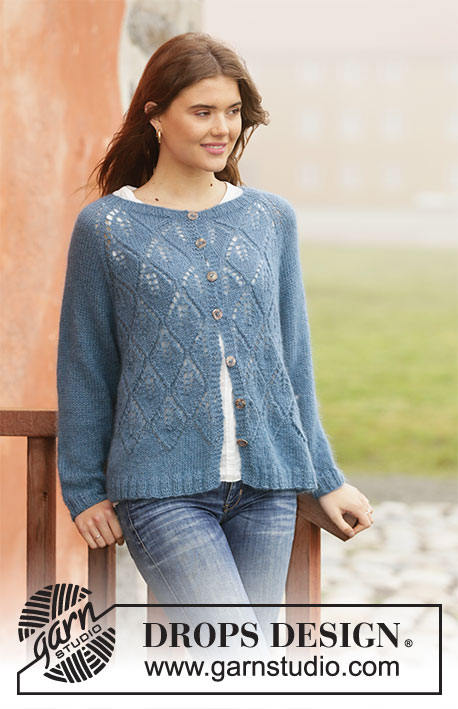
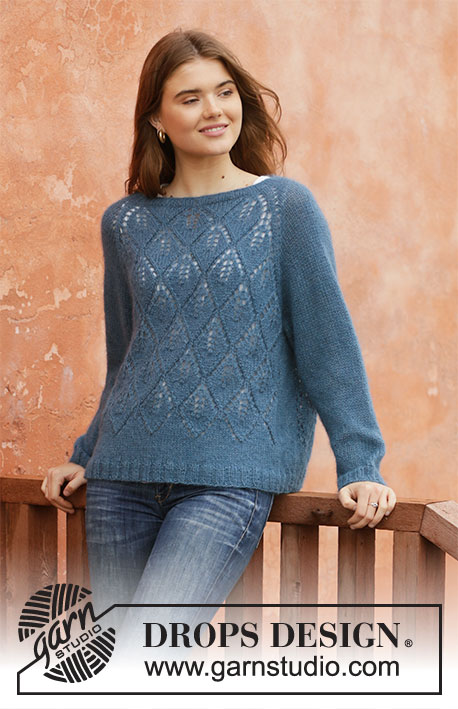
Knitted jumper with raglan in DROPS Alpaca and DROPS Kid-Silk. The piece is worked top down with lace pattern. Sizes S - XXXL.
DROPS 205-16 |
||||||||||||||||||||||
|
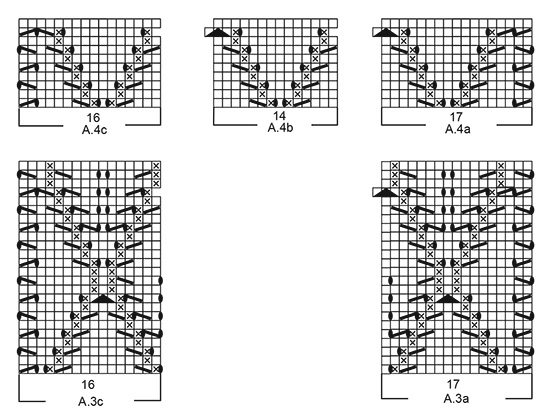
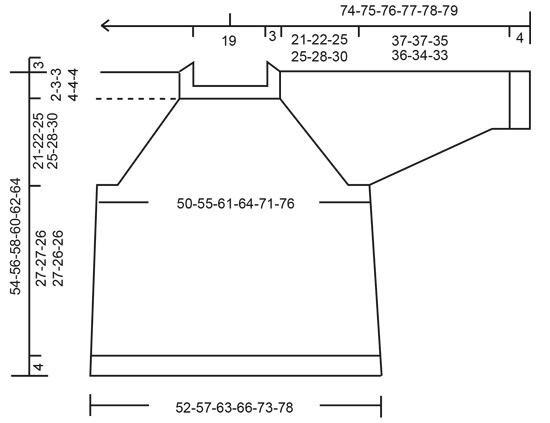
------------------------------------------------------- EXPLANATIONS FOR THE PATTERN: ------------------------------------------------------- PATTERN: See diagrams A.1 to A.4. Find your size in the diagrams. INCREASE TIP-1 (evenly spaced): To work out how to increase evenly, count the total number of stitches on the needle (e.g. 76 stitches) and divide by the number of increases to be made (e.g. 6) = 12.6. In this example, increase by making 1 yarn over after alternately each 12th and 13th stitch. On the next round knit the yarn overs twisted to avoid holes. INCREASE TIP-2 (for sides of body): Work until there is 1 stitch left before the marker thread, make 1 yarn over, knit 2 (marker thread sits between these 2 stitches) make 1 yarn over. On the next round knit the yarn overs twisted to avoid holes. Then work the new stitches in stocking stitch (= 4 increased stitches on the round). RAGLAN (for sleeves): Increase 1 stitch on each side of the sleeve inside the marker thread and 1 knitted stitch (= 4 stitches increased on round + the stitches which are increased in the diagrams on the front and back pieces). Increase 1 stitch by making 1 yarn over. On the next round knit the yarn overs twisted to avoid holes. Then work the new stitches in stocking stitch. DECREASE TIP (for sleeves): Decrease 1 stitch on each side of the marker thread as follows: Work until there are 3 stitches left before the marker thread, knit 2 together, knit 2 (marker thread sits between these 2 stitches), slip 1 stitch as if to knit, knit 1 and pass the slipped stitch over the knitted stitch. ------------------------------------------------------- START THE PIECE HERE: ------------------------------------------------------- JUMPER – SHORT OVERVIEW OF THE PIECE: The neck, yoke and body are worked in the round with circular needle, from the transition between the left sleeve and the back piece, top down. The yoke is divided for body and sleeves and the body continued in the round with circular needle. The sleeves are worked in the round with short circular needle/double pointed needles, top down. NECK: Cast on 76-80-84-88-88-92 stitches with circular needle size 4 mm and 1 strand Alpaca + 1 strand Kid-Silk (= 2 strands). Knit 1 round, then work rib (= knit 2 / purl 2) for 3 cm. Knit 1 round where you increase 6-6-2-2-2-2 stitches evenly spaced – read INCREASE TIP-1 = 82-86-86-90-90-94 stitches. Knit 1 round (yarn overs knitted twisted). Change to circular needle size 5 mm and insert 1 marker at the beginning of the round (in the transition between left sleeve and back piece); the yoke is measured from this marker! YOKE: Now work pattern as follows: Work A.1a over the first 3 stitches, A.1b over the next 28 stitches (= 2 repeats in width), A.1c over the next 2 stitches, insert a marker thread here (= in the transition between back piece and right sleeve), knit 1, make 1 yarn over, knit 6-8-8-10-10-12, make 1 yarn over, knit 1, insert a marker thread here (= in the transition between right sleeve and front piece), work A.1a over the next 3 stitches, A.1b over the next 28 stitches (= 2 repeats in width), A.1c over the next 2 stitches, insert a marker thread here (= in the transition between front piece and left sleeve), knit 1, make 1 yarn over, knit 6-8-8-10-10-12, make 1 yarn over, knit 1. There is now 1 marker thread in each transition between body and sleeves (= 4 marker threads – allow them to follow your work onwards). In addition to the increases in the diagrams, you have increased 1 stitch on each side of the sleeves to RAGLAN – read description above. REMEMBER THE KNITTING TENSION!! Continue this pattern in the round and increase to raglan on the sleeves every 2nd round 18-19-22-21-20-20 more times and then every 4th round 2-2-2-3-5-6 times (= a total of 21-22-25-25-26-27 increases on each side of each sleeve). When A.1a to A.1c have been completed in height, continue the pattern in the same way (i.e. work A.1a and A.1c towards the raglan on the sides of the front and back pieces, leaf pattern as before between these diagrams on the front and back pieces and stocking stitch on the sleeves) until you have worked 36-46-48-48-48-48 rounds of pattern in height and there are 75-85-89-89-89-89 stitches on the front and back pieces. There are now 3-4-4-4-5-5 leaves along the raglan. Continue in the different sizes as follows: Size M: Continue the leaf pattern in the same way, but towards the marker threads in each raglan (on front and back pieces) work pattern A.2 (i.e., do not increase any more stitches to raglan). There are 85 stitches on the front and back pieces. When you have worked up to and including the arrow in the diagram (and all the increases on the sleeves are finished), there are 278 stitches on the needle. The piece should measure approx. 22 cm. If the piece is shorter than this continue working leaf pattern to the correct length (without further increases to raglan). Sizes S, L, XL, XXL and XXXL: Continue the leaf pattern in the same way, but towards the marker threads in each raglan (on front and back pieces) work pattern as shown in A.2a and A.2c (do not work new leaves towards raglan but work stocking stitch and in sizes L, XL, XXL and XXXL a small lace pattern between the outermost leaf and the increases to raglan as shown in A.2a/A.2c). When all the increases are finished there are 81-95-97-105-109 stitches on the front and back pieces. When you have worked up to and including the arrow in the diagram (and all the increases on the sleeves are finished) there are 262-310-318-338-354 stitches on the needle. The piece should measure approx. 21-25-25-28-30 cm. If the piece is shorter than this continue working leaf pattern to the correct length (without further increases to raglan). ALL SIZES: Now work the next round (= the round after the round with the arrow) as follows: Work the first 81-85-95-97-106-112 stitches (= back piece), place the next 50-54-60-62-62-62 stitches on a thread for the sleeve and cast on 4-8-8-12-14-14 new stitches on the needle (= in side under sleeve), work the next 81-85-95-97-107-115 stitches (= front piece), place the next 50-54-60-62-62-62 stitches on a thread for the sleeve and cast on 4-8-8-12-14-14 new stitches on the needle (= in side under sleeve). In sizes XXL and XXXL there are 1-3 stitches left on the round. Knit these stitches – they belong to the back piece = 81-85-95-97-107-115 stitches on the back piece. Cut the strand. Body and sleeves are finished separately. THE PIECE IS NOW MEASURED FROM HERE! BODY: There are 170-186-206-218-242-258 stitches on the body. Insert a marker thread in the middle of the 4-8-8-12-14-14 stitches cast on under each sleeve (= 2-4-4-6-7-7 new stitches on each side of the thread). Start at one of the marker threads and work as follows – NOTE: The pattern should fit over the pattern from the yoke; adjust so you start on the right round in the diagrams: *Knit 12-2-7-10-9-13, work A.3a over the next 17 stitches, leaf pattern as before over the next 28-56-56-56-70-70 stitches (= 2-4-4-4-5-5 repeats), A.3c over the next 16 stitches, knit 12-2-7-10-9-13 (marker thread here) *, work from *-* 1 more time on the round. AT THE SAME TIME when the piece measures 4 cm increase 2 stitches in each side – read INCREASE TIP-2. Repeat the increase when the piece measures 12 cm = 178-194-214-226-250-266 stitches. When the piece measures approx. 17-16-14-13-15-14 cm – adjust so you finish after a round like round 12 in A.1b, there is approx. 5 cm of pattern left and 5-6-7-9-6-7 cm left of stocking stitch before the rib at the bottom of the piece. Now work A.4a over A.3a, A.4c over A.3c and A.4b over A.1b. When the diagrams have been completed in height, work stocking stitch until the body measures 27-27-26-27-26-26 cm. Knit 1 round where you increase 26-30-34-34-38-42 stitches evenly spaced = 204-224-248-260-288-308 stitches. Change to circular needle size 4 mm and work rib (= knit 2 / purl 2) for 4 cm. Cast off with knit over knit and purl over purl. The jumper measures approx. 54-56-58-60-62-64 cm from the shoulder down. SLEEVE: Place the 50-54-60-62-62-62 stitches from the thread on the one side of the piece on short circular needle/double pointed needles size 5 mm and knit up 1 stitch in each of the 4-8-8-12-14-14 stitches cast on under the sleeve = 54-62-68-74-76-76 stitches. Insert a marker thread in the middle of the new stitches (2-4-4-6-7-7 new stitches on each side of the thread). Work stocking stitch in the round. When the sleeve measures 4 cm, decrease 2 stitches under the sleeve – read DECREASE TIP. Decrease like this every 3½-2½-2-1½-1½-1½ cm a total of 9-13-15-17-17-16 times = 36-36-38-40-42-44 stitches. When the sleeve measures 37-37-35-36-34-33 cm, knit 1 round where you increase 4-4-6-4-6-4 stitches evenly spaced = 40-40-44-44-48-48 stitches. Change to double pointed needles size 4 mm and work rib (= knit 2 / purl 2) for 4 cm. Cast off with knit over knit and purl over purl. Work the other sleeve in the same way. |
||||||||||||||||||||||
Diagram explanations |
||||||||||||||||||||||
|
||||||||||||||||||||||
|
||||||||||||||||||||||

|
||||||||||||||||||||||

|
||||||||||||||||||||||
|
||||||||||||||||||||||
|
Have you made this or any other of our designs? Tag your pictures in social media with #dropsdesign so we can see them! Do you need help with this pattern?You'll find tutorial videos, a Comments/Questions area and more by visiting the pattern on garnstudio.com. © 1982-2024 DROPS Design A/S. We reserve all rights. This document, including all its sub-sections, has copyrights. Read more about what you can do with our patterns at the bottom of each pattern on our site. |
||||||||||||||||||||||


With over 40 years in knitting and crochet design, DROPS Design offers one of the most extensive collections of free patterns on the internet - translated to 17 languages. As of today we count 304 catalogues and 11422 patterns - 11422 of which are translated into English (UK/cm).
We work hard to bring you the best knitting and crochet have to offer, inspiration and advice as well as great quality yarns at incredible prices! Would you like to use our patterns for other than personal use? You can read what you are allowed to do in the Copyright text at the bottom of all our patterns. Happy crafting!
Comments / Questions (38)
Hallo,\r\nHabe ich jetzt einen Denkfehler ich stricke 12 Maschen zwischen den Ärmeln und nehme 20 mal zu sind 54 Maschen, dann nach jeder 4. Reihe noch 6 mal also 12 Maschen, habe ich also 64 Maschen am Schluss vor dem teilen bei den Ärmeln und nicht 62🤔😳
04.09.2022 - 20:29DROPS Design answered:
Liebe Veronika, die rechten Masche vor der Zunahme am Anfang der Ärmel und die ersten Maschen der Ärmel + die letzten Maschen der ÄRmel und die rechte Masche nach der Zunahme am Ende der Ärmel gehört zur Rücken- bzw Vorderteil - so sind es nur 62 Masche für die Ärmel. Viel Spaß beim stricken!
05.09.2022 - 09:37Hei har problem for å forstå om de nye 14 mesker som strikkes 9 på hver side under armen , skal de strikkes glatt strikk hele tiden eller skal inn i A3a.
09.03.2022 - 23:13DROPS Design answered:
Hei Manaye, De skal strikkes i glattstrikk. God fornøyelse!
10.03.2022 - 06:59Bonjour, Où puis je trouver la correction de ce modèle s'il vous plait ?
14.01.2022 - 11:41DROPS Design answered:
Bonjour Mme Faye, si vous n'aviez pas encore imprimé les explications, les corrections ont déjà été faites, en revanche, si vous aviez déjà imprimé, il peut être sage de les imprimer à nouveau. Bon tricot!
14.01.2022 - 16:40I love this pattern so much but I had very bad experience with Kid Silk. I felt itchy on my nose when knitting, and felt itchy on my body when wearing. What is a good substitute of the Kid Silk?
26.10.2021 - 04:39DROPS Design answered:
Hi Heidi, Any other yarn from yarn group A could be a substitute for Kid Silk. It is a good idea to work a swatch to check your knitting tension before starting your piece. Happy knitting!
26.10.2021 - 07:01Halsen i oppskriften er svært mye smalere enn på bildet. 19 cm x2= 42 cm hals, som vil si nesten tettsittende rundt halsen. På bildet er det mer en åpen båtshals, som var det jeg likte ved modellen. Hva kan man gjøre med det? Dette må jo være en feil i oppskriften?
13.12.2020 - 17:40DROPS Design answered:
Hei Irene, Det er mulig at oppleggskanten din eller strikkefastheten er for stram. Du kan prøve å legg opp og strikke med en større pinnenummer. God fornøyelse!
14.12.2020 - 10:41Hej, Jeg har laver A.1A til A.1C en gang og skal gentage nu. Mit spørgsmål er, om gentagelsen af A.1A og A.1C kun er halve blade, for hvis mønsteret skal gentages som diagrammet viser bliver det ikke former til et helt blad ligesom A.1b Hvad skal jeg gøre? Mvh. Mikkel
17.10.2020 - 15:58DROPS Design answered:
Hej, ja det stemmer A.1A og A.1C skal stadigvæk strikkes i siderne. God fornøjelse!
22.10.2020 - 12:24Bonjour, dans l'explication des raglans, on doit augmenter d'1 maille après/avant le fil marqueur (soit 4 augmentations), mais que signifie l'expression : "+ 1 maille endroit " ? merci d'avance
23.07.2020 - 11:57DROPS Design answered:
Bonjour Fanny, vous aurez 1 maille endroit entre la fin de A.1c/le début de A.1a et le jeté de la manche - regardez bien la description du 1er rang d'augmentations pour le raglan: après A.1c, on tricote 1 m end, et on augmente pour la manche ici, après cette maille endroit, on tricote les mailles de la manche jusqu'à ce qu'il reste 1 m avant le marqueur, on fait 1 jeté, on tricote 1 maille endroit (le marqueur est juste après) et on tricote A.1a. Bon tricot!
29.07.2020 - 09:10Bonjour, j'ai tricotė A1 a,b,c et j'ai réalisé toutes les augmentations. J'ai bien 85 m pour le devant et le dos. Cependant, lorsque je veux réaliser la partie suivante A2 (taille M) je n'ai pas le bon nombre de mailles . Je ne suis pas sûre d'avoir bien compris ce que je dois faire: j'ai tricoté A2 de chaque côté du dos et du devant et A1b (4 fois) au milieu. Est-ce bien ça ? Merci
28.03.2020 - 23:38DROPS Design answered:
Bonjour Mme Langevin, vous tricotez (en M) A.1 pendant 46 rangs (il reste les 2 derniers rangs de A.1 à faire la 2ème fois que vous les tricotez en hauteur). Vous tricotez maintenant A.2 sur les 15 premières et 15 dernières mailles du devant et du dos, et entre ces 2 A.2 vous tricotez le point de feuilles comme avant. Bon tricot!
30.03.2020 - 10:23Bonjour, J'ai résolu le problème des raglans. Taille M. je viens d terminer les 24 rangs A, a,b,c.Je ne vois pas le diagramme A 3b. il y a un espace entre A3a et A 3c. Je ne vois pas ce qui manque.
23.02.2020 - 20:00Comte answered:
Finalement je crois que je vais y arriver!
23.02.2020 - 21:24Bonjour, Je suis en grande difficulté avec ce modèle. je ne comprends pas les augmentations des raglans. Dans le raglan habituel on augmente 8 mailles. Les explications ne me permettent pas de voir si c'est une maille de chaque coté du marqueur..donc 8 en tout ou alors 2 à chaque manche.
22.02.2020 - 18:53DROPS Design answered:
Bonjour Mme Comte, les augmentations du devant/dos et celles des manches vont se faire à un rythme différent, celles du devant et du dos sont indiquées dans les diagrammes correspondant, celles des manches vont se faire 18 à 20 fois tous les 2 tours et 2 à 6 fois tous les 4 tours (voir taille). Donc vous augmenterez parfois 8 mailles (= 2 sur chaque pièce), ou bien seulement 4 mailles (seulement sur le dos et le devant). Attention toutefois, ce nombre est "générique" sur certains rangs de A.1a et A.1c, on va augmenter 2 m au lieu d'1 dans les diagrammes (ex. au rang 11). Bon tricot!
24.02.2020 - 08:34