
Popular categories
Looking for a yarn?


|
||||||||||
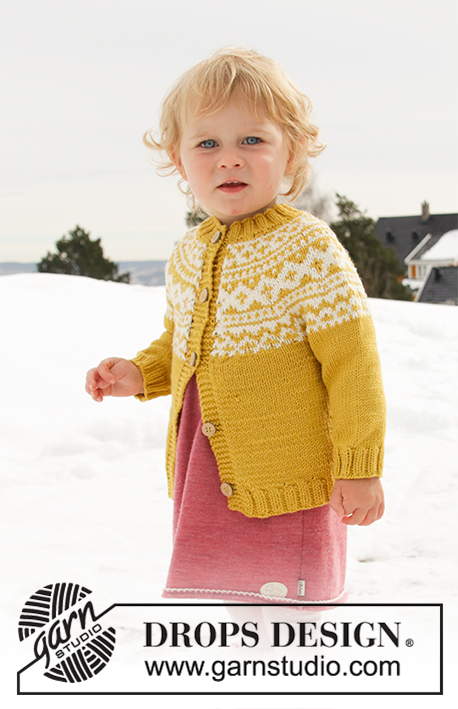
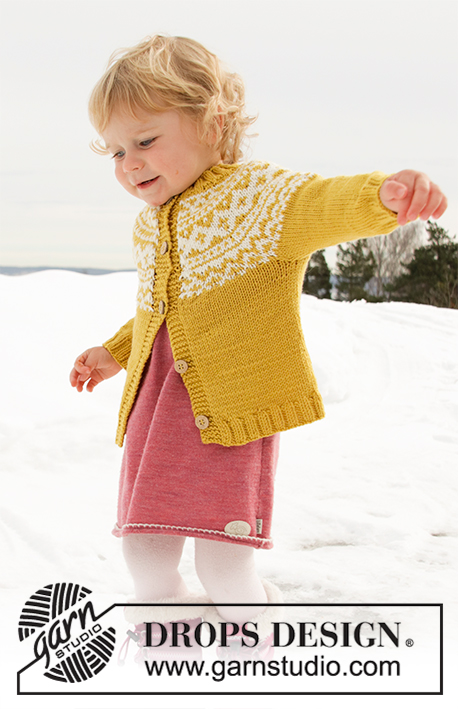
Little Missy Jacket |
||||||||||
 |
 |
|||||||||
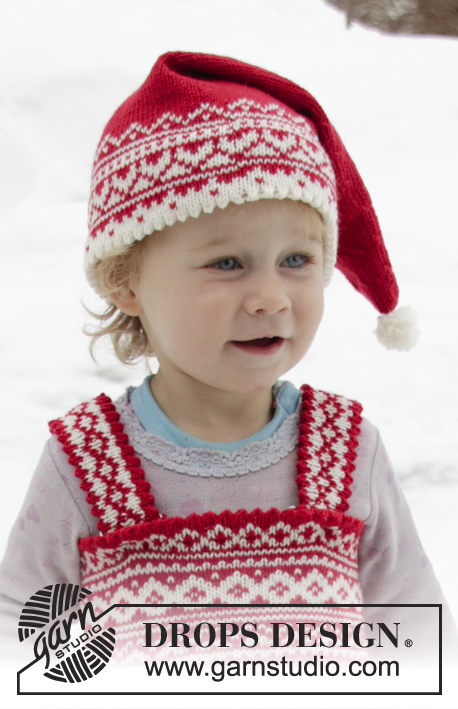
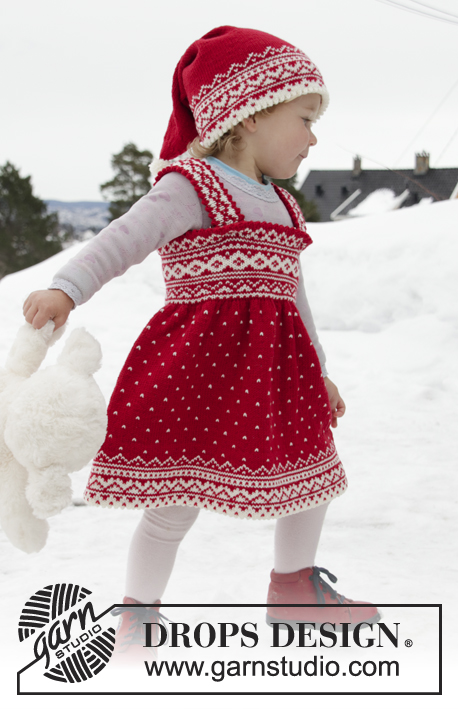
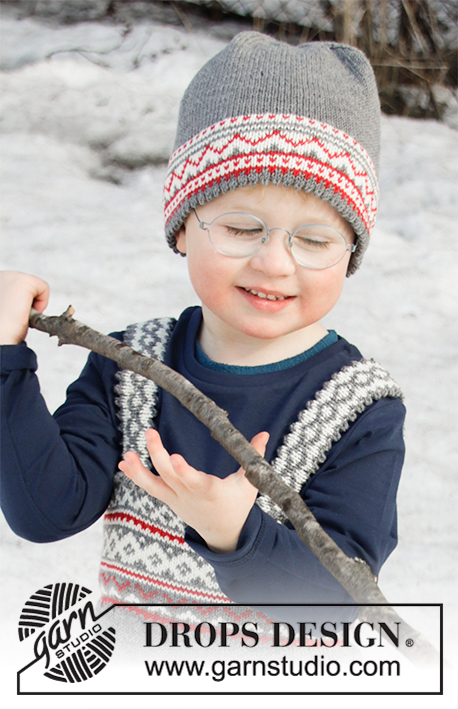
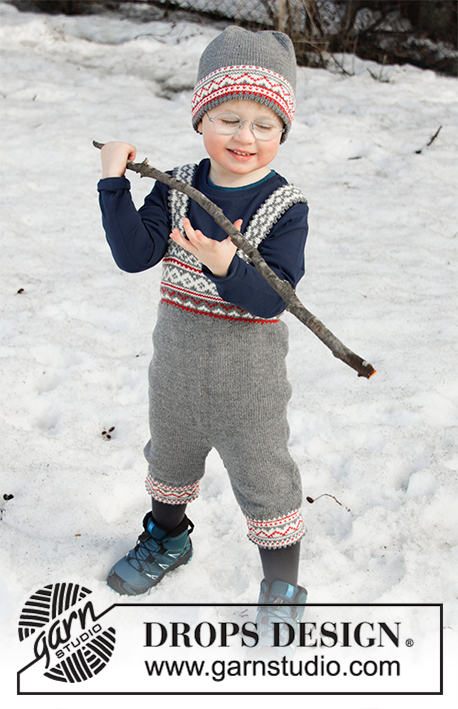
Knitted jacket for babies and children with round yoke in DROPS Lima. The piece is worked top down with Nordic pattern. Sizes 12 months – 12 years.
DROPS Children 32-8 |
||||||||||
|
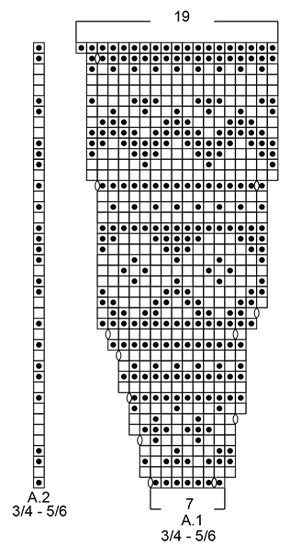
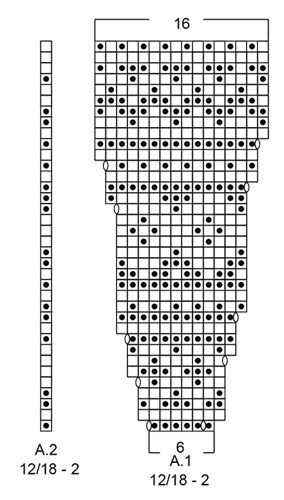
------------------------------------------------------- EXPLANATIONS FOR THE PATTERN: ------------------------------------------------------- RIDGE/GARTER STITCH (worked back and forth): 1 ridge = Knit 2 rows. PATTERN: See diagrams A.1 and A.2. Choose diagram for your size. The whole pattern is worked in stockinette stitch. KNITTING TIP (for bands): The whole of the band is worked in goldenrod. In other words, use 1 ball for each band where needed (i.e. on the rows where goldenrod is not used in the pattern). Change strands between band and yoke (to avoid strand-changes on outside of band). When changing strands, twist the two strands together so that the stitches stay together. DECREASE/INCREASE TIP: To work out how to decrease/increase evenly, count the total number of stitches on the needle (e.g. 84 stitches), minus the bands (= 74 stitches) and divide the remaining stitches by the number of decreases/increases to be made (e.g. 7) = 10.57. In this example, decrease by knitting together alternately each 9th and 10th stitch and each 10th and 11th stitch (approx.); increase by making 1 yarn over after alternately each 10th and each 11th stitch (approx.). The yarn overs are worked twisted on the next row to avoid holes – NOTE: Do not decrease/increase over the bands. INCREASE TIP (for sides of body): Increase 1 stitch on each side of the marker thread as follows: Start 2 stitches before the marker thread, make 1 yarn over, knit 4 (the marker thread sits in the middle of these 4 stitches), make 1 yarn over (= 2 stitches increased). Increase like this at both marker threads (= 4 stitches increased). On the next row work the yarn overs twisted to avoid holes. DECREASE TIP (for mid under sleeve): Decrease 1 stitch on each side of the marker thread as follows: Start 3 stitches before the marker thread, knit 2 together, knit 2 (the marker thread sits in the middle of these 2 stitches), slip 1 stitch as if to knit, knit 1 and pass the slipped stitch over the knitted stitch (= 2 stitches decreased). ELEVATION (back of neck): Skip this section if you do not want an elevation. The first row is worked as follows from the right side. Knit until there are 8 (8-8-10-10-12-12) stitches left on row, turn, tighten strand and purl until there are 8 (8-8-10-10-12-12) stitches left in the other side, turn, tighten strand and knit until there are 16 (16-16-18-18-20-20) stitches left on row, turn, tighten strand and purl until there are 16 (16-16-18-18-20-20) stitches left on other side. Continue by working 8 stitches less each time you turn 2 more times in each side, turn, tighten strand and knit to end of row, then purl 1 row from the wrong side (bands worked in garter stitch). BUTTONHOLES: Work buttonholes on right band (when the garment is worn). 1 buttonhole = start from the wrong side and knit together the 2nd and 3rd stitch from the edge, make 1 yarn over. On the next row knit the yarn over to leave a hole. The first buttonhole is worked when the neck measures approx. 1½-2 cm = ½"-¾", the next 4 (5-5-5-6-6-7) buttonholes are then worked after approx. every 6 (6-6½-7-6½-7-7) cm = 2⅜" (2⅜"-2½"-2¾"-2½"-2¾"-2¾"). ------------------------------------------------------- START THE PIECE HERE: ------------------------------------------------------- JACKET - SHORT OVERVIEW OF THE PIECE: The piece is worked top down. The yoke is worked first, then it is divided for sleeves and body. The body is continued back and forth. The sleeves are worked in the round with double pointed needles. NECK: Cast on 84 (88-92-96-100-108-112) stitches (including 5 band stitches in each side towards mid front) with circular needle size 3 mm = US 2,5 and goldenrod. Purl 1 row from the wrong side with 5 band stitches in GARTER STITCH – read description above, in each side. The next row is worked as follows from the right side: 5 band stitches in garter stitch, * knit 2, purl 2 *, work from *-* until there are 7 stitches left, finish with knit 2 and 5 band stitches in garter stitch. Continue this rib for 3 cm = 1⅛" – remember BUTTONHOLES on right band – read description above and finish after 1 row from the right side. YOKE: Change to circular needle size 4 mm = US 6. Purl 1 row from the wrong side with 5 band stitches in garter stitch in each side and decrease 7 (5-4-1-5-6-10) stitches evenly on row – read DECREASE/INCREASE TIP (purl 2 stitches together = 1 stitch decreased) = 77 (83-88-95-95-102-102) stitches. You can now work an elevation in back of neck so that the yoke is slightly higher at the back. This elevation can be left out; the neck will then be the same front and back – work ELEVATION – read description above or continue working. The next row is worked as follows from the right side: 5 band stitches in garter stitch, work pattern according to A.1 until there are 6 stitches left on row – Note: Choose diagram for your size (= 11 (12-11-12-12-13-13) repeats of 6 (6-7-7-7-7-7) stitches), work A.2 over the next stitch and finish with 5 band stitches in garter stitch. Continue this pattern and increase as shown in the diagram – read KNITTING TIP and REMEMBER THE KNITTING GAUGE! When A.1 and A.2 have been completed there are 187 (203-220-239-251-271-271) stitches on the row. Continue with stockinette stitch with 5 band stitches in garter stitch in each side in golden rod. On the next row from the right side increase 7 (7-10-7-3-0-11) stitches evenly on row (do not increase over bands) = 194 (210-230-246-254-271-282) stitches. When the piece measures 13 (14-15-16-17-18-19) cm = 5⅛" (5½"-6"-6¼"-6¾"-7"-7½") mid front (measured without the neck), divide the piece as follows: Work 29 (31-34-36-38-40-42) stitches as before (= front piece), place the next 42 (46-50-54-54-58-60) stitches on 1 thread for sleeve (without working them), cast on 6 new stitches on the needle, work 52 (56-62-66-70-75-78) stitches (= back piece), place the next 42 (46-50-54-54-58-60) stitches on 1 thread for sleeve (without working them), cast on 6 new stitches on the needle and work the remaining 29 (31-34-36-38-40-42) stitches as before (= front piece) = 122 (130-142-150-158-167-174) stitches. BODY: Insert 1 marker thread 32 (34-37-39-41-43-45) stitches in from each side (= 58 (62-68-72-76-81-84) stitches between marker threads on back piece). THE PIECE IS NOW MEASURED FROM HERE! Continue back and forth with stockinette stitch and 5 band stitches in garter stitch in each side towards mid front – remember BUTTONHOLES on band. When the piece measures 3 cm =1⅛" from where body and sleeves were divided, increase on each side of both marker threads – read INCREASE TIP. Repeat the increase when the piece measures 8 cm from where body and sleeves were divided = 130 (138-150-158-166-175-182) stitches. When the piece measures 11 (13-16-19-22-25-28) cm = 4⅜" (5 1/9"-6¼"- 7½"- 8¾"-9¾"-11") from where body and sleeves were divided, increase 14 (14-14-14-14-13-14) stitches on next row from the right side (do not increase over the bands) = 144 (152-164-172-180-188-196) stitches. Change to needle size 3 mm = US 2,5. The next row is worked as follows from the right side: 5 band stitches in garter stitch, * knit 2, purl 2 *, work from *-* until there are 7 stitches left, finish with knit 2 and 5 band stitches in garter stitch. Continue this rib for 4 cm = 1½", then bind off with garter stitch over garter stitch, knit over knit and purl over purl. The whole jacket measures approx. 34 (37-41-45-49-53-57) cm = 13⅜" (14½"-16⅛"-17¾"-19¼"-21"-22½"), measured from the shoulder. SLEEVE: Place the stitches from the one thread on double pointed needles size 4 mm = US 6 and knit up 1 stitch in each of the 6 stitches cast on under the sleeve = 48 (52-56-60-60-64-66) stitches. Insert 1 marker thread in the middle of these 6 stitches (= mid under sleeve). THE PIECE IS NOW MEASURED FROM HERE! Work stockinette stitch in the round with goldenrod. When the sleeve measures 1 cm = ⅜" from where sleeve and body were divided, decrease 2 stitches mid under sleeve – read DECREASE TIP. Decrease like this every 2 (2½-2½-2½-3½-3½-3½) cm = ¾" (1"-1"-1"-1¾"-1¾"-1¾") a total of 6 (6-8-8-8-8-9) times = 36 (40-40-44-44-48-48) stitches. When the sleeve measures 14 (16-21-24-28-31-35) cm = 5½" (6¼"-8¼"-9½"-11"-12¼"-13¾") from where sleeve and body were divided, change to double pointed needles size 3 mm = US 2,5 and work rib in the round (= knit 2 / purl 2) for 4 cm = 1½" or to desired length. Then bind off with knit over knit and purl over purl. The sleeve measures a total of approx. 18 (20-25-28-32-35-39) cm = 7" (8"-9¾"-11"-12½"-12¾"-15¼") from where sleeve and body were divided. Work the other sleeve in the same way. ASSEMBLY: Sew buttons onto left band. |
||||||||||
Diagram explanations |
||||||||||
|
||||||||||

|
||||||||||
|
||||||||||
|
||||||||||

|
||||||||||
|
Have you made this or any other of our designs? Tag your pictures in social media with #dropsdesign so we can see them! Do you need help with this pattern?You'll find tutorial videos, a Comments/Questions area and more by visiting the pattern on garnstudio.com. © 1982-2024 DROPS Design A/S. We reserve all rights. This document, including all its sub-sections, has copyrights. Read more about what you can do with our patterns at the bottom of each pattern on our site. |
||||||||||


With over 40 years in knitting and crochet design, DROPS Design offers one of the most extensive collections of free patterns on the internet - translated to 17 languages. As of today we count 304 catalogs and 11422 patterns - 11417 of which are translated into English (US/in).
We work hard to bring you the best knitting and crochet have to offer, inspiration and advice as well as great quality yarns at incredible prices! Would you like to use our patterns for other than personal use? You can read what you are allowed to do in the Copyright text at the bottom of all our patterns. Happy crafting!
Comments / Questions (71)
Hola, los aumentos se repiten en la misma corrida cada vez que vuelvo a repetir el patrón, o se hacen una sola vez por corrida? Según entiendo, sería una sola vez por corrida. Pero el chaleco no me está quedando lo suficientemente holgado en los hombros, a pesar de tejer bien suelto... gracias por la ayuda!
28.07.2020 - 03:52RÉHAUSSE (encolure dos): Bonjour je ne comprends pas ce paragraphe doit on compter les 5 mailles de bordure dans ces 8 mailles ? (Continuer à tricoter encore 2 fois 8 mailles en moins de chaque côté à chaque fois que l'on tourne, tourner, serrer le fil et tricoter à l'endroit jusqu’à la fin du rang) et là cela veut dire quoi tricoter jusqu’à ce qu'il reste 24 mailles puis 32? merci de votre réponse
16.06.2020 - 09:01DROPS Design answered:
Bonjour Mme Vigot, vous devez tricoter 8 mailles en moins qu'au rang précédent, tout comme aux premiers rangs raccourcis, si vous avez tricoté 45 m la fois précédente, tricotez 8 m en moins soit 37 mailles puis 8 m en moins soit 29 m. Après ce dernier rang, tournez, tricotez toutes les mailles jusqu'à la fin du rang, tournez et tricotez toutes les mailles. Bon tricot!
16.06.2020 - 09:19Ich stricke die Jacke in Größe 12/18 und nutze daher die untere Musterangabe. Dazu habe ich eine Frage: Da ich das Muster ja nicht in Runden stricken kann, kann ich eine Farbe ja nur entweder in aufeinanderfolgenden Reihen nutzen oder muss 2 Reihen überspringen. Das Muster ist so aber nicht aufgebaut. Ist es tatsächlich vorgesehen, dass ich alle paar Reihen den Faden abschneiden und vernähen muss (zB. Reihe 1 auf 3, Reihe 12 auf 14 etc.)? Vielen Dank im Voraus für eine Klärung.
01.05.2020 - 15:45DROPS Design answered:
Liebe Antje, die Diagramme zeigen alle Reihen, dh einige Reihen werden nur mit einer Farbe gestrickt, aber die Hauptfrabe brauchen Sie für die beidseitige Blende und wenn die nächste Reihe in die 2. Farbe gestrickt wird, Den Faden können Sie entweder folgen lassen oder abschneiden, wie Sie es am liebsten haben. Viel Spaß beim stricken!
04.05.2020 - 10:43Hola, me puedes sugerir un tutorial para usar el anillo jaquard. Es un anillo para el dedo indice de la mano izquierda, tipo resorte que perite poner dos colores de lana y tejer facilmente sin que la lana se enrede.
26.03.2020 - 23:36DROPS Design answered:
Hola Margarita. De momento no tenemos vídeos con dedal de aguja para tejer para elaborar el punto nórdico.
29.03.2020 - 23:42Hola, estoy usando el patrón 12/18-2 y quisiera saber si hay un fe de erratas. Dos personas estamos tejiendo de manera independiente y en la 5ta linea tenemos el mismo problemas con el diseño. desde ya, muchas gracias.
26.03.2020 - 23:25DROPS Design answered:
Hola Margarita. Puedes especificar tu pregunta: Cual es el problema en la 5ª fila?
29.03.2020 - 23:33Hallo, ich stricke die Größe 12/18 und habe am Ende des Musters A1 und A2 nur 175 Maschen. Leider finde ich meinen Fehler nicht - stimmt die Anzahl von 187 Maschen in der Anleitung? Danke für die Hilfe und viele Grüße
14.02.2020 - 18:34DROPS Design answered:
Liebe Inga, bei der letzte Zunahmen in A.1 haben Sie 16 Maschen, dh jetzt stricken Sie: 5 M kraus rechts (Blendemaschen), 11 x 16 Maschen (A.1 = 176 Maschen), A.2 (= 1 Masche), 5 M kraus rechts = 5+176+1+5= 187 M. Viel Spaß beim stricken!
17.02.2020 - 08:00I meant Lima yarn! 😌
09.02.2020 - 20:53Why does NECK end with finishing after a row on right side (so next row should be wrong side), but then YOKE begins with a purl row on the right side? I love this pattern - thanks so much for the design! (And I love the Lina yarn!!)
09.02.2020 - 20:51DROPS Design answered:
Dear Mindy, the US-English pattern will be edited, the yoke should start with 1 row from wrong side. Thanks for your feedback, happy knitting!
10.02.2020 - 09:46Jag har stickat norsktröjor i Drops Lima till våra tre småpojkar och fått nästan 200 gr kvar av det senapsgula. Nu vill jag sticka varsin cardigan med norskmönster till de tre flickorna och tänker ha det senapsgula som accentfärg och behöver hjälp med smakråd ang. bottenfärg. Vad tror ni om det mörkbruna nr 5610. Och i så fall, hur mycket går det åt? En av töserna är 6 månader och de andra två är 3 år. Jag köpte för mycket senaste o vill undvika det nu.
09.12.2019 - 17:53Ciao scusa mi puoi aiutare con l'inizio dello schema ? perché se faccio 11 ripetizioni da 6 m ( come scritto ) per lo schema 1 e poi aggiungo la maglia dello schema 2 non finisco con con 6 m ma me ne avanzano 3
27.11.2019 - 18:46DROPS Design answered:
Buongiorno Laura. Nella taglia più piccola ha 77 maglie. Lavora 5 m a legaccio, lo schema 1 (6 maglie) 11 volte, 1 m dello schema 2 e 5 m a legaccio. In tutto 5 + 11x6 + 1 + 5 = 77 m. Buon lavoro!
27.11.2019 - 21:38