DROPS Merino Extra Fine
100% Wool
from 4.55 $ /50g
Get the yarn to make this pattern from 27.30$.

The yarn cost is calculated from the pattern’s smallest size and the yarn’s cheapest product type. Looking for an even better price? You might find it on the DROPS Deals!

DROPS SS24

Little Missy

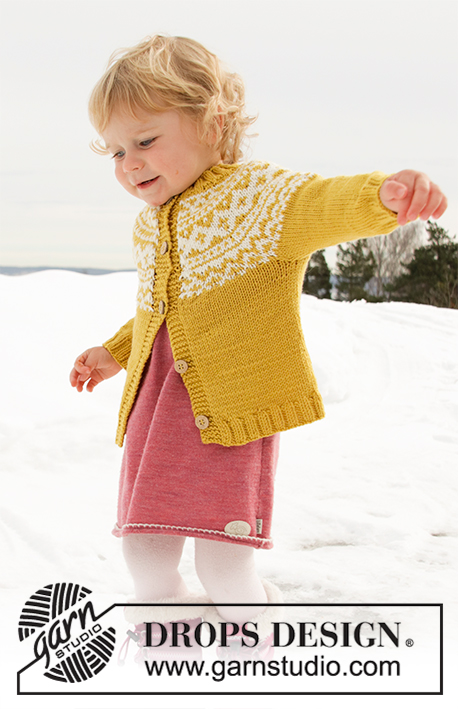
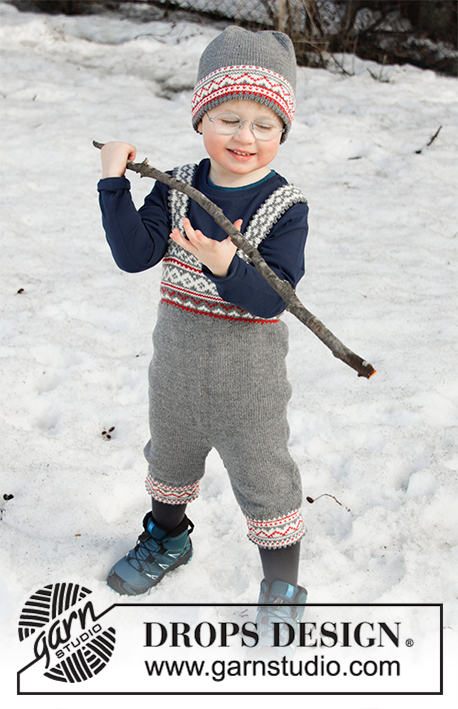
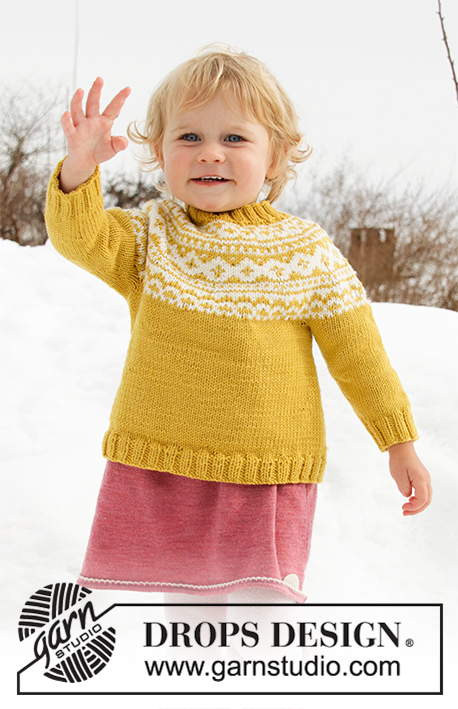
Knitted sweater for babies and children with round yoke in DROPS Merino Extra Fine. The piece is worked top down with Nordic pattern. Sizes 12 months – 12 years.

DROPS Children 32-7
DROPS Design: Pattern no me-043-bn
Yarn group B
-----------------------------------------------------------

Sizes: 12/18 months (2 - 3/4 - 5/6 - 7/8 - 9/10 - 11/12) years
The size is equivalent to approx. height of child in cm:
80/86 (92 - 98/104 - 110/116 - 122/128 - 134/140 - 146/152)
Height of child in feet: 2ft7/2ft9 (3 ft – 3ft3/3ft5 – 3ft7/3ft9 – 4ft/4ft2 – 4 ft5/4ft7 – 4ft9/4ft12
Finished measurements:
Chest measurements: 54 (58-64-68-72-76-80) cm = 21¼" (22¾"-25¼"-26¾"-28⅜"-30"-31½")
Full length: 34 (37-41-45-49-53-57) cm = 12⅜" (14½"-16⅛"-17¾"-19¼"-21"-22½")

All measurements in chart are in cm.

Materials:
DROPS MERINO EXTRA FINE from Garnstudio (belongs to yarn group B)
200 (200-200-250-250-250-300) g color 30, mustard
100 (100-100-150-150-150-150) g color 01, off white

-------------------------------------------------------
ACCESSORIES FOR THE PIECE:

KNITTING GAUGE:
21 stitches in width and 28 rows in height with stockinette stitch = 10 x 10 cm = 4" x 4".

NEEDLES:
DROPS DOUBLE POINTED NEEDLES SIZE 4 MM = US 6 – for stockinette stitch.
DROPS CIRCULAR NEEDLE SIZE 4 MM = US 6: length 40 cm = 16" and 60 cm = 24" for stockinette stitch.
DROPS DOUBLE POINTED NEEDLES SIZE 3 MM = US 2,5 – for rib on sleeves.
DROPS CIRCULAR NEEDLE SIZE 3 MM = US 2,5: length 40 cm = 16" and 60 cm = 24" for rib.
The needle size is only a guide. If you have too many stitches on 10 cm = 4", change to a larger needle size. If you have too few stitches on 10 cm = 4", change to a smaller needle size.

-------------------------------------------------------

Alternative Yarn – See how to change yarns here
Yarn Groups A to F – Use the same pattern and change the yarn here
Yarn usage using an alternative yarn – Use our yarn converter here

-------------------------------------------------------

DROPS Merino Extra Fine
100% Wool
from 4.55 $ /50g
Get the yarn to make this pattern from 27.30$.

The yarn cost is calculated from the pattern’s smallest size and the yarn’s cheapest product type. Looking for an even better price? You might find it on the DROPS Deals!

Pattern instructions

NOTE: This pattern is written in American English. All measurements in charts are in cm. For conversion from inches to cm - click here. There are different terms for crocheting in American and British English. If this pattern includes crochet, click for "crochet terms" here. For this pattern in British English, please click here.
-------------------------------------------------------

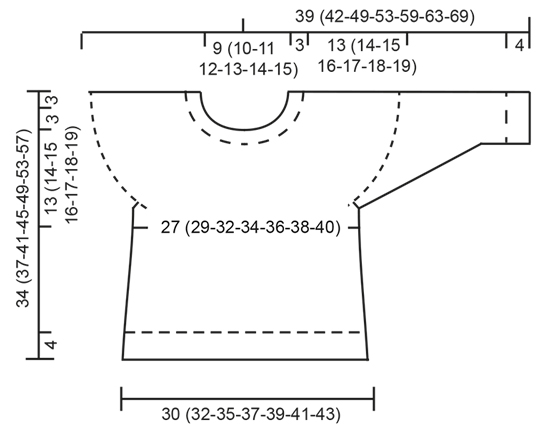
EXPLANATIONS FOR THE PATTERN:

-------------------------------------------------------

PATTERN:
See diagram A.1. Choose diagram for your size. The whole pattern is worked in stockinette stitch.

DECREASE/INCREASE TIP:
To work out when to decrease/increase evenly, count the total number of stitches on the needle (e.g. 72 stitches) and divide by the number of decreases/increases to be made (e.g. 6) = 12. In this example, decrease by working together each 11th and12th stitch, or increase after each 12th stitch by making 1 yarn over (the yarn overs are worked twisted on the next row to avoid holes).

INCREASE TIP (for sides of body):
Increase 1 stitch on each side of the marker thread as follows: Start 2 stitches before the marker thread, make 1 yarn over, knit 4 (marker thread sits in the middle of these 4 stitches), make 1 yarn over (= 2 stitches increased). Increase like this by both marker threads (4 stitches increased). On the next row work the yarn overs twisted to avoid holes.

DECREASE TIP (for mid under sleeve):
Decrease 1 stitch on each side of the marker thread as follows: Start 3 stitches before the marker thread, knit 2 together, knit 2 (marker thread sits between these 2 stitches), slip 1 stitch as if to knit, knit 1 and pass the slipped stitch over the knitted stitch (= 2 stitches decreased).

ELEVATION (back of neck):
Skip this section if you do not want an elevation. Insert 1 marker approx. mid front (i.e. after 33 (36-38-42-42-46-46) stitches).
Knit until there are 8 (8-8-10-10-12-12) stitches left before the marker, turn, tighten the strand and purl until there are 8 (8-8-10-10-12-12) stitches left on the other side, turn, tighten the strand and knit until there are 16 (16-16-18-18-20-20) stitches left, turn, tighten the strand and purl until there are 16 (16-16-18-18-20-20) stitches left on the other side. Continue by working 8 fewer stitches each time you turn 2 more times in each side, turn, tighten the strand and knit to mid back.

-------------------------------------------------------

START THE PIECE HERE:

-------------------------------------------------------

SWEATER - SHORT OVERVIEW OF THE PIECE:
The piece is worked in the round, top down. You work the yoke first which is then divided into sleeves and body. The round starts approx. mid back. The body is worked in the round with circular needle. The sleeves are worked in the round with double pointed needles.

NECK:
Cast on 72 (76-80-84-88-96-100) stitches with double pointed needles/short circular needle size 3 mm = US 2,5 and mustard (in the 2 smallest sizes, you need to cast on with double pointed needles until you have enough stitches, the other sizes can be cast on and worked with short circular needle).
Knit 1 round. Then work rib (= knit 2 / purl 2). Continue this rib for 3 cm = 1⅛".

YOKE:
Change to double pointed needles/circular needle size 4 mm = US 6.
Knit 1 round where you decrease 6 (4-3-0-4-5-9) stitches evenly on round – read DECREASE/INCREASE TIP = 66 (72-77-84-84-91-91) stitches.
You can now work an elevation in back of neck so that the yoke in slightly higher at the back. This elevation can be left out; the neck is then the same front and back – work ELEVATION – read description above, or just continue.
Work pattern according to A.1 - NOTE: Choose diagram for your size (= 11 (12-11-12-12-13-13) repeats of 6 (6-7-7-7-7-7) stitches). Continue and increase as shown in diagram.
REMEMBER THE KNITTING GAUGE! When A.1 has been completed there are 176 (192-209-228-240-260-260) stitches on the needle.
Continue with stockinette stitch and mustard. On the next round increase 7 (7-10-7-3-0-11) stitches evenly on round = 183 (199-219-235-243-260-271) stitches.
When the piece measures 13 (14-15-16-17-18-19) cm = 5⅛" (5½"-6"-6¼"-63/4"-7"-7½") mid front (measured without the neck), divide the piece as follows: Work 25 (27-30-32-34-36-38) stitches, place the next 42 (46-50-54-54-58-60) stitches on 1 thread for sleeve (without working them), cast on 8 new stitches, work 49 (53-59-63-67-72-75) stitches, place the next 42 (46-50-54-54-58-60) stitches on 1 thread for sleeve (without working them), cast on 8 new stitches and work the remaining 25 (27-30-32-34-36-38) stitches as before = 115 (123-135-143-151-160-167) stitches.

BODY:
Insert 1 marker thread in the middle of the 8 stitches cast on under each sleeve (= 57 (61-67-71-75-80-83) stitches between marker threads on front piece). THE PIECE IS NOW MEASURED FROM HERE! When the piece measures 3 cm = 1⅛" from where body and sleeves were divided, increase on each side of both marker threads – read INCREASE TIP. Repeat the increase when the piece measures 6 cm = 2⅜" and 9 cm = 2½" from where body and sleeves were divided = 127 (135-147-155-163-172-179) stitches. When the piece measures 11 (13-16-19-22-25-28) cm = 4⅜" (5⅛"-6¼"-7½"-8¾"-9¾"-11") from where body and sleeves were divided, increase 9 (9-9-9-9-8-9) stitches on next round = 136 (144-156-164-172-180-188) stitches.
Change to circular needle size 3 mm = US 2,5.
Work rib (= knit 2 / purl 2) for 4 cm = 1½". Then bind off with knit over knit and purl over purl. The whole sweater measures approx. 34 (37-41-45-49-53-57) cm = 13⅜" (14½"-16⅛"-17¾"-19¼"-21"-22½"), measured from the shoulder.

SLEEVE:
Place the stitches from the one thread on double pointed needles size 4 mm = US 6 and knit up 1 stitch in each of the 8 stitches cast on under the sleeve = 50 (54-58-62-62-66-68) stitches. Insert 1 marker thread in the middle of the 8 stitches (= mid under sleeve). THE PIECE IS NOW MEASURED FROM HERE! Work stockinette stitch in the round with mustard. When the sleeve measures 1 cm = ⅛" from where sleeve and body were divided, decrease 2 stitches mid under sleeve – read DECREASE TIP.
Decrease like this every 1½ (2-2-2½-3-3½-3½) cm = ½" (3/4"-¾"-1"-1⅛"-1⅜"-1⅜") a total of 6 (6-8-8-8-8-9) times = 38 (42-42-46-46-50-50) stitches. When the sleeve measures 14 (16-21-24-28-31-35) cm = 5½" (6¼"-8¼"-9½"-11"-12¼"-13¾") from where it was divided from the body, decrease 2 stitches evenly on round = 36 (40-40-44-44-48-48) stitches. Change to double pointed needles size 3 mm = US 2,5 and work rib in the round (= knit 2 / purl 2) for 4 cm = 1½" or to desired length.
Then bind off with knit over knit and purl over purl. The sleeve measures a total of approx.18 (20-25-28-32-35-39) cm = 7" (8"-9¾"-11"-12½"-13¾"15¼") from where it was divided from the body.
Work the other sleeve in the same way.

Diagram

All measurements in charts are in cm.

symbols = mustard
symbols = off white
symbols = between 2 stitches make 1 yarn over with background color in pattern stripe; on the next round work the yarn over twisted to avoid a hole
diagram
diagram
diagram
diagram

Each of our patterns has specific tutorial videos to help you.

Do you have a question? See a list of frequently asked questions (FAQ)

Knitting tension is what determines the final measurements of your work, and is usually measured per 10 x 10 cm. It is provided like so: number of stitches in width x number of rows in height - eg: 19 stitches x 26 rows = 10 x 10 cm.

The knitting tension is very individual; some people knit/crochet loosely while others work tightly. You adjust the knitting tension with the needle size, which is why the suggested needle size only serve as a guide! You need to adjust this (up or down) to ensure that YOUR knitting tension matches the knitting tension provided in the pattern. If you work with a different knitting tension than provided you will have a different yarn consumption, and your work will have different measurements than what the pattern suggests.

The knitting tension also determines which yarns can replace each other. As long as you achieve the same knitting tension you can replace one yarn with another.

See DROPS lesson: How to measure your tension/gauge

See DROPS video: How to make a gauge tension swatch

The required amount of yarn is provided in grams, eg: 450 g. To calculate how many balls you’ll need you first need to know how many grams are in 1 ball (25g, 50g or 100g). This information is available if you click on the individual yarn quality on our pages. Divide the amount required with the amount of each ball. For example, if each ball is 50g (the most common amount), the calculation will be as follows: 450 / 50 = 9 balls.

The important thing when changing from one yarn to another is that the knitting/crochet tension remains the same. This is so that the measurements of the finished piece will be the same as on the sketch provided. It is easier to achieve the same knitting tension using yarns from the same yarn group. It is also possible to work with multiple strands of a thinner yarn to achieve the knitting tension of a thicker one. Please try our yarn converter. We recommend you to always work a test swatch.

Please NOTE: when changing yarn the garment might have a different look and feel to the garment in the photo, due to individual properties and qualities of each yarn.

See DROPS lesson: Can I use a different yarn than the one mentioned in the pattern?

All our yarns are categorised into yarn groups (from A to F) according to thickness and knitting tension – group A contains the thinnest yarns and group F the thickest. This makes it easier for you to find alternative yarns to our patterns, should you wish to switch yarn. All yarns within the same group have a similar knitting tension and can easily replace each other. However, different yarn qualities have different structures and properties which will give the finished work a unique look and feel.

Click here for an overview of the yarns in each yarn group

At the top of all our patterns you’ll find a link to our yarn converter, which is a helpful tool should you wish to use a different yarn than suggested. By filling in the yarn quality you wish to replace, the amount (in your size) and number of strands, the converter will present good alternative yarns with the same knitting tension. Additionally it will tell you how much you’ll require in the new qualities and whether you’ll need to work with multiple strands. Most skeins are 50g (some are 25g or 100g).

If the pattern is worked with multiple colours, every colour will have to be converted separately. Similarly, if the pattern is worked with several strands of different yarns (for example 1 strand Alpaca and 1 strand Kid-Silk) you will have to find alternatives for each, individually.

Click here to see our yarn converter

Since different yarns have different qualities and textures we have chosen to keep the original yarn in our patterns. However, you can easily find options among our available qualities by using our yarn converter, or simply pick a yarn from the same yarn group.

It is possible that some retailers still have discontinued yarns in stock, or that someone has a few skeins at home that they would like to find patterns for.

The yarn converter will provide both alternative yarn as well as required amount in the new quality.

If you think it's hard to decide what size to make, it can be a good idea to measure a garment you own already and like the size of. Then you can pick the size by comparing those measures with the ones available in the pattern's size chart.

You'll find the size chart at the bottom of the pattern.

See DROPS lesson: How to read size chart

The needle size provided in the pattern serves only as a guide, the important thing is to follow the knitting tension. And since knitting tension is very individual, you will have to adjust the needle size to ensure that YOUR tension is the same as in the pattern – maybe you’ll have to adjust 1, or even 2 needle sizes, up or down to achieve the correct tension. For this, we recommend that you work test swatches.

Should you work with a different knitting tension than the one provided, the measurements of the finished garment might deviate from the measurement sketch.

See DROPS lesson: How to measure your tension/gauge

See DROPS video: How to make a gauge tension swatch

Working a garment top-down provides more flexibility and room for personal adjustment. For example it is easier to try the garment on while working, as well as making adjustments to length of yoke and shoulder caps.

The instructions are carefully explaining every step, in the correct order. Diagrams are adjusted to the knitting direction and are worked as usual.

The diagram depicts all rows/rounds, and every stitch seen from the right side. It is read from bottom to top, from right to left. 1 square = 1 stitch.

When working back and forth, every other row is worked from the right side and every other row is worked from the wrong side. When working from the wrong side, the diagram will have to be worked reversed: from left to right, knit stitches are purled, purl stitches are knit etc.

When working in the round every round is worked from the right side and the diagram are worked from right to left on all rounds.

See DROPS lesson: How to read knitting diagrams

The diagram depicts all rows/rounds, and every stitch seen from the right side. It is worked from bottom to top, from right to left.

When working back and forth every other row is worked from the right side: from right to left and every other row is worked from the wrong side: from left to right.

When working in the round, every row in the diagram are worked from the right side, from right to left.

When working a circular diagram you start in the middle and work your way outwards, counter clockwise, row by row.

The rows usually start with a given number of chain stitches (equivalent to the height of the following stitch), this will either be depicted in the diagram or explained in the pattern.

See DROPS lesson: How to read crochet diagrams

Instructions for working several diagrams after each other on the same row/round, will often be written like so: “work A.1, A.2, A.3 a total of 0-0-2-3-4 times". This means you work A.1 once, then A.2 is worked once, and A.3 is repeated (in width) the number of times provided for your size – in this case like so: S = 0 times, M = 0 times, L=2 times, XL= 3 times and XXL = 4 times.

The diagrams are worked as usual: begin with the first row in A.1, then work the first row in A.2 etc.

See DROPS lesson: How to read knitting diagrams

See DROPS lesson: How to read crochet diagrams

The total width of the garment (from wrist-to-wrist) will be larger in the larger sizes, despite the actual sleeves being shorter. The larger sizes have longer sleeve caps and wider shoulders, so there will be a good fit in all sizes.

The measurement sketch/schematic drawing provides information regarding the full length of the garment. If it’s a jumper or a jacket the length is measured from the highest point on the shoulder (usually closest to the neckline), and straight down to the bottom of the garment. It is NOT measured from the tip of shoulder. Similarly, the length of yoke is measured from the highest point on the shoulder and down to where yoke is split into body and sleeves.

See DROPS lesson: How to read a schematic drawing

Diagrams are often repeated on the round or in height. 1 repeat is the diagram the way it appears in the pattern. If it says to work 5 repeats of A.1 in the round, then you work A.1 a total of 5 times after/next to each other in the round. If it says to work 2 repeats of A.1 vertically/in height you work the entire diagram once, then begin again at the start and work the entire diagram one more time.

Chain stitches are slightly narrower than other stitches and to avoid working the cast-on edge too tight, we simply chain more stitches to begin with. The stitch count will be adjusted on the following row to fit the pattern and measurement sketch.

The rib edge is more elastic and will contract slightly compared to, for example, stocking stitch. By increasing before the rib edge, you avoid a visible difference in width between the rib edge and the rest of the body.

It’s very easy to cast off too tightly, and by making yarn overs while casting off (and simultaneously casting these off) you avoid a too tight cast off edge.

See DROPS video: How to bind off with yarn overs (yo)

To achieve an even increase (or decrease) you can increase on, for example: every 3rd and 4th row alternately, like so: work 2 rows and increase on the 3rd row, work 3 rows and increase on the 4th. Repeat this until the increase is complete.

See DROPS lesson: Increase or decrease 1 st on every 3rd and 4th row alternately

Should you prefer to work in the round instead of back and forth, you may of course adjust the pattern. You’ll need to add steeks mid-front (usually 5 stitches), and follow the instructions. When you would normally turn and work from the wrong side, simply work across the steek and continue in the round. At the end you’ll cut the piece open, pick up stitches to work bands, and cover the cut edges.

See DROPS video: How to knit steeks and cut open

Should you prefer to work back and forth instead of in the round, you may of course adjust the pattern so you work the pieces separately and then assemble them at the end. Divide the stitches for the body in 2, add 1 edge stitch in each side (for sewing) and work the front and back pieces separately.

See DROPS lesson: Can I adapt a pattern for circular needles into straight needles?

Pattern repeats can vary slightly in the different sizes, in order to get the correct proportions. If you’re not working the exact same size as the garment in the photo, yours might deviate slightly. This has been carefully developed and adjusted so that the complete impression of the garment is the same in all sizes.

Make sure to follow instructions and diagrams for your size!

If you have found a pattern you like which is available in women’s size it’s not very difficult to convert it to men’s size. The biggest difference will be the length of sleeves and body. Start working on the women size that you think would fit across the chest. The additional length will be worked right before you cast off for the armhole/sleeve cap. If the pattern is worked top-down you can add the length right after the armhole or before the first decrease on sleeve.

Regarding additional yarn amount, this will depend on how much length you add, but it is better with a skein too many than too few.

All yarns will have excess fibres (from production) that might come off as lint or shedding. Brushed yarns (ie hairier yarns) have more of these loose, excess fibres, causing more shedding.

Shedding also depends on what is worn under or over the garment, and whether this pulls at the yarn fibres. It’s therefore not possible to guarantee that there will be no shedding

Below are some tips on how to get the best result when working with hairier yarns:

1. When the garment is finished (before you wash it) shake it vigorously so the looser hairs come off. NOTE: do NOT use a lint roller, brush or any method that pulls at the yarn.

2. Place the garment in a plastic bag and put it in your freezer - the temperature will cause the fibres to become less attached to each other, and excess fibres will come off easier.

3. Leave in the freezer for a few hours before taking it out and shaking it again.

4. Wash the garment according to the instructions on the yarn label.

Pilling is a natural process that happens to even the most exclusive of fibers. It's a natural sign of wear and tear that is hard to avoid, and that is most visible in high friction areas of your garment like a sweater's arms and cuffs.

You can make your garment look as new by removing the pilling, using a fabric comb or a pill/lint remover.

Still can't find the answer you need? Then scroll down and leave your question so one of our experts can try to help you. This will be done normally within 5 to 10 working days.
In the meantime, you can read the questions and answers that others have left to this pattern or join the DROPS Workshop on Facebook to get help from fellow knitters/crocheters!

You might also like...

Little Missy

Minna, Sweden

Little Missy

Amma Knitwear, Netherlands

Little Missy

ammaknitwear, Netherlands

Little Missy

Alyssa, Canada

Little Missy

Léa, France

Little Missy

Naomi, United Kingdom

Little Missy

DonaLenka, Czech Republic

Little Missy

anasboutique, Romania

Post a comment to pattern DROPS Children 32-7

We would love to hear what you have to say about this pattern!

If you want to leave a question, please make sure you select the correct category in the form below, to speed up the answering process. Required fields are marked *.

Comments / Questions (87)

country flag Dorte wrote:

Jeg har ikke held med at få mønsteret til at passe sammen på ryggen. Altså når jeg går fra en pind til næste pind. Den er altid en række ved siden af, så de ikke matcher. Hvordan løser jeg det?

31.03.2022 - 17:29

DROPS Design answered:

Hei Dorte. Om du har det maskeantallet det skal være i den størrelsen du strikker, så strikkes det 11-12-11-12-12-13 eller 13 hele rapporter av diagrammet, slik at det matcher ved omgangs skriftet. mvh DROPS Design

04.04.2022 - 13:53

country flag Fanny Barreto wrote:

Je le trouve trop beau ce petit pull

04.12.2021 - 11:21

country flag Aude wrote:

Bonjour, Je tricote le pull en 3/4 ans. J’arrive à l’étape de séparation des manches et je n’ai pas fini le diagramme A1. Je ne comprends pas très bien comment je dois le finir sur les manches, le dos et le devant

26.10.2021 - 17:12

DROPS Design answered:

Bonjour Aude, vous pouvez arreter le jacquard et continuer en une couleur ou continuer le jacquard. Si il y a des differences, placez-les sous les manches / sur les cotes du pull, pour qu'elles se soient pas visibles. Bon tricot!

26.10.2021 - 17:27

country flag Eva Britt wrote:

Jag har börjat sticka Littfest Missy tröja. Tröjan stickas uppifrån och ner. När jag kommer till diagrammet A1 börjat första raden med att sticka 7 maskor och ett omslag. Det gör man i 12 rapporter.Andra varvet inga ökningar. På femte varvet börjar problemet. Hur görs ökningar. år det inte att sztämma. Jag stickar storlek 7/8. Ska jag börja med ett omslag och sticka rapporten ut och ett omslag och sticka rapporten ut. Jag stickar med gult garn i botten och vitt som mönster.

18.06.2021 - 11:09

DROPS Design answered:

Hej Eva Britt. Ja det stämmer, på 5e varvet gör du ett omslag och stickar sedan 8 maskor (i färg enligt diagrammet) och detta upprepas hela varvet ut. Mvh DROPS Design

18.06.2021 - 13:26

country flag Montse Gamo wrote:

Hola buenos días. Estoy realizando el jersey para niños (patrón me-043-bn) talla 3/4 Al finalizar el canesú tenia que haber obtenido 209 puntos pero en mi labor solo tengo 171 puntos (no he realizado la elevación) creo haber seguido correctamente el diagrama 7 (3/4). No se donde tengo el error. Gracias

04.04.2021 - 19:46

DROPS Design answered:

Hola Montse, todos los aumentos están incluidos en el diagrama. Para la talla de 3/4, en el diagrama A.1 tienes que pasar de 7 puntos iniciales, tras todos los aumentos, a repeticiones de 19 puntos, que tienen que cuadrar con los 209 puntos totales.

07.04.2021 - 23:53

country flag Belén wrote:

Bonjour, je n'arrive pas à trouve le diagramme pour faire le dessin. Pouvez vous m'aider ?. Merci

15.03.2021 - 17:35

DROPS Design answered:

Bonjour Mme Belén, nous rencontrons actuellement des problèmes avec le chargement des images sur notre site et travaillons à la résolution de ce problème. Merci pour votre compréhension et patience.

16.03.2021 - 08:20

country flag Outi wrote:

Miten tehdään lisäykset koossa 3/4..tai toisin sanoen miten monta kertaa kierroksella lisätään ka miten nuo kuviot saa onnistumaan lisäyskierroksella.

03.03.2021 - 06:59

DROPS Design answered:

Koossa 3/4 kerrokselle tulee 11 piirroksen A.1 mallikertaa. Esim. 1.kerroksella työhön lisätään tällöin 22 silmukkaa (2 silmukkaa joka mallikerrassa). Seuraavalla kerroksella langankierrot neulotaan kiertäen piirroksen mukaisesti.

23.03.2021 - 16:35

country flag Sammie wrote:

Ik heb deze trui bijna af. Op één plaats wordt het niet zo mooi en dat is de plaats waar ik 8 extra steken heb opgezet (met lussen) en later bij het begin van het breien van de mouw deze steken heb opgenomen. Aan weerszijden van deze plek is het heel los en/of zit er een gat (bij beide mouwen). Ik wil twee van deze truien breien. Hoe kan ik voorkomen dat dit bij de tweede trui weer gebeurt?

08.02.2021 - 21:31

DROPS Design answered:

Dag Sammie,

Zorg er in ieder geval voor dat als je de lussen maakt, de draad goed aantrekt, zodat er geen hyaat komt. Ook kun je de lussen met een extra draai in de draad opzetten. Je kunt de ontstane gaatjes later ook dicht naaien.

27.03.2021 - 15:51

country flag Andrea wrote:

Bonjour, Je tricote actuellement ce pull en taille 9/10 ans, et je pense qu'il y a un erreur dans la quantité de laine! J'ai eu besoin que de 2 pelotes pour le motif, mais par contre je viens de débuter la 5eme pelote de la couleur principale pour les cotes en bas du pull. Ca m'étonnerait que je puisse finir les manches avec cette dernière pelote...

25.12.2020 - 16:18

country flag Léa B wrote:

Hello, on the pattern it is said : "between 2 stitches make 1 yarn over with background colour in pattern stripe;" and I am not quite sure what background are we talking about. Is it 1. the main colour of the pattern (for example here mustard) or 2. the "counter" colour of the patern (for example, between two mustard stitches, the yarn over will be off white ? Thank you very much, Léa

21.12.2020 - 13:39

DROPS Design answered:

Dear Léa, this will apply to the colour of the background in pattern stripe, ie if the background colour on the row is mustard (= row 1 for example), make the yarn over with mustard, if the colour is off white (= row 5 for example), make the yarn over with off white. Happy knitting!

21.12.2020 - 14:16