
Popular categories
Looking for a yarn?


|
|
Evening Promenade |
|
|
|
|
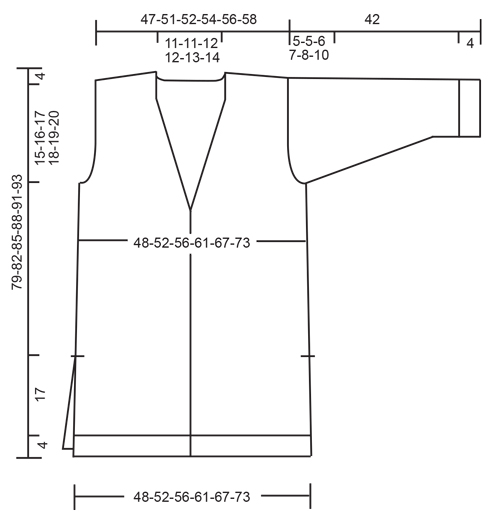
Jacket with deep v-neck and pockets in DROPS Air. Size: S - XXXL
DROPS 176-14 |
|
|
GARTER STITCH (back and forth): 1 ridge = knit 2 rows. DECREASE TIP (applies to neck): Decrease inside 7 band stitches in garter stitch. All decreases are done from the right side. Decrease as follows after 7 band stitches: Slip 1 stitch knitwise, knit 1, pass slipped stitch over stitch worked. Decrease as follows before 7 band stitches: Knit 2 together. INCREASE TIP: Increase 1 stitch by making 1 yarn over, on next row work yarn over twisted to avoid holes. BUTTONHOLES: Decrease for buttonholes on right band. 1 BUTTONHOLE = knit third and fourth stitch from edge together and make 1 yarn over. On next row knit yarn over = hole. Decrease for buttonholes when piece measures: S: 6, 15, 23, 31, 39, 47 and 55 cm M: 5, 13, 22, 30, 39, 47 and 56 cm L: 5, 14, 23, 32, 41, 50 and 59 cm XL: 4, 12, 20, 28, 36, 44, 52 and 60 cm XXL: 3, 11, 20, 28, 37, 45, 54 and 62 cm XXXL: 5, 13, 22, 30, 38, 46, 55 and 63 cm ---------------------------------------------------------- BACK PIECE: Work piece back and forth on circular needle. Cast on 90-98-106-114-122-134 stitches on circular needle size 4.5 mm / US 7 with Air. Purl 1 row from wrong side, then work as follows - from right side: 4 stitches in GARTER STITCH - see explanation above, knit 2, * purl 2, knit 2 *, repeat from *-* until 4 stitches remain, finish with 4 stitches in garter stitch. Work rib and garter stitch for 4 cm / 1½", then switch to circular needle size 5 mm / US 8. Knit 1 row with 4 stitches in garter stitch in each side while decreasing 8-10-10-10-8-10 stitches evenly, do not decrease over stitches in garter stitches = 82-88-96-104-114-124 stitches. Continue in stockinette stitch with 4 stitches in garter stitch in each side. REMEMBER THE KNITTING GAUGE When piece measures 21 cm / 8¼", cast on 1 edge stitch in each side at the end of the next 2 rows = 84-90-98-106-116-126 stitches. Then work in stockinette stitch with 1 edge stitch in garter stitch in each side of piece. When piece measures 60-62-64-66-68-69 cm / 23½"-24½"-25¼"-26"-26¾"-27", bind off for armholes in each side on every other row as follows: 2-2-3-3-3-3 stitches 1 time, 2 stitches 0-0-1-2-3-4 times and 1 stitch 0-0-0-0-1-3 times = 80-86-88-92-96-98 stitches. When piece measures 75-78-81-84-87-89 cm / 29½"-30¾"-32"-33"-34¼"-35", begin by working in garter stitch over neck AT THE SAME TIME begin bind off for diagonal shoulder. Work as follows: NECK: Work 3 ridges over the middle 30-30-32-32-34-36 stitches (work the other stitches as before) then bind off the middle 16-16-18-18-20-22 stitches for neck and finish each shoulder separately. Then decrease 1 stitch inside 7 stitches in garter stitch on next row towards neck - Read DECREASE TIP! DIAGONAL SHOULDER: bind off on every other row for diagonal shoulder as follows: 6-6-6-7-7-7 stitches 4 times, 7-10-10-8-9-9 stitches 1 time (= 31-34-34-36-37-37 stitches in total bind off for diagonal shoulder.) Repeat in the other side. RIGHT FRONT PIECE: Work piece back and forth on circular needle. Cast on 53-57-61-65-69-73 stitches (including 7 band stitches) on circular needle size 4.5 mm / US 7 with Air. Purl 1 row from wrong side, then work as follows - from right side: 7 band stitches in garter stitch, knit 2, * purl 2, knit 2 *, repeat from *-* until 4 stitches remain, finish with 4 stitches in garter stitch. Work rib and garter stitch for 4 cm / 1½" - REMEMBER BUTTONHOLE - see explanation above. Then switch to circular needle size 5 mm / US 8. Work 1 row in stockinette stitch with garter stitch in each side while decreasing 5-6-6-6-5-4 stitches evenly, do not decrease over stitches in garter stitches = 48-51-55-59-64-69 stitches. Continue in stockinette stitch with garter stitch in each side as before. REMEMBER THE KNITTING GAUGE When piece measures 21 cm / 8¼", cast on 1 edge stitch at the end of next row from right side = 49-52-56-60-65-70 stitches. Then work in stockinette stitch with 7 band stitches in garter stitch and 1 edge stitch in garter stitch in the side. When piece measures 57-58-60-62-64-65 cm / 22½"-22¾"-23½"-24½"-25¼"-25½", decrease for neck inside 7 band stitches - REMEMBER DECREASE TIP. Repeat decrease every 4th row 3-4-4-5-5-5 times in total and every other row 13-12-13-12-13-14 times in total - AT THE SAME TIME when piece measures 60-62-64-66-68-69 cm / 23½"-24½"-25¼"-26"-26¾"-27", bind off for armhole at the beginning of every row from wrong side as on back piece. When bind off for armhole and decrease for neck are done, there are 31-34-34-36-37-37 stitches on needle. When piece measures 75-78-81-84-87-89 cm / 29½"-30¾"-32"-33"-34¼"-35", bind off for diagonal shoulder as on back piece. LEFT FRONT PIECE: Cast on and work as right front piece but reversed. I.e. Bind off for armhole at beginning of row from right side. Decrease for neck inside band stitches at the end of row from right side. Bind off for diagonal shoulder at beginning of row from right side. Do not decrease for buttonholes. SLEEVE: Work piece back and forth on circular needle. Cast on 38-38-42-42-46-46 stitches (including 1 edge stitch in each side) on circular needle size 4.5 mm / US 7 with Air. Purl 1 row from wrong side, then work rib (= knit 2/purl 2) with 1 edge stitch in garter stitch in each side. Work rib for 4 cm / 1½", then switch to circular needle size 5 mm / US 8. Knit 1 row while decreasing 4 stitches evenly = 34-34-38-38-42-42 stitches. Then work in stockinette stitch with 1 edge stitch in garter stitch in each side. When piece measures 7-7-6-6-6-7 cm / 2¾"-2¾"-2⅜"-2⅜"-2⅜"-2¾", increase 1 stitch on each side – see INCREASE TIP. Repeat increase every 5½-4-4-3-2½-2 cm / 2¼"-1½"-1½"-1⅛"-⅞"-¾" 6-8-8-10-11-12 times in total = 46-50-54-58-64-66 stitches. When piece measures 37-37-36-35-34-32 cm / 14½"-14½"-14¼"-13¾"-13⅜"-12½" (shorter measurements in the larger sizes because of longer sleeve cap and wider shoulders), bind off for sleeve cap at beginning of every row in each side as follows: bind off 3 stitches 1 time, 2 stitches 4-4-3-5-6-8 times, then bind off 3 stitches in each side until piece measures approx. 42 cm / 16½" in all sizes. Bind off. Work another sleeve. ASSEMBLY: Sew the shoulder seams. Sew in sleeves. Sew sleeve seams and side seams in one inside 1 edge stitch down to ridges in the side (= 21 cm / 8¼" vent). Sew the buttons on to the left band. POCKET: Worked back and forth. Cast on 38-38-38-40-40-40 stitches (including 1 edge stitch in each side) on circular needle size 5 mm / US 8 with Air. Knit 1 row from wrong side. Then work in stockinette stitch with 1 edge stitch in garter stitch in each side until piece measures 18-18-18-20-20-20 cm / 7"-7"-7"-8"-8"-8". Work 2 ridges, bind off. Work another pocket the same way. Sew pockets on to front piece, approx. 13-13-13-14-14-14 cm / 5"-5"-5"-5½"-5½"-5½" from bottom edge and 7-7-8-8-9-9 cm/ 2¾"-2¾"-3"-3"-3½"-3½" in from mid front. |
|
|
|
|
Have you made this or any other of our designs? Tag your pictures in social media with #dropsdesign so we can see them! Do you need help with this pattern?You'll find tutorial videos, a Comments/Questions area and more by visiting the pattern on garnstudio.com. © 1982-2024 DROPS Design A/S. We reserve all rights. This document, including all its sub-sections, has copyrights. Read more about what you can do with our patterns at the bottom of each pattern on our site. |


With over 40 years in knitting and crochet design, DROPS Design offers one of the most extensive collections of free patterns on the internet - translated to 17 languages. As of today we count 304 catalogs and 11422 patterns - 11417 of which are translated into English (US/in).
We work hard to bring you the best knitting and crochet have to offer, inspiration and advice as well as great quality yarns at incredible prices! Would you like to use our patterns for other than personal use? You can read what you are allowed to do in the Copyright text at the bottom of all our patterns. Happy crafting!
Comments / Questions (53)
Mooi garen om te breien en te dragen, maar jullie adviseren te veel aan het aantal bolletjes garen.
30.04.2017 - 22:41Buongiorno. ma le 4 maglie a legaccio laterali le devo lavorare soltanto fino a 21 cm.? Grazie per l'attenzione buona serata
22.04.2017 - 19:37DROPS Design answered:
Buonasera Donatella. Sì esatto, lavora le 4 m a legaccio per 21 cm. Sono i bordi degli spacchi. Alla fine, quando confezionerà il modello, lascerà non cuciti gli ultimi 21 cm per gli spacchi laterali. Buon lavoro!
22.04.2017 - 21:31Der står således i opskriften: "...Slå 90-98-106-114-122-134 masker op på rundpind 4,5 med Air. Strik 1 pind vrang fra vrangen.." Men når jeg har slået maskerne op, er jeg da på retsiden. Skal jeg så bare strikke en pind ret, og derefter den angivne pind vrang?
17.04.2017 - 00:01DROPS Design answered:
Hej Line, det er forskelligt hvad man anser for at være retsiden og vrangen. Du vælger bare den side til retsiden som du synes er finest. Det vigtigste er at du følger opskriften når vi skriver "strik således fra retsiden". God fornøjelse!
28.04.2017 - 08:53Goedemiddag, Ik ben ook bij de schouders van het achterpand aan gekomen en begonnen met afkanten van de steken voor de schouders. Maar boven de 7 steken ribbels komen nu tricotsteken, klopt dit? Of moet ik die 7 steken in ribbelsteek breien?
15.04.2017 - 11:25DROPS Design answered:
Beste Jenny, De 7 steken aan de kant van de hals blijf je in ribbels breien, zodat de bies rondom op de panden doorloopt. Het minderen doe je naast de 7 ribbel(/biessteken). Zie 'tip voor het minderen'.
16.04.2017 - 11:55Brei tot een hoogte van 57-58-60-62-64-65 cm, minder voor de hals naast 7 voorbiessteken - DENK OM DE TIP VOOR HET MINDEREN. Herhaal dit minderen elke 4e naald 3-4-4 ZIJN DIT HET AANTAL STEKEN? EN HOEVEEL ST. VOOR HET ARMSGAT (VOORPAND)
27.02.2017 - 09:32DROPS Design answered:
Hoi Wilhelmina. Lees eerst TIP VOOR HET MINDEREN. Hier staat hoe je moet minderen. In het patroon staat er dat je mindert 3-4-4-5-5 of 5 KEER (afhankelijk van welke maat je maakt) in elke 4e nld en daarna 13-12-13-12-13 of 14 keer in elke 2e nld. Je mindert 1 st per keer, dus bijvoorbeeld maat S heb je in totaal 16 keer 1 st minderen. Je mindert op het voorpand op dezelfde manier als op het achterpand.
27.02.2017 - 14:35Ik heb een vraag zit met het afkanten voor de schuine schouders van dit vest moet dit aan de hals of aan de anderen kant? gr. wilhelmina
23.02.2017 - 13:37DROPS Design answered:
Hoi Wilhelmina. Je kant af van de schouderzijde
23.02.2017 - 13:55W opisie tyłu jest zdanie(...)w tym samym czasie równomiernie zamykając 8-10-10-10-8-10 oczek(...). Czy mam rozumieć, że dla rozmiaru M należy mniej więcej co 10 oczko w całym rzędzie przerobić razem dwa oczka?
19.02.2017 - 11:39DROPS Design answered:
Witaj Ireno! Jest dokładnie tak jak piszesz. POWODZENIA
19.02.2017 - 17:24Ik kom niet uit het stuk van het achterpand van de hals en de schouders. Ik ben bij het stuk tot 75cm breien. Ik heb het al aantal keren gelezen maar snap niet of ik nu 6 pennen moet breien voor de ribbels in de hals en dan de minderingen voor de schouders of dat het tegelijk moet
04.02.2017 - 14:13DROPS Design answered:
Hoi Prescill. Je breit 3 ribbels (dus 6 nld ribbelst) over de middelste 30 st (je hebt 80 st in totaal dus 25 st voor elke schouder). Na de 3 ribbels kan je de middelste 16 st af - je hebt dan 7 ribbelst aan elke kant van de halsopening + 25 st voor de schouder. Je mindert nu 1 st naast de 7 ribbelst zoals beschreven onder TIP VOOR HET MINDEREN (voor de hals) = dit is hoe je moet minderen voor of na de 7 ribbels. Daarna kant je af (dus ook de ribbels) in elke 2 nld van de schouderkant: 4 keer 6 st, 1 keer 7 st. Je breit de schouders apart.
06.02.2017 - 13:48Ik kan niet wachten! Wat een mooi model.
23.01.2017 - 08:32Ein sehr schönes, zeitloses Model und für das Garn gut geeignet
10.01.2017 - 18:20