
Popular categories
Looking for a yarn?


|
|
Evening Promenade |
|
|
|
|
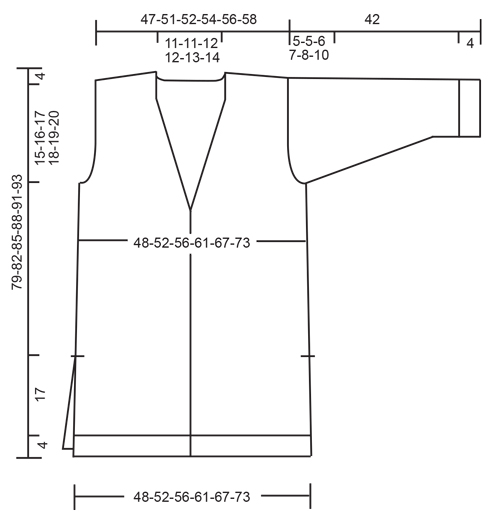
Jacket with deep v-neck and pockets in DROPS Air. Size: S - XXXL
DROPS 176-14 |
|
|
GARTER STITCH (back and forth): 1 ridge = knit 2 rows. DECREASE TIP (applies to neck): Decrease inside 7 band stitches in garter stitch. All decreases are done from the right side. Decrease as follows after 7 band stitches: Slip 1 stitch knitwise, knit 1, pass slipped stitch over stitch worked. Decrease as follows before 7 band stitches: Knit 2 together. INCREASE TIP: Increase 1 stitch by making 1 yarn over, on next row work yarn over twisted to avoid holes. BUTTONHOLES: Decrease for buttonholes on right band. 1 BUTTONHOLE = knit third and fourth stitch from edge together and make 1 yarn over. On next row knit yarn over = hole. Decrease for buttonholes when piece measures: S: 6, 15, 23, 31, 39, 47 and 55 cm M: 5, 13, 22, 30, 39, 47 and 56 cm L: 5, 14, 23, 32, 41, 50 and 59 cm XL: 4, 12, 20, 28, 36, 44, 52 and 60 cm XXL: 3, 11, 20, 28, 37, 45, 54 and 62 cm XXXL: 5, 13, 22, 30, 38, 46, 55 and 63 cm ---------------------------------------------------------- BACK PIECE: Work piece back and forth on circular needle. Cast on 90-98-106-114-122-134 stitches on circular needle size 4.5 mm / US 7 with Air. Purl 1 row from wrong side, then work as follows - from right side: 4 stitches in GARTER STITCH - see explanation above, knit 2, * purl 2, knit 2 *, repeat from *-* until 4 stitches remain, finish with 4 stitches in garter stitch. Work rib and garter stitch for 4 cm / 1½", then switch to circular needle size 5 mm / US 8. Knit 1 row with 4 stitches in garter stitch in each side while decreasing 8-10-10-10-8-10 stitches evenly, do not decrease over stitches in garter stitches = 82-88-96-104-114-124 stitches. Continue in stockinette stitch with 4 stitches in garter stitch in each side. REMEMBER THE KNITTING GAUGE When piece measures 21 cm / 8¼", cast on 1 edge stitch in each side at the end of the next 2 rows = 84-90-98-106-116-126 stitches. Then work in stockinette stitch with 1 edge stitch in garter stitch in each side of piece. When piece measures 60-62-64-66-68-69 cm / 23½"-24½"-25¼"-26"-26¾"-27", bind off for armholes in each side on every other row as follows: 2-2-3-3-3-3 stitches 1 time, 2 stitches 0-0-1-2-3-4 times and 1 stitch 0-0-0-0-1-3 times = 80-86-88-92-96-98 stitches. When piece measures 75-78-81-84-87-89 cm / 29½"-30¾"-32"-33"-34¼"-35", begin by working in garter stitch over neck AT THE SAME TIME begin bind off for diagonal shoulder. Work as follows: NECK: Work 3 ridges over the middle 30-30-32-32-34-36 stitches (work the other stitches as before) then bind off the middle 16-16-18-18-20-22 stitches for neck and finish each shoulder separately. Then decrease 1 stitch inside 7 stitches in garter stitch on next row towards neck - Read DECREASE TIP! DIAGONAL SHOULDER: bind off on every other row for diagonal shoulder as follows: 6-6-6-7-7-7 stitches 4 times, 7-10-10-8-9-9 stitches 1 time (= 31-34-34-36-37-37 stitches in total bind off for diagonal shoulder.) Repeat in the other side. RIGHT FRONT PIECE: Work piece back and forth on circular needle. Cast on 53-57-61-65-69-73 stitches (including 7 band stitches) on circular needle size 4.5 mm / US 7 with Air. Purl 1 row from wrong side, then work as follows - from right side: 7 band stitches in garter stitch, knit 2, * purl 2, knit 2 *, repeat from *-* until 4 stitches remain, finish with 4 stitches in garter stitch. Work rib and garter stitch for 4 cm / 1½" - REMEMBER BUTTONHOLE - see explanation above. Then switch to circular needle size 5 mm / US 8. Work 1 row in stockinette stitch with garter stitch in each side while decreasing 5-6-6-6-5-4 stitches evenly, do not decrease over stitches in garter stitches = 48-51-55-59-64-69 stitches. Continue in stockinette stitch with garter stitch in each side as before. REMEMBER THE KNITTING GAUGE When piece measures 21 cm / 8¼", cast on 1 edge stitch at the end of next row from right side = 49-52-56-60-65-70 stitches. Then work in stockinette stitch with 7 band stitches in garter stitch and 1 edge stitch in garter stitch in the side. When piece measures 57-58-60-62-64-65 cm / 22½"-22¾"-23½"-24½"-25¼"-25½", decrease for neck inside 7 band stitches - REMEMBER DECREASE TIP. Repeat decrease every 4th row 3-4-4-5-5-5 times in total and every other row 13-12-13-12-13-14 times in total - AT THE SAME TIME when piece measures 60-62-64-66-68-69 cm / 23½"-24½"-25¼"-26"-26¾"-27", bind off for armhole at the beginning of every row from wrong side as on back piece. When bind off for armhole and decrease for neck are done, there are 31-34-34-36-37-37 stitches on needle. When piece measures 75-78-81-84-87-89 cm / 29½"-30¾"-32"-33"-34¼"-35", bind off for diagonal shoulder as on back piece. LEFT FRONT PIECE: Cast on and work as right front piece but reversed. I.e. Bind off for armhole at beginning of row from right side. Decrease for neck inside band stitches at the end of row from right side. Bind off for diagonal shoulder at beginning of row from right side. Do not decrease for buttonholes. SLEEVE: Work piece back and forth on circular needle. Cast on 38-38-42-42-46-46 stitches (including 1 edge stitch in each side) on circular needle size 4.5 mm / US 7 with Air. Purl 1 row from wrong side, then work rib (= knit 2/purl 2) with 1 edge stitch in garter stitch in each side. Work rib for 4 cm / 1½", then switch to circular needle size 5 mm / US 8. Knit 1 row while decreasing 4 stitches evenly = 34-34-38-38-42-42 stitches. Then work in stockinette stitch with 1 edge stitch in garter stitch in each side. When piece measures 7-7-6-6-6-7 cm / 2¾"-2¾"-2⅜"-2⅜"-2⅜"-2¾", increase 1 stitch on each side – see INCREASE TIP. Repeat increase every 5½-4-4-3-2½-2 cm / 2¼"-1½"-1½"-1⅛"-⅞"-¾" 6-8-8-10-11-12 times in total = 46-50-54-58-64-66 stitches. When piece measures 37-37-36-35-34-32 cm / 14½"-14½"-14¼"-13¾"-13⅜"-12½" (shorter measurements in the larger sizes because of longer sleeve cap and wider shoulders), bind off for sleeve cap at beginning of every row in each side as follows: bind off 3 stitches 1 time, 2 stitches 4-4-3-5-6-8 times, then bind off 3 stitches in each side until piece measures approx. 42 cm / 16½" in all sizes. Bind off. Work another sleeve. ASSEMBLY: Sew the shoulder seams. Sew in sleeves. Sew sleeve seams and side seams in one inside 1 edge stitch down to ridges in the side (= 21 cm / 8¼" vent). Sew the buttons on to the left band. POCKET: Worked back and forth. Cast on 38-38-38-40-40-40 stitches (including 1 edge stitch in each side) on circular needle size 5 mm / US 8 with Air. Knit 1 row from wrong side. Then work in stockinette stitch with 1 edge stitch in garter stitch in each side until piece measures 18-18-18-20-20-20 cm / 7"-7"-7"-8"-8"-8". Work 2 ridges, bind off. Work another pocket the same way. Sew pockets on to front piece, approx. 13-13-13-14-14-14 cm / 5"-5"-5"-5½"-5½"-5½" from bottom edge and 7-7-8-8-9-9 cm/ 2¾"-2¾"-3"-3"-3½"-3½" in from mid front. |
|
|
|
|
Have you made this or any other of our designs? Tag your pictures in social media with #dropsdesign so we can see them! Do you need help with this pattern?You'll find tutorial videos, a Comments/Questions area and more by visiting the pattern on garnstudio.com. © 1982-2024 DROPS Design A/S. We reserve all rights. This document, including all its sub-sections, has copyrights. Read more about what you can do with our patterns at the bottom of each pattern on our site. |


With over 40 years in knitting and crochet design, DROPS Design offers one of the most extensive collections of free patterns on the internet - translated to 17 languages. As of today we count 304 catalogs and 11422 patterns - 11417 of which are translated into English (US/in).
We work hard to bring you the best knitting and crochet have to offer, inspiration and advice as well as great quality yarns at incredible prices! Would you like to use our patterns for other than personal use? You can read what you are allowed to do in the Copyright text at the bottom of all our patterns. Happy crafting!
Comments / Questions (53)
Worden de mouwen bovenaan wel wijd genoeg? Zijn namelijk smaller dan in andere patronen, als je de tekening bekijkt.
17.11.2017 - 23:07DROPS Design answered:
Hallo Marlies, Inderdaad, je zou wel eens gelijk kunnen hebben. Ik heb het even doorgegeven aan design afdeling om na te kijken en eventueel aan te passen.
27.11.2017 - 09:50Når jeg har fellet 22 masker til hals/nakke (største størrelsen) Da sitter jeg med 38 masker på hver side. Da skal jeg felle av til skrå skulder, 6 masker på hver skulder. Da har jeg 32 masker igjen. I oppskriften står er 37 masker. Så hva gjør jeg feil
12.09.2017 - 22:05DROPS Design answered:
Hei Trine. Du har 38 masker på hver side, nå strikkes hver skulder for seg selv. Du skal felle på hver 2. pinne slik: fell 7 masker 4 ganger (= 28 masker felt), så skal du felle 9 masker 1 gang = 28+9 = 37 felte masker. Du har nå 1 maske igjen på pinnen, dra tråden igjennom og du er ferdig med den ene siden. Gjør samme fellingen på andre side. God Fornøyelse!
20.09.2017 - 09:40Dzień dobry. Nie rozumiem zapisu dotyczącego zamykania dekoltu. "Powtórzyć zamykanie oczek w sumie 3-4-4-5-5-5 razy co 4 rzędy i w sumie 13-12-13-12-13-14 razy co 2 rzędy". Czy to oznacza, że mam zamykać po jednym oczku co 4 rzędy i powtórzyć to 4 razy, a zamykanie co drugi rząd powtórzyć 12 razy? Czy może mam zamknąć 4 oczka co 4 rzędy i 12 oczek co dwa rzędy? Ile razy mam powtórzyć taką operację?
08.09.2017 - 19:08DROPS Design answered:
Witaj Magdo, w rozmiarze M musisz zamykać po 1 oczku co 4 rzędy i powtórzyć to 4 razy, a następnie zamykać 1 oczko co 2 rzędy i powtórzyć to 12 razy. Miłej pracy!
11.09.2017 - 17:30(Overigens stelde ik mijn vraag op 25-8 jl. onder de naam Asziane)
29.08.2017 - 08:42(In reactie op uw antwoord op mijn. vraag van 26-8 jl.) U gaat uit van het voorpand maar ik ben nog met het achterpand bezig. Ik heb nadat er voor de armsgaten is afgekant toch echt 86 steken over om uiteindelijk aan de hals + schuine schouders te beginnen. 86 - 30st. (Hals) =56 st. waardoor ik start met 28 st. voor elke schouder. Daar loop ik na het afkanten van 4x6 st. nu vast want dat zijn er 24 en ik moet nogmaals 1x10 st. afkanten, ik vraag mij dus af of dat wel klopt...?
29.08.2017 - 08:39DROPS Design answered:
Hallo Anette, Excuses, ik dacht je met het voorpand bezig was. Van de 30 steken van de hals, kant je op een gegeven moment de middelste 16 steken af en daarna nog 1 steek aan elke kant van de hals, waardoor je aan beide kanten 34 steken voor de schouder over houdt (i.p.v. 28)
29.08.2017 - 17:57Synes garnmengden som er oppgitt høres mye ut i forhold til andre lignende jakker jeg har strikket. Noen som kan bekrefte at de faktisk brukte så mye som 1500 m garn til M?
28.08.2017 - 12:18DROPS Design answered:
Hei Lisa. Når vi nå veier jakken er garnmengden som er oppgitt 50 gram for mye, slik at 450 gram i str M er mer riktig. En rettelse vil bli lagt til. God Fornøyelse!
29.08.2017 - 07:35Dag, Ook ik ben inmiddels aanbeland bij het breien van de hals en schuine schouders. Ik brei maat M en begon dus met 28 steken voor de schouders. Als ik dan 4x 6st. heb afgekant, houd ik nog maar 4 st. over, terwijl ik volgens de beschrijving dan nog 1x 10 st. moet afkanten...klopt dit wel?
25.08.2017 - 23:25DROPS Design answered:
Hoi Asziane, Als het goed is heb je 34 steken (en geen 28) op de naald van het voorpand, nadat je afgekant hebt voor de hals. Wellicht is er eerder al iets mis gegaan, waardoor je niet genoeg steken hebt...? ...Als alle afkanten en minderen voor het armsgat en de hals klaar zijn, staan er nog 31-34-34-36-37-37 steken op de naald. Brei tot een hoogte van 75-78-81-84-87-89 cm, kant dan af voor de schuine schouder als op het achterpand.
28.08.2017 - 12:49Van dit patroon zijn er te weinig steken aangegeven, ik heb er 10 meer op gezet en dat was beter want de mouw was klaar en erg strak vandaar de steken meer en opnieuw gebreid
25.07.2017 - 15:15Ik ben even in de war en kom er niet meer uit. Ik heb gebreid tot 75cm. Nu moet ik 6 naalden me ribbels in de hals breien en dan 10 naalden voor de schouders. Als ik op de tekening kijk zie ik 15cm voor het armsgat en 4cm voor de hals en schouders. Maar als ik het brei zoals het er staat word me armsgat toch echt groter dan 15cm door die 6 naalden voor de hals. Wat doe ik verkeerd.
09.06.2017 - 23:10DROPS Design answered:
Hoi Marijke, Als je 75 cm hebt gebreid ga je ribbels breien over de middelste steken voor de hals en kant je tegelijkertijd af voor de schouder. Het afkanten voor de schuine shouders is ongeveer 10 naalden, wat neerkomt op 4 cm. Dus niet eerst de ribbels breien en dan afkanten, maar tegelijkertijd. Veel breiplezier!
12.06.2017 - 16:09Bonjour, Je fais le modèle 176-14, j'ai tricoté en jersey avec 4 mailles en point mousse de chaque coté jusqu'à 21 cm. Je dois faire une maille lisière de chaque coté et ensuite il est indiqué de continuer en jersey avec 1 maille lisière de chaque coté au point mousse. Donc je ne fais plus qu'une seule maille au point mousse de chaque coté? Ou j'ajoute cette maille aux 4 autres et je fais donc 5 mailles au point mousse de chaque coté? Merci. Sarah Lebigot
22.05.2017 - 00:18DROPS Design answered:
Bonjour Mme Lebigot, la maille à monter de chaque côté sert pour les coutures, vous continuez ensuite en jersey avec 1 seule maille au point mousse de chaque côté (= les m lisières). Bon tricot!
22.05.2017 - 09:33