DROPS Fabel
DROPS Fabel
75% Wool, 25% Polyamide
from 3.00 $ /50g
Get the yarn to make this pattern from 6.00$.

The yarn cost is calculated from the pattern’s smallest size and the yarn’s cheapest product type. Looking for an even better price? You might find it on the DROPS Deals!

DROPS SS24

Little Watcher

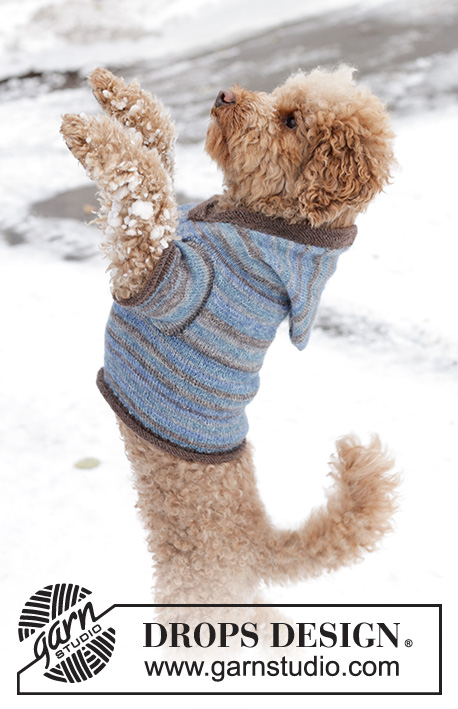
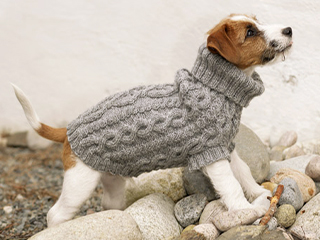
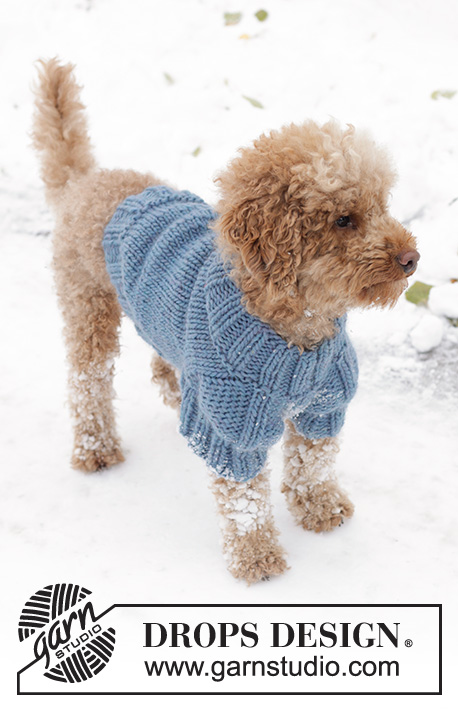
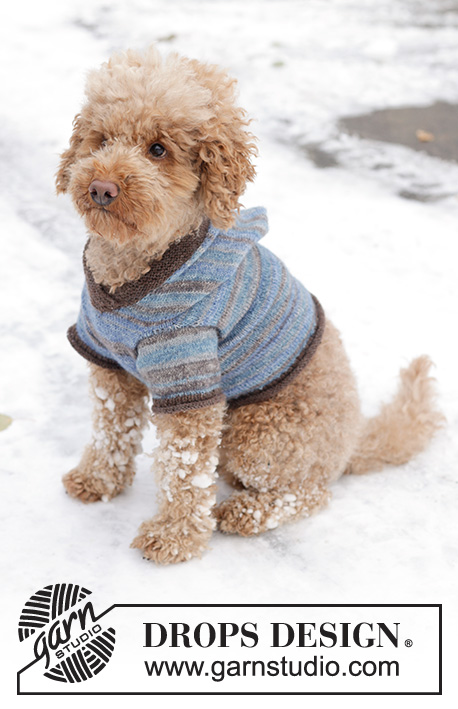
Knitted dog sweater in DROPS Fabel. The piece is worked from tail to neck, with hood. Sizes XS - M.

DROPS Extra 0-833
DROPS Design: Pattern fa-189
Yarn group A
-----------------------------------------------------------------

SIZES:
XS - S – M

MEASUREMENTS:
Back-length: approx. 14 - 25 - 32 cm = 5½" – 9¾" – 12½"
Chest: approx. 30 - 42 - 50 cm = 11¾" – 16½" – 19¾"
Examples of breeds: XS = Chihuahua,
S = Bichon Frisé, M = Cocker Spaniel

YARN:
Color alternative 1:
DROPS Fabel from Garnstudio (belongs to yarn group A)
50-100-100 g color 521, blue/brown
50 g color 107, blue

Color alternative 2:
DROPS Fabel from Garnstudio (belongs to yarn group A)
50-100-100 g color 604, ocean view
50 g color 300, brown

NEEDLES FOR SIZE XS:
DROPS DOUBLE POINTED NEEDLES SIZE 3 MM = US 2.5.

NEEDLES FOR SIZES S - M:
DROPS CIRCULAR NEEDLE SIZE 3 MM = US 2.5: Length 40 cm = 16".
DROPS DOUBLE POINTED NEEDLES SIZE 3 MM = US 2.5.

KNITTING GAUGE:
26 stitches in width and 34 rows in height with stockinette stitch = 10 x 10 cm = 4" x 4".
NOTE: Needle size is only a guide. If you get too many stitches on 10 cm = 4", change to a larger needle size. If you get too few stitches on 10 cm = 4", change to a smaller needle size.

-------------------------------------------------------

Alternative Yarn – See how to change yarns here
Yarn Groups A to F – Use the same pattern and change the yarn here
Yarn usage using an alternative yarn – Use our yarn converter here

-------------------------------------------------------

More like this:
Home Pets Dog Sweatershood
DROPS Fabel
DROPS Fabel
75% Wool, 25% Polyamide
from 3.00 $ /50g
Get the yarn to make this pattern from 6.00$.

The yarn cost is calculated from the pattern’s smallest size and the yarn’s cheapest product type. Looking for an even better price? You might find it on the DROPS Deals!

Pattern instructions

NOTE: This pattern is written in American English. All measurements in charts are in cm. For conversion from inches to cm - click here. There are different terms for crocheting in American and British English. If this pattern includes crochet, click for "crochet terms" here. For this pattern in British English, please click here.
-------------------------------------------------------

EXPLANATIONS FOR THE PATTERN:
-------------------------------------------------------


SHORT ROWS:
To make the sweater longer along the back than under the tummy, work short rows as described below. Skip this section if you do not want these short rows.
Insert 1 marker after 39-55-65 stitches (mid-back).
ROW 1 (right side): Knit to 4-5-6 stitches past the marker, turn, tighten the strand.
ROW 2: Purl to 4-5-6 stitches past the marker, turn, tighten the strand.
ROW 3: Knit to 8-10-12 stitches past the marker, turn, tighten the strand.
ROW 4: Purl to 8-10-12 stitches past the marker, turn, tighten the strand.
Continue like this back and forth, working 4-5-6 more stitches past the marker on each row a total of 7 times on each side. On the last row from the wrong side, you have work 28-35-42 past the marker. Turn and continue in the round from the right side.

GARTER STITCH (worked back and forth):
Knit all rows.
1 ridge = knit 2 rows.

------------------------------------------------------------------------------

START THE PIECE HERE:

------------------------------------------------------------------------------

DOG SWEATER – SHORT OVERVIEW OF THE PIECE:
The body is worked in the round with double pointed needles/circular needle from the tail towards the neck. The piece is divided for the front legs and worked back and forth, then the yoke is finished in the round. The hood is worked back and forth, then the legs worked in the round with double pointed needles. The sweater can be worked in 2 different color alternatives.

BODY:
Cast on 78-108-129 stitches with double pointed needles/circular needle size 3 MM = US 2.5 and color blue or brown. Work stockinette stitch in the round for 2 cm = ¾". Work rib (knit 2, purl 1) for 3 rounds. The piece measures approx. 3 cm = 1⅛". Change to color blue/brown or ocean view. Knit 2 rounds and increase 0-2-1 stitches evenly on the first round = 78-110-130 stitches. Insert a marker-thread at the beginning of the round. If you want the back to be 4 cm = 1½" longer than the tummy, work SHORT ROWS – read description above. The measurements in the pattern are without these 4 cm = 1½", therefore measure the tummy (start of round).
Skip this section if you do not want short rows.

Work stockinette stitch in the round until the piece measures 7-11-15 cm = 2¾"-4⅜"-6" (without the short rows).
Work the next round as follows: Knit 10-13-18 (= half tummy), bind off 5 stitches for the first leg, knit 48-74-84 (= back), bind off 5 stitches for the second leg, knit the last 10-13-18 stitches, then knit the first 10-13-18 stitches from the beginning of the round (= whole tummy). Place the 48-74-84 back-stitches on a stitch holder.

TUMMY:
= 20-26-36 stitches. Continue working stockinette stitch back and forth and bind off 1 stitch at the beginning of each row 4 times = 16-22-32 stitches.
Work until the tummy measures 5-7-9 cm = 2"-2¾"-3½" from the bind-off stitches.
Cast on 1 stitch at the beginning of each row 4 times = 20-26-36 stitches, cut the strand and place the stitches on a stitch holder. The tummy measures 6-8-10 cm = 2⅜"-3⅛"-4" from the bind-off stitches.

BACK:
Place the 48-74-84 stitches back on needle size 3 MM = US 2.5. Continue working stockinette stitch back and forth and bind off 1 stitch at the beginning of each row 4 times = 44-70-80 stitches.
Work until the back measures 5-7-9 cm = 2"-2¾"-3½" from the bind-off stitches. Cast on 1 stitch at the beginning of each row 4 times = 48-74-84 stitches. The back measures 6-8-10 cm = 2⅜"-3⅛"-4" from the bind-off stitches.
Work as follows from the right side: Knit 48-74-84, cast on 5 stitches, knit the 20-26-36 stitches from the stitch holder, cast on 5 stitches = 78-110-130 stitches.
Insert 1 marker in the middle of the 20-26-36 tummy-stitches = start of round.

YOKE:
Work stockinette stitch in the round for a further 1-2-3 cm = ⅜"-¾"-1⅛". The piece measures 14-21-28 cm = 5½"-8¼"-11" along the tummy.

HOOD:
Insert 1 new marker after 39-55-65 stitches = mid-back of hood.
READ THE NEXT PARAGRAPH BEFORE CONTINUING!
Work stockinette stitch back and forth and bind off at the beginning of each row on each side as follows: 4 stitches 1 time, 2 stitches 2 times, 1 stitch 7 times (15 bind-off stitches on each side). Continue working back and forth until the hood measures 9-14-18 cm = 3½"-5½"-7". Now cast on 1 stitch on each side. Repeat on each side every 6th row a total of 3 times.
AT THE SAME TIME, when the hood measures 9-14-18 cm = 3½"-5½"-7" and the next row is from the right side, decrease mid-back as follows: Work until there are 2 stitches left before the marker, knit 2 together, marker, slip 1 stitch knit-wise, knit 1, pass the slipped stitch over the knitted stitch and work to end of row. Repeat on each row from the right side a total of 8 times (16 decreased stitches).
After all the decreases/increases are finished there are 38-70-90 stitches and the hood measures approx. 14-19-24 cm = 5½"-7½"-9½". Bind off. Lay the hood double and sew the top together, with grafting stitch from the right side.

HOOD-EDGE:
Knit up 72-98-124 stitches around the hood, with needle size 3 MM = US 2.5 and color blue or brown, starting at the bottom of one side. Work GARTER STITCH back and forth – read description above, casting on 1 stitch at the beginning of each row until you have worked 6 ridges. Bind off loosely with 2 strands.
Overlap the edges mid-front and sew down neatly.

LEGS:
Knit up 42-52-62 stitches around the leg-opening, with double pointed needles size 3 MM = US 2.5 and color blue/brown or ocean view. Work stockinette stitch in the round for 4-6-8 cm = 1½"-2⅜"-3⅛". Change to color blue or brown and work rib (knit 1, purl 1) for 3 rounds. Work 6 rounds of stockinette stitch. Bind off loosely. Repeat around the other leg-opening.

This pattern has been corrected.

Updated online: 07.11.2023
The pattern has been reviewed and rephrased.

Each of our patterns has specific tutorial videos to help you.

Do you have a question? See a list of frequently asked questions (FAQ)

Knitting tension is what determines the final measurements of your work, and is usually measured per 10 x 10 cm. It is provided like so: number of stitches in width x number of rows in height - eg: 19 stitches x 26 rows = 10 x 10 cm.

The knitting tension is very individual; some people knit/crochet loosely while others work tightly. You adjust the knitting tension with the needle size, which is why the suggested needle size only serve as a guide! You need to adjust this (up or down) to ensure that YOUR knitting tension matches the knitting tension provided in the pattern. If you work with a different knitting tension than provided you will have a different yarn consumption, and your work will have different measurements than what the pattern suggests.

The knitting tension also determines which yarns can replace each other. As long as you achieve the same knitting tension you can replace one yarn with another.

See DROPS lesson: How to measure your tension/gauge

See DROPS video: How to make a gauge tension swatch

The required amount of yarn is provided in grams, eg: 450 g. To calculate how many balls you’ll need you first need to know how many grams are in 1 ball (25g, 50g or 100g). This information is available if you click on the individual yarn quality on our pages. Divide the amount required with the amount of each ball. For example, if each ball is 50g (the most common amount), the calculation will be as follows: 450 / 50 = 9 balls.

The important thing when changing from one yarn to another is that the knitting/crochet tension remains the same. This is so that the measurements of the finished piece will be the same as on the sketch provided. It is easier to achieve the same knitting tension using yarns from the same yarn group. It is also possible to work with multiple strands of a thinner yarn to achieve the knitting tension of a thicker one. Please try our yarn converter. We recommend you to always work a test swatch.

Please NOTE: when changing yarn the garment might have a different look and feel to the garment in the photo, due to individual properties and qualities of each yarn.

See DROPS lesson: Can I use a different yarn than the one mentioned in the pattern?

All our yarns are categorised into yarn groups (from A to F) according to thickness and knitting tension – group A contains the thinnest yarns and group F the thickest. This makes it easier for you to find alternative yarns to our patterns, should you wish to switch yarn. All yarns within the same group have a similar knitting tension and can easily replace each other. However, different yarn qualities have different structures and properties which will give the finished work a unique look and feel.

Click here for an overview of the yarns in each yarn group

At the top of all our patterns you’ll find a link to our yarn converter, which is a helpful tool should you wish to use a different yarn than suggested. By filling in the yarn quality you wish to replace, the amount (in your size) and number of strands, the converter will present good alternative yarns with the same knitting tension. Additionally it will tell you how much you’ll require in the new qualities and whether you’ll need to work with multiple strands. Most skeins are 50g (some are 25g or 100g).

If the pattern is worked with multiple colours, every colour will have to be converted separately. Similarly, if the pattern is worked with several strands of different yarns (for example 1 strand Alpaca and 1 strand Kid-Silk) you will have to find alternatives for each, individually.

Click here to see our yarn converter

Since different yarns have different qualities and textures we have chosen to keep the original yarn in our patterns. However, you can easily find options among our available qualities by using our yarn converter, or simply pick a yarn from the same yarn group.

It is possible that some retailers still have discontinued yarns in stock, or that someone has a few skeins at home that they would like to find patterns for.

The yarn converter will provide both alternative yarn as well as required amount in the new quality.

If you think it's hard to decide what size to make, it can be a good idea to measure a garment you own already and like the size of. Then you can pick the size by comparing those measures with the ones available in the pattern's size chart.

You'll find the size chart at the bottom of the pattern.

See DROPS lesson: How to read size chart

The needle size provided in the pattern serves only as a guide, the important thing is to follow the knitting tension. And since knitting tension is very individual, you will have to adjust the needle size to ensure that YOUR tension is the same as in the pattern – maybe you’ll have to adjust 1, or even 2 needle sizes, up or down to achieve the correct tension. For this, we recommend that you work test swatches.

Should you work with a different knitting tension than the one provided, the measurements of the finished garment might deviate from the measurement sketch.

See DROPS lesson: How to measure your tension/gauge

See DROPS video: How to make a gauge tension swatch

Working a garment top-down provides more flexibility and room for personal adjustment. For example it is easier to try the garment on while working, as well as making adjustments to length of yoke and shoulder caps.

The instructions are carefully explaining every step, in the correct order. Diagrams are adjusted to the knitting direction and are worked as usual.

The diagram depicts all rows/rounds, and every stitch seen from the right side. It is read from bottom to top, from right to left. 1 square = 1 stitch.

When working back and forth, every other row is worked from the right side and every other row is worked from the wrong side. When working from the wrong side, the diagram will have to be worked reversed: from left to right, knit stitches are purled, purl stitches are knit etc.

When working in the round every round is worked from the right side and the diagram are worked from right to left on all rounds.

See DROPS lesson: How to read knitting diagrams

The diagram depicts all rows/rounds, and every stitch seen from the right side. It is worked from bottom to top, from right to left.

When working back and forth every other row is worked from the right side: from right to left and every other row is worked from the wrong side: from left to right.

When working in the round, every row in the diagram are worked from the right side, from right to left.

When working a circular diagram you start in the middle and work your way outwards, counter clockwise, row by row.

The rows usually start with a given number of chain stitches (equivalent to the height of the following stitch), this will either be depicted in the diagram or explained in the pattern.

See DROPS lesson: How to read crochet diagrams

Instructions for working several diagrams after each other on the same row/round, will often be written like so: “work A.1, A.2, A.3 a total of 0-0-2-3-4 times". This means you work A.1 once, then A.2 is worked once, and A.3 is repeated (in width) the number of times provided for your size – in this case like so: S = 0 times, M = 0 times, L=2 times, XL= 3 times and XXL = 4 times.

The diagrams are worked as usual: begin with the first row in A.1, then work the first row in A.2 etc.

See DROPS lesson: How to read knitting diagrams

See DROPS lesson: How to read crochet diagrams

The total width of the garment (from wrist-to-wrist) will be larger in the larger sizes, despite the actual sleeves being shorter. The larger sizes have longer sleeve caps and wider shoulders, so there will be a good fit in all sizes.

The measurement sketch/schematic drawing provides information regarding the full length of the garment. If it’s a jumper or a jacket the length is measured from the highest point on the shoulder (usually closest to the neckline), and straight down to the bottom of the garment. It is NOT measured from the tip of shoulder. Similarly, the length of yoke is measured from the highest point on the shoulder and down to where yoke is split into body and sleeves.

See DROPS lesson: How to read a schematic drawing

Diagrams are often repeated on the round or in height. 1 repeat is the diagram the way it appears in the pattern. If it says to work 5 repeats of A.1 in the round, then you work A.1 a total of 5 times after/next to each other in the round. If it says to work 2 repeats of A.1 vertically/in height you work the entire diagram once, then begin again at the start and work the entire diagram one more time.

Chain stitches are slightly narrower than other stitches and to avoid working the cast-on edge too tight, we simply chain more stitches to begin with. The stitch count will be adjusted on the following row to fit the pattern and measurement sketch.

The rib edge is more elastic and will contract slightly compared to, for example, stocking stitch. By increasing before the rib edge, you avoid a visible difference in width between the rib edge and the rest of the body.

It’s very easy to cast off too tightly, and by making yarn overs while casting off (and simultaneously casting these off) you avoid a too tight cast off edge.

See DROPS video: How to bind off with yarn overs (yo)

To achieve an even increase (or decrease) you can increase on, for example: every 3rd and 4th row alternately, like so: work 2 rows and increase on the 3rd row, work 3 rows and increase on the 4th. Repeat this until the increase is complete.

See DROPS lesson: Increase or decrease 1 st on every 3rd and 4th row alternately

Should you prefer to work in the round instead of back and forth, you may of course adjust the pattern. You’ll need to add steeks mid-front (usually 5 stitches), and follow the instructions. When you would normally turn and work from the wrong side, simply work across the steek and continue in the round. At the end you’ll cut the piece open, pick up stitches to work bands, and cover the cut edges.

See DROPS video: How to knit steeks and cut open

Should you prefer to work back and forth instead of in the round, you may of course adjust the pattern so you work the pieces separately and then assemble them at the end. Divide the stitches for the body in 2, add 1 edge stitch in each side (for sewing) and work the front and back pieces separately.

See DROPS lesson: Can I adapt a pattern for circular needles into straight needles?

Pattern repeats can vary slightly in the different sizes, in order to get the correct proportions. If you’re not working the exact same size as the garment in the photo, yours might deviate slightly. This has been carefully developed and adjusted so that the complete impression of the garment is the same in all sizes.

Make sure to follow instructions and diagrams for your size!

If you have found a pattern you like which is available in women’s size it’s not very difficult to convert it to men’s size. The biggest difference will be the length of sleeves and body. Start working on the women size that you think would fit across the chest. The additional length will be worked right before you cast off for the armhole/sleeve cap. If the pattern is worked top-down you can add the length right after the armhole or before the first decrease on sleeve.

Regarding additional yarn amount, this will depend on how much length you add, but it is better with a skein too many than too few.

All yarns will have excess fibres (from production) that might come off as lint or shedding. Brushed yarns (ie hairier yarns) have more of these loose, excess fibres, causing more shedding.

Shedding also depends on what is worn under or over the garment, and whether this pulls at the yarn fibres. It’s therefore not possible to guarantee that there will be no shedding

Below are some tips on how to get the best result when working with hairier yarns:

1. When the garment is finished (before you wash it) shake it vigorously so the looser hairs come off. NOTE: do NOT use a lint roller, brush or any method that pulls at the yarn.

2. Place the garment in a plastic bag and put it in your freezer - the temperature will cause the fibres to become less attached to each other, and excess fibres will come off easier.

3. Leave in the freezer for a few hours before taking it out and shaking it again.

4. Wash the garment according to the instructions on the yarn label.

Pilling is a natural process that happens to even the most exclusive of fibers. It's a natural sign of wear and tear that is hard to avoid, and that is most visible in high friction areas of your garment like a sweater's arms and cuffs.

You can make your garment look as new by removing the pilling, using a fabric comb or a pill/lint remover.

Still can't find the answer you need? Then scroll down and leave your question so one of our experts can try to help you. This will be done normally within 5 to 10 working days.
In the meantime, you can read the questions and answers that others have left to this pattern or join the DROPS Workshop on Facebook to get help from fellow knitters/crocheters!

You might also like...

Post a comment to pattern DROPS Extra 0-833

We would love to hear what you have to say about this pattern!

If you want to leave a question, please make sure you select the correct category in the form below, to speed up the answering process. Required fields are marked *.

Comments / Questions (20)

Leslie J. McCreath-Hunneman wrote:

Good Morning and Greetings from Canada! Here is my question: I cast on 78 stitches for my sweater, and am ready to start the cast-off section for the leg openings. The math isn't working for me😳! If I work as follows: Knit 10, bind off 5, knit 48, bind off 5 and knit 20, I am short 10 stitches. 10+5+48+5+20=88, making 10 extra stitches. Blessings...Leslie 😊

01.01.2017 - 16:06

DROPS Design answered:

Dear Mrs McCreath-Hunneman, the first 10 sts worked are before first leg and the last 20 sts worked are the last 10 sts on round (= the 10 sts after 2nd leg) + 10 sts before 1st leg (you already worked once at the beg of round) = 20 sts for belly. Happy knitting!

02.01.2017 - 09:01

country flag Jette Hoegh wrote:

Jeg er ved hætten Hvordan kan man skrive senere i en opskrift og hvor lang skal man strikke frem og tilbage og tage ind 😡

26.09.2015 - 19:03

DROPS Design answered:

Hej Jette, hvis du læser lidt længere i stykket så står der: Midt bagpå: Samtidig når hætten måler 7-11-15 cm tages der ind ..... osv! God fornøjelse!

01.10.2015 - 16:15

country flag Jette Hoegh wrote:

Der er en fejl i denne opskrift. Jeg er igang med at strikke denne trøje i en xs og på den omgang hvor man skal lukke af til ben .efter 2 ben står der at man skal strikke 20 ret men man skal kun lave 10 ret.

26.09.2015 - 13:27

country flag S.christensen wrote:

Kan ikke forstå der ikke er et mønster til opskriften????

25.11.2014 - 21:43

DROPS Design answered:

Hej, Det er det melerede Fabel garn som danner mønsteret. God fornøjelse!

26.11.2014 - 15:14

country flag Mª Luz wrote:

Falta el diagrama con los dibujos, o yo no lo encuentro.

11.03.2013 - 11:21

DROPS Design answered:

Hola MªLuz. No hace falta el diagrama porque se trata de una lana especial multicolor que va haciendo el dibujo según se teje.

08.05.2013 - 23:41

country flag Mathilde wrote:

Nadat de mouwopening is gesloten, zie ik niet dat er een aantal centimeter wordt gebreid voordat er met de capuchon word begonnen. Er mist dus een gedeelte voor de borst.

24.01.2013 - 02:17

DROPS Design answered:

Het gedeelte net boven de mouw dat u op de foto ziet, is al onderdeel van de capuchon; deze wordt met dezelfde kleur gebreid als het lijf. Vr gr Angelique

07.02.2013 - 14:18

country flag Astrid wrote:

Is er bij dit patroon ook een teltekening met alle verschillende kleuren

12.12.2012 - 17:42

DROPS Design answered:

Nee, het garen Fabel is een print garen met meerdere kleuren, dus het patroon/kleurverschillen komen automatisch. Je hebt alleen de 521 blauw/bruin nodig en de 107 blauw voor de randjes. Zie ook kleurenoverzicht van Fabel

13.12.2012 - 16:39

country flag Pia wrote:

DROPS Design: Model nr fa-189 Hej jeg ved ikke hvordan jeg kan lave denne en størrelse mindre end xs altså xxs. Kan i hjælpe mig :)

16.10.2012 - 11:38

DROPS Design answered:

Du kan med hjaelp fra strikkefastheden (hvor mange masker x pinde du skal have per 10 cm for dette mönster) rette mönstret til saa det bliver mindre. Du kan f.eks. se at du her skal have 26 m per 10 cm. Dvs, skal den vaere f.eks. 5 cm smallere, saa skal du saette 13 m mindre op osv. Du kan ogsaa spörge i din DROPS butik

19.10.2012 - 12:20

country flag Evelina wrote:

Det känns som om luvan hamnar snett efter att det blir en ny början på varv..

05.10.2012 - 20:59

country flag Agneta wrote:

Har tittat på detta mönster, en tröja till hunden. Fattar inget. Hur långt ska man sticka efter ben delningen och hur många maskor ska man ta upp till luvan? Mvh Agneta

14.09.2012 - 09:17