DROPS Baby Merino
DROPS Baby Merino
100% Wool
from 3.50 £ /50g
Get the yarn to make this pattern from 10.50£.

The yarn cost is calculated from the pattern’s smallest size and the yarn’s cheapest product type. Looking for an even better price? You might find it on the DROPS Deals!

DROPS Super Sale
DROPS Baby 11-4
Size: 1/3 – 6/9 – 12/18 – 24 months
Size in cm: 50/56 – 62/68 – 74/80 - 86/92

Materials: DROPS Baby Merino from Garnstudio
Dress:
100-150-150-200 g colour no 08, pink

DROPS circular needle size 2.5 mm
DROPS crochet hook size 2.5 mm
DROPS button, no 620 (pink), 4 pcs

Socks:
50-50-50-50 g colour no 1101, white
DROPS double pointed needles size 2.5mm
DROPS crochet hook size 2.5 mm

-------------------------------------------------------

Alternative Yarn – See how to change yarns here
Yarn Groups A to F – Use the same pattern and change the yarn here
Yarn usage using an alternative yarn – Use our yarn converter here

-------------------------------------------------------

DROPS Baby Merino
DROPS Baby Merino
100% Wool
from 3.50 £ /50g
Get the yarn to make this pattern from 10.50£.

The yarn cost is calculated from the pattern’s smallest size and the yarn’s cheapest product type. Looking for an even better price? You might find it on the DROPS Deals!

Pattern instructions

NOTE: This pattern is written in British English. All measurements in charts are in cm. For conversion from cm to inches - click here. There are different terms for crocheting in British and American English. If this pattern includes crochet, click for "crochet terms" here. For this pattern in American English, please click here.
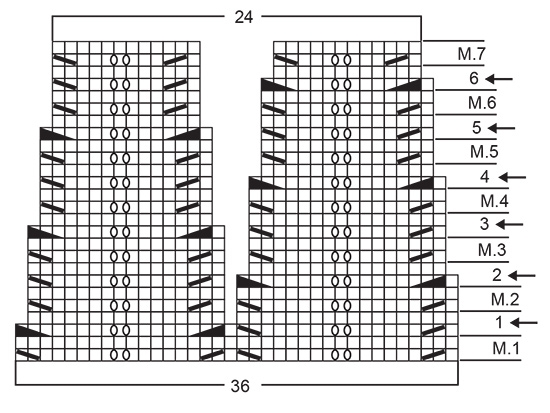
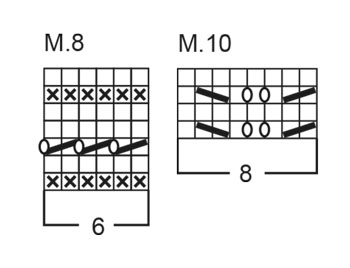
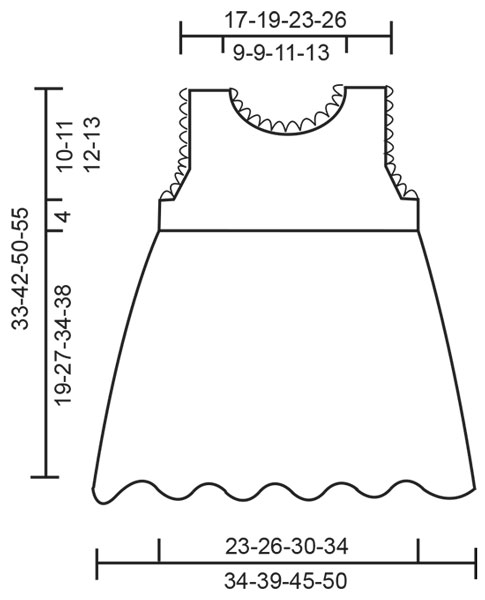
Knitting tension: M.1 to M.7 and M.9: 32 sts x 34 rows on needle size 2.5 mm = 10 x 10 cm. Stocking sts: 25 sts x 34 rows on needle size 2.5 mm = 10 x 10 cm.

Garter sts (back and forth on needle: knit all rows.
Garter sts (on circular needle): knit 1 round, purl 1 round.

Pattern: See diagrams M.1 to M10. The diagrams are seen from the RS.
--------------------------------------------------------------------

DRESS:

Buttonhole: Make buttonholes on the right edge mid back from the RS. 1 buttonhole = cast off the 3rd and 4th sts from the edge and cast on 2 new sts in the same place on the return row. Make buttonholes as follows:
Size 1/3 months: 2, 5, 8 and 11 cm
Size 6/9 months: 2, 5, 9 and 12 cm
Size 12/18 months: 2, 6, 10 and 13 cm
Size 24 months: 2, 6, 10 and 14 cm

Dec tips (apply to armhole and neckline): Dec inside 2 edge sts in garter sts from the RS.
Dec as follows after 2 edge sts: slip 1 st as if to knit, K1, psso.
Dec as follows before 2 edge sts: K2 tog.
--------------------------------------------------------------------

Back and front piece:
The dress is knitted round on circular needle from bottom edge up. Cast on 216-252-288-324 sts on circular needle size 2.5 mm with pink. Knit 2 rounds in garter sts and continue in M.1.
When piece measures 8-10-13-17 cm begin the dec. Dec 12-14-16-18 sts per round, i.e. dec 2 sts on every 2nd repeat across – see arrows in diagram. This means the size of the zig-zags in the pattern will decrease as you go along.
Dec as follows:
When piece measures 8-10-13-17 cm knit first 1 round with dec = 204-238-272-306 sts, continue in M.2.
When piece measures 10-14-17-21 cm knit second round with dec = 192-224-256-288 sts, continue in M.3.
When piece measures 12-17-21-25 cm knit third round with dec = 180-210-240-270 sts, continue in M.4.
When piece measures 14-20-25-29 cm knit fourth round with dec = 168-196-224-252 sts, continue in M.5.
When piece measures 16-23-29-33 cm knit fifth round with dec = 156-182-208-234 sts, continue in M.6.
When piece measures 18-26-33-37 cm knit sixth round with dec = 144-168-192-216 sts, continue in M.7.
When piece measures 19-27-34-38 cm knit M.8 (= row with holes), at the same time on the last round of M.8 dec 2 sts evenly = 142-166-190-214 sts. Now carry on measuring piece from the first round of M.8. Divide the piece mid back and finish the dress back and forth on circular needle. Cast on 2 new sts each side = 146-170-194-218 sts. Knit next row as follows form the RS: 5 edge sts in garter sts, M.9A (= 8 sts), M.9B over 120-144-168-192 sts, M.9C (= 8 sts) and 5 edge sts in garter sts. Continue in pattern whilst making buttonholes on right edge – see explanation above. When piece measures 3 cm (from 1st round of M.8) knit next row as follows from the RS: 5 edge sts in garter sts, 28-34-40-46 sts of M.9, 10 sts in garter sts, 60-72-84-96 sts of M.9, 10 sts in garter sts, 28-34-40-46 sts of M.9, 5 edge sts in garter sts. Continue in pattern until there are 4 rows in garter sts over 10 sts each side. On the next row cast off 6 sts each side for armhole and finish each piece separately.

Front piece: = 64-76-88-100 sts. Continue in M.9 with 2 sts in garter sts each side. At the same time dec 1 st for armhole – see Dec tips – on every other row a total of 5-8-8-8 times = 54-60-72-84 sts. P the sts (seen from the RS) not fitting into M.9. After the dec for armhole continue with 2 sts in garter sts + 1 st in stocking st each side (i.e. 1 st in stocking sts along armhole). When piece measures approx 9-10-10-11 cm – adjust after 1 full repeat of M.9 – knit 4 rows with garter sts over the middle 22-22-28-34 sts (M.9 over remaining sts). Now cast off the middle 18-18-24-30 sts for neck and dec 1 st towards neckline on every other row a total of 6 times – see Dec Tips = 12-15-18-21 sts left on each shoulder. Continue in M.9 with 2 sts in garter sts + 1 st in stocking st towards the neckline. When piece measures approx 14-15-16-17 cm (= 33-42-50-55 cm full length) cast off remaining sts – adjust after a full pattern repeat.

Left back piece: = 35-41-47-53 sts. Continue in M.9 with 2 sts in garter sts towards armhole and 5 edge sts in garter sts towards mid back. At the same time dec for armhole as described for front piece = 30-33-39-45 sts. When piece measures approx 12-13-14-15 cm – adjust after a full pattern repeat – knit 4 rows with garter sts over 18-18-21-24 sts towards mid back. Now cast off 16-16-19-22 sts towards mid back for neck and dec 1 st towards neckline on every other row 2 times – see Dec Tips = 12-15-18-21 sts left on shoulder. Continue in M.9 with 2 sts in garter sts + 1 st in stocking st towards the neckline. When piece measures approx 14-15-16-17 cm (= 33-42-50-55 cm full length) cast off remaining sts – adjust after a full pattern repeat.

Right back piece: = 35-41-47-53 sts. Knit as left back piece, but mirrored. Remember buttonholes!

Assembly: Sew shoulder seams. Place right edge over left edge on back piece and sew at bottom. Sew on buttons.

Crochet borders: Crochet round armholes and neckline with crochet hook size 2.5 mm with pink as follows (crochet round the 2 outermost sts in garter sts): 1 dc, *3 ch, 1 dc in first ch, skip 1 st, 1 dc in next st* , repeat from *-*.
------------------------------------------------------------------

SOCKS:

Foot length: 10-11-12-14 cm

Cast on 56-56-64-64 sts on double pointed needles size 2.5 mm with white Alpaca. Knit 1 round and knit 2 cm of M.10. Knit 1 round, at the same time dec 16-16-20-20 sts evenly on round = 40-40-44-44 sts. Knit M.8. Now knit heel as follows:
Knit 3-3.5-3.5-4 cm stocking sts back and forth on needles over 18 sts mid back. Heel dec (1st row = RS):
1st row: Knit 10 sts, K2 tog into back of st, K1, turn.
2nd row: slip 1 st as if to P, P4, P2 tog, P1, turn.
3rd row: slip 1 st as if to K, K5, K2 tog into back of st, K1, turn.
4th row: slip 1 st as if to P, P6, P2 tog, P1, turn.
5th row: slip 1 st as if to K, K7, K2 tog into back of st, K1, turn.
6th row: slip 1 st as if to P, P8, P2 tog, P1, turn.
7th row: K2 tog, K8, K2 tog into back of st = 10 sts on needle (= total 32-32-36-36 sts).
Now pick up 7-8-8-9 sts on each side of the heel = 46-48-52-54 sts. Continue in stocking sts over all sts and dec 1 st on each side of the upper 18-20-22-24 sts on every other row a total of 7 times = 32-34-38-40 sts.
When foot measures 8-9-11-12 cm (from the start of the heel dec) insert a marking thread each side and dec 1 st on each side of both threads on every round (4 dec per round) a total of 7-7-8-8 times. Cut the thread and pull through remaining sts. Sew tight.
Crochet a chain of ch with pink , approx 35 cm long, and pull through row with holes.

Diagram

symbols = K from RS, P from WS
symbols = K into back of st from RS, P into back of st from WS
symbols = P from RS, K from WS
symbols = yo
symbols = K2 tog
symbols = slip 1 st as if to knit, K1, psso
symbols = K3 tog
symbols = slip 1 st as if to knit, K2 tog, psso.
symbols = Put 1 st on cable needle behind piece, K1 into back of st, P1 from cable needle
symbols = Put 1 st on cable needle in front of piece, P1, K1 into back of st from cable needle.
symbols = Arrow pointing from right to left in M.1 to M.7 = dec
diagram
diagram
diagram
diagram

Each of our patterns has specific tutorial videos to help you.

Do you have a question? See a list of frequently asked questions (FAQ)

Knitting tension is what determines the final measurements of your work, and is usually measured per 10 x 10 cm. It is provided like so: number of stitches in width x number of rows in height - eg: 19 stitches x 26 rows = 10 x 10 cm.

The knitting tension is very individual; some people knit/crochet loosely while others work tightly. You adjust the knitting tension with the needle size, which is why the suggested needle size is only meant as a guide! You need to adjust this (up or down) to ensure that YOUR knitting tension matches the knitting tension provided in the pattern. If you work with a different knitting tension than provided you will have a different yarn consumption, and your work will have different measurements than what the pattern suggests.

The knitting tension also determines which yarns can replace each other. As long as you achieve the same knitting tension you can replace one yarn with another.

See DROPS lesson: How to measure your tension/gauge

See DROPS video: How to make a gauge tension swatch

The required amount of yarn is provided in grams, eg: 450 g. To calculate how many balls you’ll need you first need to know how many grams are in 1 ball (25g, 50g or 100g). This information is available if you click on the individual yarn quality on our pages. Divide the amount required with the amount of each ball. For example, if each ball is 50g (the most common amount), the calculation will be as follows: 450 / 50 = 9 balls.

The important thing when changing from one yarn to another is that the knitting/crochet tension remains the same. This is so that the measurements of the finished piece will be the same as on the sketch provided. It is easier to achieve the same knitting tension using yarns from the same yarn group. It is also possible to work with multiple strands of a thinner yarn to achieve the knitting tension of a thicker one. Please try our yarn converter. We recommend you to always work a test swatch.

Please NOTE: when changing yarn the garment might have a different look and feel to the garment in the photo, due to individual properties and qualities of each yarn.

See DROPS lesson: Can I use a different yarn than the one mentioned in the pattern?

All our yarns are categorised into yarn groups (from A to F) according to thickness and knitting tension – group A contains the thinnest yarns and group F the thickest. This makes it easier for you to find alternative yarns to our patterns, should you wish to switch yarn. All yarns within the same group have a similar knitting tension and can easily replace each other. However, different yarn qualities have different structures and properties which will give the finished work a unique look and feel.

Click here for an overview of the yarns in each yarn group

At the top of all our patterns you’ll find a link to our yarn calculator, which is a helpful tool should you wish to use a different yarn than suggested. By filling in the yarn quality you wish to replace, the amount (in your size) and number of strands, the calculator will present good alternative yarns with the same knitting tension. Additionally it will tell you how much you’ll require in the new qualities and whether you’ll need to work with multiple strands. Most skeins are 50g (some are 25g or 100g).

If the pattern is worked with multiple colours, every colour will have to be calculated separately. Similarly, if the pattern is worked with several strands of different yarns (for example 1 strand Alpaca and 1 strand Kid-Silk) you will have to find alternatives for each, individually.

Click here to see our yarn calculator

Since different yarns have different qualities and textures we have chosen to keep the original yarn in our patterns. However, you can easily find options among our available qualities by using our yarn calculator, or simply pick a yarn from the same yarn group.

It is possible that some retailers still have discontinued yarns in stock, or that someone has a few skeins at home that they would like to find patterns for.

The yarn calculator will provide both alternative yarn as well as required amount in the new quality.

If you think it's hard to decide what size to make, it can be a good idea to measure a garment you own already and like the size of. Then you can pick the size by comparing those measures with the ones available in the pattern's size chart.

You'll find the size chart at the bottom of the pattern.

See DROPS lesson: How to read size chart

The needle size provided in the pattern serves only as a guide, the important thing is to follow the knitting tension. And since knitting tension is very individual, you will have to adjust the needle size to ensure that YOUR tension is the same as in the pattern – maybe you’ll have to adjust 1, or even 2 needle sizes, up or down to achieve the correct tension. For this, we recommend that you work test swatches.

Should you work with a different knitting tension than the one provided, the measurements of the finished garment might deviate from the measurement sketch.

See DROPS lesson: How to measure your tension/gauge

See DROPS video: How to make a tension/gauge swatch

Working a garment top-down provides more flexibility and room for personal adjustment. For example it is easier to try the garment on while working, as well as making adjustments to length of yoke and shoulder caps.

The instructions are carefully explaining every step, in the correct order. Diagrams are adjusted to the knitting direction and are worked as usual.

The diagram depicts all rows/rounds, and every stitch seen from the right side. It is read from bottom to top, from right to left. 1 square = 1 stitch.

When working back and forth, every other row is worked from the right side and every other row is worked from the wrong side. When working from the wrong side, the diagram will have to be worked reversed: from left to right, knit stitches are purled, purl stitches are knit etc.

When working in the round every round is worked from the right side and the diagram are worked from right to left on all rounds.

See DROPS lesson: How to read knitting diagrams

The diagram depicts all rows/rounds, and every stitch seen from the right side. It is worked from bottom to top, from right to left.

When working back and forth every other row is worked from the right side: from right to left and every other row is worked from the wrong side: from left to right.

When working in the round, every row in the diagram are worked from the right side, from right to left.

When working a circular diagram you start in the middle and work your way outwards, counter clockwise, row by row.

The rows usually start with a given number of chain stitches (equivalent to the height of the following stitch), this will either be depicted in the diagram or explained in the pattern.

See DROPS lesson: How to read crochet diagrams

Instructions for working several diagrams after each other on the same row/round, will often be written like so: “work A.1, A.2, A.3 a total of 0-0-2-3-4 times". This means you work A.1 once, then A.2 is worked once, and A.3 is repeated (in width) the number of times provided for your size – in this case like so: S = 0 times, M = 0 times, L=2 times, XL= 3 times and XXL = 4 times.

The diagrams are worked as usual: begin with the first row in A.1, then work the first row in A.2 etc.

See DROPS lesson: How to read knitting diagrams

See DROPS lesson: How to read crochet diagrams

The total width of the garment (from wrist-to-wrist) will be larger in the larger sizes, despite the actual sleeves being shorter. The larger sizes have longer sleeve caps and wider shoulders, so there will be a good fit in all sizes.

The measurement sketch/schematic drawing provides information regarding the full length of the garment. If it’s a jumper or a jacket the length is measured from the highest point on the shoulder closest to the neckline, and straight down to the bottom of the garment. It is NOT measured from the tip of shoulder. Similarly, the length of yoke is measured from the highest point on the shoulder and down to where yoke is split into body and sleeves.

On a jacket measures are never taken along bands, unless specifically stated. Always measure inside band stitches when measuring the length.

See DROPS lesson: How to read a schematic drawing

Diagrams are often repeated on the round or in height. 1 repeat is the diagram the way it appears in the pattern. If it says to work 5 repeats of A.1 in the round, then you work A.1 a total of 5 times after/next to each other in the round. If it says to work 2 repeats of A.1 vertically/in height you work the entire diagram once, then begin again at the start and work the entire diagram one more time.

Chain stitches are slightly narrower than other stitches and to avoid working the cast-on edge too tight, we simply chain more stitches to begin with. The stitch count will be adjusted on the following row to fit the pattern and measurement sketch.

The rib edge is more elastic and will contract slightly compared to, for example, stocking stitch. By increasing before the rib edge, you avoid a visible difference in width between the rib edge and the rest of the body.

It’s very easy to cast off too tightly, and by making yarn overs while casting off (and simultaneously casting these off) you avoid a too tight cast off edge.

See DROPS video: How to bind off with yarn overs (yo)

To achieve an even increase (or decrease) you can increase on, for example: every 3rd and 4th row alternately, like so: work 2 rows and increase on the 3rd row, work 3 rows and increase on the 4th. Repeat this until the increase is complete.

See DROPS lesson: Increase or decrease 1 st on every 3rd and 4th row alternately

Should you prefer to work in the round instead of back and forth, you may of course adjust the pattern. You’ll need to add steeks mid-front (usually 5 stitches), and follow the instructions. When you would normally turn and work from the wrong side, simply work across the steek and continue in the round. At the end you’ll cut the piece open, pick up stitches to work bands, and cover the cut edges.

See DROPS video: How to knit steeks and cut open

Should you prefer to work back and forth instead of in the round, you may of course adjust the pattern so you work the pieces separately and then assemble them at the end. Divide the stitches for the body in 2, add 1 edge stitch in each side (for sewing) and work the front and back pieces separately.

See DROPS lesson: Can I adapt a pattern for circular needles into straight needles?

Pattern repeats can vary slightly in the different sizes, in order to get the correct proportions. If you’re not working the exact same size as the garment in the photo, yours might deviate slightly. This has been carefully developed and adjusted so that the complete impression of the garment is the same in all sizes.

Make sure to follow instructions and diagrams for your size!

If you have found a pattern you like which is available in women’s size it’s not very difficult to convert it to men’s size. The biggest difference will be the length of sleeves and body. Start working on the women size that you think would fit across the chest. The additional length will be worked right before you cast off for the armhole/sleeve cap. If the pattern is worked top-down you can add the length right after the armhole or before the first decrease on sleeve.

Regarding additional yarn amount, this will depend on how much length you add, but it is better with a skein too many than too few.

All yarns will have excess fibres (from production) that might come off as lint or shedding. Brushed yarns (ie hairier yarns) have more of these loose, excess fibres, causing more shedding.

Shedding also depends on what is worn under or over the garment, and whether this pulls at the yarn fibres. It’s therefore not possible to guarantee that there will be no shedding

Below are some tips on how to get the best result when working with hairier yarns:

1. When the garment is finished (before you wash it) shake it vigorously so the looser hairs come off. NOTE: do NOT use a lint roller, brush or any method that pulls at the yarn.

2. Place the garment in a plastic bag and put it in your freezer - the temperature will cause the fibres to become less attached to each other, and excess fibres will come off easier.

3. Leave in the freezer for a few hours before taking it out and shaking it again.

4. Wash the garment according to the instructions on the yarn label.

Pilling is a natural process that happens to even the most exclusive of fibers. It's a natural sign of wear and tear that is hard to avoid, and that is most visible in high friction areas of your garment like a sweater's arms and cuffs.

You can make your garment look as new by removing the pilling, using a fabric comb or a pill/lint remover.

Still can't find the answer you need? Then scroll down and leave your question so one of our experts can try to help you. This will be done normally within 5 to 10 working days.
In the meantime, you can read the questions and answers that others have left to this pattern or join the DROPS Workshop on Facebook to get help from fellow knitters/crocheters!

You might also like...

Post a comment to pattern DROPS Baby 11-4

We would love to hear what you have to say about this pattern!

If you want to leave a question, please make sure you select the correct category in the form below, to speed up the answering process. Required fields are marked *.

Comments / Questions (69)

country flag Franca Schianchi wrote:

Sto lavorando il modello con i ferri n° 3,5. Ho fatto un campione del motivo M.1, avviando 36 maglie, misura 15 cm di larghezza X 10 ferri, misura 4 cm. di altezza, nella parte più alta dello zig-zag. Con queste misure quante maglie devo avviare per la taglia dei 24 mesi? Grazie.

01.01.2013 - 23:08

DROPS Design answered:

Per avere un risultato simile al modello proposto il campione deve corrispondere a quello indicato nel modello.

14.02.2013 - 10:09

country flag S. Hidalgo wrote:

Für die Größe für 12/18 Monate bin ich mit den angegeben 150 g nicht ausgekommen! Also besser vo vorneherein 200 g kaufen! Ansonsten sehr schönes Modell!

26.12.2012 - 12:06

country flag Hanne Kristine H. Olsen wrote:

Samtidig på siste p av M.8 felles det 2 m jevnt fordelt = 142-166-190-214 m. Arb måles videre fra 1.omg av M.8. Videre deles arb midt bak og det strikkes ferdig frem og tilbake på p. Legg opp 2 nye m i hver side = 146-170-194-218 m. Vil det si at jeg skal strikke en omgang til der jeg øker før jeg begynner på M9?

02.10.2012 - 12:00

DROPS Design answered:

Nej, du skal bare begynde med at strikke M.9 og saet da de 2 m i hver side

05.12.2012 - 17:10

country flag Lis Marhauer wrote:

I opskriften står der "stolpemasker" jeg kan ikke finde nogen steder, hvordan de strikkes. Baby Drops 11-4

27.08.2012 - 17:13

DROPS Design answered:

De strikkes i riller, dvs ret på hver p.

28.08.2012 - 02:15

Isabelle Degremont wrote:

Bonjour, je viens juste de commencer a tricoter le modele babyDROPS11-4. Les explications de la progression sont donnees en hauteur totale: par ex.: commencer les diminutions a 10cm de hauteur totale. A cause du point fantaisie, la bordure de la robe est en zig-zag. A partir de quel point dois-je mesurer la hauteur? Merci!

09.04.2012 - 18:12

DROPS Design answered:

Bonjour Isabelle, mesurez à partir de la pointe du zig-zag. Bon tricot !

10.04.2012 - 10:45

country flag Gun wrote:

Ohjeen ruutupiirroksen selitykset on nyt lisätty suomeksi. Ne löytyvät ohjeen lopusta.

11.06.2008 - 11:37

country flag Leenu wrote:

Miten nuo M9:n kuviot tehdään? Ei ohjeet oikein tanskan kielellä kaavioista mene perille, enkä saa selvää tuosta kuvastakaan.

09.06.2008 - 19:00

country flag Britta WIberg Jensen wrote:

den findes i samme katalog som kjolen. Det er nr. 6 i katalog nr. 11. Der er den i blå, men mønstret er også i den lyserøde farve. God fornøjelse, den er rigtig sød.

29.12.2006 - 15:31

country flag ses wrote:

Hei, eg syest at denne kjolen er så søt. Har også lyst til å strikke den jakka som heng bak. Er det nokon som veit kvar den oppskrifta står henne

26.12.2006 - 18:20