
Popular categories
Looking for a yarn?


|
|||||||||||||||||||
Edison |
|||||||||||||||||||
 |
 |
||||||||||||||||||
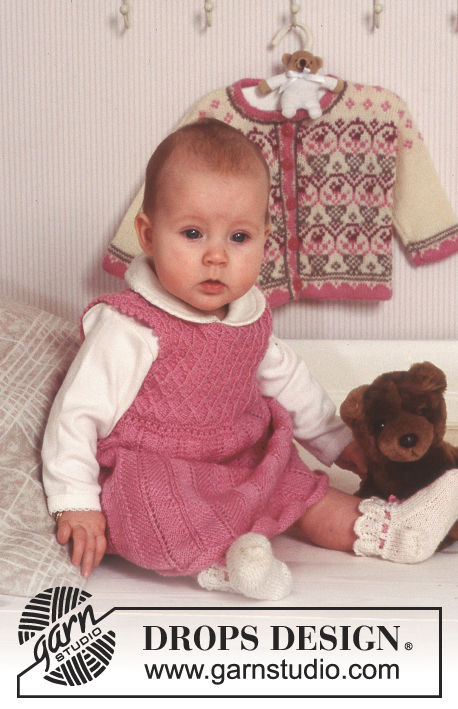
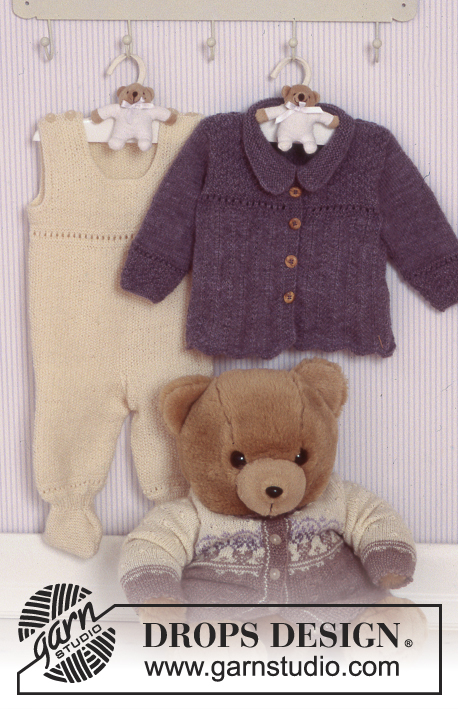
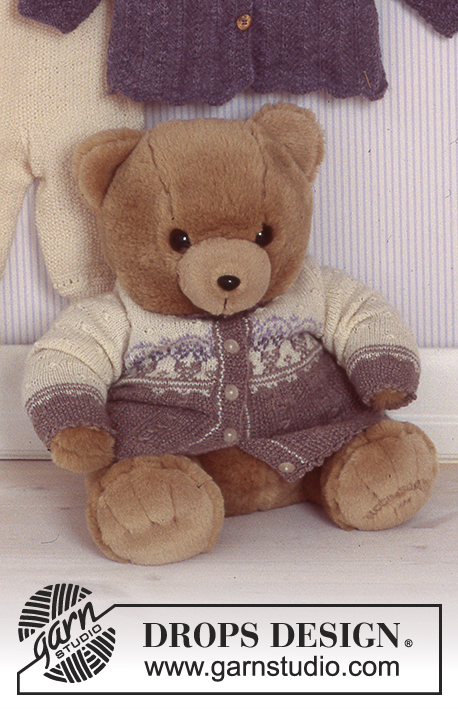
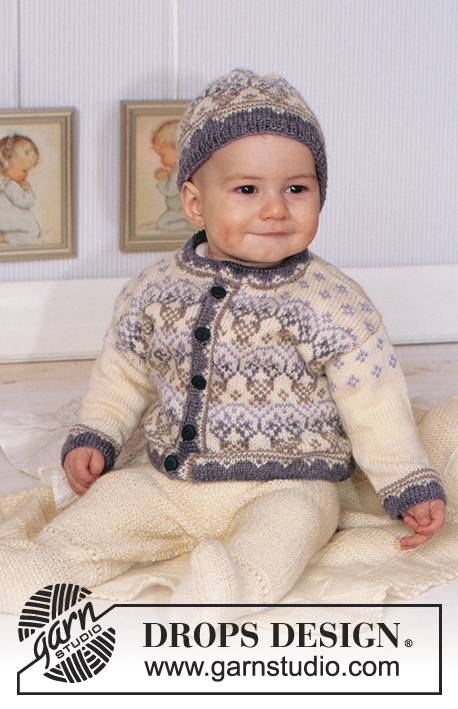
Norwegian style jacket and hat in BabyMerino and blanket in Karisma Superwash.
DROPS Baby 11-6 |
|||||||||||||||||||
|
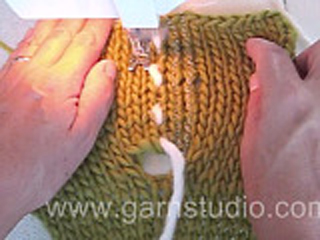
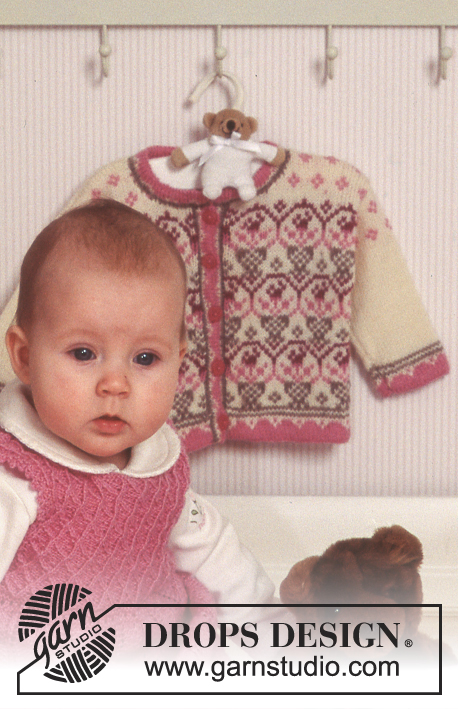
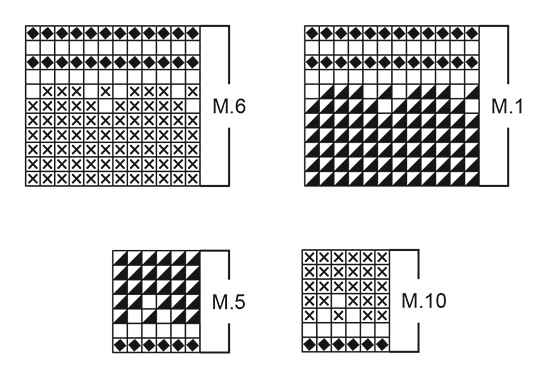
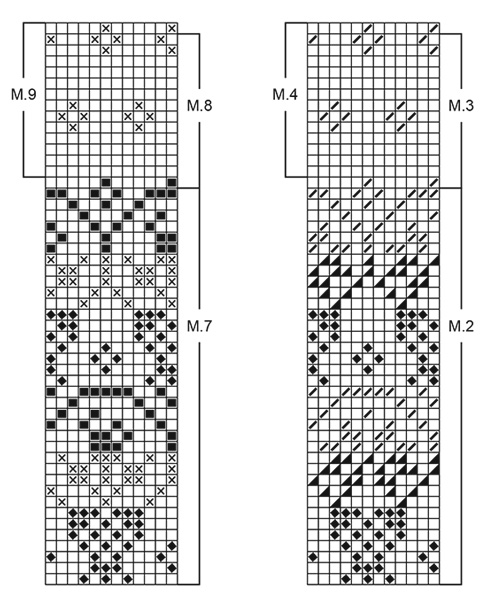
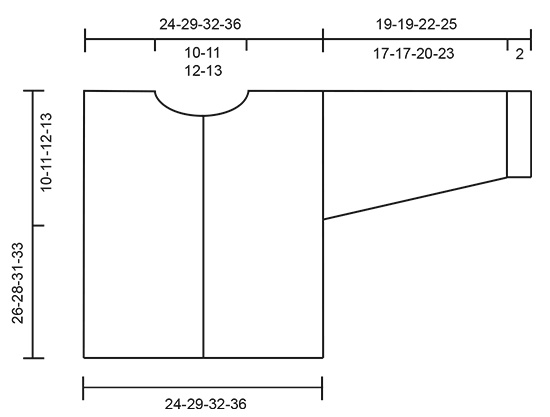
Knitting tension: 25 sts x 34 rows on needles size 2.5 mm in stocking sts = 10 x 10 cm. Pattern: See diagrams M.1 to M.5 (M.6 to M.10). The diagrams show the pattern from the right side. JACKET: Front and back piece: Knitted round, after the folding edge, on circular needle and cut for armhole and front edges afterwards. Cast on 123-147-159-183 sts (incl 1 edge st each side towards mid front) on circular needle size 2 mm with blue (cerise). Knit 5 rows in stocking sts and P 1 round (= folding edge) – measure piece from here. Change to circular needle size 2.5 mm and continue round in M.1 (M.6), at the same time cast on 3 new sts mid front (these 3 sts + 2 edge sts = 5 sts to be cut afterwards are knitted in stocking sts throughout) = 126-150-162-186 sts. After M.1 (M.6) knit 1.5-1.5-2-2 repeats of M.2 (M.7) and continue in M.3 (M.8 – knit 1st row of M.8 in pink the first time and in cerise thereafter) until finished measurements. At the same time, when piece measures 16-17-19-20 cm knit next round as follows from the RS: 5 sts for cutting, knit 29-35-38-44 sts (= front piece), cast off 1 st for armhole, knit 61-73-79-91 sts (= back piece), cast off 1 st for armhole, knit 29-35-38-44 sts (= front piece) = 124-148-160-184 sts. On next row cast on 5 new sts over the cast off st each side (these sts are to be cut for armhole and are knitted in stocking sts) = 134-158-170-194 sts. When piece measures 22-24-26-28 cm cast off 13-15-15-19 sts (incl the 5 sts for cutting) mid front for neck = 121-143-155-175 sts. Finish the piece back and forth on needle. Dec to shape the neckline each side on every other row: 2 sts 2 times and 1 st 3-3-4-4 times. At the same time when piece measures 24-26-29-31 cm cast off the middle 21-23-25-29 sts mid back for neck and dec 1 st towards the neckline on every other row 2 times. Cast of the remaining 41-51-55-63 sts on shoulder (incl the 5 sts for cutting) when piece measures 26-28-31-33 cm. Sleeve: Cast on 36-36-42-42 sts on double pointed needles size 2 mm with blue (cerise). Knit 5 rounds in stocking sts and P 1 round (= folding edge). Make all measurements from here. Read all of this section before knitting it! Change to double pointed needles size 2.5 mm and knit M.1 (M.6). Continue in stocking sts and off-white until piece measure 14-14-17-20 cm, knit 1 repeat of M.4 (M.9) and finish the sleeve in off-white. At the same time when piece measures 4 cm inc 2 sts mid under arm a total of 7-10-9-12 times as follows: Size 3/6 months: on every 7th and 8th round alternately Size 6/9 months: on every 5th round Size 12/18 months: on every 7th round Size 24 months: on every 6th round = 50-56-60-66 sts. When piece measures 19-19-22-25 cm knit reverse stocking sts back and forth on needle from mid under arm (= edge for sewing on sleeve). Cast off when edge measures 1 cm. Assembly: Insert a marking thread in the middle of the 5 sts for cutting mid front and at sides. On your sewing machine make 2 seams on each side of the marking thread, 1st seam = ½ st from the thread, 2nd seam = ½ st from the 1st seam. Cut mid front and for armhole. Sew shoulder seams. Left front edge: Pick up approx 60 to 72 sts (divisible by 6) along left front piece on needle size 2 mm with beige and knit M.5 (M.10), P 1 row from the RS (= folding edge) and knit 7 rows in stocking sts with blue (cerise). Cast off. Fold edge towards WS and attach. Right front edge: Pick up and knit as left front edge, but after 3 rows make 4 buttonholes evenly distributed – the bottom one approx 1 cm from the edge and the top one approx 4-5 cm from the top (there will be a buttonhole on neckline as well). 1 buttonhole: cast off 2 sts and cast on 2 new sts in the same place on the return row. Remember to make buttonholes also on the piece in stocking sts after the folding edge. Neck: Pick up approx 61 to 85 sts (divisible by 6 +1) round the neck (also over the front edges) on circular needle size 2 mm with beige. Knit M.5 (M.10), at the same time after 3 rows make a buttonhole over the others on the front edge. After M.5 (M.10) P 1 row from the RS (= folding edge) and knit 7 rows in stocking sts with blue (pink). Remember button hole on the piece in stocking sts after the folding edge. Cast off, fold the edge towards the WS and attach. Set in sleeves, fold the edge on the sleeve over the cutting edge on back and front pieces and sew. Fold edges at bottom of sleeves and body pieces towards the WS and attach. Sew on buttons. ----------------------------------------------------------------- HAT: To fit head circumference: 40/42 – 44/46 – 48/50 cm Rib: *K1, P1*, repeat from *-*. Cast on 96-108-120 sts on double pointed needles size 2 mm with blue (cerise). Knit 5 rounds in Rib. Change to double pointed needles size 2.5 mm and continue as follows: M.1 (M.6), half a repeat of M.2 (M.7), 1 round of M.3 (M.8) and finish the hat in off-white and stocking sts. When piece measures 10-11-12 cm dec 12-14-16 sts evenly. Repeat the dec on every 4th round a total of 4 times = 48-52-56 sts left. When piece measures approx 14-15-16 cm knit all sts tog 2 by 2. Cut the thread and pull through remaining sts. Sew tight. The hat measures approx 15-16-17 cm. ----------------------------------------------------------------- BLANKET: see pattern no 11-25 ----------------------------------------------------------------- |
|||||||||||||||||||
Diagram explanations |
|||||||||||||||||||
|
|||||||||||||||||||
|
|||||||||||||||||||
|
|||||||||||||||||||
|
|||||||||||||||||||
|
Have you made this or any other of our designs? Tag your pictures in social media with #dropsdesign so we can see them! Do you need help with this pattern?You'll find tutorial videos, a Comments/Questions area and more by visiting the pattern on garnstudio.com. © 1982-2024 DROPS Design A/S. We reserve all rights. This document, including all its sub-sections, has copyrights. Read more about what you can do with our patterns at the bottom of each pattern on our site. |
|||||||||||||||||||


With over 40 years in knitting and crochet design, DROPS Design offers one of the most extensive collections of free patterns on the internet - translated to 17 languages. As of today we count 304 catalogues and 11422 patterns - 11422 of which are translated into English (UK/cm).
We work hard to bring you the best knitting and crochet have to offer, inspiration and advice as well as great quality yarns at incredible prices! Would you like to use our patterns for other than personal use? You can read what you are allowed to do in the Copyright text at the bottom of all our patterns. Happy crafting!
Comments / Questions (10)
Suomenkielisestä ohjeesta puuttuu hihaohjeesta M6(sininen) tai vastaava roosa kuvioohje kokonaan.Ohkeessa käsketään neuloa vain luonnonvalkoisella heti taotereunan jälkeen?Luin englanninkielisen ohjeen ja siinä oli kuvio hihan alareunaan.
20.06.2023 - 12:23Edison by Drops Design baby 11-6. 159 masker + 3 masker til opklipning = 162 masker. Mønsterrapport er på 12 masker det går ikke op i 162-5 masker hvad gør jeg med overskydende maske. Mønster bliver gentaget 13 gange når der ses bort fra 5 masker til opklipning.
25.08.2021 - 16:36DROPS Design answered:
Hei Hanne. Om du strikker str. 12/18 må du strikke 13 rapporter av M.1 + de 3 første maske av M.1 = 12x13=156+de 3 første maske av M.1 = 159 masker + 3 oppklippsmasker = 159 + 3 = 162 masker. Mvh DROPS design
27.08.2021 - 11:16A 22-24-26-28 cm de hauteur totale, pour l\'encolure devant les 13-15-15-19 m centrales (y compris les 5 mailles « steek ») = le mot manquant sil vous plait
09.08.2021 - 02:47DROPS Design answered:
Bonjour Mme Paradis, il fallait lire "rabattre" - le mot manquant a été ajouté, merci pour votre retour! Bonne continuation!
09.08.2021 - 08:41. Terminer en allers retours sur l'aiguille circulaire, en rabattant pour l'encolure de chaque côté tous les 2 rangs : 2 fois 2 m et 3-3-4-4 fois 1 m. En même temps, à 24-26-29-31 cm de hauteur totale, rabattre pour l'encolure dos les 21-23-25-29 m centrales, puis 2 fois 1 m tous les 2 rangs. À 26-28-31-33 cm de hauteur totale, rabattre les 41-51-55-63 m restantes (y compris les 5 m « stune explication serait aprecie et le mot manquant a la phrase suivant ).
09.08.2021 - 02:46Ik wil dit vestje graag gewoon heen en weer breien. Dat kan toch wel? Moet ik dan die 5 steken gewoon weglaten?? vr.gr. Hanneke
01.10.2016 - 09:14DROPS Design answered:
Hoi Hanneke. Ja, dat kan, ik zou dan wel 1 kantst opzetten aan beide zijkanten om later de st voor de voorbies in op te nemen.
03.10.2016 - 11:04Bonjour Je veux faire le modèle en 12/18 mois et je ne comprends pas comment commencer le motif M6 . Sachant que j'aurai 162 mailles sur mon aiguille circulaire dont 5 mailles steek. comment repartir le motif qui se déroule sur 12 mailles ? Par avance merci
30.09.2016 - 11:45DROPS Design answered:
Bonjour Christine, vous avez au total 157 m + 5 m steek: tricotez 13 x M.6 (= 13 x 12 m = 156 m), terminez par la 1ère m de M.6 (= 157 m) et tricotez les 5 m steek en jersey. Bon tricot!
30.09.2016 - 11:51Bonjour. Que veux dire....continuer avec l aiguille circulaire 2, 5 et tricoter M1 (M6), .... je fait la première taille 1/3 ...il faut prendre lequel ?.?? Merci
19.02.2016 - 16:03DROPS Design answered:
Bonjour Catherine, vous suivez le diagramme M1 à M5 dans la version bleue et les diagrammes M6 à M10 dans la version rose. Bon tricot!
19.02.2016 - 16:35I have always admired this set. I would like to make the sweater and hat for my granddaughter who is 3 yrs old. What would I have to do to adjust the size?
30.11.2012 - 23:10De 5 st moeten volgens het patroon doorgeknipt worden bij het afwerken. Kijk onder "Afwerking" voor de beschrijving. U kunt ook bij de video's kijken (Index) hoe u moet naaien en doorknippen. Ik hoop dat u hiermee verder kunt. Succes
21.09.2011 - 10:56Mijn probleem over dit patroon is middenvoor, daar heb ik ook de 5 extra steken die meegebreid is, wat doe ik daarmee? dat staat niet beschreven in de beschrijving van het patroon.waar moet dat in verwerken?
21.09.2011 - 00:21