
Popular categories
Looking for a yarn?


|
|
Lucky Star |
|
|
|
|
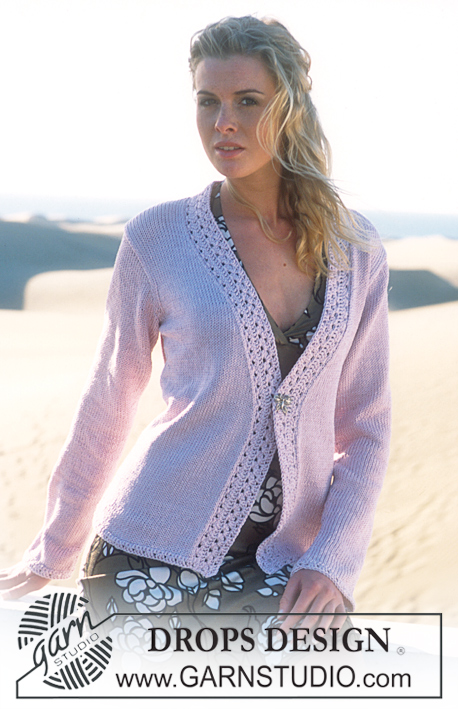
DROPS Cardigan in Ice
DROPS 87-8 |
|
|
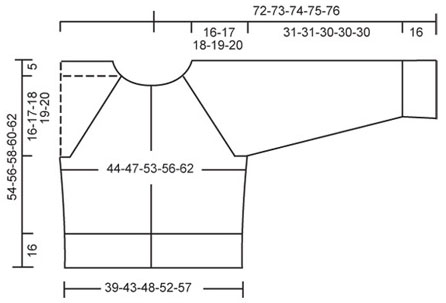
Gauge: 11 sts x 15 rows on larger needles in stockinette st = 10 x 10 cm. Rib: * K 5, P 5 *, repeat from * - *. Buttonband: The buttonbands are knit in garter st. To make the edge neat, knit the bands a little tight. You may wish to knit them on smaller double-pointed needles at the same time as the body on larger circular needles. Buttonhole: Make buttonholes on right buttonband as follows from edge (seen from the right side): K 2, yo, K 2 tog. On the next row twist and knit the yo. Make buttonholes when the piece measures: Size S: 16, 22, 30, 38, 45 cm Size M: 16, 24, 32, 40, 47 cm Size L: 16, 24, 32, 40, 48 cm Size XL: 16, 25, 33, 41, 50 cm Stl XXL: 16, 25, 34, 43, 52 cm Knitting tips (for raglan shaping): Dec inside 2 sts on the sleeve and 1 st on body (the marker sits between the 1 st on body and the 2 sts on the sleeve). Dec as follows on right side: After 1 or 2 sts: slip 1 as if to K, K 1, psso. Before 1 or 2 sts: K 2 tog. Dec as follows on wrong side: After 1 or 2 sts: P 2 tog Before 1 or 2 sts: twist and P 2 tog Knitting tip: If your row gauge is not correct, you will need to make adjustments for the raglan shaping – otherwise, the yoke will be too short or too long. If your gauge is too tight (more than 15 rows = 10 cm), add rows without shaping. If your gauge is too loose (fewer than 15 rows = 10 cm), dec more frequently. Body: Cast on 95-105-115-125-135 sts on smaller circular needles. P 1 row (wrong side), then knit rib, keeping 5 edge sts at each side (center front edges) in garter st – see instructions above. Start and end the rib with K 5 at each side inside of buttonband sts. When the piece measures 16 cm change to larger circular needles and stockinette st but keep the 15 outermost sts at each side as before (5 garter st edge sts, K 5, P 5 rib). On the 1st row after the rib inc to 98-106-118-126-138 sts evenly distributed on the row. Make buttonholes on right button band (see instructions above). Put a marker 27-29-32-34-37 sts in from each side = 44-48-54-58-64 sts between markers on back. When the piece measures 18 cm inc 1 st at each side of each marker. Repeat inc when the piece measures 28 cm = 106-114-126-134-146 sts. When the piece measures 33-34-35-36-37 cm knit the next row as follows (right side row): 26-28-31-33-36 sts (= right front), bind off 6 sts for armhole, 42-46-52-56-62 sts (= back), bind off 6 sts for armhole, 26-28-31-33-36 sts (= left front). Lay piece aside and knit the sleeves. Sleeve: Cast on 35-35-35-45-45 sts on smaller double-pointed needles; join and place a marker at the join. K 1 row, decreasing 5 sts evenly distributed = 30-30-30-40-40 sts. Then knit rib. When the piece measures 16 cm change to larger double-pointed needles and stockinette, adjusting (inc/dec as needed) to 30-32-32-34-34 sts on the 1st row. When the piece measures 18 cm inc 1 st each side of marker every 6.5-6.5-5-5-4 cm a total of 5-5-6-6-7 times = 40-42-44-46-48 sts. When the piece measures 47-47-46-46-46 cm bind off 3 sts each side of marker = 34-36-38-40-42 sts. Lay piece aside and knit second sleeve. Yoke: Put the sleeves in on the same circular needles as body where you bound off for armholes = 162-174-190-202-218 sts. Put a marker in each transition between body and the sleeves = 4 markers. Read the entire section before knitting: Raglan shaping: Body: Dec every other row 12-11-10-9-8 times, then every row 1-4-8-11-15 times. Sleeve: Dec every other row 12-13-14-14-15 times, then every row 0-0-0-1-1 time. Neckband: When the piece measures 46-48-49-51-53 cm put the outermost 11-11-12-12-12 sts at each center front edge on a st holder for the neck edge. Then bind off for the neck every other row: 2 sts 1 time and 1 st 2 times. After all raglan and neck shaping is complete 32-32-30-30-30 sts remain on needles. Pick up approx. 15-18 sts at each side of front neck edge (incl. sts from st holder) = approx. 60-68 sts. Put all sts on smaller circular needles and knit flat as follows: P 1 row (wrong side row), decreasing evenly distributed to 53-53-59-59-59 sts. K 1 row and then P and bind off all sts on the next row – so that the edge will not be too tight, make and bind off a yo approx. every 8 sts at the same time as binding off. Assembly: Sew opening under the sleeve. Sew on buttons. |
|
|
|
|
Have you made this or any other of our designs? Tag your pictures in social media with #dropsdesign so we can see them! Do you need help with this pattern?You'll find tutorial videos, a Comments/Questions area and more by visiting the pattern on garnstudio.com. © 1982-2024 DROPS Design A/S. We reserve all rights. This document, including all its sub-sections, has copyrights. Read more about what you can do with our patterns at the bottom of each pattern on our site. |


With over 40 years in knitting and crochet design, DROPS Design offers one of the most extensive collections of free patterns on the internet - translated to 17 languages. As of today we count 304 catalogs and 11422 patterns - 11417 of which are translated into English (US/in).
We work hard to bring you the best knitting and crochet have to offer, inspiration and advice as well as great quality yarns at incredible prices! Would you like to use our patterns for other than personal use? You can read what you are allowed to do in the Copyright text at the bottom of all our patterns. Happy crafting!
Comments / Questions (7)
Hej Hvilken garn vil du anbefale, jeg anvender i stedet for Ice? Tak for mange gode opskrifter. God dag Mvh Laila
16.01.2023 - 06:34DROPS Design answered:
Hei Laila. Om du ønsker jakken i bomull (DROPS Ice var i 55% Bomull, 45% Akryl), kan du strikke den med 2 tråder DROPS Paris eller 4 tråder DROPS Safran. Men du kan strikke den med 1 tråd i garn fra garngruppe E, f.eks DROPS Andens, DROPS Snow og DROPS Wish (alpaca, ull og ullblandingsgarn). Bare husk å overholde strikkefastheten som er oppgitt i oppskriften. mvh DROPS Design
16.01.2023 - 13:43Vil I forklare mig raglanindtagningerne? Er der 3 masker mellem hver og skal den spejlvendes på hver anden.
16.08.2020 - 12:18DROPS Design answered:
Hei Lone. Ja, det blir 3 masker mellom. Forklaringen til raglanfellingene står beskrevet under Felletips i oppskriften. Der står det hvordan det skal felles både fra retten og fra vrangen og hvordan det skal felles. God Fornøyelse!
24.08.2020 - 10:41Jeg er i tvivl om hvordan raglanindtagning strikkes?\r\nSkal der være 3 masker mellem raglanindtagningerne ved hver mærketråd således:\r\n1 løs af, 1 r, træk over, 3 masker, 2 r sm. Og strikkes det således ved alle 4 mærketråde eller skal det spejlvendes på hvert ærme således: 1 løs af, 1 r, træk over, 3 masker ret, 2 r sm og så modsat ved den næste mærketråd: 2 r sm, 3 m r, 1 r løs af, 1 r, træk over.\r\nEn smuk trøje/jakke som jeg meget gerne vil færdiggøre.
16.08.2020 - 12:17Det gick åt åt 25% mer garn i storlek M. Det gick åt 750 gr och jag brukar klara mig med utsatt åtgång av garn i andra mönster.
11.06.2009 - 12:56The raglan dec on the front piece, continues on the sts you have from sleeve. All sts are on the same needle.
07.01.2008 - 18:03I am having trouble with size small. I begin yoke with 26 sts in front. Raglan shaping decreases 13 sts at sleeve edge. Neckband shaping puts 11 sts on stitch holder & binds off 4 stitches (2+1+1). Total decrease/stitch holder/bindoff is 28. 28 is 2 more than the 26 sts available. What do I do? Thanks!
01.01.2008 - 21:03Pouvez-vous me dire à quelles mesures (poitrine, hanches) correspondent vos patrons?
18.09.2007 - 19:56