
Popular categories
Looking for a yarn?


|
|
Twisted Love |
|
 |
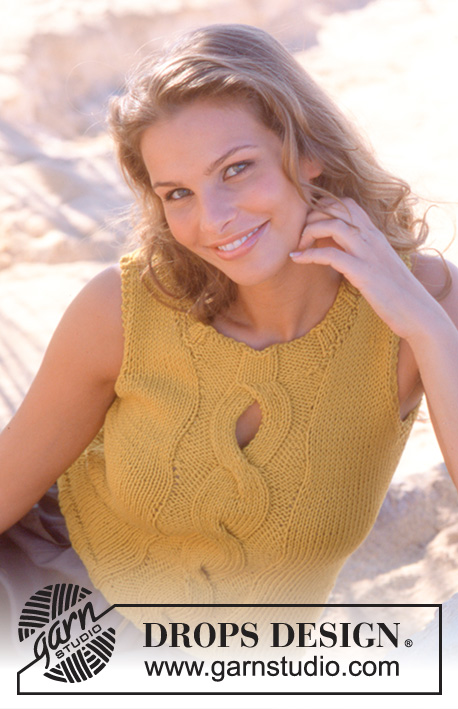 |
DROPS Top in Paris.
DROPS 82-15 |
|
|
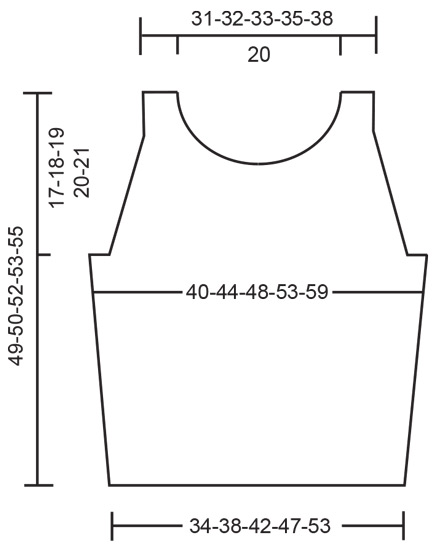
Gauge: 17 sts x 22 rows on larger needles in stockinette st = 10 x 10 cm. Rib: Row 1 (right side): * K 3, P 4 *, repeat from * - *. Row 2 (wrong side): * P 3, K 4 *, repeat from * - *. Knitting tips (for armhole): All decs are made on right side rows. Dec inside of 2 edge sts knit in garter st as follows: After 2 edge sts: Slip 1 as if to knit, K 1, psso.Before 2 edge sts: K 2 tog. Translator’s tip: The front is knit alternately in two pieces and in one piece, facilitated by putting sts on and off st holders. It is much easier to use 2 circular needles (one for each half) instead of using st holders. Front: Cast on 62-68-76-84-94 sts on smaller needles. Knit rib as follows: Row 1 (right side): Size S: K 1 (edge st knit in garter st), P 2, * K 3, P 4 *, repeat from * - * over 14 sts, K 3, P 8, K 6, P 8, * K 3, P 4 *, repeat from * - * over 14 sts, K 3, P 2, and K 1 (edge st knit in garter st).Size M: K 1 (edge st knit in garter st), K 1, * P 4, K 3 *, repeat from * - * over 21 sts, P 8, K 6, P 8, * K 3, P 4 *, repeat from * - * over 21 sts, K 1, and K 1 (edge st knit in garter st) Size L: K 1 (edge st knit in garter st), P 2, * K 3, P 4 *, repeat from * - * over 21 sts, K 3, P 8, K 6, P 8, K 3, * P 4, K 3 *, repeat from * - * over 21 sts, P 2, and K 1 (edge st knit in garter st). Size XL: K 1 (edge st knit in garter st), K 2, * P 4, K 3 *, repeat from * - * over 28 sts, P 8, K 6, P 8, * K 3, P 4 *, repeat from * - * over 28 sts, K 2, and K 1 (edge st knit in garter st). Size XXL: K 1 (edge st knit in garter st), * P 4, K 3 *, repeat from * - * over 35 sts, P 8, K 6, P 8, * K 3, P 4 *, repeat from * - * over 35 sts, K 1 (edge st knit in garter st). Row 2 (wrong side): Size S: K 1 (edge st knit in garter st), K 2, * P 3, K 4 *, repeat from * - * over 14 sts, P 3, K 8, P 6, K 8, * P 3, K 4 *, repeat from * - * over 14 sts, P 3, K 2, and K 1 (edge st knit in garter st). Size M: K 1 (edge st knit in garter st), P 1, * K 4, P 3 *, repeat from * - * over 21 sts, K 8, P 6, K 8, * P 3, K 4 *, repeat from * - * over 21 sts, P 1, and K 1 (edge st knit in garter st) Size L: K 1 (edge st knit in garter st), K 2, * P 3, K 4 *, repeat from * - * over 21 sts, P 3, K 8, P 6, K 8, P 3, * K 4, P 3 *, repeat from * - * over 21 sts, K 2, and K 1 (edge st knit in garter st). Size XL: K 1 (edge st knit in garter st), P 2, * K 4, P 3 *, repeat from * - * over 28 sts, K 8, P 6, K 8, * P 3, K 4 *, repeat from * - * over 28 sts, P 2, and K 1 (edge st knit in garter st). Size XXL: K 1 (edge st knit in garter st), * K 4, P 3 *, repeat from * - * over 35 sts, K 8, P 6, K 8, * P 3, K 4 *, repeat from * - * over 35 sts, K 1 (edge st knit in garter st). Knit 4-4-5-5-6 cm in rib as established (adjust to end after a wrong side row). Change to larger needles and establish pattern on the next row as follows (right side row): K 1 (edge st knit in garter st), 19-22-26-30-35 sts stockinette st, P 8, put the remaining 34-37-41-45-50 sts on a st holder. Pick up and knit 1 st in back of each of the first 6 K sts on st holder = 34-37-41-45-50 sts on needle. Read the rest of the Front section before knitting further: * Knit 3 more rows in pattern as established. At the same time (on right side rows) P 2 tog the 2 first P sts every other row 4 times. After 3 rows put sts on a st holder and knit 4 rows on the other side – start at center front and use a second ball of yarn – make the first dec on the 3rd row, P 2 tog the last 2 P sts (right side row). Put all sts back on needles (you have K 1 (edge st knit in garter st), 19-22-26-30-35 sts stockinette st, P 7, K 12, P 7, 19-22-26-30-35 sts stockinette st, K 1 (edge st knit in garter st) on the row as seen from the right side). Continue decs until you have P 4 at each side of the K 12 at center front (5 more rows – last row is a right side row). Then knit 5 rows in pattern as established – (row 1 is a wrong side row). On the next row (right side row) and every other row for a total of 4 times, inc by P 2 in the 1st P st at right side and P 2 in the last P st at left side – the first 2 incs are made before and the last 2 incs are made after the piece is divided again. Knit 4 rows, then divide the piece at center and knit 4 rows with piece divided (all incs are now complete, there is P 8 at each side of the center K sts). Knit the other side (begin and end at center front), put sts on st holder. Put the sts from first side back on needles and knit the next row as follows (right side row): K 1 (edge st), 19-22-26-30-35 sts stockinette st, P 8, put 6 K sts on a cable needle in front of work, K 6 from the other side. Put sts from cable needle and other side on a st holder *. Repeat from * - * a total of 3 times. At the same time when the piece measures 8 cm inc 1 st at each side every 5 cm a total of 5 times = 1 edge st + 24-27-31-35-40 sts stockinette st at each side of cable sts. After 3 cables the piece measures approx. 31-31-32-32-33 cm. Now knit 1 more cable, leaving it open at center, and at the same time shape armhole. Cable: knit from * - * 1 time, but do not join the two sides – so that the edges of the opening will be neat, knit 1 st at open edge in garter st. The two sides will be joined after the cable (see below). Armhole: At the same time as the last cable begins, knit 4 rows with garter st over 5-6-7-8-9 sts at the side edge, then bind off 3-4-5-6-7 sts at the side for armhole. Then dec 1 st at armhole inside of 2 sts knit in garter st to finished measurements – see Decreasing tips: every other row 7-8-10-11-13 times. After the last cable knit the next row as follows (right side row): K 2 (edge sts in garter st), 13-14-15-17-19 sts stockinette st, P 8, then knit the 6 sts at each side of cable together as follows: put the last 6 sts on a cable needle in front of work, knit 1 st from st holder and 1 st from cable needle together, repeat over all 6 K sts from each side, and then knit the remaining sts on the other side = 52-54-56-60-64 sts. The piece measures approx. 40-40-41-41-42 cm. Neck: Now put the center 18 sts on a st holder for the neck. Bind off at each neck edge every other row: 2 sts 2 times and 1 st 4 times = 9-10-11-13-15 sts remain on each shoulder. Bind off when the piece measures 49-50-52-53-55 cm. Back: Cast on 65-66-79-85-96 sts on smaller needles and establish rib as follows: Row 1 (right side): Size S: K 1 (edge st knit in garter st), P 2, * K 3, P 4 *, repeat from * - * end with K 3, P 2 and K 1 (edge st knit in garter st). Size M: K 1 (edge st knit in garter st), K 2, * P 4, K 3 *, repeat from * - *, finish with P 4, K 2 and K 1 (edge st knit in garter st). Size L: K 1 (edge st knit in garter st), P 2, * K 3, P 4 *, repeat from * - * and finish with K 3, P 2 and K 1 (edge st knit in garter st). Size XL: K 1 (edge st knit in garter st), K 1, * P 4, K 3 *, repeat from * - *, finish with P 4, K 1 and K 1 (edge st knit in garter st). Size XXL: K 1 (edge st knit in garter st), * K 3, P 4 *, repeat from * - *, finish with K 3 and K 1 (edge st knit in garter st). Row 2 (wrong side): Size S: K 1 (edge st knit in garter st), K 2, * P 3, K 4 *, repeat from * - * end with P 3, K 2 and K 1 (edge st knit in garter st). Size M: K 1 (edge st knit in garter st), P 2, * K 4, P 3 *, repeat from * - *, finish with K 4, P 2 and K 1 (edge st knit in garter st). Size L: K 1 (edge st knit in garter st), K 2, * P 3, K 4 *, repeat from * - * and finish with P 3, K 2 and K 1 (edge st knit in garter st). Size XL: K 1 (edge st knit in garter st), P 1, * K 4, P 3 *, repeat from * - *, finish with K 4, P 1 and K 1 (edge st knit in garter st). Size XXL: K 1 (edge st knit in garter st), * P 3, K 4 *, repeat from * - *, finish with P 3 and K 1 (edge st knit in garter st). Knit 4-4-5-5-6 cm rib. Change to larger needles and stockinette st, decreasing 5-0-5-3-4 sts evenly distributed on the first row = 60-66-74-82-92 sts. When the piece measures 8 cm inc 1 st at each side every 5 cm a total of 5 times = 70-76-84-92-102 sts. When the piece measures 31-31-32-32-33 cm knit 4 rows with garter st over 5-6-7-8-9 sts at each side, then bind off 3-4-5-6-7 sts at each side for armhole. Continue to dec 1 st at armhole edge inside 2 edge sts knit in garter st to finished measurements – see knitting tips: every other row 6-7-9-10-12 times = 52-54-56-60-64 sts. Continue with 2 sts in garter st at each side to finished measurements. When the piece measures 47-48-50-51-53 cm bind off the center 30 sts for the neck. Then bind off 2 sts at each neck edge on the next row = 9-10-11-13-15 sts remain on each shoulder. Bind off when the piece measures 49-50-52-53-55 cm. Assembly: Sew shoulder seams and sew side seams using edge sts as seam allowance. Neckband: Pick up 88 or 95 sts around the neck on smaller short circular needles; join and place a marker at the join. Knit rib as follows: The center front 22 sts continue in P 8, K 6, P 8 to follow previous sts, over the remaining sts P 1 row, K 1 row, then knit rib = K 3, P 4. When the collar measures 3 cm bind off all sts in rib. |
|
|
|
|
Have you made this or any other of our designs? Tag your pictures in social media with #dropsdesign so we can see them! Do you need help with this pattern?You'll find tutorial videos, a Comments/Questions area and more by visiting the pattern on garnstudio.com. © 1982-2024 DROPS Design A/S. We reserve all rights. This document, including all its sub-sections, has copyrights. Read more about what you can do with our patterns at the bottom of each pattern on our site. |
|


With over 40 years in knitting and crochet design, DROPS Design offers one of the most extensive collections of free patterns on the internet - translated to 17 languages. As of today we count 304 catalogs and 11422 patterns - 11417 of which are translated into English (US/in).
We work hard to bring you the best knitting and crochet have to offer, inspiration and advice as well as great quality yarns at incredible prices! Would you like to use our patterns for other than personal use? You can read what you are allowed to do in the Copyright text at the bottom of all our patterns. Happy crafting!
Comments / Questions (20)
Je vois que sur la photo il ny a pas 5 cm de côtes comme il est dis dans les explications ???
01.08.2023 - 17:31DROPS Design answered:
Bonjour Corinne, le modèle était probablement tricoté en taille S ou M, et doit donc avoir 4 cm de côtes seulement - mais on les voit très peu sur la photo, elles sont effectivement un peu cachées. Bon tricot!
01.08.2023 - 17:57Suite à mon message du 27 juillet merci de me donner des informations sur ce modèle Dites moi s il y eu des modifications !!!!! Cordialement
01.08.2023 - 08:47DROPS Design answered:
Bonjour Corinne, nous n'avons pas fait de modifications récemment, mais peut-être pourriez-vous nous indiquer quelle partie des explications vous ne comprenez pas? Ce serait ainsi plus simple pour nous de vous aider. Merci pour votre compréhension.
01.08.2023 - 09:34Bonjour Pourriez vous s il vous plaît me donner des renseignements concernant la torsade du devant car je comprends pas les explications et pourtant experte au niveau tricot Cordialement
27.07.2023 - 14:44DROPS Design answered:
Bonjour Argentin, les explications des torsades sont incluses dans les explications écrites de ce modèle; à quel niveau des explications en êtes vous? Ce sera plus facile de vous répondre si nous savons où vous en êtes (et quelle taille vous faites). Merci pour votre compréhension!
27.07.2023 - 16:27Jeg forstår ikke ret meget forklaringen pp forstykket. Jeg synes det er lidt dårligt forklaret. Er der mulighed for, at I kan lave en video, hvor i strikker hele forstykket?
21.08.2022 - 13:18DROPS Design answered:
Hei Mathilde. Vi kan sette opp et videoønske, men usikker på når vi får anledning til å lagen en video på det. Nå prioriteres sesongens oppskrifter. Men strikk slik: 1 kantmaske, 2 vrangmasker, 3 rett, 4 vrang, 3 rett, 4 vrang, 3 rett, 8 vrang, 6 rett, 8 vrang, 3 rett, 4 vrang, 3 rett, 4 vrang, 3 rett, 2 vrang og 1 kantmaske = 62 masker. Når det er brukt 2 stjerner *, så fortelles det at da er det noe som skal gjentas flere ganger. Slik som i denne oppskriften når det står *3 r, 4 vr* gjentas fra *-* over 14 masker, så strikker du 3 rett, 4 vrang, 3 rett, 4 vrang (3+4+3+4=14 masker). mvh DROPS Design
22.08.2022 - 14:10Vil du prøve at skrive præcis, hvordan maskerne i ribben forløber sig i str. s. Jeg forstår ikke, at der står, jeg skal gentage over 14 masker både i begyndelsen og i slutningen. Hvis jeg gentager så mange gange, kommer der mere end 62 masker. Regnestykket ser sådan ud, når jeg læser det: 1+2+3+4+14+3+8+6+8+3+4+14+3+2+1 = 76m.
15.08.2022 - 18:03DROPS Design answered:
Hei Mathilde, Du får 1 kantmaske, 2vr, 14 masker i vrangbord (3r, 4vr x 2), 3r, 8vr, 6r, 8vr, 14 masker i vrangbord (3r, 4vr x 2), 3r, 2 vr og 1 kantmaske. Det er totalt 62 masker. God fornøyelse!
17.08.2022 - 06:55Hej. Jeg kan ikke få maskerne til at passe i ribben på forstykket. Jeg strikker en smal, og der står jeg skal slå 62 masker op, men ribben er strikket over 76 masker? Hvordan går det op?
14.08.2022 - 12:21DROPS Design answered:
Hei Mathilde. LItt usikker på hvor du har 76 masker fra? Vrangborden som er beskrevet i oppskriften går over 62 masker. Slik strikkes vrangeborden i str S: 1 kantm, 2 vr, * 3 r, 4 vr *, gjenta fra *-* over 14 m, 3 r, 8 vr, 6 r, 8 vr, * 3 r, 4 vr *, gjenta fra *-* over 14 m, 3 r, 2 vr og 1 kantm = 62 masker. mvh DROPS Design
15.08.2022 - 13:10Bonjour, Est-ce normal que le dos et le devant ne soit pas tricoté avec la même grosseur d’aiguille? Le modèle indique une taille 6 pour le devant et 5 pour le dos. Merci pour votre réponse !
10.05.2022 - 23:04DROPS Design answered:
Bonjour Mme De Waele, c'était une faute de frappe, le devant se tricote bien en 5, comme le dos. La correction a été faite, merci pour votre retour,. Bon tricot!
11.05.2022 - 08:23Hi! I’ve just finished knitting the rib pattern for the beginning of the front, however, I’m having trouble understanding the next steps. I’ve already put the remaining sts on a st holder. The next sentence doesn’t make sense to me “Pick up and knit 1 st in back of each of the first 6 K sts on st holder = 34-37-41-45-50 sts on needle.” Could you please elaborate more? Thanks!
24.03.2021 - 14:03DROPS Design answered:
Dear Shafia, this video shows (for another kind of pattern) how to pick up stitches behind other stitches. Ie in that case, pick up 1 stitch behind each of the first st from thread as shown in the video linked above. Happy knitting!
24.03.2021 - 15:37Hello - I would like help with the second part of the splitting of the cable, when dividing the two sides again. the patter says"Knit 4 rows, then divide the piece at center and knit 4 rows with piece divided" Does divided also mean picking up a new yarn in addition to divining onto separate needles? because then once you repeat back to the *, it also says to pick up another ball of yarn -then also confused about "Knit the other side: the wrong side? or other needle? thx!
31.08.2020 - 17:18DROPS Design answered:
Dear Ingrid Solveig, these 4 rows have to be worked separately on each side (each side with its own ball might avoid to cutting the yarn and join it). On next row you work both parts together crossing the stitches for the cable. Happy knitting!
01.09.2020 - 09:00Thx. Got it. Was reading decrease tips as sskp on right piece and k2tog on left piece..do them each side on both pieces. Thank you
16.05.2019 - 16:36