
Popular categories
Looking for a yarn?


|
|||||||||||||||||||
DROPS 44-2 |
|||||||||||||||||||
|
|
|||||||||||||||||||
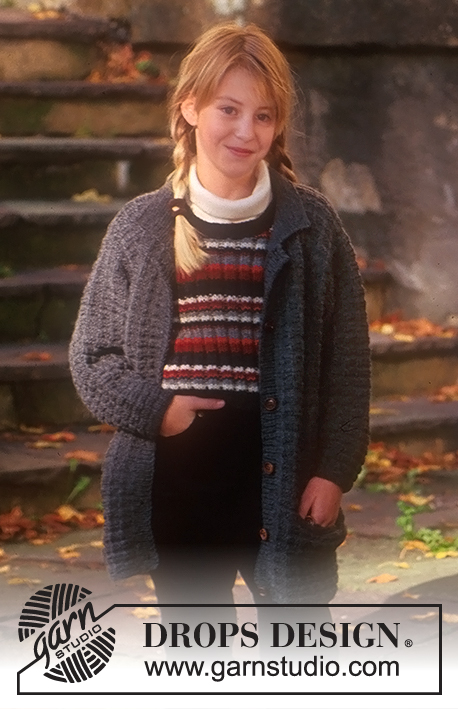
Jacket with pockets in English rib and Waistcoat / slipover
DROPS 44-2 |
|||||||||||||||||||
|
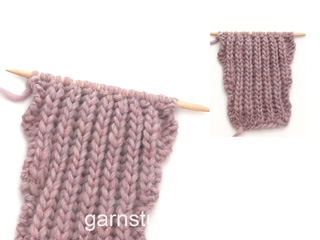
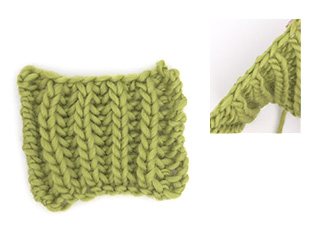
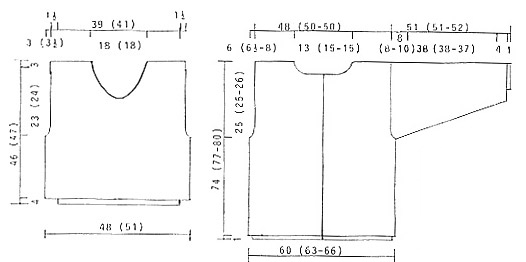
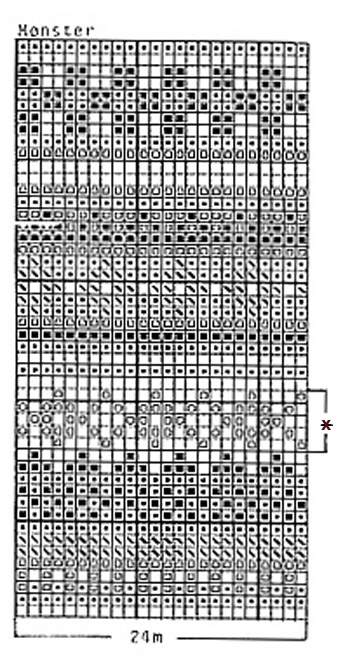
Knitting tension: 19sts x 40 rows on needle size 4 mm and English rib = 10 x 10 cm Remember needle sizes are guidelines only! Ridge (back and forth on needle): 1 ridge = 2 rows 1st row: K, 2nd round: K ‘English rib’ (back and forth on needle): Pattern is dividable by 2 + 3 sts. 1st row (= RS): 1 edge st, * YO, slip 1 st as if to knit, K1 *, YO, slip 1 st as if to knit, 1 edge st. 2nd row (=WS): 1 edge st, * P slipped st and YO tog, K1 *, P slipped st and YO tog, 1 edge sts. Repeat 1st and 2nd rows continuously. Rib: * K1, P1 *, Repeat from *-*. Pocket lining: Cast on 32 sts on double pointed needles size 4 mm with grey and knit 24 cm stocking sts and cast off 2 sts evenly on row = 30 sts and slip sts onto thread or stitch holder. Knit 2 pcs. Buttonhole: When piece measures 1 (1-1), 9 (9.5-10) cm, 17.5 (18.5-19.5), 26 (27.5-29), 34.5 (26.5-38.5) cm, 43 (45.5-48) cm and 51 (54-57) cm cast off for buttonholes on right front piece as follows: Cast off 3rd and 4th sts and cast on 2 new sts over cast off sts on next row. _____________________________________________________________________ BODY Knit jacket back and forth on circular needles. Cast on 239 (251-261) sts on needle size 4 mm and knit 2 ridges. Continuing knit english rib with 5 ridge sts on each side mid front (= front band). Remember buttonhole on right front edge – see explanation above. Remember knitting tension. When piece measures 20 (20-20) cm knit next row as follows: Knit 16 (16-16) sts, slip 30 sts onto thread or stitch holder, knit until 46 (46-46) sts are left, slip 30 sts onto thread or stitch holder for pocket, knit 16 (16-16) sts. On next row slip pocket lining (see explanation above) in on row in opening over the 30 sts on thread or stitch holder. Continue with established rib. When piece measures 49 (52-54) cm knit next row as follows: 60 (63-66) sts front piece, cast off 4 sts for armhole, 111 (117-121) sts back piece, cast off 4 sts for armhole, 60 (63-66) sts front piece. Complete each piece separately. Left front piece: = 60 (63-66) sts. Continuing cast off for armhole on every other row: 3 sts 1 (1-2) times, 2 sts 2 (3-2) times, 1 sts 3 (2-3) times = 50 (52-53) sts. When piece measures 52 (55-58) cm continu as before and at the same time knit collar in "English rib" over front band sts. Knit ridge on first sts (= edge sts) and on first row inc to 4 sts in the other sts (= 3 new sts). Then continue to inc 1 st within 1 edge sts on every other row 16 times. AT the same time dec 1 st by knitting 2 sts tog within the original 7th st (= the last st from front band) on every 4th row: 6 (8-9) times, and then dec 1 st continuously 6 times on every 6th row = 57 (57-57) sts. Knit in new sts into "English rib". When piece measures 74 (77-80) cm cast off 33 (33-33) sts for shoulder and continue with "English rib" continuously on remaining 24 (24-24) sts (measure collar from this point). When collar measures 6.5 (7.5-7.5) cm from shoulder cast off from side of shoulder towards mid front on every other row: 1sts 16 times and then remaining 8 sts at once. Right front piece: Knit like left front piece but cast off for collar by knitting 2 tog are cast off as follows: Slip 1 sts as if to knit, K1, psso. Back piece: = 111 (117-121) sts. Continuing cast off for armhole like front piece = 91 (95-95) sts. When piece measures 72 (75-78) cm cast off middle 21 (25-25) sts to shape neckline. Then cast off 2 sts on each side on next row to shape neckline. Cast off when piece measures 74 (77-80) cm. SLEEVE Knit sleeves back and forth on needle. Cast on 44 (44-46) sts (incl 1 edge sts on each side to seam) on needle size 4 mm with grey and knit 2 ridges. Continuing knit "English rib", see explanation above. When piece measures 5 (5-5) cm inc each side within edge sts: 1 sts 26 (26-27) times on every 5th row = 96 (96-100) sts. When piece measures 43 (43-42) cm cast off on each side to shape sleeve cap on every other row: 2 sts 16 (16-20) times, cast off Piece measures approx 51 (51-52) cm. ASSEMBLY Sew shoulder seams. Sew collar from front piece along neck edge on back piece. Sew on collar mid back. Slip sts from thread or stitch holder for pocket onto needle size 2.5 mm and knit rib – but inc 10 sts evenly on first row = 40 sts and after 1.5 cm P1 row, cast off. Fold pocket lining double, sew edges tog with backstitches and then sew pocket lining into first row of rib edge of pocket. Sew in sleeves and buttons. ________________________________________ DROPS Waistcoat with small borders. Size: Small/medium (Medium/large) Materials: DROPS Karisma Superwash from Garnstudio 100 (100) g colour no 56, brown 50 (100) g colour no 55, beige 50 (50) g colour no 48, wine 50 (50) g colour no 51, blue 50 (50) g colour no 49, rust DROPS circular needle and double pointed needles sizes 2.5 mm and 4 mm. Knitting tension: 20 sts x 26 rows on needle size 4 mm and pattern = 10 x 10 cm Remember needle sizes are guidelines only! Pattern: See diagram (1 diagram = 1 pattern repeat) Diagrams are seen from RS. Knit entire pattern in stocking sts. * = Marked round on diagram only apply to sizes Medium/large. Waist coat will be too big if these rounds of the pattern has to go into number of sts amount around body. Therefore the pattern is written so there will be a full and an open round knit tog on one side. Rib: * K1, P1 *, Repeat from *-*. Body: Cast on 192 (204) sts on circular needle size 2.5 mm with brown and knit 4 cm Rib. Change to circular needles size 4 mm. Continue in pattern. Remember knitting tension. When piece measures 20 (20) cm knit next row as follows: Cast off 2 sts for armhole, 92 (98) sts front piece, cast off 4 sts for armhole, 92 (98) sts back piece, cast off 2 sts for armhole. Complete each piece separately. Front piece: = 92 (98) sts. Continuing cast off for armhole on every other row: 3 sts 1 time, 2 sts 1 time, 1 sts 2 times = 78 (82) sts. When piece measures 28 (29) cm cast off middle 8 (8) sts for neck. Continuing cast off to shape neckline on every other row: 2 sts 2 time, 1 st 6 times and then on every 4th row: 1 sts 1 times and then on every 6th row: 1 st 3 times. At the same time when piece measures 43 (44) cm cast off for shoulder from armhole towards neckline on every other row: 5 (6) sts 3 times, 6 (5) sts 1 time. All sts are now cast off, piece measures approx 46 (47) cm. Back piece: = 92 (98) sts. Continuing cast off for armhole and shoulder on front piece. Neck: When piece measures 44 (45) cm cast off middle 32 (32) sts for neck. Then cast off 2 sts on each side on next row to shape neckline. Assembly: Sew shoulder seams. Pick up approx 130 sts round neckline on double pointed needles size 2.5 mm with brown and knit 2 cm rib, cast off. Pick up approx 120 sts round neckline on double pointed needles size 2.5 mm with brown and knit 1.5 cm rib, cast off. |
|||||||||||||||||||
Diagram explanations |
|||||||||||||||||||
|
|||||||||||||||||||
|
|||||||||||||||||||
|
|||||||||||||||||||
|
Have you made this or any other of our designs? Tag your pictures in social media with #dropsdesign so we can see them! Do you need help with this pattern?You'll find tutorial videos, a Comments/Questions area and more by visiting the pattern on garnstudio.com. © 1982-2024 DROPS Design A/S. We reserve all rights. This document, including all its sub-sections, has copyrights. Read more about what you can do with our patterns at the bottom of each pattern on our site. |
|||||||||||||||||||


With over 40 years in knitting and crochet design, DROPS Design offers one of the most extensive collections of free patterns on the internet - translated to 17 languages. As of today we count 304 catalogues and 11422 patterns - 11422 of which are translated into English (UK/cm).
We work hard to bring you the best knitting and crochet have to offer, inspiration and advice as well as great quality yarns at incredible prices! Would you like to use our patterns for other than personal use? You can read what you are allowed to do in the Copyright text at the bottom of all our patterns. Happy crafting!
Comments / Questions (13)
For the vest front piece. (M/L), pattern notes to cast off stitches for the armhole, 3 sts one row, 2 sts 1 row and 1 sts two rows. Assuming these are cast off at either end of the rows it amounts to 14 stitches. Front piece starts with 98 sts after cast off for armholes it note 82 stitches ie a reduction of 16 stitches. Is this incorrect and should patter read 84 stitches?
02.09.2023 - 17:10DROPS Design answered:
Dear Marie, you cast off only on every 2nd row (so from rows from the same side). And yes, there seems to be a mistake in this pattern, we'll check it with the design department. Happy knitting!
03.09.2023 - 23:19Have some of the colour numbers been discontinued (I dont seem to be able to find the rust or the blue)? If so could you confirm the new colour numbers as shown in the image for the waste coat. Many thanks.
21.08.2023 - 12:28DROPS Design answered:
Dear Marie, oh yes some colours might have been discontinued since this pattern has been published, but you should be able to find similar colours in the new / current shadecard. Should you need any help choosing the best matching colours, please feel free to contact your DROPS store, even per mail or telephone. Happy knittting!
21.08.2023 - 15:10Leider noch eine Frage: Haben sie eine Skizze von Kragen? Ich verstehe nicht, wie ich den Kragen fertigstellen und dann an- und zusammennähen soll.
04.09.2022 - 15:57DROPS Design answered:
Liebe Frau Schwab, schauen Sie mal dieses Video, auch wenn den Kragen nicht genau der gleiche im Video ist, wird die Technik dieselbe sein = die abgekettetene Maschen von beiden Kragen-Hälfte zusammennähen und dann am Halsausschnitt/Rückenteil annähen. Viel Spaß beim fertigstellen!
05.09.2022 - 09:25Ich verstehe die Kragenanleitung nicht. Habe mit den Zunahmen für den Kragen begonnen und verstehe nicht, wie und warum ich gleichzeitig Maschen re zusammen stricken soll? Besten Dank für Ihre Hilfe
30.08.2022 - 07:33DROPS Design answered:
Liebe Frau Schwab, Sie werden jetzt gleichzeitig für den Kragen (1 Masche x 16 Mal in jeder 2. Reihe) zunehmen und für den Halsausschnitt (1 Masche 6-8-9 Mal in jeder 4. Reihe + 6 Mal in jeder 6. Reihe) abnehmen - die Abnahmen werden innerhalb 7 Maschen gestrickt, dh beim linken Vorderteil vor den 7 Blenden-Maschen. Kann das Ihnen helfen?
30.08.2022 - 08:33Leider noch ne Frage........die Tasche soll 24 cm hoch gestrickt werden und bei einer Höhe von 20 cm des Rumpfteils eingearbeitet? Dann hängt die doch unten raus oder verstehe ich hier was nicht ? Vielen Dank noch mal, hoffe es kommt sonst nix mehr ;)
18.01.2022 - 07:40DROPS Design answered:
Liebe Jutta, die Taschen werden danach doppelt gefaltet und zusammen genäht, dh sie werden nur 12 cm hoch. Viel Spaß beim stricken!
18.01.2022 - 10:45Ich glaube, dass die Musteranleitung (Patent) falsch dargestellt ist. Scheint, die Anleitung ist noch nicht überarbeitet. Sollte sie aber sein. Möchte die Jacke nachstricken (sehr schönes klassisches Modell) ...hoffentlich geht alles glatt ;)
15.01.2022 - 08:19DROPS Design answered:
Liebe Jutta, vielleicht kann Ihnen dieses Video helfen? Viel Spaß beim stricken!
17.01.2022 - 10:01I opskriften 44-2 - Strikket jakke i helpatent - er der i forklaringen til helpatent brugt udtrykket: kast (kastet vrang) Hvad i alverden betyder det?? Venlig hilsen Ingrid
01.02.2020 - 09:40DROPS Design answered:
Hei Ingrid. Du skal strikke den løsemasken (den masken du løftet løst over på forrige pinne) og kastet vrang sammen. God Fornøyelse!
03.02.2020 - 11:53Hej, jag försökte få tag på knapparna som är till koftan men hittar dom inte. Vilken storlek är det på dom? Så kan man beställa en annan
06.01.2020 - 00:00DROPS Design answered:
Hej De har dessvärre utgått ur sortimentet, men jag tror att de är ca 2 cm så du bör kunna byta ut de mot t.ex knapp 515. Mvh DROPS Design
29.01.2020 - 11:39Ich habe mehrmals gelesen, dass diese Wolle die Tendenz zum 'Ausleiern' hat. Ist das Patentmuster dafür sehr anfällig? Sollte man vielleicht eine kleinere Nadel wählen? Eine kleinere Größe? Habe noch nicht angefangen.... Danke für die Antwort
29.03.2017 - 08:13DROPS Design answered:
Liebe Frau Gallasch, am besten stricken Sie zuerst Ihre Maschenprobe, dann waschen Sie sie wie Sie dann Ihre Jacke waschen werden, und die Maschenprobe mal prüfen. Und beachten Sie immer die Pflegehinweise. Mehr Hilfe und Tipps bekommen Sie gerne von Ihrem DROPS Laden, auch telefonisch oder per mail. Viel Spaß beim stricken!
29.03.2017 - 09:58Zu den Ärmeln: Sie schreiben, die Ärmel werden auf einem Nadelspiel hin und zurück gestrickt. Wenn hin- und zurück, warum dann Nadelspiel? Wenn in Runden, warum dann Randmaschen? Wie werden die Ärmel gestrickt, rund oder gerade und später zusammen genäht? mit freundlichem Gruß Regine
16.03.2015 - 10:41DROPS Design answered:
Liebe Regine, die Anleitung ist schon etwas in die Jahre gekommen, sie wird in Kürze noch einmal überarbeitet. Sie haben natürlich Recht, dass das ein Widerspruch ist. Richtig ist, dass Sie die Ärmel in Hin- und Rück-R mit beidseitig je 1 Rand-M auf einer geraden Nadel oder einer Rundnadel stricken, nicht mit dem Nadelspiel. Die Ärmel werden am Ende zusammengenäht.
16.03.2015 - 13:15