
Popular categories
Looking for a yarn?


|
||||||||||||||||||||||
Northern Dream |
||||||||||||||||||||||
 |
 |
|||||||||||||||||||||
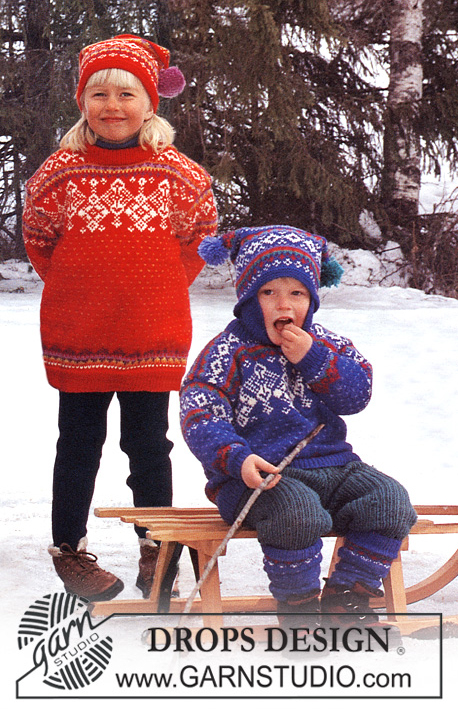
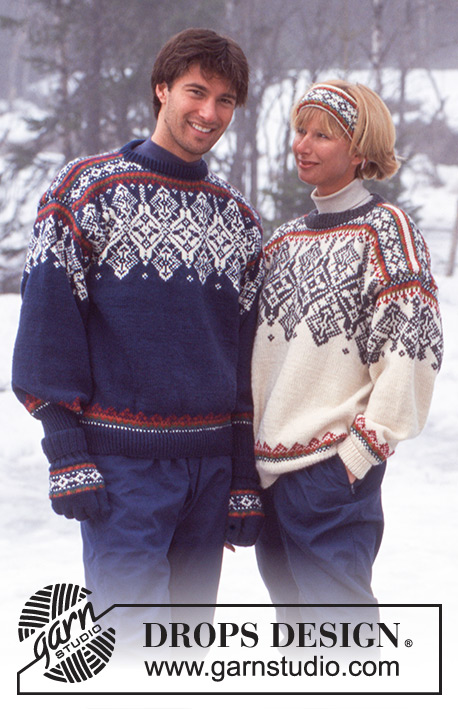
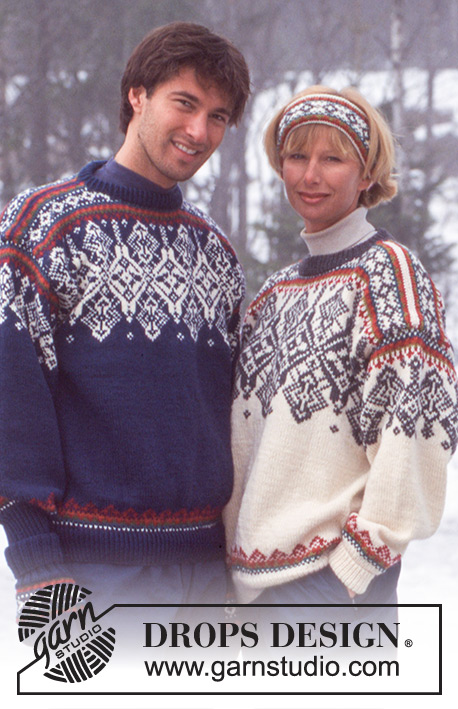
DROPS Norwegian sweater for men with snow crystals, headband, hat, gloves and socks in Karisma Superwash.
DROPS 47-1 |
||||||||||||||||||||||
|
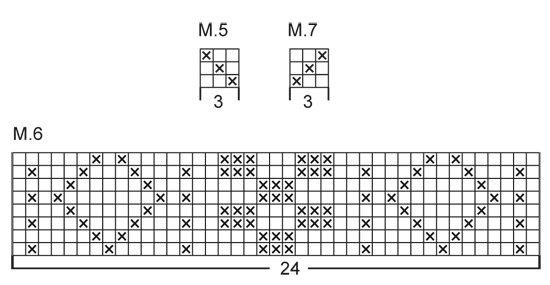
Knitting gauge: 21 sts x 28 rows on needles size 3.5 mm / US 4 with Karisma in stockinette sts = 10 x 10 cm / 4" x 4". Rib: *K1, P1*, repeat from *-* Pattern: See diagram M.1 – M.6. The diagrams show the pattern from the RS. BODY The description in ( ) = male and yarn alternative 2. The sweater is worked on circular needles and is cut for the armholes afterwards. Cast on 240-256-272 (256-272) sts on circular needles size 2.5 mm / US 1or2 with off-white (blue) and work 6 cm / 2⅜" Rib. Change to circular needles size 3.5 mm / US 4 and work chart M.1. After M.1 continue with off-white (blue) until the piece measures 31-33-36 (38-41) cm / 12¼"-13"-14¼" (15"-16⅛"). Remember to check the knitting gauge! Insert a marking thread each side: front and back piece = 120-128-136 (128-136) sts each. Now finish the piece in M.2 – begin at the arrow for appropriate size and work over the front sts, begin at the arrow again and work over the back sts. At the same time when the piece measures 33-35-36 (39-41) cm / 13"-13¾"-14¼" (15¼"-16⅛") inc 5 sts each side (these sts are the seam sts to be cut up for the armholes at the end and are therefore not included in the pattern). Continue the pattern. When the piece measures 54-56-58 (61-64) cm / 21¼"-22"-22¾" (24"-25¼") bind off the middle 26-28-30 (30-32) sts at the front for the neck and continue to work back and forth on needle. Then bind off towards the neck on every other row each side: 3 sts 1 time, 2 sts 2 times and 1 st 1 time. At the same time when the piece measures 58-60-62 (65-68) cm / 22¾"-23½"-24½" (25½"-26¾") bind off the middle 38-40-42 (42-44) sts at the back for the neck. On the following row bind off 2 sts towards the neck. Bind off remaining sts after M.2 – the piece measures approx. 60-62-64 (67-70) cm / 23½"-24½"-25¼" (26½"-27½"). Sleeve: Cast on 54-56-56 (56-58) sts on double pointed needles size 2.5 mm / US 1or2 with off-white (blue) and work 10 cm / 4" in Rib – the Rib is folded double and therefore measures 5 cm / 2" when folded. Change to double pointed needles size 3.5 mm / US 4 and work M.1 and then continue with off-white (blue) - at the same time after the Rib inc 2 sts mid under arm for ladies size S+M and men size S/M + M/L: on every 4th row, for ladies size L: alternate between every 3 and every 4th row, a total of 30-29-31 (31-32) times = 114-114-118 (118-122) sts. At the same time when the piece measures 36-35-34 (41-40) cm / 14¼"-13¾"-13⅜" (16⅛"-15¾") work M.3 and then 2 rows in off-white – the sleeve measures approx. 50-49-48 (55-54) cm / 19¾"-19¼"-19" (21⅝"-21¼"). Then work 2 cm / ¾" in revere stockinette, for an edge to cover the cut edge on body part, with off-white (blue). Bind off. Assembly: Sew a marking thread in the center of the inc sts each side of the body part. Sew 2 seams on a sewing machine around the marking thread 1st seam = ½ st from the marking thread, 2nd seam = ½ st from the 1st seam. Cut up for armholes. Sew the shoulder seam. Pick up approx. 100-106 sts around the neck on double pointed needles size 2.5 mm / US 1or2 in gray (blue) and work 1 round of stockinette sts and then 6 cm / 2⅜" in Rib, bind off and fold double towards the WS and sew. Sew the sleeves to the body from the RS as follows: Alternate between 1 st in the last row on the sleeve before edge then 1 st in the body part after the machine sewn seam. Turn the sweater and sew the edge from the sleeves over the cut edges on the body part. ------------------------------- HEADBAND: Size: Ladies (Men) Materials: DROPS Karisma Superwash from Garnstudio 50 (50) g color no. 01, off white (color no. 37, blue) + a remainder of the pattern colors DROPS double pointed needles size 2.5 mm / US 1 or the size needed to obtain the correct knitting gauge. Knitting gauge: 23 sts x 32 rows on needles size 2.5 mm / US 1 with Karisma in pattern knit = 10 x 10 cm / 4" x 4". Headband: Description and color suggestions in ( ) = male. Cast on 120 (128) sts on double pointed needles size 2.5 mm / US 1 with off white (blue) and work 18 rows stockinette sts, purl 1 round (= folding edge), work chart M.4, Purl 1 round (= folding edge), 2 rounds in off white (blue) and bind off. Sew the cast on and st on and bind off edge tog, sew in the outermost sts to avoid a chunky seam. ------------------------------- HAT: Size: The hat circumference = 46 (50) cm / 18" (19¾") Materials: DROPS Karisma Superwash from Garnstudio 150 (150) g color n. 01, off white (color n. 37, blue) + a remainder of the pattern colors DROPS circular needles size 3 and 3.5 mm/US 3 and 4 or the size needed to obtain the correct knitting gauge. Knitting gauge: 21 sts x 28 rows on needles size 3.5 mm / US 4 with Karisma in stockinette sts = 10 x 10 cm / 4" x 4". Rib: *K2, P2*, repeat from *-* Hat: Cast on 144 (152) sts on circular needle size 3 mm / US 2or3 with off-white (blue) and work in 15 cm / 6" Rib. Change to needle size 3.5 mm / US 4 and work M.4. At the same time bind off 48 (48) sts evenly distributed on the first round = 96 (104) sts. After M.4 continue with off-white (blue) at the same time insert a marker after every 6th (8th) st. On next round K2 tog after each marker. Repeat dec on every 5th (7th) round until 16 (13) sts left. Pull a double thread through the remaining sts and sew tight. Make a small pompom approx 5 cm / 2" in diameter with off-white (blue) and sew it tight to the top of the hat. ------------------------------- GLOVES: Size: Ladies (Men) Materials: DROPS Karisma Superwash from Garnstudio 100 (100) g color no. 01, off white (color no. 37, blue) + a remainder of the pattern colors DROPS double pointed needles size 3 and 3.5 mm/US 3 and 4 or the size needed to obtain the correct knitting gauge. Knitting gauge: 21 sts x 28 rows on needles size 3.5 mm / US 4 with Karisma in stockinette sts = 10 x 10 cm / 4" x 4". Rib: *K2, P2*, repeat from *-*. Gloves: Description and color suggestions in ( ) = male. Cast on 52 (56) sts on double pointed needles size 3 mm / US 2or3 with off white (blue) and work 15 cm / 6" Rib - at the same time bind off 8 (8) sts evenly distributed on the last round = 44(48) sts. Change to double pointed needles size 3.5 mm / US 4 and work M.4 at the same time insert a marker after 22 (24) sts = the top of the hand – put the marker in the 23rd (25th) sts – inc the sts for the thumb each side of this st – the remaining 21 (23) sts = the inside of the hand. Continue to measure the piece from this point onwards! When the piece measure 1 cm / ⅜" inc 1 st each side of the marker, repeat on every 4th (3rd) round a total of 5 (6) times. Work the inc sts into M.4 as you go along. When all inc for the thumb are completed put the mid 11 sts over the thumb on a thread. Cast on 1 new st over the sts on the thread = 44 (59) sts. After M.4 work with off-white (blue) in stockinette sts. Continue until the piece measure 10 (11) cm / 4" (4½"). Now work the fingers as follows: Little finger: Pick up 4 (6) sts from the top of the hand and 4 (5) sts from the inside of the hand and cast on 1 new st towards the third finger = 9 (12) sts. Work 5 (6) cm / 2" (2½") with off-white (blue) in stockinette sts. On the following round K2 tog around, and pull a double thread through the remaining sts. Work 3 rounds over the remaining sts of the glove before continuing with the other fingers. Ring finger: Pick up 6 (6) sts from the top of the hand and 6 (7) sts from the inside of the hand and cast on 1 new sts towards the little finger and 1 st towards the middle finger = 14 (15) sts. Work 6 (7) cm / 2½" (2¾") with off-white (blue) in stockinette sts. On the following round K2 tog around, and pull a double thread through the remaining sts. Middle finger: As ring finger but work 7 (8) cm / 2¾" (3") of stockinette sts with off-white (blue) Index finger: Pick up 6 (6) sts from the top of the hand and 6 (7) sts from the inside of the hand and cast on 1 new sts towards the middle finger = 13 (14) sts. Work as ring finger. Thumb: Pick up 14 (16) sts (incl. the sts on the thread) around the thump and work 6 (6.5) cm / 2¼" (2½") with off-white (blue) in stockinette sts. Bind off as done for the ring finger. Sew a small stitch in between each finger. Work another glove but with the thumb at the opposite side. ------------------------------- SOCKS: Size: European shoe size 38-41 (41-44) Size: US: 7½/9½ - 10/12 EU: 38/40 - 41/44 Length: 58 (65) cm / 22¾" (25½"). The foot 23 (26) cm / 9" (10¼") Materials: DROPS Karisma Superwash from Garnstudio 350 (350) g color no. 01, off white (color no. 37, blue) DROPS double pointed needles size 2.5 and 3 mm/US 1 and 2 or the size needed to obtain the correct knitting gauge. Knitting gauge: 22 sts x 30 rows on needles size 3 mm / US 2 with Karisma in stockinette sts = 10 x 10 cm / 4" x 4". Rib: *K2, P2*, repeat from *-* Dec. for heel (the heel is worked in stockinette sts throughout): 1st row (= RS): Work until 8 (9) sts left on row, slip a st as if to knit, K1, psso, turn 2nd row (= WS): Work until 8 (9) sts left on row, slip a st as if to purl, P1, psso, turn 3rd row (= RS): Work until 7 (8) sts left, slip a st as if to knit, K1, psso, turn 4th row (= WS): Work until 7 (8) sts left, slip a st as if to purl, P1, psso, turn 5th row (= RS): Work until 6 (7) sts left, slip a st as if to knit, K1, psso, turn 6th row (= WS): Work until 6 (7) sts left, slip a st as if to purl, P1, psso, turn 7th row (= RS): Work until 5 (6) sts left, slip a st as if to knit, K1, psso, turn 8th row (= WS): Work until 5 (6) sts left, slip a st as if to purl, P1, psso, turn. Continue with 1 st less before each turn until 12 (14) sts remaining . Socks: Description and color suggestions in ( ) = male. Cast on 72 (80) sts on double pointed needles size 2.5 mm / US 1 with off white (blue) and work 14 (16) cm / 5½" (6¼") in Rib. Change to double pointed needles size 3 mm / US 2 and work 1 round of stockinette sts - at the same time inc 0 (4) sts evenly distributed on round = 72-(84) sts. Then work 15 (21) sts of M.5, M.6, 15 (21) sts of M.7 and 1 st mid back (is worked in garter sts throughout) until the piece measures 30 (32) cm / 11¾" (12½"). Then shape the sock as follows: Before the st mid back: Slip a st as if to knit, K1, psso, and after the st mid back: K2 tog. Repeat dec on every 5th (4th) round a total of 12 (16) times = 48 (52) st. When the piece measures 50 (56) cm / 19¾"-22" put the mid front 24 (26) sts (= the foot) on a thread and continue in stockinette sts back and forth. Work 5 (6) cm / 2" (2½") of stockinette sts (heel) over the middle back 24 (26) sts and then dec for the heel (see explanation above). After heel pick up 12 (13) sts each side of the heel and put all sts on the same needle = 60 (66) sts. Continue to dec as follows: On every other row K tog the first and the last 2 sts of the top 24 (26) sts a total of 6 times = 48 (54) sts. Continue in stockinette sts until the foot measures approx. 19 (21.5) cm / 7½" (8½"). Insert a marker each side of the foot and bind off for the toe each side of the markers as follows: On every other round K2 tog before and after each marker a total of 3 times = 36 (42) sts. Then on every round a total of 7 (9) times = 8 (6) sts. Pull yarn through rem sts and pull together tight. Fasten off |
||||||||||||||||||||||
Diagram explanations |
||||||||||||||||||||||
|
||||||||||||||||||||||

|
||||||||||||||||||||||

|
||||||||||||||||||||||
|
||||||||||||||||||||||
|
Have you made this or any other of our designs? Tag your pictures in social media with #dropsdesign so we can see them! Do you need help with this pattern?You'll find tutorial videos, a Comments/Questions area and more by visiting the pattern on garnstudio.com. © 1982-2024 DROPS Design A/S. We reserve all rights. This document, including all its sub-sections, has copyrights. Read more about what you can do with our patterns at the bottom of each pattern on our site. |
||||||||||||||||||||||


With over 40 years in knitting and crochet design, DROPS Design offers one of the most extensive collections of free patterns on the internet - translated to 17 languages. As of today we count 304 catalogs and 11422 patterns - 11417 of which are translated into English (US/in).
We work hard to bring you the best knitting and crochet have to offer, inspiration and advice as well as great quality yarns at incredible prices! Would you like to use our patterns for other than personal use? You can read what you are allowed to do in the Copyright text at the bottom of all our patterns. Happy crafting!
Comments / Questions (16)
Hello! Do you have this pattern in a larger size? I’m afraid the M/L might be too snug for me but would LOVE to make this gorgeous jumper. Also, what yarns do you recommend to substitute for the discontinued colors?
27.12.2022 - 05:45DROPS Design answered:
Dear Mrs Brook, we only have these sizes available for this pattern, but at this time the jumpers had some ease fitting - check measurement chart - for any assistance choosing the best matching colour, you are welcome to contact your DROPS store, they will help you even per mail or telephone. Happy knitting!
02.01.2023 - 09:46Hvor gammelt er dette mønsteret? Årsaker at jeg lurer er at jeg har strikket den da den kom, men klarer ikke å huske når den kom. Nå har min datter arvet den.
08.06.2022 - 22:16DROPS Design answered:
Hej Lotta, kan det være midten af 90erne.... :)
10.06.2022 - 08:29Tres joli modele mais pas de colories de laines correspondantes pourquoi nous faire rever
26.03.2022 - 19:21DROPS Design answered:
Bonjour Mme François, ce modèle a été publié il y a de nombreuses années, les nuanciers ont été actualisés depuis, n'hésitez pas à demander conseil à votre magasin pour toute assistance au choix des couleurs, ils pourront vous aider, même par mail ou téléphone. Bon tricot!
28.03.2022 - 10:41Tarvitsen apua hihan tekoon nainen L-koossa. Kuinka monta silmukkaa tulee lisätä aina yhteen kerrokseen?
27.12.2021 - 21:37DROPS Design answered:
Lisäykset tehdään vuorotellen joka 3. ja joka 4. kerros. Jokaisella lisäyskerroksella lisätään 2 silmukkaa. Lisäykset toistetaan yhteensä 31 kertaa.
20.01.2022 - 17:45Er mængden af garn der er angivet i starten af opskriften(under alt 1 og alt 2) for hele sættet, eller kun til sweateren?
27.04.2021 - 12:10Hej, jag håller på att sticks vantarna och har kommit till den delen där jag ska sticka M.4 men jag kan inte hitta det diagrammet, och jag undrar vart det finns?
05.09.2020 - 09:36DROPS Design answered:
Hei My. Her manglet det en markering på et diagram hvor M.4 skulle være. Dette er nå oppdatert, takk for at du gjorde oss oppmerksom på dette. mvh DROPS design
07.09.2020 - 11:51Aion tehdä nämä miehelleni ja minulle. Nimiehdotus upeille neuleille: Kuurankukat.
17.07.2017 - 22:45Bij de sok ik kan niet vinden of ik de bovenvoet recht moet breien of in patroon ...zou u me dat kunnen zeggen?
06.01.2016 - 22:35DROPS Design answered:
Hoi Ria. Je breit de bovenvoet verder in patroon tot 19 (21,5) cm, de laatste stuk met de minderingen brei je in tricotst.
07.01.2016 - 14:21Bonjour, J'ai fait les 2 modèles , femme en S et homme en XL. Ils sont superbes! mes enfants vont être les + beaux! mais à vrai dire cela a été un peu difficile surtout le modèle homme en XL, le bleu marine, c'est pas top pour tricoter le soir. Mais le rendu est splendide. je conseille ces modèles
29.10.2015 - 17:22Kam wrote:
Hi there, I'm currently knitting the "body" section of the sweater for a lady, size L, and i am currently stuck on understanding the M.2 diagram. Am I to start knitting the first row on the column indicated by the arrow and knit till I reach the marker? Then repeat that for the back piece? Does that mean that I need to do the same thing for the rest of the M.2 diagram? Hope you understand my question, Kam
14.10.2015 - 15:07DROPS Design answered:
Dear Kam, start diagram M.2 by the arrow and work the last sts (read from the right towards the left every round), then repeat M.2 from 1st st as many times as necessary to the marker, then start from marker again by the arrow and repeat M.2 to the beg of round. Happy knitting!
14.10.2015 - 17:24