DROPS Air
DROPS Air
65% Alpaca, 28% Polyamide, 7% Wool
from 6.45 $ /50g
DROPS Kid-Silk
DROPS Kid-Silk
75% Mohair, 25% Silk
from 6.75 $ /25g
Get the yarn to make this pattern from 99.45$.

The yarn cost is calculated from the pattern’s smallest size and the yarn’s cheapest product type. Looking for an even better price? You might find it on the DROPS Deals!

DROPS SS24

Making Wishes

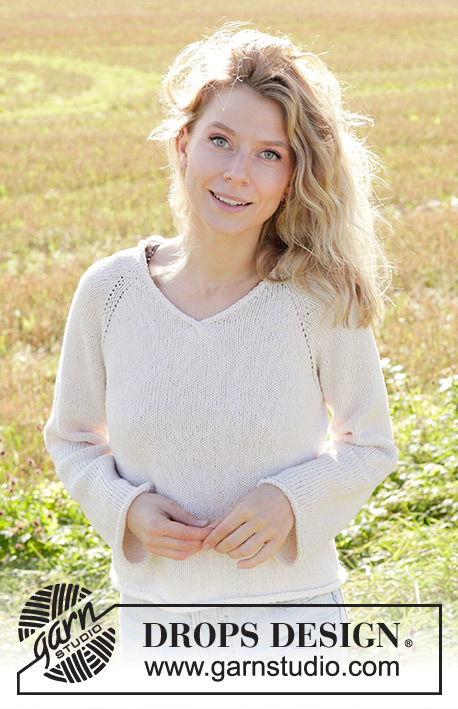
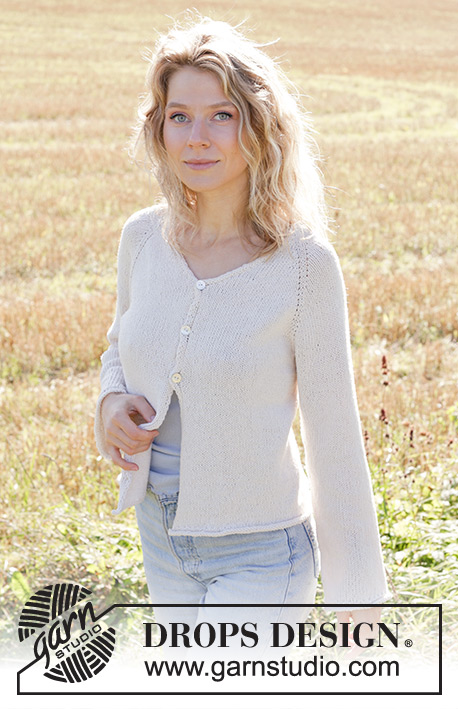
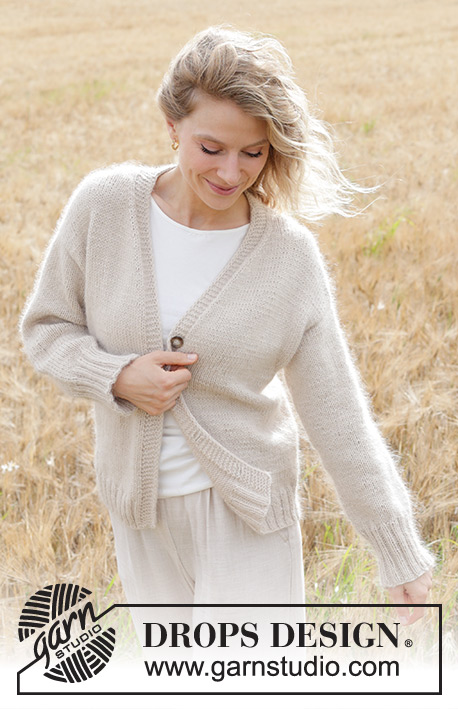
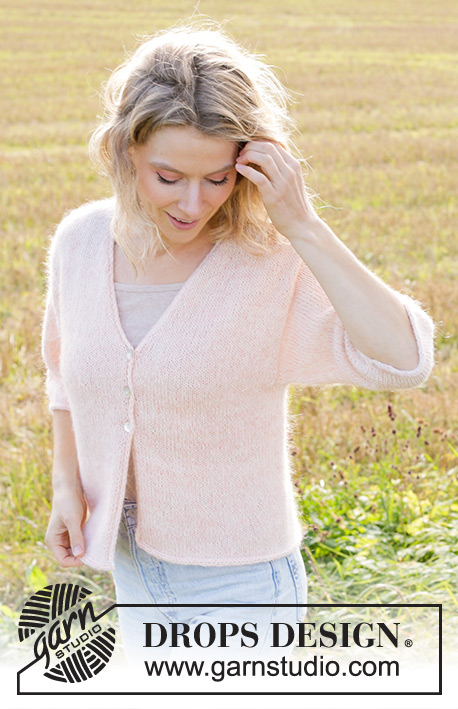
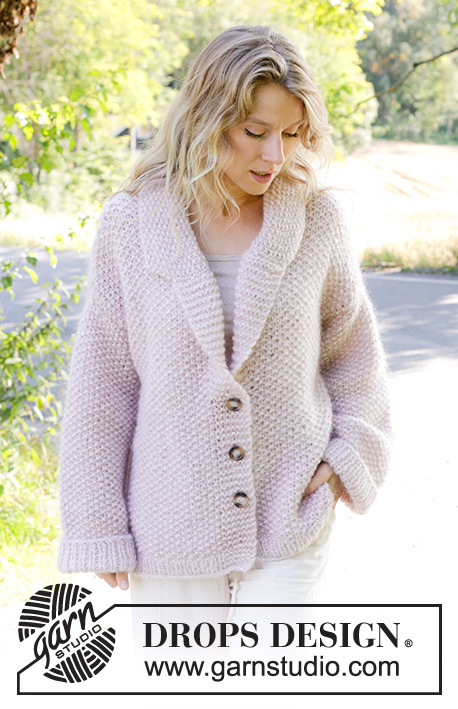
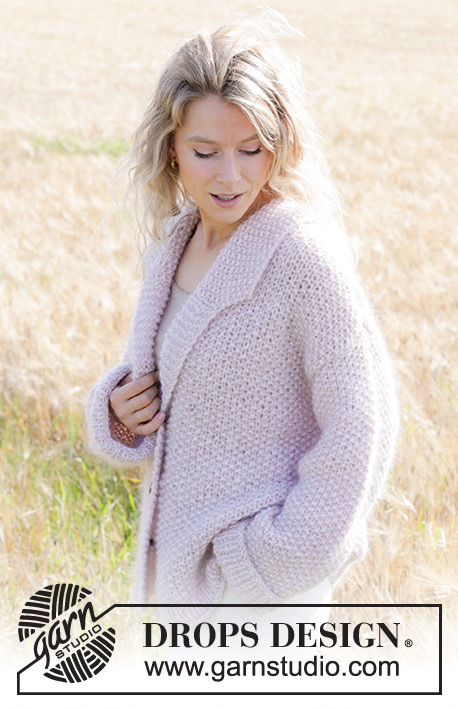
Knitted oversized jacket in 1 strand DROPS Air and 2 strands DROPS Kid-Silk. The piece is worked bottom up with moss stitch, a collar and sewn-in sleeves. Sizes XS - XXL.

DROPS 248-33
DROPS Design: Pattern ai-475
Yarn group C + A + A or E
-------------------------------------------------------

SIZES:
XS - S - M - L - XL – XXL

Finished measurements:
Chest measurements: 108-114-126-136-148-154 cm = 42½"-45"-49½"-53½"-58⅜"-60⅝"
Full length: 64-66-68-70-72-74 cm = 25¼"-26"-26¾"-27½"-28⅜"-29⅛"
All measurements in charts are in cm.

YARN:
DROPS AIR from Garnstudio (belongs to yarn group C)
300-350-350-400-450-500 g color 33, pink sand
And use:
DROPS KID-SILK from Garnstudio (belongs to yarn group A)
225-250-250-275-325-350 g color 40, pink pearl

BUTTONS:
DROPS BUTTONS NO 630: 3 items in all sizes.

NEEDLES:
DROPS CIRCULAR NEEDLES SIZE 8 MM = US 11: Length 80 cm = 32".
DROPS CIRCULAR NEEDLES SIZE 6 MM = US 10: Length 80 cm = 32".

KNITTING GAUGE:
11 stitches in width and 19 rows in height with moss stitch (A.1) and 1 strand DROPS Air and 2 strands DROPS Kid-Silk = 10 x 10 cm = 4" x 4".
NOTE: Needle size is only a guide. If you get too many stitches on 10 cm = 4", change to a larger needle size. If you get too few stitches on 10 cm = 4", change to a smaller needle size.

-------------------------------------------------------

Alternative Yarn – See how to change yarns here
Yarn Groups A to F – Use the same pattern and change the yarn here
Yarn usage using an alternative yarn – Use our yarn converter here

-------------------------------------------------------

DROPS Air
DROPS Air
65% Alpaca, 28% Polyamide, 7% Wool
from 6.45 $ /50g
DROPS Kid-Silk
DROPS Kid-Silk
75% Mohair, 25% Silk
from 6.75 $ /25g
Get the yarn to make this pattern from 99.45$.

The yarn cost is calculated from the pattern’s smallest size and the yarn’s cheapest product type. Looking for an even better price? You might find it on the DROPS Deals!

Pattern instructions

NOTE: This pattern is written in American English. All measurements in charts are in cm. For conversion from inches to cm - click here. There are different terms for crocheting in American and British English. If this pattern includes crochet, click for "crochet terms" here. For this pattern in British English, please click here.
-------------------------------------------------------

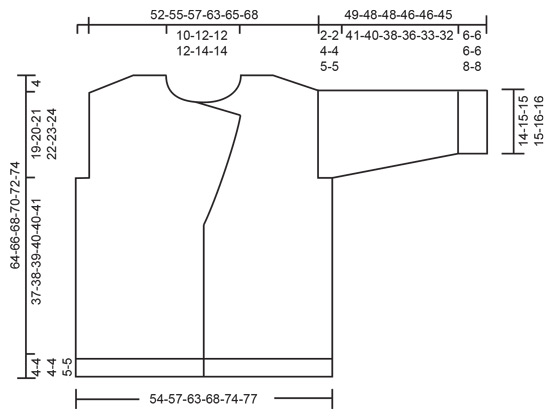
EXPLANATIONS FOR THE PATTERN:

-------------------------------------------------------

GARTER STITCH (worked back and forth):
Knit all rows, from both the right and wrong side.
1 ridge in height = knit 2 rows.

PATTERN:
See diagrams A.1 and A.2. The diagrams show all rows in the pattern from the right side.

INCREASE TIP-1 (for bands):
Increase 1 stitch mid-front by making 1 yarn over inside the band. On the next row knit the yarn over twisted to avoid a hole.

INCREASE TIP-2 (for sleeves):
Increase 1 stitch on each side by making 1 yarn over, inside the 1 garter stitch. On the next row knit the yarn over twisted to avoid a hole. Then work the new stitches into A.1.

BUTTONHOLES:
Work the buttonholes on the right band. 1 BUTTONHOLE = knit together the 3rd and 4th stitch from the edge, make 1 yarn over. On the next row knit the yarn over to leave a hole.
Work the buttonholes when the piece measures
XS: 15, 23, 31 cm = 6", 9", 12¼"
S: 15, 24, 33 cm = 6", 9½", 13"
M: 15, 23, 31 cm = 6", 9", 12¼"
L: 15, 24, 33 cm = 6", 9½", 13"
XL: 16, 26, 36 cm = 6¼", 10¼", 14¼"
XXL: 18, 28, 38 cm = 7", 11", 15"

-------------------------------------------------------

START THE PIECE HERE:

-------------------------------------------------------

JACKET – SHORT OVERVIEW OF THE PIECE.
The piece is worked back and forth with circular needle, bottom up. The front and back pieces and the sleeves are worked separately, then sewn together.
Stitches are knitted up along the neckline and the collar worked back and forth, then sewn to the bands on each side.

BACK PIECE:
Cast on 71-75-83-89-97-101 stitches with circular needle size 6 MM = US 10, 1 strand DROPS Air and 2 strands DROPS Kid-Silk (= 3 strands). Purl 1 row from the wrong side. Work as follows from the right side: 1 GARTER STITCH – read description above, work rib (knit 1, purl 1) until there are 2 stitches left, knit 1 and 1 garter stitch. Continue this rib for 4-4-4-4-5-5 cm = 1½"-1½"-1½"-1½"-2"-2".
Change to circular needle size 8 MM = US 11. Work PATTERN – read description above, as follows from the right side: 1 garter stitch, work A.1 until there is 1 stitch left, decreasing at the same time 10-10-12-12-14-14 stitches evenly spaced, 1 garter stitch = 61-65-71-77-83-87 stitches. Continue pattern, with 1 garter stitch on each side. REMEMBER THE KNITTING GAUGE!
When the piece measures 41-42-43-44-45-46 cm = 16⅛"-16½"-17"-17¼"-17¾"-18", bind off 2-2-4-4-6-6 stitches for the armholes at the beginning of the next 2 rows = 57-61-63-69-71-75 stitches. Continue A.1 with 1 garter stitch on each side, until the piece measures 60-62-64-66-68-70 cm = 23⅝"-24⅜"-25¼"-26"-26¾"-27½".

OVERVIEW OF NEXT SECTION:
Insert 1 marker in the middle stitch on the row (= mid-back). This is used when working the neckline.
You now place stitches on threads for the diagonal shoulders and bind off for the neckline. Read DIAGONAL SHOULDERS and NECKLINE before continuing.
DIAGONAL SHOULDERS:
Place stitches on a thread at the beginning of each row on both sides as follows: 5-5-5-6-6-7 stitches on the thread 3 times on each side, then the next 8-9-10-10-10-9 stitches towards the neck (=23-24-25-28-28-30 stitches on the threads each side).
NECKLINE:
At the same time, when the piece measures 62-64-66-68-70-72 cm = 24⅜"-25¼"-26"-26¾"-27½"-28⅜", bind off the middle 9-11-11-11-13-13 stitches for the neckline (= marker-stitch + 4-5-5-5-6-6 stitches on each side). Continue as before and bind off 1 stitch on the next row from the neck.

When all the stitches are on threads or bind off for the neckline, the piece measures 64-66-68-70-72-74 cm = 25¼"-26"-26¾"-27½"-28⅜"-29⅛" from the cast-on edge at the top of the shoulder.
Place the 23-24-25-28-28-30 stitches from the thread on one side back on circular needle size 8 MM = US 11 and work 1 row stockinette stitch; to avoid holes in the transitions between the sets of stitches, pick up the loop before the next stitch on the left needle and place it twisted on the left needle. Work together this loop with the next stitch on the left needle. Bind off.
Work the other shoulder in the same way.

RIGHT FRONT PIECE:
Cast on 42-44-48-50-54-56 stitches with circular needle size 6 MM = US 10, 1 strand DROPS Air and 2 strands DROPS Kid-Silk (= 3 strands). Purl 1 row from the wrong side. Work as follows from the right side: 7 garter stitches (= band), work rib (knit 1, purl 1) until there is 1 stitch left, 1 garter stitch. Continue this rib for 4-4-4-4-5-5 cm = 1½"-1½"-1½"-1½"-2"-2".
Change to circular needle size 8 MM = US 11 and work pattern as follows from the right side: 7 garter stitches, work A.1 until there is 1 stitch left and decrease 6-6-6-6-6-6 stitches evenly spaced, 1 garter stitch = 36-38-42-44-48-50 stitches. Continue the pattern with 7 garter stitches mid-front and 1 garter stitch at the side.
When the piece measures 15-15-15-15-16-18 cm = 6"-6"-6"-6"-6¼"-7", start to work BUTTONHOLES – read description above. When you have worked 1 cm = ⅜" after the last buttonhole (the piece measures approx. 32-34-32-34-37-39 cm = 12½"-13⅜"-12½"-13⅜"-14½"-15¼"), increase the number of garter stitches in the band mid-front (which becomes wider) as follows: Increase 1 stitch inside the band – read INCREASE TIP-1, every 8th-8th-8th-8th-6th-6th row 6-6-7-7-8-8 times; each increase is on the outside of the already increased stitches (away from the 7 band stitches).
AT THE SAME TIME, when the piece measures 41-42-43-44-45-46 cm = 16⅛"-16½"-17"-17¼"-17¾"-18", bind off 2-2-4-4-6-6 stitches for the armhole at the beginning of the next row from the side.
When the piece measures 54-56-58-60-61-62 cm = 21¼"-22"-22¾"-23⅝"-24"-24⅜" from the cast-on edge and the band-increases are finished, place the outermost 13-13-14-14-15-15 stitches mid-front on a thread (these stitches are later sewn to the collar) = 27-29-31-33-35-37 stitches on the front piece. Insert 1 marker in the first stitch on the row, by the neck, which is used when knitting up stitches for the collar.
Continue working and bind off for the neckline at the beginning of each row from the neck as follows: 2 stitches 1-1-1-1-2-2 times and 1 stitch 2-3-4-3-3-3 times = 23-24-25-28-28-30 stitches. When the piece measures 60-62-64-66-68-70 cm = 23⅝"-24⅜"-25¼"-26"-26¾"-27½", place stitches on a thread for the diagonal shoulder.

DIAGONAL SHOULDER:
Place stitches on a thread at the beginning of each row from the side as follows: 5-5-5-6-6-7 stitches on the thread 3 times = 8-9-10-10-10-9 stitches left by the neck.
Place the 15-15-15-18-18-21 stitches from the thread back on needle size 8 MM = US 11 (= 23-24-25-28-28-30 stitches), work 1 row stockinette stitch; to avoid holes in the transitions between the sets of stitches, pick up the loop before the next stitch on the left needle and place it twisted on the left needle. Work together this loop with the next stitch on the left needle. Bind off.

LEFT FRONT PIECE:
Cast on 42-44-48-50-54-56 stitches with circular needle size 6 MM = US 10, 1 strand DROPS Air and 2 strands DROPS Kid-Silk (= 3 strands). Purl 1 row from the wrong side. Work as follows from the right side: 1 garter stitch, work rib (knit 1, purl 1) until there are 7 stitches left, 7 garter stitches (= band). Continue this rib for 4-4-4-4-5-5 cm = 1½"-1½"-1½"-1½"-2"-2".
Change to circular needle size 8 MM = US 11 and work pattern as follows from the right side: 1 garter stitch, work A.2 until there are 7 stitches left and decrease 6-6-6-6-6-6 stitches evenly spaced, 7 garter stitches = 36-38-42-44-48-50 stitches. Continue the pattern with 1 garter stitch at the side and 7 garter stitches mid-front.
When the piece measures 32-34-32-34-37-39 cm = 12½"-13⅜"-12½"-13⅜"-14½"-15¼" (match the length to the right front piece), increase the number of garter stitches in the band mid-front (which becomes wider) as follows: Increase 1 stitch inside the band – remember INCREASE TIP-1, every 8th-8th-8th-8th-6th-6th row 6-6-7-7-8-8 times; each increase is on the outside of the already increased stitches (away from the 7 band stitches).
AT THE SAME TIME, when the piece measures 41-42-43-44-45-46 cm = 16⅛"-16½"-17"-17¼"-17¾"-18", bind off 2-2-4-4-6-6 stitches for the armhole at the beginning of the next row from the side.
When the piece measures 54-56-58-60-61-62 cm = 21¼"-22"-22¾"-23⅝"-24"-24⅜" from the cast-on edge and the band-increases are finished, place the outermost 13-13-14-14-15-15 stitches mid-front on a thread (these stitches are later sewn to the collar) = 27-29-31-33-35-37 stitches on the front piece. Insert 1 marker in the last stitch on the row, by the neck, which is used when knitting up stitches for the collar.
Continue working and bind off for the neckline at the beginning of each row from the neck as follows: 2 stitches 1-1-1-1-2-2 times and 1 stitch 2-3-4-3-3-3 times = 23-24-25-28-28-30 stitches. When the piece measures 60-62-64-66-68-70 cm = 23⅝"-24⅜"-25¼"-26"-26¾"-27½", place stitches on a thread for the diagonal shoulder.

DIAGONAL SHOULDER:
Place stitches on a thread at the beginning of each row from the side as follows: 5-5-5-6-6-7 stitches on the thread 3 times = 8-9-10-10-10-9 stitches left by the neck.
Place the 15-15-15-18-18-21 stitches from the thread back on needle size 8 MM = US 11 (= 23-24-25-28-28-30 stitches), work 1 row stockinette stitch; to avoid holes in the transitions between the sets of stitches, pick up the loop before the next stitch on the left needle and place it twisted on the left needle. Work together this loop with the next stitch on the left needle. Bind off.

SLEEVES:
Cast on 38-40-42-42-44-44 stitches with circular needle size 6 MM = US 10, 1 strand DROPS Air and 2 strands DROPS Kid-Silk (= 3 strands). Purl 1 row from the wrong side. Work as follows from the right side: 1 garter stitch, work rib (knit 1, purl 1) until there is 1 stitch left, 1 garter stitch. Continue this rib for 6-6-6-6-8-8 cm = 2⅜"-2⅜"-2⅜"-2⅜"-3⅛"-3⅛".
Change to circular needle size 8 MM = US 11. Work pattern with the first row from the right side as follows: 1 garter stitch, work A.1 until there is 1 stitch left and decrease 6-6-6-6-6-6 stitches evenly spaced, 1 garter stitch = 32-34-36-36-38-38 stitches. Continue the pattern with 1 garter stitch on each side.
When the piece measures 8-8-8-8-10-10 cm = 3⅛"-3⅛"-3⅛"-3⅛"-4"-4", increase 1 stitch on each side – read INCREASE TIP-2. Increase like this every 7-7-6½-5-4½-4 cm = 2¾"-2¾"-2½"-2"-1⅝"-1½" a total of 6-6-6-7-7-8 times = 44-46-48-50-52-54 stitches. Work until the sleeve measures 47-46-44-42-41-40 cm = 18½"-18"-17¼"-16½"-16⅛"-15¾", or to desired length before the sleeve cap (which measures 2-2-4-4-5-5 cm = ¾"-¾"-1½"-1½"-2"-2").
Insert 1 marker in each side – mark the bottom of the armhole and they are used when sewing in the sleeve.
Work a further 2-2-4-4-5-5 cm = ¾"-¾"-1½"-1½"-2"-2" from the markers, the sleeve measures approx. 49-48-48-46-46-45 cm = 19¼"-19"-19"-18"-18"-17¾" from the cast-on edge. Bind off.

ASSEMBLY:
Sew the shoulder seams. Sew the side seams inside 1 garter stitch. Sew the sleeve seams from the cuff to the marker (= a split of approx. 2-2-4-4-5-5 cm = ¾"-¾"-1½"-1½"-2"-2" at top of sleeve). Sew the sleeve cap to the armhole, inside 1 garter stitch. Sew the split at the top of the sleeve to the bottom of the armhole – see sketch.

COLLAR:
Use circular needle size 8 MM = US 11, 1 strand DROPS Air and 2 strands DROPS Kid-Silk (= 3 strands). Start from the wrong side by the marker on the left front piece and knit up 35-37-37-37-43-43 stitches along the neckline as far as the marker on the right front piece. Work A.1 back and forth over all stitches until the collar measures 14-14-15-15-16-16 cm = 5½"-5½"-6"-6"-6¼"-6¼". Bind off a little loosely with rib.
Use grafting stitch and sew the stitches from the thread to the right band – sew 1 stitch from the band to 1 row in height on the collar. Sew in the same way on the other front piece.

Diagram

All measurements in charts are in cm.

symbols = knit from right side, purl from wrong side
symbols = purl from right side, knit from wrong side
symbols = Sew a to A and b to B
diagram
diagram
diagram

Each of our patterns has specific tutorial videos to help you.

Do you have a question? See a list of frequently asked questions (FAQ)

Knitting tension is what determines the final measurements of your work, and is usually measured per 10 x 10 cm. It is provided like so: number of stitches in width x number of rows in height - eg: 19 stitches x 26 rows = 10 x 10 cm.

The knitting tension is very individual; some people knit/crochet loosely while others work tightly. You adjust the knitting tension with the needle size, which is why the suggested needle size only serve as a guide! You need to adjust this (up or down) to ensure that YOUR knitting tension matches the knitting tension provided in the pattern. If you work with a different knitting tension than provided you will have a different yarn consumption, and your work will have different measurements than what the pattern suggests.

The knitting tension also determines which yarns can replace each other. As long as you achieve the same knitting tension you can replace one yarn with another.

See DROPS lesson: How to measure your tension/gauge

See DROPS video: How to make a gauge tension swatch

The required amount of yarn is provided in grams, eg: 450 g. To calculate how many balls you’ll need you first need to know how many grams are in 1 ball (25g, 50g or 100g). This information is available if you click on the individual yarn quality on our pages. Divide the amount required with the amount of each ball. For example, if each ball is 50g (the most common amount), the calculation will be as follows: 450 / 50 = 9 balls.

The important thing when changing from one yarn to another is that the knitting/crochet tension remains the same. This is so that the measurements of the finished piece will be the same as on the sketch provided. It is easier to achieve the same knitting tension using yarns from the same yarn group. It is also possible to work with multiple strands of a thinner yarn to achieve the knitting tension of a thicker one. Please try our yarn converter. We recommend you to always work a test swatch.

Please NOTE: when changing yarn the garment might have a different look and feel to the garment in the photo, due to individual properties and qualities of each yarn.

See DROPS lesson: Can I use a different yarn than the one mentioned in the pattern?

All our yarns are categorised into yarn groups (from A to F) according to thickness and knitting tension – group A contains the thinnest yarns and group F the thickest. This makes it easier for you to find alternative yarns to our patterns, should you wish to switch yarn. All yarns within the same group have a similar knitting tension and can easily replace each other. However, different yarn qualities have different structures and properties which will give the finished work a unique look and feel.

Click here for an overview of the yarns in each yarn group

At the top of all our patterns you’ll find a link to our yarn converter, which is a helpful tool should you wish to use a different yarn than suggested. By filling in the yarn quality you wish to replace, the amount (in your size) and number of strands, the converter will present good alternative yarns with the same knitting tension. Additionally it will tell you how much you’ll require in the new qualities and whether you’ll need to work with multiple strands. Most skeins are 50g (some are 25g or 100g).

If the pattern is worked with multiple colours, every colour will have to be converted separately. Similarly, if the pattern is worked with several strands of different yarns (for example 1 strand Alpaca and 1 strand Kid-Silk) you will have to find alternatives for each, individually.

Click here to see our yarn converter

Since different yarns have different qualities and textures we have chosen to keep the original yarn in our patterns. However, you can easily find options among our available qualities by using our yarn converter, or simply pick a yarn from the same yarn group.

It is possible that some retailers still have discontinued yarns in stock, or that someone has a few skeins at home that they would like to find patterns for.

The yarn converter will provide both alternative yarn as well as required amount in the new quality.

If you think it's hard to decide what size to make, it can be a good idea to measure a garment you own already and like the size of. Then you can pick the size by comparing those measures with the ones available in the pattern's size chart.

You'll find the size chart at the bottom of the pattern.

See DROPS lesson: How to read size chart

The needle size provided in the pattern serves only as a guide, the important thing is to follow the knitting tension. And since knitting tension is very individual, you will have to adjust the needle size to ensure that YOUR tension is the same as in the pattern – maybe you’ll have to adjust 1, or even 2 needle sizes, up or down to achieve the correct tension. For this, we recommend that you work test swatches.

Should you work with a different knitting tension than the one provided, the measurements of the finished garment might deviate from the measurement sketch.

See DROPS lesson: How to measure your tension/gauge

See DROPS video: How to make a gauge tension swatch

Working a garment top-down provides more flexibility and room for personal adjustment. For example it is easier to try the garment on while working, as well as making adjustments to length of yoke and shoulder caps.

The instructions are carefully explaining every step, in the correct order. Diagrams are adjusted to the knitting direction and are worked as usual.

The diagram depicts all rows/rounds, and every stitch seen from the right side. It is read from bottom to top, from right to left. 1 square = 1 stitch.

When working back and forth, every other row is worked from the right side and every other row is worked from the wrong side. When working from the wrong side, the diagram will have to be worked reversed: from left to right, knit stitches are purled, purl stitches are knit etc.

When working in the round every round is worked from the right side and the diagram are worked from right to left on all rounds.

See DROPS lesson: How to read knitting diagrams

The diagram depicts all rows/rounds, and every stitch seen from the right side. It is worked from bottom to top, from right to left.

When working back and forth every other row is worked from the right side: from right to left and every other row is worked from the wrong side: from left to right.

When working in the round, every row in the diagram are worked from the right side, from right to left.

When working a circular diagram you start in the middle and work your way outwards, counter clockwise, row by row.

The rows usually start with a given number of chain stitches (equivalent to the height of the following stitch), this will either be depicted in the diagram or explained in the pattern.

See DROPS lesson: How to read crochet diagrams

Instructions for working several diagrams after each other on the same row/round, will often be written like so: “work A.1, A.2, A.3 a total of 0-0-2-3-4 times". This means you work A.1 once, then A.2 is worked once, and A.3 is repeated (in width) the number of times provided for your size – in this case like so: S = 0 times, M = 0 times, L=2 times, XL= 3 times and XXL = 4 times.

The diagrams are worked as usual: begin with the first row in A.1, then work the first row in A.2 etc.

See DROPS lesson: How to read knitting diagrams

See DROPS lesson: How to read crochet diagrams

The total width of the garment (from wrist-to-wrist) will be larger in the larger sizes, despite the actual sleeves being shorter. The larger sizes have longer sleeve caps and wider shoulders, so there will be a good fit in all sizes.

The measurement sketch/schematic drawing provides information regarding the full length of the garment. If it’s a jumper or a jacket the length is measured from the highest point on the shoulder (usually closest to the neckline), and straight down to the bottom of the garment. It is NOT measured from the tip of shoulder. Similarly, the length of yoke is measured from the highest point on the shoulder and down to where yoke is split into body and sleeves.

See DROPS lesson: How to read a schematic drawing

Diagrams are often repeated on the round or in height. 1 repeat is the diagram the way it appears in the pattern. If it says to work 5 repeats of A.1 in the round, then you work A.1 a total of 5 times after/next to each other in the round. If it says to work 2 repeats of A.1 vertically/in height you work the entire diagram once, then begin again at the start and work the entire diagram one more time.

Chain stitches are slightly narrower than other stitches and to avoid working the cast-on edge too tight, we simply chain more stitches to begin with. The stitch count will be adjusted on the following row to fit the pattern and measurement sketch.

The rib edge is more elastic and will contract slightly compared to, for example, stocking stitch. By increasing before the rib edge, you avoid a visible difference in width between the rib edge and the rest of the body.

It’s very easy to cast off too tightly, and by making yarn overs while casting off (and simultaneously casting these off) you avoid a too tight cast off edge.

See DROPS video: How to bind off with yarn overs (yo)

To achieve an even increase (or decrease) you can increase on, for example: every 3rd and 4th row alternately, like so: work 2 rows and increase on the 3rd row, work 3 rows and increase on the 4th. Repeat this until the increase is complete.

See DROPS lesson: Increase or decrease 1 st on every 3rd and 4th row alternately

Should you prefer to work in the round instead of back and forth, you may of course adjust the pattern. You’ll need to add steeks mid-front (usually 5 stitches), and follow the instructions. When you would normally turn and work from the wrong side, simply work across the steek and continue in the round. At the end you’ll cut the piece open, pick up stitches to work bands, and cover the cut edges.

See DROPS video: How to knit steeks and cut open

Should you prefer to work back and forth instead of in the round, you may of course adjust the pattern so you work the pieces separately and then assemble them at the end. Divide the stitches for the body in 2, add 1 edge stitch in each side (for sewing) and work the front and back pieces separately.

See DROPS lesson: Can I adapt a pattern for circular needles into straight needles?

Pattern repeats can vary slightly in the different sizes, in order to get the correct proportions. If you’re not working the exact same size as the garment in the photo, yours might deviate slightly. This has been carefully developed and adjusted so that the complete impression of the garment is the same in all sizes.

Make sure to follow instructions and diagrams for your size!

If you have found a pattern you like which is available in women’s size it’s not very difficult to convert it to men’s size. The biggest difference will be the length of sleeves and body. Start working on the women size that you think would fit across the chest. The additional length will be worked right before you cast off for the armhole/sleeve cap. If the pattern is worked top-down you can add the length right after the armhole or before the first decrease on sleeve.

Regarding additional yarn amount, this will depend on how much length you add, but it is better with a skein too many than too few.

All yarns will have excess fibres (from production) that might come off as lint or shedding. Brushed yarns (ie hairier yarns) have more of these loose, excess fibres, causing more shedding.

Shedding also depends on what is worn under or over the garment, and whether this pulls at the yarn fibres. It’s therefore not possible to guarantee that there will be no shedding

Below are some tips on how to get the best result when working with hairier yarns:

1. When the garment is finished (before you wash it) shake it vigorously so the looser hairs come off. NOTE: do NOT use a lint roller, brush or any method that pulls at the yarn.

2. Place the garment in a plastic bag and put it in your freezer - the temperature will cause the fibres to become less attached to each other, and excess fibres will come off easier.

3. Leave in the freezer for a few hours before taking it out and shaking it again.

4. Wash the garment according to the instructions on the yarn label.

Pilling is a natural process that happens to even the most exclusive of fibers. It's a natural sign of wear and tear that is hard to avoid, and that is most visible in high friction areas of your garment like a sweater's arms and cuffs.

You can make your garment look as new by removing the pilling, using a fabric comb or a pill/lint remover.

Still can't find the answer you need? Then scroll down and leave your question so one of our experts can try to help you. This will be done normally within 5 to 10 working days.
In the meantime, you can read the questions and answers that others have left to this pattern or join the DROPS Workshop on Facebook to get help from fellow knitters/crocheters!

You might also like...

Post a comment to pattern DROPS 248-33

We would love to hear what you have to say about this pattern!

If you want to leave a question, please make sure you select the correct category in the form below, to speed up the answering process. Required fields are marked *.

Comments / Questions (10)

country flag Wil Kerkmeer wrote:

Gisteravond het vest afgemaakt, prachtig! Ik brei helemaal “op maat” in dit geval mt L en ik heb 7 bollen Air gebruikt en 10 bolletjes Kid Silk en hield nog ruim 25 gr over van de laatste gebruikte bollen! Heerlijke wol, mooie combi😉👍

03.04.2024 - 08:52

country flag Cindy Hijts wrote:

Ik zou graag deze vest willen breien in maat xxl Hoeveel bolletjes garen heb ik dan nodig Dank u

08.03.2024 - 20:20

DROPS Design answered:

Dag Cindy,

De hoeveelheid benodigde garens staat aangegeven bovenaan bij de materialen. De reeks getallen slaat op de maten, dus voor xxl neem je het laatste getal. Een bol Air weegt 50 gram en een bol Kid-Silk weegt 25 gram.

10.03.2024 - 10:20

country flag Bettina wrote:

Superbe veste pour l'automne. J'adore.

22.01.2024 - 10:15

country flag Nonne wrote:

Chic

21.01.2024 - 13:22

country flag Lynda Kuit wrote:

Spring bubbles

19.01.2024 - 09:58

country flag Karin wrote:

Hygge on a fall day

19.01.2024 - 05:51

country flag Kelly wrote:

Friend

18.01.2024 - 21:55

country flag Kelly wrote:

Cozy

18.01.2024 - 21:54

country flag Caren Veraart wrote:

Airlight

18.01.2024 - 18:16

country flag Sabine HENRICH wrote:

Voilà une superbe veste qui tiendra bien chaud ! Elle a l'air très douce.

18.01.2024 - 13:22