
Popular categories
Looking for a yarn?


|
||||
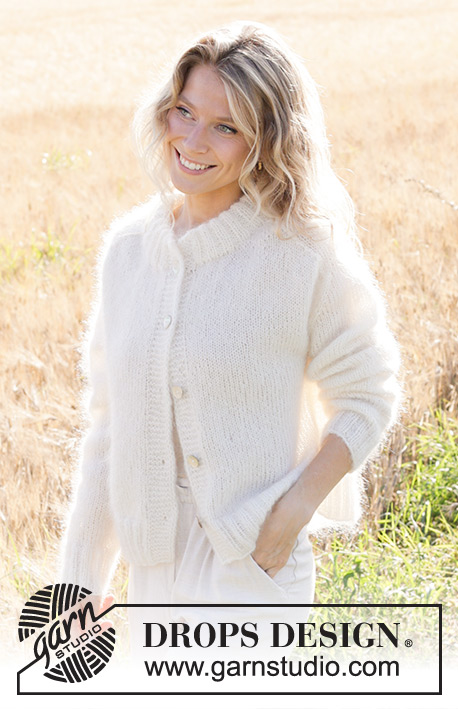
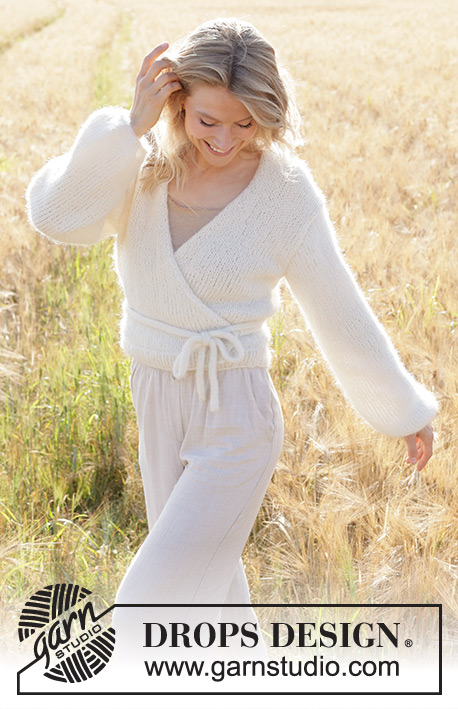
Ballerina's Dream |
||||
 |
 |
|||
Knitted wrap-around jacket in DROPS Air and DROPS Kid-Silk. The piece is worked bottom up with I-cord, sewn in sleeves and waist-ties. Sizes S - XXXL.
DROPS 248-2 |
||||
|
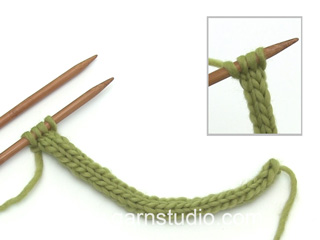
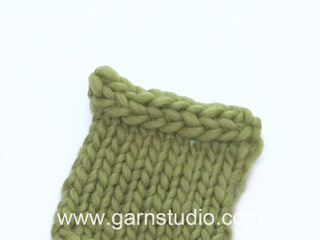
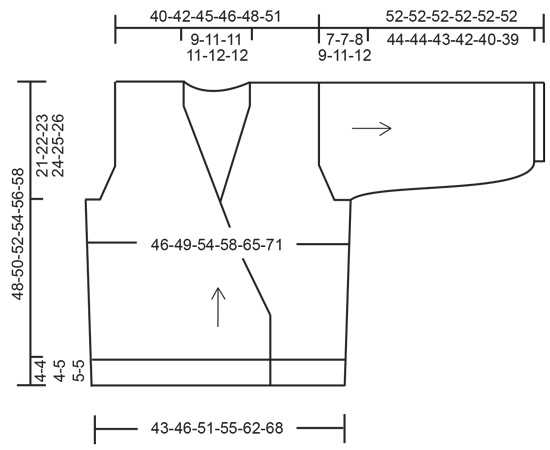
------------------------------------------------------- EXPLANATIONS FOR THE PATTERN: ------------------------------------------------------- GARTER STITCH (worked back and forth): Knit all rows – from both the right and wrong side. 1 ridge in height = knit 2 rows. I-CORD (for bands): FIRST 2 STITCHES: Work as follows on every row: Slip 1 stitch purl-wise with strand in front, knit 1. LAST 2 STITCHES: Work as follows on every row: Work until there are 2 stitches left on row, slip 1 stitch purl-wise with strand in front, knit 1. I-CORD CAST-OFF (for sleeves): At end of round, after the last stitch has been worked: Cast on 4 stitches on right needle from the right side, with 1 strand of each quality. Pass the 4 stitches from the right needle to the left needle, so the working yarn is 4 stitches in on the left needle (tighten this strand when working, to form a small tube). ROW 1 (= right side): Knit 3, knit 2 twisted together. ROW 2 (= right side): Pass the 4 stitches from the right needle back onto the left needle, knit 3, knit 2 twisted together. Repeat ROW 2 until there are 4 stitches left on right needle. Pass the 4 stitches from the right needle back onto the left needle. Cast off. Sew a small stitch to join the beginning and end of the I-cord. I-CORD CAST-OFF (for back of neck): Cast on 3 stitches on right needle from the right side with 1 strand of each quality. Pass the 3 stitches from the right needle to the left needle, so the working yarn is 3 stitches in on the left needle (tighten this strand when working, to form a small tube). ROW 1 (= right side): Knit 2, knit 2 twisted together. ROW 2 (= right side): Pass the 3 stitches from the right needle back onto the left needle, knit 2, knit 2 twisted together. Repeat ROW 2 until there are 3 stitches left on right needle. Pass the 3 stitches from the right needle back onto the left needle. Cast off. I-CORD (for waist-ties) Pass the 6 stitches from the right needle to the left needle, so the working yarn is 6 stitches in on the left needle (tighten this strand when working, to form a small tube) ROW 1 (= right side): Knit 6. ROW 2 (= right side): Pass the 6 stitches from the right needle back onto the left needle, tighten the strand, knit 6. Repeat ROW 2 to the correct length. Cast off. INCREASE TIP: All increases are worked from the right side! Increase 1 stitch by making 1 yarn-over, inside the 4 outermost stitches. On the next row purl the yarn-over twisted to avoid a hole. DECREASE TIP-1 (for armholes and back of neck): All decreases are worked from the right side! DECREASE 1 STITCH AT BEGINNING OF ROW: Knit 3, slip 1 stitch knit-wise, knit 1, pass the slipped stitch over the knitted stitch (= 1 stitch decreased). DECREASE 1 STITCH AT END OF ROW: Work until there are 5 stitches left on row, knit 2 together, knit 3 (= 1 stitch decreased). DECREASE TIP-2 (for wrap-around): All decreases are worked from the right side! DECREASE 1 STITCH AT BEGINNING OF ROW: Work 2 stitches I-cord as before, slip 1 stitch knit-wise, knit 1, pass the slipped stitch over the knitted stitch (= 1 stitch decreased). DECREASE 1 STITCH AT END OF ROW: Work until there are 4 stitches left on row, knit 2 together, 2 stitches I-cord as before (= 1 stitch decreased). DECREASE TIP-3 (mid-under sleeve): Decrease 1 stitch on each side of the marker-thread as follows: Work until there are 4 stitches left before the marker-thread, knit 2 together, knit 4 (marker-thread sits in middle of these 4 stitches), slip 1 stitch knit-wise, knit 1 and pass the slipped stitch over the knitted stitch (2 stitches decreased). ------------------------------------------------------- START THE PIECE HERE: ------------------------------------------------------- JACKET – SHORT OVERVIEW OF THE PIECE. The pattern uses both long and short needles; start with the length which fits the number of stitches and change when necessary. The front and back pieces are worked separately, back and forth and bottom up. The sleeves are started back and forth then continued in the round, top down. The sections are sewn together. Stitches are knitted up back of neck, and the neck worked in I-cord. 2 waist-ties are worked in I-cord to finish and sewn to the body. All measurements are taken from the cast-on edges. BACK PIECE: Cast on 65-69-77-83-93-101 stitches with circular needle size 5.5 mm, 1 strand DROPS Air and 1 strand DROPS Kid-Silk (= 2 strands). Purl 1 row from the wrong side. Work as follows from the right side: 1 GARTER STITCH – read description above, work rib (knit 1, purl 1) until there are 2 stitches left, knit 1 and 1 garter stitch. Continue this rib back and forth for 4-4-4-5-5-5 cm. Change to circular needle size 7 mm. Continue with stocking stitch and 1 garter stitch on each side and decrease 7-7-9-9-11-11 stitches evenly on row 1 = 58-62-68-74-82-90 stitches. REMEMBER THE KNITTING TENSION! When the piece measures 10 cm, increase 1 stitch on each side – read INCREASE TIP. Repeat this increase when the piece measures 20 cm = 62-66-72-78-86-94 stitches. When the piece measures 27-28-29-30-31-32 cm, cast off 3-3-3-4-5-6 stitches for the armholes at the beginning of the next 2 rows = 56-60-66-70-76-82 stitches. Work 2 more rows, then decrease 1 stitch on each side for the armholes – read DECREASE TIP-1. Repeat the decrease every 2nd row a total of 2-3-4-5-7-8 times on each side = 52-54-58-60-62-66 stitches. When the piece measures 45-47-49-51-53-55 cm, cast off the middle 10-12-12-12-14-14 stitches for the neckline and finish each shoulder separately. Decrease 1 stitch for the neckline on the next row from the right side – read DECREASE TIP -1 = 20-20-22-23-23-25 shoulder-stitches. Work until the piece measures 48-50-52-54-56-58 cm. Cast off. Work the other shoulder in the same way. RIGHT FRONT PIECE: Cast on 48-50-56-62-66-74 stitches with circular needle size 5.5 mm, 1 strand DROPS Air and 1 strand DROPS Kid-Silk (= 2 strands). Purl 1 row from the wrong side. Work as follows from the right side: 2 stitches I-CORD – read description above, rib (knit 1, purl 1), until there is 1 stitch left, 1 garter stitch. Continue this rib for 4-4-4-5-5-5 cm. Change to circular needle size 7 mm. Work stocking stitch with 2 stitches I-cord mid-front and 1 garter stitch at the side and decrease 6-6-6-8-8-10 stitches evenly on row 1 = 42-44-50-54-58-64 stitches (do not decrease over the edge stitches). OVERVIEW OF NEXT SECTION: You now decrease for the wrap-around, increase in the side and cast off for the armhole - read DECREASES FOR WRAP-AROUND, SIDE-INCREASES and ARMHOLE before continuing. DECREASES FOR WRAP-AROUND: When the piece measures 10-10-11-11-12-12 cm, decrease 1 stitch inside the I-cord stitches – read DECREASE TIP -2. Decrease like this every 2nd row a total of 7-8-13-14-15-17 times, then every 4th row 10-10-8-8-8-8 times (= 17-18-21-22-23-25 decreased stitches). SIDE-INCREASES: At the same time, when the piece measures 10 cm, increase 1 stitch in the side – remember INCREASE TIP. Repeat this increase when the piece measures 20 cm (= 2 increased stitches). ARMHOLE: At the same time, when the piece measures 27-28-29-30-31-32 cm, cast off 3-3-3-4-5-6 stitches for the armhole at the beginning of the next row from the wrong side. Work 2 more rows, then decrease 1 stitch for the armhole – remember DECREASE TIP -1. Decrease like this every 2nd row a total of 2-3-4-5-7-8 times. After all the decreases and increases there are 22-22-24-25-25-27 stitches (2 more stitches than on the back shoulder). Continue working until the piece measures 48-50-52-54-56-58 cm. Cast off. LEFT FRONT PIECE: Cast on 48-50-56-62-66-74 stitches with circular needle size 5.5 mm, 1 strand DROPS Air and 1 strand DROPS Kid-Silk (= 2 strands). Purl 1 row from the wrong side. Work as follows from the right side: 1 garter stitch, rib (purl 1, knit 1), until there are 2 stitches left, 2 stitches I-CORD – read description above. Continue this rib for 4-4-4-5-5-5 cm. Change to circular needle size 7 mm. Work stocking stitch with 1 garter stitch at the side and 2 stitches I-cord mid-front and decrease 6-6-6-8-8-10 stitches evenly on row 1 = 42-44-50-54-58-64 stitches (do not decrease over the edge stitches). OVERVIEW OF NEXT SECTION: You now decrease for the wrap-around, increase in the side and cast off for the armhole - read DECREASES FOR WRAP-AROUND, SIDE-INCREASES and ARMHOLE before continuing. DECREASES FOR WRAP-AROUND: When the piece measures 10-10-11-11-12-12 cm, decrease 1 stitch inside the I-cord stitches – remember DECREASE TIP -2. Decrease like this every 2nd row a total of 7-8-13-14-15-17 times, then every 4th row 10-10-8-8-8-8 times (= 17-18-21-22-23-25 decreased stitches). SIDE-INCREASES: At the same time, when the piece measures 10 cm, increase 1 stitch in the side – remember INCREASE TIP. Repeat this increase when the piece measures 20 cm (= 2 increased stitches). ARMHOLE: At the same time, when the piece measures 27-28-29-30-31-32 cm, cast off 3-3-3-4-5-6 stitches for the armhole at the beginning of the next row from the right side. Work 2 more rows, then decrease 1 stitch for the armhole – remember DECREASE TIP -1. Decrease like this every 2nd row a total of 2-3-4-5-7-8 times. After all the decreases and increases there are 22-22-24-25-25-27 stitches (2 more stitches than on the back shoulder). Continue working until the piece measures 48-50-52-54-56-58 cm. Cast off. SLEEVES: Cast on 24-26-26-24-24-22 stitches with circular needle size 5.5 mm and 1 strand of each quality (= 2 strands). Work stocking stitch back and forth, casting on stitches for the sleeve cap at the end of each row as follows: 3-3-3-4-5-6 stitches 1 time, 3 stitches 1-1-1-1-1-1 time, 1 stitch 0-0-0-1-2-3 times, 2 stitches 2-2-3-3-3-3 times and 3 stitches 1-1-1-1-1-1 time on each side = 50-52-56-58-62-64 stitches. The sleeve measures approx. 7-7-8-9-11-12 cm. Now join the sleeve and continue stocking stitch in the round. Insert 1 marker-thread at the beginning of the round (= mid-under sleeve); this is used when decreasing under the sleeve. When the sleeve measures 9-9-10-11-13-14 cm, decrease 2 stitches under the sleeve – read DECREASE TIP -3. Repeat the decrease when the sleeve measures 11-11-12-13-15-16 cm = 46-48-52-54-58-60 stitches. Work until the sleeve measures 51 cm in all sizes and decrease 6-6-8-8-8-8 stitches evenly on the last round = 40-42-44-46-50-52 stitches. Cast off with I-CORD – read description above. BACK NECKLINE: Use circular needle size 7 mm. Knit up from the right side 24-26-26-26-28-28 stitches along the back neckline. Cut the strand. Cast off with I-CORD – read description above. ASSEMBLY: Sew the shoulder seams inside the cast-off edge, starting by the armhole and sewing stitch to stitch towards the neck, finish by sewing the 2 last stitches on the front piece to the I-cord edge from the back piece. Sew the side seams, inside the 1 edge stitch, leaving an opening of 3 cm, 10-10-11-11-12-12 cm up from the bottom edge on the right side of the garment, to thread the waist-tie through. Sew in the sleeves inside the 1 edge stitch around the armholes. WAIST TIES: Cast on 6 stitches with circular needle size 5.5 mm and 1 strand of each quality (= 2 strands). Work I-CORD – read description above, for 100-110-120-130-140-150 cm – or to desired length. Cast off. Work a second tie in the same way. Sew each tie to the wrong side of each front piece, in the transition between the stocking stitch and I-cord and approx. 10-10-11-11-12-12 cm up from the cast-on edge. |
||||
Diagram explanations |
||||
|
||||
|
||||
|
Have you made this or any other of our designs? Tag your pictures in social media with #dropsdesign so we can see them! Do you need help with this pattern?You'll find tutorial videos, a Comments/Questions area and more by visiting the pattern on garnstudio.com. © 1982-2024 DROPS Design A/S. We reserve all rights. This document, including all its sub-sections, has copyrights. Read more about what you can do with our patterns at the bottom of each pattern on our site. |
||||


With over 40 years in knitting and crochet design, DROPS Design offers one of the most extensive collections of free patterns on the internet - translated to 17 languages. As of today we count 304 catalogues and 11422 patterns - 11422 of which are translated into English (UK/cm).
We work hard to bring you the best knitting and crochet have to offer, inspiration and advice as well as great quality yarns at incredible prices! Would you like to use our patterns for other than personal use? You can read what you are allowed to do in the Copyright text at the bottom of all our patterns. Happy crafting!
Comments / Questions (33)
Økingene på ermene går ikke opp, strikker str S og får ikke tallet til å bli 50. Er det feil i oppskriften?
26.03.2024 - 15:02DROPS Design answered:
Hej Renate, du starter med 24 masker, legger opp 3+3+2+2+3=13x2 (da det er i begge sider) =26 = totalt 50 masker :)
05.04.2024 - 08:59Hi, just wanted to double check the sleeves are meant to be knitted in 5.5 mm circle needles as opposed to 7mm as I would’ve thought this would make more sense as the body is mainly knitted on 7mm. Some of my measurements in the sleeve have been slightly off but for the body my knitting tension matched the measurements on the pattern. Is this intentional or a mistake in the pattern?
04.03.2024 - 16:29DROPS Design answered:
Hi Jennifer, The sleeves are worked with needle size 7 mm, top down. Happy knitting!
05.03.2024 - 08:21Hallo ! Leider lassen sich die Seiten 4-6 der deutschen Anleitung nicht ausdrucken Bitte um Überprüfen
20.02.2024 - 06:55DROPS Design answered:
Liebe Cornelie, wir konnten alle Seite ausdrucken, schauen Sie mal die Druckereinstellungen, vielleicht wurden vorigen Einstellungen gespeichert. Viel Spaß beim stricken!
20.02.2024 - 08:21Sød trøje, men havde jeg vidt den blev strikket nedefra, havde den ikke fået min stemme
06.02.2024 - 07:31Spring Bolero
22.01.2024 - 10:16Ballerine
21.01.2024 - 22:29First days of spring
21.01.2024 - 16:04Name suggestion: Wrap me up top
20.01.2024 - 17:33Caché cœur nuage
20.01.2024 - 10:11Summer breeze
20.01.2024 - 08:10