DROPS Alpaca
DROPS Alpaca
100% Alpaca
from 3.40 £ /50g
DROPS Kid-Silk
DROPS Kid-Silk
75% Mohair, 25% Silk
from 4.60 £ /25g
Get the yarn to make this pattern from 19.40£.

The yarn cost is calculated from the pattern’s smallest size and the yarn’s cheapest product type. Looking for an even better price? You might find it on the DROPS Deals!

DROPS SS24

Sweet Peppermint

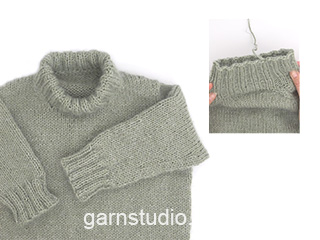
Knitted jumper for children in DROPS Alpaca and DROPS Kid-Silk. The piece is worked top down, with European/diagonal shoulders and double neck. Sizes 2 – 12 years.

DROPS Children 47-12
DROPS Design: Pattern z-052-bn
Yarn group A + A or C
-----------------------------------------------------------

SIZES:
2 - 3/4 - 5/6 - 7/8 - 9/10 - 11/12 years
Child’s height in cm:
92 - 98/104 - 110/116 - 122/128 - 134/140 - 146/152

YARN:
DROPS ALPACA from Garnstudio (belongs to yarn group A)
150-150-200-200-200-250 g colour 9030, pistachio ice cream
And use:
DROPS KID-SILK from Garnstudio (belongs to yarn group A)
50-75-75-75-100-100 g colour 47, pistachio ice cream

NEEDLES FOR SIZES 2 - 3/4 years:
DROPS CIRCULAR NEEDLE SIZE 5 MM: Length 40 cm and 60 cm.
DROPS CIRCULAR NEEDLE SIZE 3.5 MM: Length 40 cm and 60 cm.
DROPS DOUBLE POINTED NEEDLES SIZE 5 MM.
DROPS DOUBLE POINTED NEEDLES SIZE 3.5 MM.
The technique MAGIC LOOP can be used – you then only need 80 cm circular needle in each size.

NEEDLES FOR SIZES 5/6 - 7/8 - 9/10 - 11/12 years:
DROPS CIRCULAR NEEDLE SIZE 5 MM: Length 40 cm and 80 cm.
DROPS CIRCULAR NEEDLE SIZE 3.5 MM: Length 40 cm and 80 cm.
DROPS DOUBLE POINTED NEEDLES SIZE 5 MM.
DROPS DOUBLE POINTED NEEDLES SIZE 3.5 MM.
The technique MAGIC LOOP can be used – you then only need 80 cm circular needle in each size.

KNITTING TENSION:
17 stitches in width and 22 rows in height with stocking stitch and 1 strand of each quality = 10 x 10 cm.
NOTE: Needle size is only a guide. If you get too many stitches on 10 cm, change to a larger needle size. If you get too few stitches on 10 cm, change to a smaller needle size.

-------------------------------------------------------

Alternative Yarn – See how to change yarns here
Yarn Groups A to F – Use the same pattern and change the yarn here
Yarn usage using an alternative yarn – Use our yarn converter here

-------------------------------------------------------

DROPS Alpaca
DROPS Alpaca
100% Alpaca
from 3.40 £ /50g
DROPS Kid-Silk
DROPS Kid-Silk
75% Mohair, 25% Silk
from 4.60 £ /25g
Get the yarn to make this pattern from 19.40£.

The yarn cost is calculated from the pattern’s smallest size and the yarn’s cheapest product type. Looking for an even better price? You might find it on the DROPS Deals!

Pattern instructions

NOTE: This pattern is written in British English. All measurements in charts are in cm. For conversion from cm to inches - click here. There are different terms for crocheting in British and American English. If this pattern includes crochet, click for "crochet terms" here. For this pattern in American English, please click here.
-------------------------------------------------------

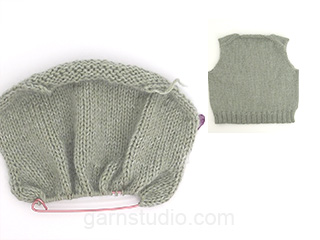
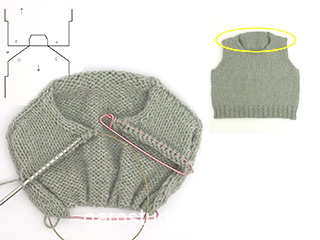
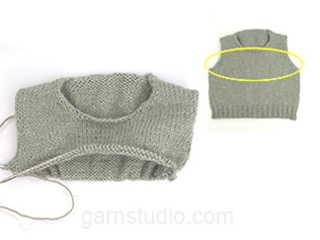
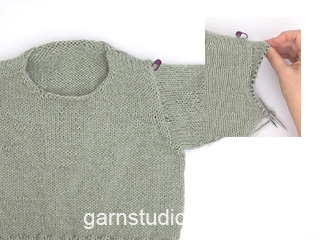
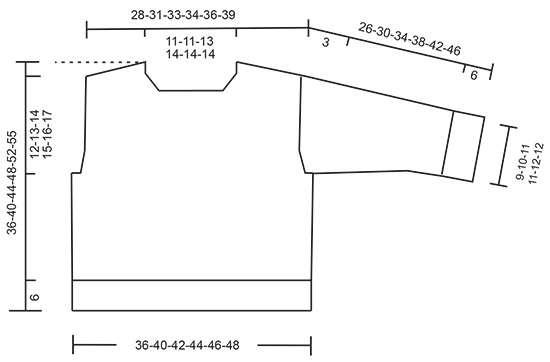
EXPLANATIONS FOR THE PATTERN:
-------------------------------------------------------

INCREASE TIP FROM THE RIGHT SIDE:
Increase towards the left AFTER MARKER:
Use left needle to pick up thread between 2 stitches from row below, pick up thread from front and knit stitch in back loop.
Increase towards the right BEFORE MARKER:
Use left needle to pick up thread between 2 stitches from row below, pick up thread from behind and knit stitch in front loop.

INCREASE TIP FROM THE WRONG SIDE:
Increase towards the left AFTER MARKER:
Use left needle to pick up thread between 2 stitches from row below, pick up thread from behind and purl stitch in front loop.
Increase towards the right BEFORE MARKER:
Use left needle to pick up thread between 2 stitches from row below, pick up thread from front and purl stitch in back loop.

DECREASE TIP (for sleeves):
Decrease 1 stitch on each side of the marker-thread as follows: Work until there are 3 stitches left before the marker-thread, knit 2 together, knit 2 (marker-thread sits between these 2 stitches), slip 1 stitch knit-wise, knit 1 and pass the slipped stitch over the knitted stitch.
-------------------------------------------------------

START THE PIECE HERE:

-------------------------------------------------------

JUMPER – SHORT OVERVIEW OF THE PIECE:
The back piece is worked back and forth with circular needle and top down until the armholes are finished. Stitches are knitted up along each back shoulder for the front piece, then cast on for the neck and the front piece is worked back and forth with circular needle until the armholes are finished. The front and back pieces are joined and the body continued in the round with circular needle. Stitches are knitted up around each armhole and the sleeves worked first back and forth with circular needle for the sleeve cap, then finished in the round with circular needle/ double pointed needles. The neck is worked in the round to finish.

BACK PIECE:
Cast on 20-20-24-26-26-26 stitches with circular needle size 5 mm and 1 strand of each quality (2 strands).
Purl 1 row from the wrong side.
Insert 1 marker inside the 3 outermost stitches on each side. Keep the markers inside 3 stitches as you work onwards.
Work stocking stitch back and forth.
AT THE SAME TIME, increase AFTER the marker at the beginning of the row (from the right side) and BEFORE the marker at the end of the row – read INCREASE TIP FROM THE RIGHT SIDE.
On the next row (wrong side) increase in the same way – read INCREASE TIP FROM THE WRONG SIDE.
Continue increasing, both from the right and wrong side, a total of 14-16-16-16-18-20 times = 48-52-56-58-62-66 stitches. Work 4 rows. Move the markers to the outermost stitch on each side; the piece is now measured from here.
REMEMBER THE KNITTING TENSION!
Continue stocking stitch until the piece measures 5-5-6-7-7-8 cm, from the markers measured along the armhole. Now increase 1 stitch inside 3 stitches on each side - remember INCREASE TIP FROM THE RIGHT SIDE. Increase every 2nd row (= each row from the right side) 4 times in total = 56-60-64-66-70-74 stitches. Continue working until the piece measures 9-9-10-11-12-12 cm along the armhole. Cut the strand, place the stitches on a stitch holder and work the front piece.

FRONT PIECE:
Start with left shoulder (when garment is worn):
Knit up 14-16-16-16-18-20 stitches evenly along the left back shoulder, working from the neck to the marker in the side, see D in sketch. Work stocking stitch back and forth. When the front piece measures 4 cm, increase 1 stitch at the beginning of each row from the right side (after 3 stitches) - remember INCREASE TIP FROM THE RIGHT SIDE. Increase a total of 4 times = 18-20-20-20-22-24 stitches. Purl back from the wrong side. Cut the strand, place the stitches on a stitch holder and work the right front shoulder.

Knit up 14-16-16-16-18-20 stitches evenly along the right back shoulder, working from the marker in the side to the neck, see E in sketch. Work stocking stitch back and forth. When the front piece measures 4 cm, increase 1 stitch at the end of each row from the right side (before 3 stitches) - remember INCREASE TIP FROM THE RIGHT SIDE. Increase a total of 4 times = 18-20-20-20-22-24 stitches. Purl back from the wrong side.
Now work as follows from the right side: Knit the 18-20-20-20-22-24 stitches from the right front piece, cast on 12-12-16-18-18-18 stitches for the neck, knit the 18-20-20-20-22-24 stitches from the left front piece = 48-52-56-58-62-66 stitches.
Continue stocking stitch back and forth until the piece measures 11-13-14-15-16-18 cm along the armhole. Now increase 1 stitch inside 3 stitches on each side, remember INCREASE TIP FROM THE RIGHT SIDE. Increase every 2nd row (= each row from the right side) 4 times in total = 56-60-64-66-70-74 stitches. Continue with stocking stitch until the front piece measures 15-17-18-19-20-22 cm.
Now join the front and back pieces for the body.

BODY:
Work the 56-60-64-66-70-74 stitches from the front piece, cast on 6-8-8-8-8-8 stitches (side), work the 56-60-64-66-70-74 stitches from the back piece, cast on 6-8-8-8-8-8 stitches = 124-136-144-148-156-164 stitches.
Work stocking stitch in the round until the piece measures 30-34-38-42-46-49 cm, from the top of the shoulder on the front piece. Knit 1 round and increase 20-24-24-28-28-28 stitches evenly spaced = 144-160-168-176-184-192 stitches. Change to circular needle size 3.5 mm. Work rib (knit 2, purl 2) for 6 cm. Cast off a little loosely. The jumper measures approx. 36-40-44-48-52-55 cm from the top of the shoulder and down the front piece.

LEFT SLEEVE:
Lay piece flat and insert 1 marker on the top of armhole (NB: This is not where the stitches were knitted up for the front piece, but approx. 3-5 cm down on the front piece, this is the middle of the shoulder).
Using circular needle size 5 mm and 1 strand of each quality, start in the middle of the new stitches cast on under sleeve and pick up 42-44-46-50-54-56 stitches around armhole – adjust so that there are the same number of stitches along armhole on each side of the marker. Now work stocking stitch back and forth with short rows over sleeve cap, to give the sleeve a better fit.

1st row (from right side): work 4 stitches after marker, turn.
2nd row (from wrong side): work 4 sts after marker, turn.
3rd row (from right side): work 8 sts after marker, turn.
4th row (from wrong side): work 8 sts after marker, turn.
5th row (from right side): work 12 sts after marker, turn.
6th row (from wrong side): work 12 sts after marker, turn.
7th row (from right side): work to the beginning of the round.

Continue working in the round in stocking stitch over all stitches. Insert a marker-thread at the beginning of the round (mid-under sleeve). Allow the marker-thread to follow your work onwards.
Work stocking stitch in the round.

When the sleeve measures 5 cm from the knitted-up stitches, decrease 2 stitches mid-under sleeve – read DECREASE TIP. Decrease like this every 3-4-5-5-4½-5 cm a total of 5-5-5-6-7-7 times = 32-34-36-38-40-42 stitches. Continue working until the sleeve measures 20-24-28-32-36-40 cm from the knitted-up stitches. There is approx. 6 cm left; try the jumper on and work to desired length before the rib. Knit 1 round and increase 8-6-8-6-8-6 stitches evenly spaced = 40-40-44-44-48-48 stitches. Change to double pointed needles size 3.5 mm and work rib (knit 2, purl 2) for 6 cm. Loosely cast off. The sleeve measures approx. 26-30-34-38-42-46 cm.

RIGHT SLEEVE:
Work in the same way as the left sleeve.

DOUBLE NECK:
Use short circular needle size 3.5 mm and 1 strand of each quality. Start on one shoulder and knit up from the right side, inside 1 edge stitch, 68 to 84 stitches around the neck. The stitch-count must be divisible by 4. Work rib in the round (knit 2, purl 2) for 14 cm. Cast off a little loosely. Fold the neck double to the inside and fasten down with a couple of stitches.

Diagram

symbols = stitches for left front shoulder (d) knitted up along left back shoulder (D), stitches for right front shoulder (e), knitted up along right back shoulder (E)
symbols = knitting direction
diagram
diagram

Each of our patterns has specific tutorial videos to help you.

Do you have a question? See a list of frequently asked questions (FAQ)

Knitting tension is what determines the final measurements of your work, and is usually measured per 10 x 10 cm. It is provided like so: number of stitches in width x number of rows in height - eg: 19 stitches x 26 rows = 10 x 10 cm.

The knitting tension is very individual; some people knit/crochet loosely while others work tightly. You adjust the knitting tension with the needle size, which is why the suggested needle size is only meant as a guide! You need to adjust this (up or down) to ensure that YOUR knitting tension matches the knitting tension provided in the pattern. If you work with a different knitting tension than provided you will have a different yarn consumption, and your work will have different measurements than what the pattern suggests.

The knitting tension also determines which yarns can replace each other. As long as you achieve the same knitting tension you can replace one yarn with another.

See DROPS lesson: How to measure your tension/gauge

See DROPS video: How to make a gauge tension swatch

The required amount of yarn is provided in grams, eg: 450 g. To calculate how many balls you’ll need you first need to know how many grams are in 1 ball (25g, 50g or 100g). This information is available if you click on the individual yarn quality on our pages. Divide the amount required with the amount of each ball. For example, if each ball is 50g (the most common amount), the calculation will be as follows: 450 / 50 = 9 balls.

The important thing when changing from one yarn to another is that the knitting/crochet tension remains the same. This is so that the measurements of the finished piece will be the same as on the sketch provided. It is easier to achieve the same knitting tension using yarns from the same yarn group. It is also possible to work with multiple strands of a thinner yarn to achieve the knitting tension of a thicker one. Please try our yarn converter. We recommend you to always work a test swatch.

Please NOTE: when changing yarn the garment might have a different look and feel to the garment in the photo, due to individual properties and qualities of each yarn.

See DROPS lesson: Can I use a different yarn than the one mentioned in the pattern?

All our yarns are categorised into yarn groups (from A to F) according to thickness and knitting tension – group A contains the thinnest yarns and group F the thickest. This makes it easier for you to find alternative yarns to our patterns, should you wish to switch yarn. All yarns within the same group have a similar knitting tension and can easily replace each other. However, different yarn qualities have different structures and properties which will give the finished work a unique look and feel.

Click here for an overview of the yarns in each yarn group

At the top of all our patterns you’ll find a link to our yarn calculator, which is a helpful tool should you wish to use a different yarn than suggested. By filling in the yarn quality you wish to replace, the amount (in your size) and number of strands, the calculator will present good alternative yarns with the same knitting tension. Additionally it will tell you how much you’ll require in the new qualities and whether you’ll need to work with multiple strands. Most skeins are 50g (some are 25g or 100g).

If the pattern is worked with multiple colours, every colour will have to be calculated separately. Similarly, if the pattern is worked with several strands of different yarns (for example 1 strand Alpaca and 1 strand Kid-Silk) you will have to find alternatives for each, individually.

Click here to see our yarn calculator

Since different yarns have different qualities and textures we have chosen to keep the original yarn in our patterns. However, you can easily find options among our available qualities by using our yarn calculator, or simply pick a yarn from the same yarn group.

It is possible that some retailers still have discontinued yarns in stock, or that someone has a few skeins at home that they would like to find patterns for.

The yarn calculator will provide both alternative yarn as well as required amount in the new quality.

If you think it's hard to decide what size to make, it can be a good idea to measure a garment you own already and like the size of. Then you can pick the size by comparing those measures with the ones available in the pattern's size chart.

You'll find the size chart at the bottom of the pattern.

See DROPS lesson: How to read size chart

The needle size provided in the pattern serves only as a guide, the important thing is to follow the knitting tension. And since knitting tension is very individual, you will have to adjust the needle size to ensure that YOUR tension is the same as in the pattern – maybe you’ll have to adjust 1, or even 2 needle sizes, up or down to achieve the correct tension. For this, we recommend that you work test swatches.

Should you work with a different knitting tension than the one provided, the measurements of the finished garment might deviate from the measurement sketch.

See DROPS lesson: How to measure your tension/gauge

See DROPS video: How to make a tension/gauge swatch

Working a garment top-down provides more flexibility and room for personal adjustment. For example it is easier to try the garment on while working, as well as making adjustments to length of yoke and shoulder caps.

The instructions are carefully explaining every step, in the correct order. Diagrams are adjusted to the knitting direction and are worked as usual.

The diagram depicts all rows/rounds, and every stitch seen from the right side. It is read from bottom to top, from right to left. 1 square = 1 stitch.

When working back and forth, every other row is worked from the right side and every other row is worked from the wrong side. When working from the wrong side, the diagram will have to be worked reversed: from left to right, knit stitches are purled, purl stitches are knit etc.

When working in the round every round is worked from the right side and the diagram are worked from right to left on all rounds.

See DROPS lesson: How to read knitting diagrams

The diagram depicts all rows/rounds, and every stitch seen from the right side. It is worked from bottom to top, from right to left.

When working back and forth every other row is worked from the right side: from right to left and every other row is worked from the wrong side: from left to right.

When working in the round, every row in the diagram are worked from the right side, from right to left.

When working a circular diagram you start in the middle and work your way outwards, counter clockwise, row by row.

The rows usually start with a given number of chain stitches (equivalent to the height of the following stitch), this will either be depicted in the diagram or explained in the pattern.

See DROPS lesson: How to read crochet diagrams

Instructions for working several diagrams after each other on the same row/round, will often be written like so: “work A.1, A.2, A.3 a total of 0-0-2-3-4 times". This means you work A.1 once, then A.2 is worked once, and A.3 is repeated (in width) the number of times provided for your size – in this case like so: S = 0 times, M = 0 times, L=2 times, XL= 3 times and XXL = 4 times.

The diagrams are worked as usual: begin with the first row in A.1, then work the first row in A.2 etc.

See DROPS lesson: How to read knitting diagrams

See DROPS lesson: How to read crochet diagrams

The total width of the garment (from wrist-to-wrist) will be larger in the larger sizes, despite the actual sleeves being shorter. The larger sizes have longer sleeve caps and wider shoulders, so there will be a good fit in all sizes.

The measurement sketch/schematic drawing provides information regarding the full length of the garment. If it’s a jumper or a jacket the length is measured from the highest point on the shoulder closest to the neckline, and straight down to the bottom of the garment. It is NOT measured from the tip of shoulder. Similarly, the length of yoke is measured from the highest point on the shoulder and down to where yoke is split into body and sleeves.

On a jacket measures are never taken along bands, unless specifically stated. Always measure inside band stitches when measuring the length.

See DROPS lesson: How to read a schematic drawing

Diagrams are often repeated on the round or in height. 1 repeat is the diagram the way it appears in the pattern. If it says to work 5 repeats of A.1 in the round, then you work A.1 a total of 5 times after/next to each other in the round. If it says to work 2 repeats of A.1 vertically/in height you work the entire diagram once, then begin again at the start and work the entire diagram one more time.

Chain stitches are slightly narrower than other stitches and to avoid working the cast-on edge too tight, we simply chain more stitches to begin with. The stitch count will be adjusted on the following row to fit the pattern and measurement sketch.

The rib edge is more elastic and will contract slightly compared to, for example, stocking stitch. By increasing before the rib edge, you avoid a visible difference in width between the rib edge and the rest of the body.

It’s very easy to cast off too tightly, and by making yarn overs while casting off (and simultaneously casting these off) you avoid a too tight cast off edge.

See DROPS video: How to bind off with yarn overs (yo)

To achieve an even increase (or decrease) you can increase on, for example: every 3rd and 4th row alternately, like so: work 2 rows and increase on the 3rd row, work 3 rows and increase on the 4th. Repeat this until the increase is complete.

See DROPS lesson: Increase or decrease 1 st on every 3rd and 4th row alternately

Should you prefer to work in the round instead of back and forth, you may of course adjust the pattern. You’ll need to add steeks mid-front (usually 5 stitches), and follow the instructions. When you would normally turn and work from the wrong side, simply work across the steek and continue in the round. At the end you’ll cut the piece open, pick up stitches to work bands, and cover the cut edges.

See DROPS video: How to knit steeks and cut open

Should you prefer to work back and forth instead of in the round, you may of course adjust the pattern so you work the pieces separately and then assemble them at the end. Divide the stitches for the body in 2, add 1 edge stitch in each side (for sewing) and work the front and back pieces separately.

See DROPS lesson: Can I adapt a pattern for circular needles into straight needles?

Pattern repeats can vary slightly in the different sizes, in order to get the correct proportions. If you’re not working the exact same size as the garment in the photo, yours might deviate slightly. This has been carefully developed and adjusted so that the complete impression of the garment is the same in all sizes.

Make sure to follow instructions and diagrams for your size!

If you have found a pattern you like which is available in women’s size it’s not very difficult to convert it to men’s size. The biggest difference will be the length of sleeves and body. Start working on the women size that you think would fit across the chest. The additional length will be worked right before you cast off for the armhole/sleeve cap. If the pattern is worked top-down you can add the length right after the armhole or before the first decrease on sleeve.

Regarding additional yarn amount, this will depend on how much length you add, but it is better with a skein too many than too few.

All yarns will have excess fibres (from production) that might come off as lint or shedding. Brushed yarns (ie hairier yarns) have more of these loose, excess fibres, causing more shedding.

Shedding also depends on what is worn under or over the garment, and whether this pulls at the yarn fibres. It’s therefore not possible to guarantee that there will be no shedding

Below are some tips on how to get the best result when working with hairier yarns:

1. When the garment is finished (before you wash it) shake it vigorously so the looser hairs come off. NOTE: do NOT use a lint roller, brush or any method that pulls at the yarn.

2. Place the garment in a plastic bag and put it in your freezer - the temperature will cause the fibres to become less attached to each other, and excess fibres will come off easier.

3. Leave in the freezer for a few hours before taking it out and shaking it again.

4. Wash the garment according to the instructions on the yarn label.

Pilling is a natural process that happens to even the most exclusive of fibers. It's a natural sign of wear and tear that is hard to avoid, and that is most visible in high friction areas of your garment like a sweater's arms and cuffs.

You can make your garment look as new by removing the pilling, using a fabric comb or a pill/lint remover.

Still can't find the answer you need? Then scroll down and leave your question so one of our experts can try to help you. This will be done normally within 5 to 10 working days.
In the meantime, you can read the questions and answers that others have left to this pattern or join the DROPS Workshop on Facebook to get help from fellow knitters/crocheters!

Post a comment to pattern DROPS Children 47-12

We would love to hear what you have to say about this pattern!

If you want to leave a question, please make sure you select the correct category in the form below, to speed up the answering process. Required fields are marked *.

Comments / Questions (7)

country flag Uli wrote:

Wenn ich diese Anleitung in SAFRAN stricken möchte, werden zwei Fäden von SAFRAN gleichzeitig verstrickt, richtig? Wie errechne ich den Verbrauch von SAFRAN, da bei der Originalanleitung ja zwei verschiedene Garne verwendet werden? Besten Dank und Gruß. Uli

19.03.2024 - 02:10

DROPS Design answered:

Liebe Uli, richtig, diesen Pullover können Sie mit 2 Fäden Safran stricken, benutzen Sie den Garnumrechner um die neue Garnmenge kalkulieren zu lassen. Viel Spaß beim Stricken!

19.03.2024 - 11:17

country flag Kerstin Stenholm wrote:

Hej! Jag kan inte sticka armarna med rundstickor, för få maskor, blir inte snyggt med strumpstickor heller. Kan man sticka armen på annat sätt. Annars blir det ingen tröja av det här Med vänlig hälsning, Kerstin

16.03.2024 - 19:58

DROPS Design answered:

Hej Kerstin, jo du kan strikke rundt på strømpepinde (det gør vi). Eller så kan du vælge at strikke frem og tilbage fra midt under ærmet og sy det sammen bagefter.

19.03.2024 - 14:44

country flag Rachel wrote:

Are we able to do this on straight kneedles ? X

10.03.2024 - 09:55

DROPS Design answered:

Dear Rachel, yes, you can. We even have atutorial, showing you how to do it, here: https://www.garnstudio.com/lesson.php?id=13&cid=19 I hope this helps. Happy Knitting!

10.03.2024 - 22:14

country flag Sylvie Guibaud wrote:

Bonjour.\r\nEst-ce que les 6 premières augmentations dos et devant se font côté encolure ?

01.01.2024 - 12:18

DROPS Design answered:

Bonjour Mme Guilbaud, je ne suis pas bien sûre de comprendre de quelles augmentations vous parlez, mais vous retrouverez la technique des épaules européennes dans les vidéos en bas de page, vous verrez ainsi comment tricoter ces augmentations au début du dos et du devant. Bon tricot!

02.01.2024 - 12:00

country flag Sabine wrote:

Vielen Dank!

14.11.2023 - 14:01

country flag Sabine wrote:

Warum wird immer mit zwei Garne gestrickt? Ich habe die Baby Merino und finde hierzu keine Anleitung

13.11.2023 - 18:50

DROPS Design answered:

Liebe Sabine, hier finder Sie Pullover, die mit einem Garn der Garngruppe A (mit nur 1 Faden = Maschenprobe von 25-23 Maschen) gestrickt werden, benutzen Sie den Garnumrechner, falls das gewünschte Modell nicht mit Baby Merino gestrickt wird. Viel Spaß beim stricken!

14.11.2023 - 10:15

country flag Morag Ogilvie wrote:

Do you have this pattern in adult sizes please?

19.09.2023 - 18:26

DROPS Design answered:

Dear Mrs Ogilvie, please find all our jumpers with european shoulders in adult size here. Happy knitting!

20.09.2023 - 07:19