DROPS Air
DROPS Air
65% Alpaca, 28% Polyamide, 7% Wool
from 4.80 £ /50g
Get the yarn to make this pattern from 24.00£.

The yarn cost is calculated from the pattern’s smallest size and the yarn’s cheapest product type. Looking for an even better price? You might find it on the DROPS Deals!

DROPS SS24

Feel the Beat

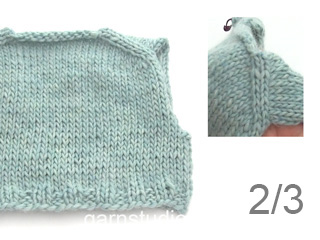
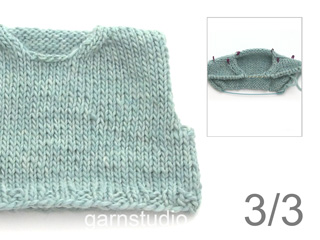
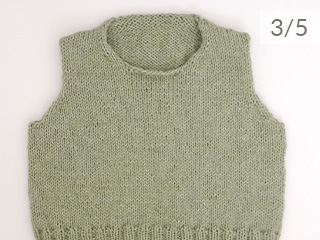
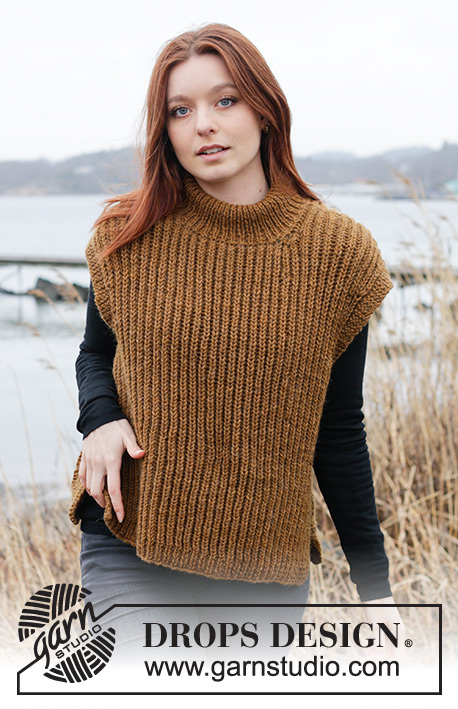
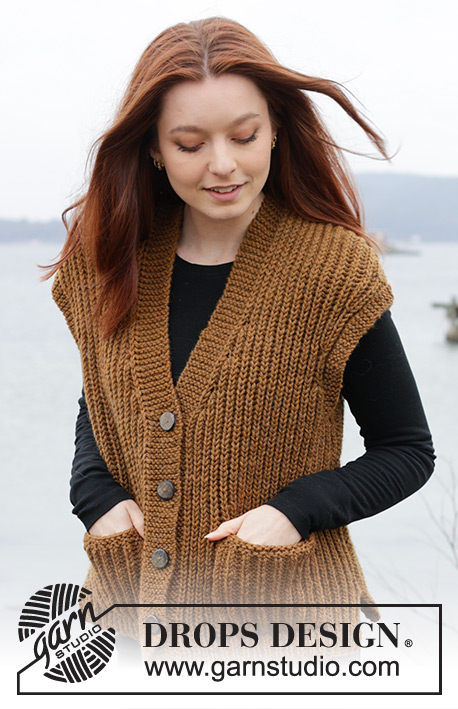
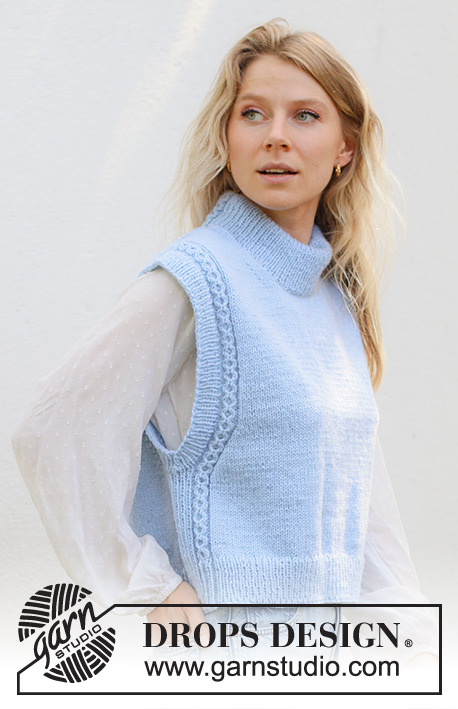
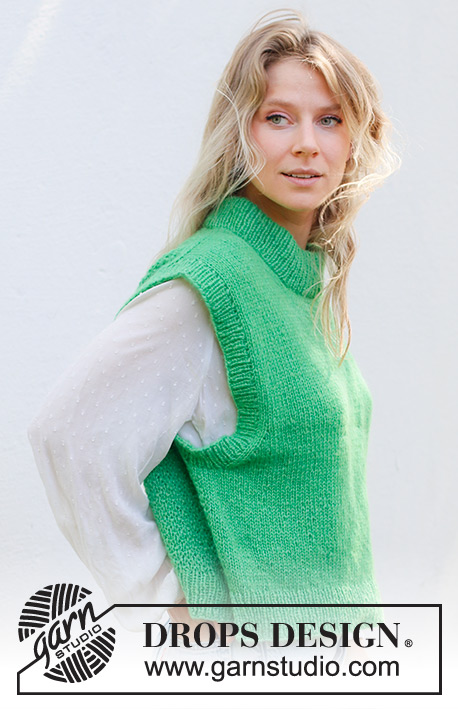
Knitted vest in DROPS Air. The piece is worked top down with European/diagonal shoulders, double neck, moss stitch on back piece and split in sides. Sizes S - XXXL.

DROPS 244-30
DROPS Design: Pattern ai-445
Yarn group C or A + A
-------------------------------------------------------

SIZES:
S - M - L - XL - XXL - XXXL

YARN:
DROPS AIR from Garnstudio (belongs to yarn group C)
250-250-250-300-350-350 g colour 43, parrot green

NEEDLES:
DROPS CIRCULAR NEEDLES SIZE 5 MM: Length 80 cm.
DROPS CIRCULAR NEEDLES SIZE 3.5 MM: Length 40 cm and 80 cm.
The technique MAGIC LOOP can be used – you then only need 80 cm circular needle in each size.

KNITTING TENSION:
17 stitches in width and 22 rows in height with stocking stitch = 10 x 10 cm.
NOTE: Needle size is only a guide. If you get too many stitches on 10 cm, change to a larger needle size. If you get too few stitches on 10 cm, change to a smaller needle size.

-------------------------------------------------------

Alternative Yarn – See how to change yarns here
Yarn Groups A to F – Use the same pattern and change the yarn here
Yarn usage using an alternative yarn – Use our yarn converter here

-------------------------------------------------------

DROPS Air
DROPS Air
65% Alpaca, 28% Polyamide, 7% Wool
from 4.80 £ /50g
Get the yarn to make this pattern from 24.00£.

The yarn cost is calculated from the pattern’s smallest size and the yarn’s cheapest product type. Looking for an even better price? You might find it on the DROPS Deals!

Pattern instructions

NOTE: This pattern is written in British English. All measurements in charts are in cm. For conversion from cm to inches - click here. There are different terms for crocheting in British and American English. If this pattern includes crochet, click for "crochet terms" here. For this pattern in American English, please click here.
-------------------------------------------------------

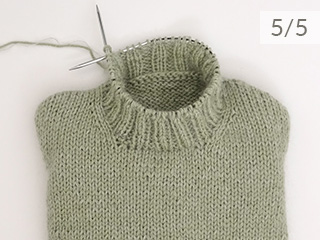
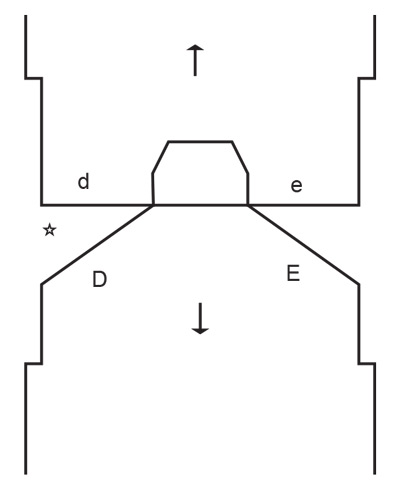
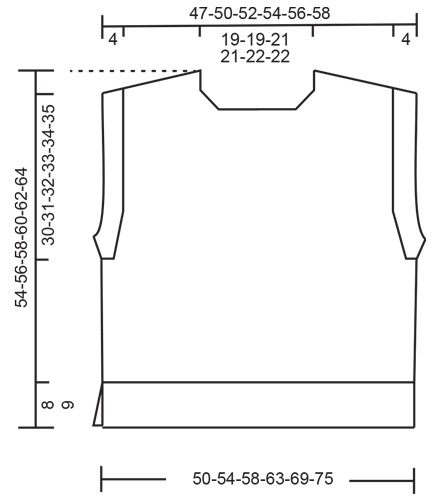
EXPLANATIONS FOR THE PATTERN:
-------------------------------------------------------

EDGE STITCH (for front piece and split):
Work 1 edge stitch on each side. This stitch is knitted from both the right and wrong side (garter stitch).

PATTERN:
See diagram A.1. The diagram shows all rows in the pattern from the right side.

INCREASE TIP FROM THE RIGHT SIDE:
Increase to the left AFTER marker/3 stitches.
Use left needle to pick up thread between 2 stitches from row below, pick up thread from front and knit stitch in back loop.
Increase to the right BEFORE marker/3 stitches:
Use left needle to pick up thread between 2 stitches from row below, pick up thread from behind and knit stitch in front loop.

INCREASE TIP FROM THE WRONG SIDE:
Increase to the left AFTER marker:
Use left needle to pick up thread between 2 stitches from row below, pick up thread from behind and purl stitch in front loop.
Increase to the right BEFORE marker:
Use left needle to pick up thread between 2 stitches from row below, pick up thread from front and purl stitch in back loop.

INCREASE TIP-1 (for armholes):
All increases are worked from the right side!
Increase 1 stitch inside 3 stocking stitches by making 1 yarn over which is worked twisted on the next row to avoid a hole. The increased stitches are worked into A.1 on back piece/in stocking stitch on front piece.

INCREASE TIP-2 (evenly spaced):
Increase 1 stitch by making 1 yarn over which is worked twisted on the next row to avoid a hole.

-------------------------------------------------------

START THE PIECE HERE:

-------------------------------------------------------

VEST - SHORT OVERVIEW OF THE PIECE:
The top of the back piece is worked back and forth with circular needle until the armholes are finished. Stitches are knitted up along each shoulder and the front piece is worked back and forth with circular needle until the armholes are finished.
The front and back pieces are joined and the body worked in the round with circular needle as far as the split, then the front and back pieces are finished separately with circular needle. The sleeve edges and neck are worked in the round with circular needle to finish.

BACK PIECE:
Cast on 35-35-37-37-39-39 stitches with circular needle size 5 mm and DROPS Air.
Purl 1 row from the wrong side.
Insert 1 marker inside the 3 outermost stitches on each side. Keep the markers in this position on every row onwards.
Work A.1 back and forth, with the outermost 3 stitches on each side worked in stocking stitch.
AT THE SAME TIME increase AFTER the marker at the beginning of the row (from the right side) and BEFORE the marker at the end of the row – read INCREASE TIP FROM RIGHT SIDE.
On the next row (wrong side) increase in the same way – read INCREASE TIP FROM WRONG SIDE. The increased stitches are worked into A.1.
Increase like this from both the right and wrong side a total of 17-19-20-22-22-24 times = 69-73-77-81-83-87 stitches.
REMEMBER THE KNITTING TENSION!
Work 2 rows without further increases, with 3 stocking stitches on each side.
Move the markers to the outermost stitch on each side – the piece is now measured from here.
Work A.1 with 3 stocking stitches on each side.
When the piece measures 21-22-22-21-19-18 cm from the markers, increase 1 stitch on each side for the armholes – read INCREASE TIP-1. Increase like this every 2nd row (each row from the right side) a total of 6-6-7-8-11-13 times = 81-85-91-97-105-113 stitches. After the last increase, work back from the wrong side. The piece measures approx. 26-27-28-28-29-30 cm from the markers, measured along the armhole. Cut the strand, place the stitches on a stitch holder.

FRONT PIECE:
Start with left shoulder (when garment is worn).
Knit up 19-21-22-24-24-26 stitches inside the outermost stitch along the left back shoulder (i.e., knit up 1 stitch in each of the 17-19-20-22-22-24 rows + 2 stitches as far as the marker). Work stocking stitch back and forth with 1 EDGE STITCH on each side – read description above.
When the piece measures 7-7-8-8-8-8 cm from the knitted-up stitches, increase for the neckline at the beginning of each row from the right side after the 3 stitches – remember INCREASE TIP FROM RIGHT SIDE. Increase 1 stitch 4-4-4-4-5-5 times = 23-25-26-28-29-31 stitches. Work back from the wrong side, cut the strand, place the stitches on a stitch holder and work the right front shoulder as follows:

Start by the marker and knit up 19-21-22-24-24-26 inside the outermost stitch along the right back shoulder. Work stocking stitch back and forth with 1 edge stitch on each side.
When the piece measures 7-7-8-8-8-8 cm from the knitted-up stitches, increase for the neckline at the end of each row from the right side, before the 3 stitches – remember INCREASE TIP FROM RIGHT SIDE. Increase 1 stitch 4-4-4-4-5-5 times = 23-25-26-28-29-31 stitches. Work back from the wrong side.
Work as follows from the right side: Stocking stitch over the right front piece, cast on 23-23-25-25-25-25 stitches for the neckline, work stocking stitch over the 23-25-26-28-29-31 stitches on the left front piece = 69-73-77-81-83-87 stitches.
Continue the stocking stitch back and forth with 1 edge stitch on each side.
When the piece measures 29-30-30-31-29-28 cm from the knitted-up stitches, increase for the armholes in the same way as on the back piece = 81-85-91-97-105-113 stitches. Work back from the wrong side. The piece measures approx. 34-35-36-38-39-40 cm, measured along the armhole. Cut the strand. The back and front pieces are now joined together.

BODY:
Cast on 2-3-4-5-6-7 stitches for the armhole, knit the 81-85-91-97-105-113 stitches from the front piece, cast on 4-6-8-10-12-14 stitches for the second armhole, continue A.1 from the right side over the 81-85-91-97-105-113 stitches from the back piece and cast on 2-3-4-5-6-7 stitches = 170-182-198-214-234-254 stitches.
Insert 1 marker-thread in the middle of the 4-6-8-10-12-14 stitches cast on under each sleeve. Allow the threads to follow your work onwards; they are used when working the split in each side.
Work in the round, with stocking stitch on the front piece and A.1 on the back piece.
When the piece measures 46-48-50-51-53-55 cm, measured from the top front shoulder, divide for the split in each side as follows:
Place the 85-91-99-107-117-127 stitches on the back piece on a stitch holder and work the front piece.

FRONT PIECE:
Change to circular needle size 3.5 mm. Knit 1 row from the right side and increase 26-28-28-32-34-38 stitches evenly spaced – read INCREASE TIP-2 = 111-119-127-139-151-165 stitches. Work as follows from the wrong side: 1 edge stitch, * purl 1, knit 1 *, work from *-* until there are 2 stitches left, purl 1 and 1 edge stitch. Continue this rib back and forth for 8-8-8-9-9-9 cm. Cast off – you can use Italian cast-off. The vest measures approx. 54-56-58-60-62-64 cm from the top of the shoulder.

BACK PIECE:
Work in the same way as the front piece.

SLEEVE EDGES:
Lay the piece flat and insert 1 marker at the top of the armholes (top of shoulder).
Start from the right side at the bottom of the armhole and knit up 124-130-136-142-148-154 stitches around the armhole, with short circular needle size 3.5 mm – make sure you have equal numbers of stitches on each side of the armhole. Work rib in the round (knit 1, purl 1). AT THE SAME TIME every 2nd round, decrease 2 stitches under the sleeve as follows: Work until there is 1 stitch left before the knitted stitch mid-under the sleeve, slip 2 stitches as if to knit together, knit 1 and pass the slipped stitches over the knitted stitch (= 2 stitches decreased). This will give you a neat sleeve edge.
Work until the rib measures 4 cm. Cast off in the same way as on the front and back pieces. Work the other sleeve edge in the same way.

NECK:
Start on one shoulder and knit up from the right side 98-98-108-108-114-114 stitches around the neck, inside 1 edge stitch, using short circular needle size 3.5 mm. Work rib in the round (knit 1, purl 1) for 11-11-11-13-13-13 cm. Cast off a little loosely. Fold the neck double to the inside and sew down. To avoid the neck being tight and rolling outwards, it is important that the seam is elastic.

Diagram

symbols = knit from right side, purl from wrong side
symbols = purl from right side, knit from wrong side
symbols = stitches for left front shoulder (d) knitted up along left back shoulder (D), stitches for right front shoulder (e), knitted up along right back shoulder (E)
symbols = knitting direction
diagram
diagram
diagram

Each of our patterns has specific tutorial videos to help you.

Do you have a question? See a list of frequently asked questions (FAQ)

Knitting tension is what determines the final measurements of your work, and is usually measured per 10 x 10 cm. It is provided like so: number of stitches in width x number of rows in height - eg: 19 stitches x 26 rows = 10 x 10 cm.

The knitting tension is very individual; some people knit/crochet loosely while others work tightly. You adjust the knitting tension with the needle size, which is why the suggested needle size is only meant as a guide! You need to adjust this (up or down) to ensure that YOUR knitting tension matches the knitting tension provided in the pattern. If you work with a different knitting tension than provided you will have a different yarn consumption, and your work will have different measurements than what the pattern suggests.

The knitting tension also determines which yarns can replace each other. As long as you achieve the same knitting tension you can replace one yarn with another.

See DROPS lesson: How to measure your tension/gauge

See DROPS video: How to make a gauge tension swatch

The required amount of yarn is provided in grams, eg: 450 g. To calculate how many balls you’ll need you first need to know how many grams are in 1 ball (25g, 50g or 100g). This information is available if you click on the individual yarn quality on our pages. Divide the amount required with the amount of each ball. For example, if each ball is 50g (the most common amount), the calculation will be as follows: 450 / 50 = 9 balls.

The important thing when changing from one yarn to another is that the knitting/crochet tension remains the same. This is so that the measurements of the finished piece will be the same as on the sketch provided. It is easier to achieve the same knitting tension using yarns from the same yarn group. It is also possible to work with multiple strands of a thinner yarn to achieve the knitting tension of a thicker one. Please try our yarn converter. We recommend you to always work a test swatch.

Please NOTE: when changing yarn the garment might have a different look and feel to the garment in the photo, due to individual properties and qualities of each yarn.

See DROPS lesson: Can I use a different yarn than the one mentioned in the pattern?

All our yarns are categorised into yarn groups (from A to F) according to thickness and knitting tension – group A contains the thinnest yarns and group F the thickest. This makes it easier for you to find alternative yarns to our patterns, should you wish to switch yarn. All yarns within the same group have a similar knitting tension and can easily replace each other. However, different yarn qualities have different structures and properties which will give the finished work a unique look and feel.

Click here for an overview of the yarns in each yarn group

At the top of all our patterns you’ll find a link to our yarn calculator, which is a helpful tool should you wish to use a different yarn than suggested. By filling in the yarn quality you wish to replace, the amount (in your size) and number of strands, the calculator will present good alternative yarns with the same knitting tension. Additionally it will tell you how much you’ll require in the new qualities and whether you’ll need to work with multiple strands. Most skeins are 50g (some are 25g or 100g).

If the pattern is worked with multiple colours, every colour will have to be calculated separately. Similarly, if the pattern is worked with several strands of different yarns (for example 1 strand Alpaca and 1 strand Kid-Silk) you will have to find alternatives for each, individually.

Click here to see our yarn calculator

Since different yarns have different qualities and textures we have chosen to keep the original yarn in our patterns. However, you can easily find options among our available qualities by using our yarn calculator, or simply pick a yarn from the same yarn group.

It is possible that some retailers still have discontinued yarns in stock, or that someone has a few skeins at home that they would like to find patterns for.

The yarn calculator will provide both alternative yarn as well as required amount in the new quality.

If you think it's hard to decide what size to make, it can be a good idea to measure a garment you own already and like the size of. Then you can pick the size by comparing those measures with the ones available in the pattern's size chart.

You'll find the size chart at the bottom of the pattern.

See DROPS lesson: How to read size chart

The needle size provided in the pattern serves only as a guide, the important thing is to follow the knitting tension. And since knitting tension is very individual, you will have to adjust the needle size to ensure that YOUR tension is the same as in the pattern – maybe you’ll have to adjust 1, or even 2 needle sizes, up or down to achieve the correct tension. For this, we recommend that you work test swatches.

Should you work with a different knitting tension than the one provided, the measurements of the finished garment might deviate from the measurement sketch.

See DROPS lesson: How to measure your tension/gauge

See DROPS video: How to make a tension/gauge swatch

Working a garment top-down provides more flexibility and room for personal adjustment. For example it is easier to try the garment on while working, as well as making adjustments to length of yoke and shoulder caps.

The instructions are carefully explaining every step, in the correct order. Diagrams are adjusted to the knitting direction and are worked as usual.

The diagram depicts all rows/rounds, and every stitch seen from the right side. It is read from bottom to top, from right to left. 1 square = 1 stitch.

When working back and forth, every other row is worked from the right side and every other row is worked from the wrong side. When working from the wrong side, the diagram will have to be worked reversed: from left to right, knit stitches are purled, purl stitches are knit etc.

When working in the round every round is worked from the right side and the diagram are worked from right to left on all rounds.

See DROPS lesson: How to read knitting diagrams

The diagram depicts all rows/rounds, and every stitch seen from the right side. It is worked from bottom to top, from right to left.

When working back and forth every other row is worked from the right side: from right to left and every other row is worked from the wrong side: from left to right.

When working in the round, every row in the diagram are worked from the right side, from right to left.

When working a circular diagram you start in the middle and work your way outwards, counter clockwise, row by row.

The rows usually start with a given number of chain stitches (equivalent to the height of the following stitch), this will either be depicted in the diagram or explained in the pattern.

See DROPS lesson: How to read crochet diagrams

Instructions for working several diagrams after each other on the same row/round, will often be written like so: “work A.1, A.2, A.3 a total of 0-0-2-3-4 times". This means you work A.1 once, then A.2 is worked once, and A.3 is repeated (in width) the number of times provided for your size – in this case like so: S = 0 times, M = 0 times, L=2 times, XL= 3 times and XXL = 4 times.

The diagrams are worked as usual: begin with the first row in A.1, then work the first row in A.2 etc.

See DROPS lesson: How to read knitting diagrams

See DROPS lesson: How to read crochet diagrams

The total width of the garment (from wrist-to-wrist) will be larger in the larger sizes, despite the actual sleeves being shorter. The larger sizes have longer sleeve caps and wider shoulders, so there will be a good fit in all sizes.

The measurement sketch/schematic drawing provides information regarding the full length of the garment. If it’s a jumper or a jacket the length is measured from the highest point on the shoulder closest to the neckline, and straight down to the bottom of the garment. It is NOT measured from the tip of shoulder. Similarly, the length of yoke is measured from the highest point on the shoulder and down to where yoke is split into body and sleeves.

On a jacket measures are never taken along bands, unless specifically stated. Always measure inside band stitches when measuring the length.

See DROPS lesson: How to read a schematic drawing

Diagrams are often repeated on the round or in height. 1 repeat is the diagram the way it appears in the pattern. If it says to work 5 repeats of A.1 in the round, then you work A.1 a total of 5 times after/next to each other in the round. If it says to work 2 repeats of A.1 vertically/in height you work the entire diagram once, then begin again at the start and work the entire diagram one more time.

Chain stitches are slightly narrower than other stitches and to avoid working the cast-on edge too tight, we simply chain more stitches to begin with. The stitch count will be adjusted on the following row to fit the pattern and measurement sketch.

The rib edge is more elastic and will contract slightly compared to, for example, stocking stitch. By increasing before the rib edge, you avoid a visible difference in width between the rib edge and the rest of the body.

It’s very easy to cast off too tightly, and by making yarn overs while casting off (and simultaneously casting these off) you avoid a too tight cast off edge.

See DROPS video: How to bind off with yarn overs (yo)

To achieve an even increase (or decrease) you can increase on, for example: every 3rd and 4th row alternately, like so: work 2 rows and increase on the 3rd row, work 3 rows and increase on the 4th. Repeat this until the increase is complete.

See DROPS lesson: Increase or decrease 1 st on every 3rd and 4th row alternately

Should you prefer to work in the round instead of back and forth, you may of course adjust the pattern. You’ll need to add steeks mid-front (usually 5 stitches), and follow the instructions. When you would normally turn and work from the wrong side, simply work across the steek and continue in the round. At the end you’ll cut the piece open, pick up stitches to work bands, and cover the cut edges.

See DROPS video: How to knit steeks and cut open

Should you prefer to work back and forth instead of in the round, you may of course adjust the pattern so you work the pieces separately and then assemble them at the end. Divide the stitches for the body in 2, add 1 edge stitch in each side (for sewing) and work the front and back pieces separately.

See DROPS lesson: Can I adapt a pattern for circular needles into straight needles?

Pattern repeats can vary slightly in the different sizes, in order to get the correct proportions. If you’re not working the exact same size as the garment in the photo, yours might deviate slightly. This has been carefully developed and adjusted so that the complete impression of the garment is the same in all sizes.

Make sure to follow instructions and diagrams for your size!

If you have found a pattern you like which is available in women’s size it’s not very difficult to convert it to men’s size. The biggest difference will be the length of sleeves and body. Start working on the women size that you think would fit across the chest. The additional length will be worked right before you cast off for the armhole/sleeve cap. If the pattern is worked top-down you can add the length right after the armhole or before the first decrease on sleeve.

Regarding additional yarn amount, this will depend on how much length you add, but it is better with a skein too many than too few.

All yarns will have excess fibres (from production) that might come off as lint or shedding. Brushed yarns (ie hairier yarns) have more of these loose, excess fibres, causing more shedding.

Shedding also depends on what is worn under or over the garment, and whether this pulls at the yarn fibres. It’s therefore not possible to guarantee that there will be no shedding

Below are some tips on how to get the best result when working with hairier yarns:

1. When the garment is finished (before you wash it) shake it vigorously so the looser hairs come off. NOTE: do NOT use a lint roller, brush or any method that pulls at the yarn.

2. Place the garment in a plastic bag and put it in your freezer - the temperature will cause the fibres to become less attached to each other, and excess fibres will come off easier.

3. Leave in the freezer for a few hours before taking it out and shaking it again.

4. Wash the garment according to the instructions on the yarn label.

Pilling is a natural process that happens to even the most exclusive of fibers. It's a natural sign of wear and tear that is hard to avoid, and that is most visible in high friction areas of your garment like a sweater's arms and cuffs.

You can make your garment look as new by removing the pilling, using a fabric comb or a pill/lint remover.

Still can't find the answer you need? Then scroll down and leave your question so one of our experts can try to help you. This will be done normally within 5 to 10 working days.
In the meantime, you can read the questions and answers that others have left to this pattern or join the DROPS Workshop on Facebook to get help from fellow knitters/crocheters!

You might also like...

Post a comment to pattern DROPS 244-30

We would love to hear what you have to say about this pattern!

If you want to leave a question, please make sure you select the correct category in the form below, to speed up the answering process. Required fields are marked *.

Comments / Questions (13)

country flag Enormous wrote:

Enjoying this pattern - thank you! Can I just confirm that the part 1 video on European shoulders covers many patterns and so the line in. *this* pattern “Increase like this every 2nd row (each row from the right side) a total of 6-6-7-8-11-13 times = 81-85-91-97-105-113 stitches.” where there is NO increase on wrong side should be followed rather than the video? An increase on wrong side is demonstrated in the video. Thanks!

26.04.2024 - 11:32

DROPS Design answered:

Dear Enormous, in this pattern you increase for shoulders on back piece on every row (= from RS as well as from WS) and in the video we also show how to increaes from WS - see time code 02:04 for example. Increase from RS and from WS in this pattern as explained under INCREASE TIP FROM THE RIGHT SIDE and under INCREASE TIP FROM THE WRONG SIDE. Happy knitting!

26.04.2024 - 13:41

country flag Corina Avram wrote:

Hello, Is it possible to work the neck like the sleeve edges? and not to fold it in double? Thanks

27.03.2024 - 15:40

DROPS Design answered:

Dear Corina, of course, if you prefer it that way, you are welcome to do so. Happy Knitting!

27.03.2024 - 22:17

country flag Monika Pfeffer wrote:

Hallo liebes Drops-Team, Beim Vorderteil steht …..bei einer Länge von …cm für die armausschnitte abketten. Es mus aber zugenommen werden., das ist etwas verwirrend. Liebe Grüße

10.12.2023 - 16:03

country flag Sacha wrote:

Bonjour ! Comme Susanne, je ne comprends pas bien les augmentations du dos, en taille M, si j'augmente 19 fois 2 mailles sur l'envers et sur l'endroit, je crée 76 nouvelles mailles, en additionnant 76 à 35 j'obtiens 111. Pouvez me dire à quoi correspond le chiffre 73 et comment y arriver, svp ? En vous remerciant par avance de votre aide et du temps passé à répondre. Bonne journée

02.12.2023 - 16:20

DROPS Design answered:

Bonjour Sacha, vous devez augmenter 19 fois 2 mailles soit 38 mailles au total sur un total de 19 rangs (- on augmente tous les rangs, sur l'endroit aussi bien que sur l'envers et non 19 fois sur l'endroit et 19 fois sur l'envers). Vous aurez ainsi bien 35 + 38 = 73. Bon tricot!

04.12.2023 - 07:58

country flag Murielle Pham wrote:

Bonsoir, tout d'abord merci pour votre réponse à ma question précédente. J'en suis maintenant aux emmanchures du devant mais il est dit de mesurer 30 cm depuis qu'on a relevé les mailles (il s'agit bien des mailles relevées sur les épaules ?). D'où mesure r on exactement ? Au niveau de l'encolure ou de l'épaule ?

19.11.2023 - 20:54

DROPS Design answered:

Bonjour Mme Pham, vous mesurez le devant à partir des mailles relevées, comme vous avez le même nombre de rangs côté encolure et côté épaules, la mesure sera la même des 2 côtés. Bon tricot!

20.11.2023 - 11:16

country flag PHAM Murielle wrote:

Bonjour, pour remonter les mailles de l'épaule du devant, je démarre donc a 22 m avant les bordures en jersey ( je n'ai pas de m à remonter sur les bordures?)

14.11.2023 - 17:38

DROPS Design answered:

Bonjour Mme Pham, pour l'épaule gauche, vous commencez à relever les mailles à partir du 1er rang du dos jusqu'au marqueur - dans cette vidéo nous montrons comment relever les mailles des deux devants. Bon tricot!

15.11.2023 - 07:58

country flag Mirjam Weiß wrote:

Liebes Drops-Team, ich stricke den Pollunder in Größe M und bin gerade beim Vorderteil. Momentan sind es 73 Maschen und ich frage mich, wann ich mit den Zunahmen beginnen muss, damit ich auf insgesamt 85 Maschen komme und wann ich das Vorderteil abketten muss. An dieser Stelle kommt mir die Anleitung etwas durcheinander vor oder bin nur ich das? 😅 Vielen Dank für eure Hilfe!

02.11.2023 - 21:33

DROPS Design answered:

Liebe Frau Weiß, nach den letzten Zunahmen stricken Sie noch 2 Reihen und setzen Sie die Markierungen beidseitig, jetzt messen Sie von hier; dann stricken Sie die 73 Maschen bis die Arbeit 22 cm von den Markierungen, und dann wird es neue Maschen für die Armlöcher beideitig zugenommen, so haben Sie die 85 Maschen und die Arbeit misst 27 cm. Maschen still legen und Vorderteil stricken. Siehe wie man so einen Rückenteil strickt in diesem Video. Viel Spaß beim stricken!

03.11.2023 - 06:37

country flag Susanne wrote:

Hallo Drops Design Team, Ich habe heute mit diesem Pullunder in GrößeM begonnen. Allerdings habe ich für das Rückenteil nach Ende der Schulterzunahmen 111 Maschen auf der Nadel und nicht 73. Ich habe wie beschrieben 35 M Anschlag plus 19 x 2 M in den Hinreihen plus 19 x 2 M in den Rückreihen gearbeitet, ist natürlichzu breit, was mir aufgrund der kurzen Rundstricknadel nicht aufgefallen ist. Also fange ich noch mal von vorne an 😫, mit nur 19 x 2 in den Hinreihen. Schade!

26.10.2023 - 19:37

DROPS Design answered:

Liebe Susanne, es soll insgesamt 19 Mal in jeder Reihe zugenommen werden, so 19 Reihen mit Zunahmen bei den Hin- sowie den Rückreihen. Viel Spaß beim stricken!

27.10.2023 - 09:42

country flag Cathrine wrote:

Er det rigtigt forstået, at 5 garnnøgler er tilstrækkeligt til størrelse L?

25.10.2023 - 20:46

DROPS Design answered:

Hej Cathrine, det stemmer :)

26.10.2023 - 14:10

country flag Emmi wrote:

Kan man sticka mosstickning på framstyckets med i det antalet maskor som står? Eller blir det en förändring i storlek? Vore fint om det var mosstickning även fram, händer lite mer.

19.10.2023 - 20:33

DROPS Design answered:

Hej Emmi, ja det kan du gøre :)

24.10.2023 - 08:19