
Popular categories
Looking for a yarn?


|
|
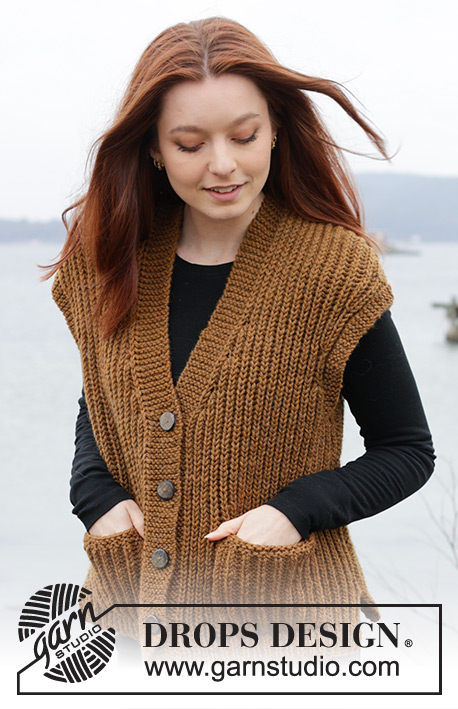
Caramel Ridge |
|
 |
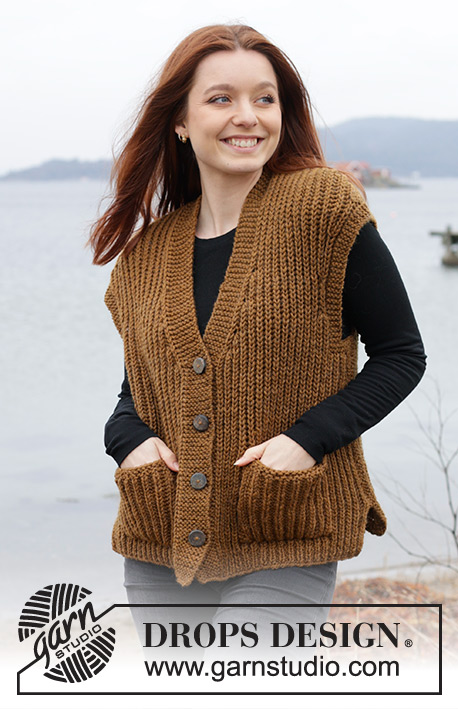 |
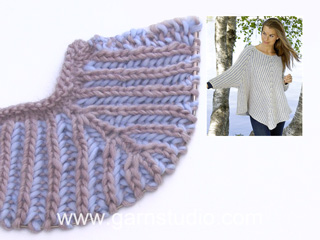
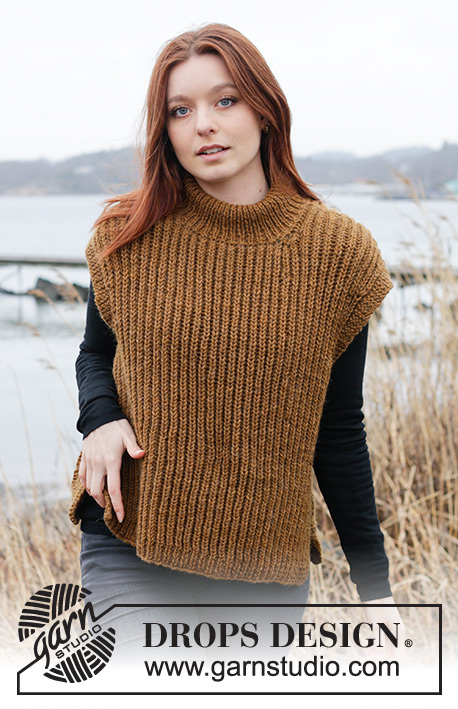
Knitted vest in DROPS Alaska. The piece is worked bottom up with English rib, V-neck, pockets and split in sides. Sizes S - XXXL.
DROPS 244-20 |
|
|
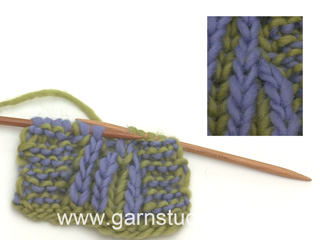
------------------------------------------------------- EXPLANATIONS FOR THE PATTERN: ------------------------------------------------------- GARTER STITCH (worked back and forth): Knit all rows. 1 ridge = knit 2 rows. ENGLISH RIB STITCHES: When counting stitches the yarn overs are not included. ENGLISH RIB (back and forth): ROW 1 (right side): 1 garter stitch, * knit the yarn over and slipped stitch together, 1 yarn over, slip 1 stitch purl-wise *, work from *-* until there are 2 stitches left, knit the yarn over and slipped stitch together, 1 garter stitch. ROW 2 (wrong side): 1 stitch in garter stitch, * 1 yarn over, slip 1 stitch as if to purl, knit the yarn over and slipped stitch together *, work from *-* until there are 2 stitches left and finish with 1 yarn over, slip 1 stitch as if to purl, 1 stitch in garter stitch. Repeat rows 1 and 2. DECREASE TIP-1 (armholes and back of neck): All decreases are worked from the right side! AT THE BEGINNING OF THE ROW: Work 4 garter stitches when decreasing for the armholes or 1 garter stitch when decreasing for the neck, work 1 English rib stitch as before, slip the next stitch + yarn over knit-wise, knit together the next 2 stitches (+ yarn over) and pass the slipped stitch + yarn-over over the knitted-together stitches. AT THE END OF THE ROW: Work until there are 8 stitches left when decreasing for the armholes or 5 stitches left when decreasing for the neck, knit together the next 3 stitches (+ their yarn overs), work 1 English rib stitch as before and 1/4 garter stitch(es). DECREASE TIP-2 (V-neck): All decreases are worked from the right side! DECREASE 2 STITCHES ON THE RIGHT FRONT PIECE: Work 7 band stitches in garter stitch and 1 English rib stitch as before, slip the next stitch + yarn over knit-wise, knit together the next 2 stitches (+ yarn over) and pass the slipped stitch + yarn-over over the knitted-together stitches. DECREASE 2 STITCHES ON THE LEFT FRONT PIECE: Work until there are 11 stitches left, knit together the next 3 stitches (+ their yarn overs), work 1 English rib stitch as before and 7 band stitches in garter stitch. INCREASE TIP (armholes): All increases are worked from the right side! INCREASE 2 STITCHES IN THE ENGLISH RIB STITCH, AFTER/BEFORE 4 GARTER STITCHES ON EACH SIDE: Work 3 stitches in the knitted stitch: knit together the yarn over and knitted stitch but do not slip them from the needle, make 1 yarn over and knit together the knitted stitch and yarn over again, slip the stitches from the needle = 3 stitches. Work as follows from on the next row: Make 1 yarn over, slip 1 stitch purl-wise, knit 1, make 1 yarn over, slip 1 stitch purl-wise. Then work the new stitches into the English rib. BUTTONHOLES (bottom up): Work buttonholes on the right band. 1 BUTTONHOLE = knit together the 3rd and 4th stitch from the edge and make 1 yarn over. On the next row knit the yarn over to leave a hole. Work the buttonholes when the piece measures: S: 6, 14, 22 and 30 cm = 2⅜", 5½", 8¾" and 11¾". M: 7, 15, 23 and 31 cm = 2¾", 6", 9" and 12¼". L: 8, 16, 24 and 32 cm = 3⅛", 6¼", 9½" and 12½". XL: 6, 15, 24 and 33 cm = 2⅜", 6", 9½" and 13". XXL: 7, 16, 25 and 34 cm = 2¾", 6¼", 9¾" and 13⅜". XXXL: 8, 17, 26 and 35 cm = 3⅛", 6¾", 10¼" and 13¾". ------------------------------------------------------- START THE PIECE HERE: ------------------------------------------------------- VEST - SHORT OVERVIEW OF THE PIECE: The front and back pieces are worked separately, back and forth with circular needle and bottom up, then sewn together. The neck is sewn onto the neckline at the back and the pockets worked to finish. BACK PIECE: Cast on 105-111-120-132-144-156 stitches with circular needle size 3.5 MM = US 4 and DROPS Alaska. Purl 1 row from the wrong side. Then work as follows from the right side: 1 GARTER STITCH – read description above, * knit 1, purl 2 *, work from *-* until there are 2 stitches, knit 1, 1 garter stitch. Continue this rib back and forth for 3 cm = 1⅛". Then work as follows from the wrong side: 1 garter stitch, * make 1 yarn over, slip 1 stitch purl-wise, knit 2 together *, work from *-* until there are 2 stitches left, 1 yarn over, slip 1 stitch purl-wise, 1 garter stitch = 71-75-81-89-97-105 stitches – read ENGLISH RIB STITCHES. Change to circular needle size 5 MM = US 8. Work ENGLISH RIB (back and forth) – read description above. REMEMBER THE KNITTING GAUGE! ARMHOLES: When the piece measures 30-31-32-33-34-35 cm = 11¾"-12¼"-12½"-13"-13⅜"-13¾", work 2 ridges over the 7-7-7-9-9-9 stitches in each side (yarn overs knitted together with their respective stitches and work the remaining stitches in English rib as before). After the 2 ridges, bind off 3-3-3-5-5-5 stitches for the armholes at the beginning of the next 2 rows = 65-69-75-79-87-95 stitches. Continue with English rib as before with 4 stitches in garter stitch in each side. When you have worked 8 rows after the bind-off for the armholes (4 visible rows), work the next row from the right side and decrease 2 stitches on each side – read DECREASE TIP-1 = 61-65-71-75-83-91 stitches. When you have worked 20-20-22-22-24-24 rows after binding off (10-10-11-11-12-12 visible rows) and the next row is from the right side, increase 2 stitches on each side – read INCREASE TIP. Repeat the increase every 12th-12th-14th-14th-16th-16th row 2 more times on each side = 73-77-83-87-95-103 stitches. OVERVIEW OF THE NEXT SECTION: Now you will place stitches on threads for the diagonal shoulders on each side and bind off for the neck. Both occur simultaneously. Read DIAGONAL SHOULDERS and NECK before continuing! DIAGONAL SHOULDERS: When the piece measures 49-51-53-55-57-59 cm = 19¼"-20"-21"-21⅝"-22½"-23¼", place stitches on threads at the beginning of each row on each side as follows: Place 1 stitch on the thread a total of 13 times on each side, then the last 15-17-19-21-23-27 stitches (28-30-32-34-36-40 stitches for the shoulders). NECK: AT THE SAME TIME when the piece measures 53-55-57-59-61-63 cm = 21"-21⅝"-22½"-23¼"-24"-24¾", bind off the middle 13-13-15-15-19-19 stitches for the neck and finish each shoulder separately (continue the diagonal shoulders). On the next row from the right side, decrease 2 stitches for the neck – read DECREASE TIP-1. When all the stitches are bind off or on the threads, the piece measures approx. 56-58-60-62-64-66 cm = 22"-22¾"-23⅝"-24⅜"-25¼"-26" from the top of the shoulder. Place the shoulder stitches on circular needle size 5 MM = US 8 and bind off (yarn overs bind off as normal stitches to give a loose bind-off edge). Work the other shoulder in the same way – remember DECREASE TIP-1. RIGHT FRONT PIECE: Cast on 60-63-66-72-78-84 stitches with circular needle size 3.5 MM = US 4 and DROPS Alaska. Purl 1 row from the wrong side. Then work as follows from the right side: 7 band stitches in garter stitch, * knit 1, purl 2 *, work from *-* until there are 2 stitches left, knit 1, 1 garter stitch. Continue this rib back and forth for 3 cm = 1⅛". Then work as follows from the wrong side: 1 garter stitch, * make 1 yarn over, slip 1 stitch purl-wise, knit 2 together *, work from *-* until there are 8 stitches left, make 1 yarn over, slip 1 stitch purl-wise, 7 band stitches in garter stitch = 43-45-47-51-55-59 stitch. Change to circular needle size 5 MM = US 8. Work English rib with 7 band stitches mid-front and 1 garter stitch at the side. Remember the BUTTONHOLES on the band – read explanation above. ARMHOLE: When the piece measures 30-31-32-33-34-35 cm = 11¾"-12¼"-12½"-13"-13⅜"-13¾", work 2 ridges over the 7-7-7-9-9-9 stitches on the side. AT THE SAME TIME after the last ridge towards armhole has been worked, work 1 ridge over the band (without working the other stitches – allows the band to lie neatly when the V-neck begins and this is done only one time). After the 2 ridges on the side, bind off 3-3-3-5-5-5 stitches for the armhole at the beginning of the first row from the side = 40-42-44-46-50-54 stitches. OVERVIEW OF THE NEXT SECTION: Continue the English rib, 4 garter stitches by the armholes and the 7 band stitches in garter stitch. AT THE SAME TIME decrease for the V-neck, decrease and increase for the armhole and place stitches on a thread for the shoulder. Read V-NECK, ARMHOLE and DIAGONAL SHOULDERS before continuing! V-NECK: On the first row from the right side after binding off for the armhole, decrease 2 stitches, for the neck – read DECREASE TIP-2. Decrease like this every 10th row a total of 3 times, then every 16th row 2-2-2-2-3-3 times. ARMHOLE: AT THE SAME TIME when you have worked 8 rows after binding off for the armhole (4 visible rows) and the next row is from the right side decrease 2 stitches in the side – remember DECREASE TIP-1. When you have worked 20-20-22-22-24-24 rows after binding off for the armhole (10-10-11-11-12-12 visible rows) and the next row is from the right side, increase 2 stitches in the side – remember INCREASE TIP. Repeat this increase every 12th-12th-14th-14th-16th-16th row 2 more times. DIAGONAL SHOULDER: AT THE SAME TIME, when the piece measures 49-51-53-55-57-59 cm = 19¼"-20"-21"-21⅝"-22½"-23¼" (all increases/decreases for V-neck and armhole are finished), place stitches on a thread at the beginning of each row from the side as follows: Place 1 stitch on the thread 13 times, then the last 14-16-18-20-22-26 stitches (27-29-31-33-35-39 stitches for the shoulders – NOTE: 1 less stitch on the front pieces than on the back piece because the neck will be sewn inside 1 stitch on the back piece). When all stitches are decreased for the neck and placed on a thread for shoulder, there are 7 stitches and the piece measures approx. 56-58-60-62-64-66 cm = 22"-22¾"-23⅝"-24⅜"-25¼"-26" from the top of the shoulder. Work garter stitch back and forth over the 7 band stitches for 7-7-8-8-9-9 cm = 2¾"-2¾"-3⅛"-3⅛"-3½"-3½" = neck at back. Bind off. Place the stitches on circular needle size 5 MM = US 8 and bind off in the same way as on the back piece. LEFT FRONT PIECE: Cast on 60-63-66-72-78-84 stitches with circular needle size 3.5 MM = US 4 and DROPS Alaska. Purl 1 row from the wrong side. Then work as follows from the right side: 1 garter stitch, * knit 1, purl 2 *, work from *-* until there are 8 stitches left, knit 1, 7 band stitches in garter stitch. Continue this rib back and forth for 3 cm = 1⅛". Then work as follows from the wrong side: 7 band stitches in garter stitch, * make 1 yarn over, slip 1 stitch purl-wise, knit 2 together *, work from *-* until there are 2 stitches left, make 1 yarn over, slip 1 stitch purl-wise, 1 garter stitch = 43-45-47-51-55-59 stitch. Change to circular needle size 5 MM = US 8. Work English rib with 7 band stitches mid-front and 1 garter stitch at the side. The rest of the left front piece is worked in the same way as the right front piece, but with increases and decreases on the opposite side (do not work buttonholes on the left band). ASSEMBLY: Sew the shoulder seams inside the bind-off edge – start outermost on the armhole and sew 1 stitch to 1 stitch = 1 stitch left on the back piece. Sew the side seams in the outermost loop of the outermost stitch so the seam is flat – leave a split of 6 cm = 2⅜" at the bottom on each side. Sew the neck together mid-back and sew the neck to the neckline inside 1 stitch. Sew the buttons onto the left band. POCKETS: Cast on 21-21-23-23-25-25 stitches with circular needle size 5 MM = US 8 and DROPS Alaska. Work as follows from the wrong side: 2 garter stitches, * make 1 yarn over, slip 1 stitch purl-wise, knit 1 *, work from *-* until there are 3 stitches left, make 1 yarn over, slip 1 stitch purl-wise, 2 garter stitches. Work English rib (back and forth) with 2 garter stitches on each side, until the pocket measures 12-12-13-13-14-14 cm = 4¾"-4¾"-5⅛"-5⅛"-5½"-5½" – finish after a row from the right side. Change to circular needle size 3.5 MM = US 4. Knit 3 rows over all stitches (on the first row knit together the yarn over with the stitch). Bind off with knit from the right side. Work 1 more pocket in the same way. Sew 1 pocket onto each front piece – 9-10-11-12-13-14 cm = 3½"-4"-4⅜"-4¾"-5⅛"-5½" from the front edge and 3 cm = 1⅛" up from the bottom edge (just above the rib). |
|

|
|
|
Have you made this or any other of our designs? Tag your pictures in social media with #dropsdesign so we can see them! Do you need help with this pattern?You'll find tutorial videos, a Comments/Questions area and more by visiting the pattern on garnstudio.com. © 1982-2024 DROPS Design A/S. We reserve all rights. This document, including all its sub-sections, has copyrights. Read more about what you can do with our patterns at the bottom of each pattern on our site. |
|


With over 40 years in knitting and crochet design, DROPS Design offers one of the most extensive collections of free patterns on the internet - translated to 17 languages. As of today we count 304 catalogs and 11422 patterns - 11417 of which are translated into English (US/in).
We work hard to bring you the best knitting and crochet have to offer, inspiration and advice as well as great quality yarns at incredible prices! Would you like to use our patterns for other than personal use? You can read what you are allowed to do in the Copyright text at the bottom of all our patterns. Happy crafting!
Comments / Questions (10)
Do you have a tutorial video for pattern number 129-15, take me to Spain vest, knitted Drops asymmetric vest worked from top down?
12.04.2024 - 23:07DROPS Design answered:
Dear Sheila, you can find the relevant videos for each pattern if you click on the word "Videos+, just below the title line, above the pattern itself. Happy Crafting!
13.04.2024 - 00:08Ich danke Ihnen ganz herzlich , so komme ich prima klar. Christiane Jakoy
31.01.2024 - 09:49Sie müssen entschuldigt aber wie muß ich nun Stricken? Die erste Ma stilllegen und dann 4 Kraus rechts und weiter im Patent. Dann verschiebt sich der Kraus- Rand Richtung Hals und muß ich die 13 stillgelegten Ma in Hin-und Rückreihe stricken?
30.01.2024 - 11:56DROPS Design answered:
Liebe Frau Jakob, stricken Sie die Maschen genauso wie zuvor, damit Das Muster nicht verschoben wird, dh bei der 1. verkürzte Reihe stricken Sie 1 M kraus rechts, legen Sie still, stricken Sie die Ende bis zur Ende, wenden und diese Reihe wiederholen, bei der nächsten Hinreihe sind es nur noch 3 kraus rechte Maschen, 1 M stricken und still legen, die 2 nächsten M kraus rechts stricken und bis zur Ende genauso wie zuvor stricken, diese Reihe bei der Rücseite wiederholen und immer so Weiterstricken, so werden die 4 krausrechte Maschen + 11 M Patentmuster stillgelegt und die restlichen Maschen genauso wie zuvor mit Patentmuster stricken. Viel Spaß beim stricken!
31.01.2024 - 08:09Wenn ich die erste Masche stilllegen soll dann sind es ja nur noch 3 Kraus Re Maschen. Können Sie mir den genauen Vorgang beschreiben? Ich stehe völlig auf dem Schlauch und habe soetwas noch nicht gestrickt.
29.01.2024 - 13:46DROPS Design answered:
Liebe Frau Jakoby, die Maschen stricken Sie einfach wie zuvor, dh wie sie erscheinen: Patent und Krausrechts, also bei den verkürzten Reihen wird man genauso wie zuvor stricken, nur immer weniger Maschen gegen Armloch damit die Schulter am Hals höher als beim Armloch ist. Viel Spaß beim stricken!
30.01.2024 - 07:38Hallo liebes Drops Team, ich bin beim Rückenteil und soll für die Schulterschrägung 13x bds. 1 Ma stilllegen. Bedeutet das, daß ich weiter in die Höhe stricke und wenn ja, wie soll ich die 4 Ma kraus re weiterstricken ? Ich kann mir das Ganze nicht vorstellen. lg Christiane Jakoby
28.01.2024 - 16:07DROPS Design answered:
Liebe Frau Jakoby, bei der Schulterschrägung stricken Sie die verkürzten Reihe ab Schulter, dh die Maschen gegen Schulter werden stillgelegt und alle anderen Maschen genauso wie zuvor gestrickt. So bei der 4 ersten Mal stricken Sie die Maschen krausrippe wie zuvor. Viel Spaß beim stricken!
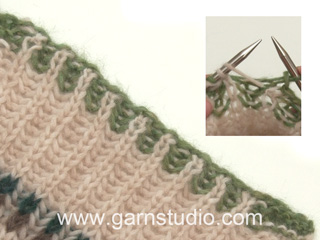
29.01.2024 - 12:19Hello. In the explanation for Decrease, after the garter section it says we have to do 1 stich in English rib and than the -2 decrease for english rib (slip kw, k2tog, passsliped stich) . It seams to me, by looking at the photos of the pattern, that after the garter stiches I should slip as if to knitt that very first stich of fhe English rib section. Thanks in advance
27.11.2023 - 17:35DROPS Design answered:
Dear Branislava, decrease just as explained, along the front band stitches in garter stitch, you should have 1 knitted stitch from the English Rib - maybe you can see that better on the 3rd picture. Happy knitting!
28.11.2023 - 08:34Wie viel Wolle benötige ich für diese Weste in Größe M?
03.11.2023 - 14:55DROPS Design answered:
Liebe Frau Ivetic, die Garnmenge finden Sie im Kopfteil für jede Grösse, so in M brauchen Sie 700 g DROPS Alaska/50 g das Knäuel =14 Knäuel Alaska. Viel Spaß beim stricken!
03.11.2023 - 15:53Sunday Vest
07.08.2023 - 06:28J'aime bien les poches et les fentes latérales aussi .
04.08.2023 - 12:56Modèle classique et point ( côtes anglaises ? ) moelleux à mettre en toutes saisons . Choisir une couleur adaptée si l'on veut changer .
04.08.2023 - 12:54