
Popular categories
Looking for a yarn?


|
|
Moon Mist |
|
 |
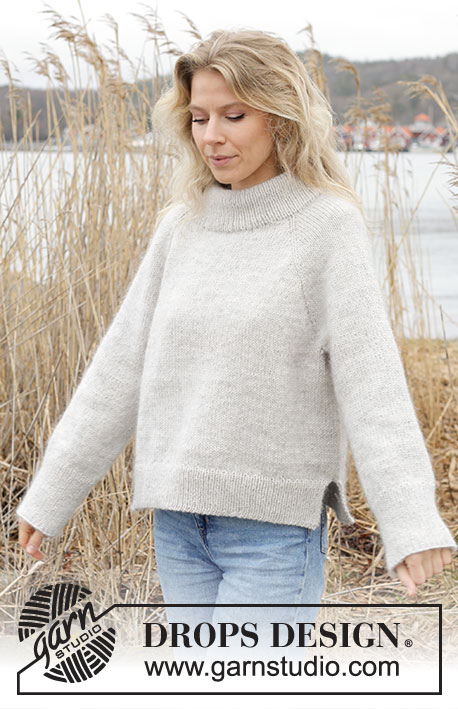 |
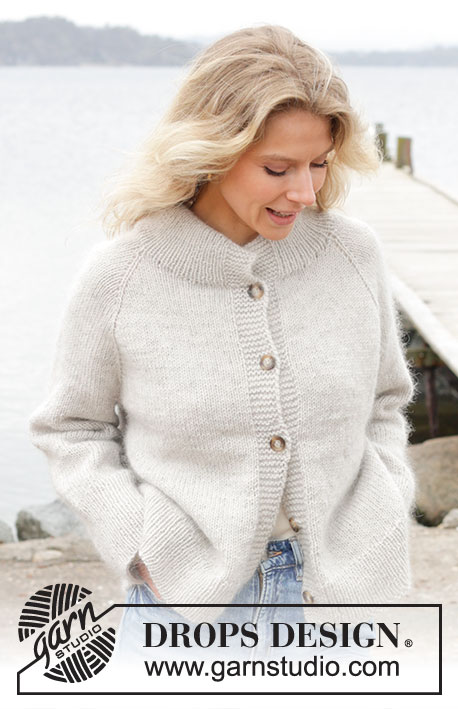
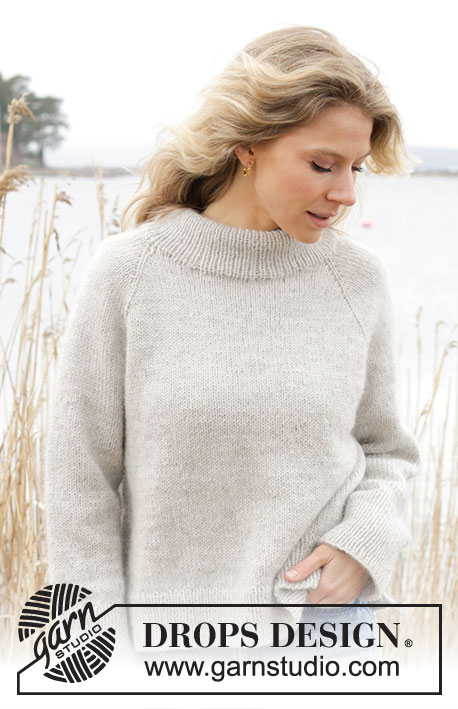
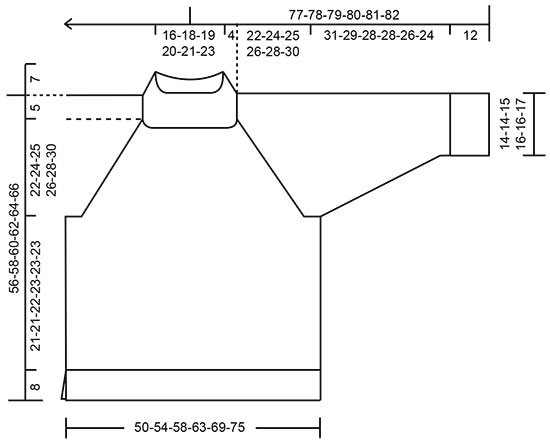
Knitted sweater in DROPS Lima and DROPS Kid-Silk. The piece is worked top down with raglan, double neck and split in sides. Sizes S - XXXL.
DROPS 245-7 |
|
|
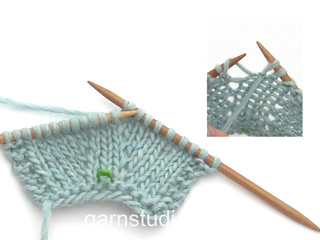
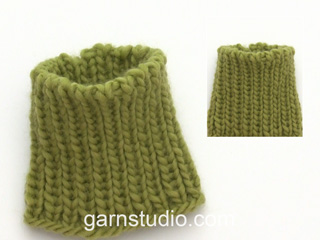
------------------------------------------------------- EXPLANATIONS FOR THE PATTERN: ------------------------------------------------------- GARTER STITCH (worked back and forth): Knit all rows. 1 ridge = knit 2 rows. RAGLAN-1: All increases are worked from the right side! Increase 1 stitch before/after the 4 marker-stitches – hereafter called raglan-stitches. The raglan-stitches are always worked in stockinette stitch. Increase 1 stitch by making 1 yarn over, which is worked twisted as described below, then worked in stockinette stitch. From the wrong side: BEFORE raglan-stitches: Purl the back loop – no hole. AFTER raglan-stitches: Slip the yarn over off the left needle and replace it the other way round (insert the left needle in the back when replacing it). Purl the front loop – no hole. From the right side: BEFORE raglan-stitches: Slip the yarn over off the left needle and replace it the other way round (insert the left needle in the back when replacing it). Knit the front loop (the stitch twists to the right) – no hole. AFTER raglan-stitches: Knit the back loop (the stitch twists to the left) – no hole. RAGLAN-2: Increase 1 stitch before/after the raglan-stitches on the front/back pieces (not on the sleeves). Raglan-2 is worked in addition to Raglan-1. Work as follows: BEFORE raglan-stitches: Work until there are 3 stitches left before the raglan-stitches, use left needle to pick up thread between 2 stitches from round below, pick up thread from behind and knit stitch in front loop – no hole. AFTER raglan-stitches: Work 3 stitches past the raglan-stitches (if there are yarn overs, they are not counted as stitches), use left needle to pick up thread between 2 stitches from round below, pick up thread from front and knit stitch in back loop – no hole. INCREASE TIP: Increase 1 stitch by making 1 yarn over, which is worked twisted on the next row/round to avoid a hole. DECREASE TIP (for sleeves): Decrease 1 stitch on either side of the marker-thread as follows: Work until there are 3 stitches left before the marker-thread, knit 2 together, knit 2 (marker-thread sits between these 2 stitches), slip 1 stitch knit-wise, knit 1 and pass the slipped stitch over the knitted stitch. ------------------------------------------------------- START THE PIECE HERE: ------------------------------------------------------- SWEATER – SHORT OVERVIEW OF THE PIECE. The neckline is worked first back and forth with circular needle and top down, and new stitches are cast on for neckline; then the yoke is continued in the round with circular needle from mid-back. The yoke is divided for body and sleeves and the body continued in the round with circular needle as far as the split in each side. The front and back pieces are finished back and forth with circular needle. The sleeves are worked in the round with double pointed needles/short circular needle. The neck is worked to finish. NECKLINE: Cast on 62-64-66-68-70-72 stitches with circular needle size 5 MM = US 8 and 1 strand of each quality (2 strands). Insert 4 markers and 1 marker thread as follows: Count 1 stitch, insert 1 marker in the next stitch, count 16 stitches (sleeve), insert 1 marker in the next stitch, count 12-13-14-15-16-17 stitches, insert 1 marker thread (mid-back), count 12-13-14-15-16-17 stitches insert 1 marker in the next stitch, count 16 stitches (sleeve), insert 1 marker in the next stitch, = 1 stitch left after the last marker. These marker stitches are now called raglan-stitches. Work back and forth as follows: ROW 1 (right side): Knit and increase for RAGLAN-1 on each side of the 4 raglan-stitches – read description above (8 increased stitches), cast on 2 stitches at the end of the row = 72-74-76-78-80-82 stitches. ROW 2 (wrong side): Purl (yarn overs worked as described under Raglan-1), cast on 2 stitches at the end of the row = 74-76-78-80-82-84 stitches. ROW 3 (right side): Knit and increase for raglan-1 on each side of the 4 raglan-stitches (8 increased stitches), cast on 2 stitches at the end of the row = 84-86-88-90-92-94 stitches. ROW 4 (wrong side): Purl, cast on 2 stitches at the end of the row = 86-88-90-92-94-96 stitches. ROW 5 (right side): Knit, increase for raglan-1 on each side of the 4 raglan-stitches (8 stitches increased), cast on 3 stitches at the end of the row = 97-99-101-103-105-107 stitches. ROW 6 (wrong side): Purl, cast on 3 stitches at the end of the row = 100-102-104-106-108-110 stitches. ROW 7 (right side): Knit, increase for raglan-1 on each side of the 4 raglan-stitches (8 stitches increased), cast on 8-10-12-14-16-18 stitches at the end of the row = 116-120-124-128-132-136 stitches. Work to the marker-thread mid-back. The neckline is finished and you have increased 4 times for raglan-1 on each side of the 4 raglan-stitches. YOKE: Continue with stockinette stitch in the round from mid-back. REMEMBER THE KNITTING GAUGE. NOTE: You will now increase more stitches on the front/back pieces than on the sleeves, so you will now work raglan-2 regularly in addition to raglan-1. Read the next 3 paragraphs before continuing. Increase for raglan-1 on each side of the 4 raglan-stitches every 2nd round 3-5-8-13-13-11 times (i.e., 7-9-12-17-17-15 times including the 4 increases on the neckline). AT THE SAME TIME on the first round, increase for RAGLAN-2 on the front and back pieces – read description above (raglan-2 is worked in addition to raglan-1). Increase for raglan-2 every 12th-12th-14th-10th-8th-8th round a total of 2-2-2-4-5-6 times. You have increased for raglan-1 3-5-8-13-13-11 times after the neckline. Continue to increase for raglan-1 every 2nd round but every second increase is only worked on the front and back pieces (i.e., increase on the front/back pieces every 2nd round and on the sleeves every 4th round). Increase like this 14-14-12-8-10-14 times on the front/back pieces (7-7-6-4-5-7 times on the sleeves) – remember raglan-2. You have now increased a total of 23-25-26-29-32-35 times on the front/back pieces (including raglan-2) and 14-16-18-21-22-22 times on the sleeves. After all the increases for raglan-1 and raglan-2 there are 232-252-268-296-316-332 stitches (70-76-80-88-96-104 stitches on the front and back pieces between the raglan-stitches and 44-48-52-58-60-60 stitches on the sleeves). Continue with stockinette stitch, without further increases until the piece measures 22-24-25-26-28-30 cm = 8¾"-9½"-9¾"-10¼"-11"-11¾", measured mid-back from cast-on edge. Divide for the body and sleeves as follows: Knit 36-39-41-45-49-53 (half back piece), place the next 44-48-52-58-60-60 stitches on a thread for the sleeve, cast on 8-8-10-10-12-14 stitches (in side under sleeve), knit 72-78-82-90-98-106 (front piece), place the next 44-48-52-58-60-60 stitches on a thread for the sleeve, cast on 8-8-10-10-12-14 stitches (in side under sleeve), knit the last 36-39-41-45-49-53 stitches (half back piece). The body and sleeves are finished separately. The piece is now measured from here! BODY: = 160-172-184-200-220-240 stitches. Insert 1 marker-thread in the middle of the 8-8-10-10-12-14 cast-on stitches under each sleeve. Allow the threads to follow your work onwards – they are used when working the split in each side. Continue stockinette stitch in the round until the body measures 21-21-22-23-23-23 cm = 8¼"-8¼"-8¾"-9"-9"-9" from the division. Now divide at both marker-threads and finish each piece separately. Place the front piece on circular needle size 3.5 MM = US 4 and leave the back piece on the needle. FRONT PIECE: = 80-86-92-100-110-120 stitches. Knit 1 row from the right side and increase 25-27-29-31-35-37 stitches evenly spaced – read INCREASE TIP = 105-113-121-131-145-157 stitches. Work first row as follows from the wrong side: 1 GARTER STITCH – read description above, * purl 1, knit 1 *, work from *-* until there are 2 stitches left, purl 1 and 1 garter stitch. Continue this rib back and forth for 8 cm = 3⅛". Bind off. You can use Italian bind-off. The sweater measures approx. 56-58-60-62-64-66 cm = 22"-22¾"-23⅝"-24⅜"-25¼"-26" from the shoulder. BACK PIECE: Place the 80-86-92-100-110-120 stitches on circular needle size 3.5 MM = US 4 and work in the same way as the front piece. SLEEVES: Place the 44-48-52-58-60-60 stitches from the thread on the one side of the piece on short circular needle/double pointed needles size 5 MM = US 8 and knit up 1 stitch in each of the 8-8-10-10-12-14 stitches cast on under the sleeve = 52-56-62-68-72-74 stitches. Insert a marker-thread in the middle of the new stitches under the sleeve. Start at the marker-thread and work stockinette stitch in the round. When the sleeve measures 4-4-4-2-2-3 cm = 1½"-1½"-1½"-¾"-¾"-1⅛", decrease 2 stitches mid under sleeve – read DECREASE TIP. Decrease like this every 7-5-3½-3-2½-2 cm = 2¾"-2"-1¼"-1⅛"-1"-¾" a total of 4-5-7-9-10-10 times = 44-46-48-50-52-54 stitches. Continue working until the sleeve measures 31-29-28-28-26-24 cm = 12¼"-11⅜"-11"-11"-10¼"-9½" from the division (or to desired length before the rib. There is 12 cm = 4¾" left). Change to double pointed needles size 3.5 MM = US 4. Knit 1 round and increase 20-20-20-20-24-24 stitches evenly spaced = 64-66-68-70-76-78 stitches. Work rib (knit 1, purl 1) for 12 cm = 4¾". Bind off in the same way as on the front/back pieces. The sleeve measures approx. 43-41-40-40-38-36 cm = 17"-16⅛"-15¾"-15¾"-15"-14¼" from the division. Work the other sleeve in the same way. DOUBLE NECK: Start mid-back and knit up from the right side 100-104-108-112-116-120 stitches round the neck, with short circular needle size 3.5 MM = US 4 and 1 strand of each quality (2 strands) – stitch number must be divisible by 4 – match the rib to the raglan-stitches so they continue to be knitted (seen from the right side) and you have an odd number of stitches between each raglan-stitch so the rib fits. Work rib in the round (knit 1, purl 1) for 15 cm = 6". Bind off. Fold the neck double to the inside and fasten with a couple of stitches in each raglan-line. |
|
|
|
|
Have you made this or any other of our designs? Tag your pictures in social media with #dropsdesign so we can see them! Do you need help with this pattern?You'll find tutorial videos, a Comments/Questions area and more by visiting the pattern on garnstudio.com. © 1982-2024 DROPS Design A/S. We reserve all rights. This document, including all its sub-sections, has copyrights. Read more about what you can do with our patterns at the bottom of each pattern on our site. |
|


With over 40 years in knitting and crochet design, DROPS Design offers one of the most extensive collections of free patterns on the internet - translated to 17 languages. As of today we count 304 catalogs and 11422 patterns - 11417 of which are translated into English (US/in).
We work hard to bring you the best knitting and crochet have to offer, inspiration and advice as well as great quality yarns at incredible prices! Would you like to use our patterns for other than personal use? You can read what you are allowed to do in the Copyright text at the bottom of all our patterns. Happy crafting!
Comments / Questions (24)
Hallo, Ich habe den Halsausschnitt in Hin- und Rückreihen gestrickt. Jetzt bin ich unsicher, wie weiter. Am Ende steht "Bis zum Markierungsfaden an der hinteren Mitte weiterstricken.". Heißt das, dass ich damit die Runde nun schließen soll und die Passe dann in Runden anschließe? Besten Dank im Voraus und Grüße
20.02.2024 - 17:58DROPS Design answered:
Liebe Christine, die letzte verkürzte Reihe ist eine Rückreihe, wenden Sie und stricken Sie (= Hinreihe) jetzt bis die Markierungsfaden an der hinteren Mitte und ab jetzt stricken Sie dann in Runden. Viel Spaß beim stricken!
21.02.2024 - 08:18Jeg vil gerne strikke moon list 245-7 så jeg vil høre om jeg kan bruge air i stedet for lima ved godt med strikkeprøve men om det er helt galt.
06.02.2024 - 10:02DROPS Design answered:
Hei Annelene. Man kan ikke erstatte DROPS Lima med DROPS Air, Lima er tynnere enn Air, men i denne oppskriften er Lima strikket sammen med DROPS Kid-Silk slik at disse 2 kvaliteten sammen blir tykkere. Strikkefastheten er oppgitt til 16 masker i bredden og 20 pinner i høyden med glattstrikk og DROPS Air har en veiledende strikkefasthet på 17 m x 22 p. Så om du strikker en prøvelapp med Air og får oppskriftens oppgitte strikkefasthet, kan du bytte, evnt justere litt på pinne str. mvh DROPS Design
15.02.2024 - 10:56Je ne comprends rien je monte 66 mailles car je fais la taille L. Je monte donc1 maille, puis 1 m avec un marqueur, puis 16 m pour les manches, puis de nouveau 1 marqueur puis 14 m demi dos, 1 m pour le fil marqueur et de nouveau 14 m pour le demi dos, puis 1 m marqueur, 16 m . Arrivee à ce stade, j'ai 65 mailles et non 64. Il ne me reste qu'une maille au lieu de deux. Ou alors le fil marqueur ne se met pas dans une maille mais entre deux mailles ? Je ne comprends pas j'ai recompte 6 fois.
19.01.2024 - 16:43DROPS Design answered:
Bonjour Anna, posez vos marqueurs ainsi: 1 m (devant), 1 m (marqueur), 16 m (manche), 1 m (marqueur), 14 m (demi-dos), fil marqueur, 14 m (demi-dos), 1 m (marqueur), 16 m (manche), 1 m (marqueur), 1 m (devant)=1+1+16+1+14+14+1+16+1+1= 66 mailles. Bon tricot!
22.01.2024 - 07:48Bonjour j'ai un échantillon que je ne peux plus modifier (j'ai tout essayé) le plus près de l'échantillon, c'est 16m par 24 rangs. Est ce que ca ira quand même ? merci
17.01.2024 - 21:25DROPS Design answered:
Bonjour Anna, s'il vous faut davantage de rangs pour 10 cm, vous aurez probablement besoin de davantage de laine qu'indiqué dans les explications, et comme vous avez besoin de davantage de rangs pour la bonne hauteur, vous pouvez soit ajouter des tours sans augmentations entre les tours avec augmentations, soit tricoter comme indiqué et continuer après le raglan jusqu'à la hauteur indiquée pour l'empiècement, ainsi vous êtes sûre d'avoir la bonne longueur. Bon tricot!
18.01.2024 - 08:54Jag har stickat den här tröjan och är så nöjd. Jag stickade den i drops karisma , färg 37 , och kid-silk , färg 28 , och det blev jättefint. Mjuk och skön och en härligt rymlig modell. En sak som jag undrar är hur man lämpligast mäter ett stickat arbete. Liggande eller hängande? Mvh Åsa
14.01.2024 - 15:07Het wordt een prachtige trui! Ik heb een vraag over de meerderingen op het moment dat je over gaat van de romp rondbreien naar heen en weer breien in boordsteek en een spilt krijgt. Waarom moet je dan zoveel steken meerderen komt dat om dat je overgaat een dunnere naald? Ik ben bang dat de onderkant te wijd wordt
12.01.2024 - 23:15DROPS Design answered:
Dag Annemiek,
De boordsteek trekt het werk samen en om dit te voorkomen moet je zoveel steken meerderen.
14.01.2024 - 13:03Hallo. Leider habe ich es nicht verstanden, warum der Halsausschnitt in Hin- und Rückreihen gestrickt wird. Wann wird dieses Loch geschlossen und wie? Danke für die Antwort.-
27.12.2023 - 21:35DROPS Design answered:
Liebe Daniela, der Halsausschnitt wird in Hin- und Rückreihen gestrickt, damit der Halsauschnitt hinten länger als der Halsausschnitt vorne wird. Am Ende der 7. Reihe wird man die mittleren Maschen für den Halsausschnitt vorne angeschlagen, dann stricken Sie in Runden = die Maschen am Ende der Reihe bis zum Markierungsfaden an der hinteren Mitte. Viel Spaß beim stricken!
02.01.2024 - 09:10The pattern looks great but none of the increases actually add up to the correct amount t of stitches at the end of the yoke increases - supposed to have 296 stitches but that is more than 88 x 2 for front/back added with 58 x 2 for both sleeves - where are the extra 4 supposed to be?
12.12.2023 - 18:54DROPS Design answered:
Hi Mrs Guymer, Have you inserted the markers in stitches (instead of between stitches)? That could be where your extra 4 stitches are included. Happy knitting!
13.12.2023 - 06:43Bonjour, je suis bloquée avec les raglans. Comment différent marqueurs manches et dos/devant? Est-ce que cela veut dire: tricoter jusqu’au 1er marqueur côté dos, faire le raglan 2, pas d’augmentation côté manche (donc au contraire du raglan 1, on augmente pas des 2 côtés du raglan? ) Je vous remercie d’avance.
10.12.2023 - 12:10DROPS Design answered:
Bonjour Myriam, vous avez 4 marqueurs, 1 entre chaque pièce pour séparer les manches du dos et du devant; pour le raglan, vous allez augmenter de part et d'autre de la maille avec un marqueur; mais vous devez augmenter davantage pour le devant/le dos que pour les manches, autrement dit, vous augmentez (raglan-1) pour le devant, le dos et les manches et en plus, vous augmenterez (raglan-2) seulement pour le devant et le dos; puis vous augmenterez alternativement 4 mailles (dos / devant seulement - raglan-1) et 8 mailles (comme avant, dos, devant et manches). Bon tricot!
11.12.2023 - 09:02Bonjour, Pour les augmentations du raglan 2 et les augmentations du raglan 1 pour les dos/devant : doit-on augmenter seulement de 2 mailles sur deux mailles raglan quand on arrive au dos et devant, ou doit-on augmenter de 4 mailles sur les 4 mailles raglan seulement sur les cotés dos/devant ? Merci d'avance
29.11.2023 - 11:09DROPS Design answered:
Bonjour Victoria, on va augmenter systématiquement 2 mailles pour les manches (augmentations-1) et soit 2 soit 4 mailles pour le devant et le dos (augmentations-1 + augmentations-2). Bon tricot!
29.11.2023 - 14:15