DROPS Air
DROPS Air
65% Alpaca, 28% Polyamide, 7% Wool
from 4.80 £ /50g
Get the yarn to make this pattern from 38.40£.

The yarn cost is calculated from the pattern’s smallest size and the yarn’s cheapest product type. Looking for an even better price? You might find it on the DROPS Deals!

DROPS SS24

Early Moorning Mist

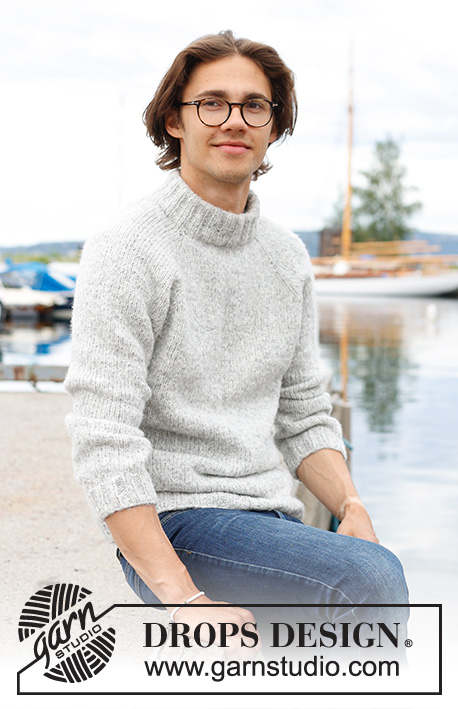
Knitted jumper for men in DROPS Air. The piece is worked top down with stocking stitch, double neck and raglan. Sizes S - XXXL.

DROPS 233-6
DROPS Design: Pattern ai-423
Yarn group C or A + A
-------------------------------------------------------

SIZES:
S - M - L - XL - XXL - XXXL

MATERIALS:
DROPS AIR from Garnstudio (belongs to yarn group C)
400-400-450-500-550-600 g colour 03, pearl grey

NEEDLES:
DROPS CIRCULAR NEEDLE SIZE 5 MM: Length 40 cm and 80 cm.
DROPS CIRCULAR NEEDLE SIZE 4 MM: Length 40 cm and 80 cm.
DROPS DOUBLE POINTED NEEDLES SIZE 5 MM.
DROPS DOUBLE POINTED NEEDLES SIZE 4 MM.
The technique MAGIC LOOP can be used – you then only need circular needle of 80 cm in each size.

KNITTING TENSION:
17 stitches in width and 22 rows in height with stocking stitch = 10 x 10 cm.
NOTE: Needle size is only a guide. If you get too many stitches on 10 cm, change to a larger needle size. If you get too few stitches on 10 cm, change to a smaller needle size.

-------------------------------------------------------

Alternative Yarn – See how to change yarns here
Yarn Groups A to F – Use the same pattern and change the yarn here
Yarn usage using an alternative yarn – Use our yarn converter here

-------------------------------------------------------

DROPS Air
DROPS Air
65% Alpaca, 28% Polyamide, 7% Wool
from 4.80 £ /50g
Get the yarn to make this pattern from 38.40£.

The yarn cost is calculated from the pattern’s smallest size and the yarn’s cheapest product type. Looking for an even better price? You might find it on the DROPS Deals!

Pattern instructions

NOTE: This pattern is written in British English. All measurements in charts are in cm. For conversion from cm to inches - click here. There are different terms for crocheting in British and American English. If this pattern includes crochet, click for "crochet terms" here. For this pattern in American English, please click here.
-------------------------------------------------------

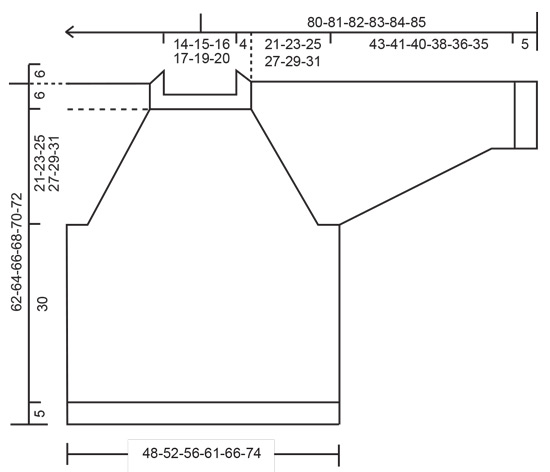
EXPLANATIONS FOR THE PATTERN:
-------------------------------------------------------

RAGLAN:
All increases before/after 1 stitch in stocking stitch (the stitch with the marker).
Increase for the body before markers 1 and 3 and after markers 2 and 4 when working from the right side/after markers 1 and 3 and before markers 2 and 4 when working from the wrong side.
Increase for the sleeves after markers 1 and 3 and before markers 2 and 4 when working from right side / before marker 1 and 3 and after marker 2 and 4 when working from wrong side.
Increase 1 stitch by making 1 yarn over.

The yarn overs are worked as follows from the wrong side:
BEFORE MARKER:
Purl the back loop. No hole.
AFTER MARKER:
Slip the yarn over off the left needle and place it back twisted (insert the left needle from the back when replacing it). Purl the front loop. No hole.

The yarn overs are worked as follows from the right side:
BEFORE MARKER:
Slip the yarn over off the left needle and place it back twisted (insert the left needle from the back when replacing it). Knit the front loop; the stitch twists to the right. No hole.
AFTER MARKER:
Knit the back loop (the stitch twists to the left). No hole.

DECREASE TIP (for sleeves):
Start 3 stitches before the marker, knit 2 together, knit 2 (marker sits between these 2 stitches), slip 1 stitch as if to knit, knit 1 and pass the slipped stitch over the knitted stitch.

-------------------------------------------------------

START THE PIECE HERE:

-------------------------------------------------------

JUMPER – SHORT OVERVIEW OF THE PIECE:
The neck and yoke are worked in the round with circular needle, from mid back and top down. The yoke is divided for body and sleeves and the body is continued in the round with circular needle. The sleeves are worked with short circular needle/double pointed needles.

DOUBLE NECK:
Cast on 88-92-96-100-104-108 stitches with short circular needle size 5 mm and DROPS Air. Change to circular needle size 4 mm. Work rib in the round (knit 2, purl 2) for 13 cm.
On the next round, insert 4 markers at the same time as you increase 4 stitches on the round as follows – the markers are used when increasing for raglan:
Knit 10-12-12-14-14-16 and increase 1 stitch (half back piece), insert marker-1 in the next stitch, knit 21 (sleeve), insert marker-2 in the next stitch, knit 21-23-25-27-29-31 and increase 2 stitches evenly spaced (front piece), insert marker-3 in the next stitch, knit 21 (sleeve), insert marker-4 in the next stitch, knit the last 11-11-13-13-15-15 stitches and increase 1 stitch (half back piece) = 92-96-100-104-108-112 stitches. Cut the strand.

NECKLINE:
Change to circular needle size 5 mm and work the neckline with short rows AT THE SAME TIME as increasing to raglan as follows:
Start from the right side, 2 stitches before marker-3 (left front of neck when the garment is worn). Work stocking stitch, increase to RAGLAN – read description above, on each side of the 4 marker-stitches and until you have worked 2 stitches past marker-2 (right front of neck – 8 stitches increased for raglan).
Turn, tighten the strand, work back from the wrong side, increase for raglan to 2 stitches past the beginning of the short rows by marker-3 (8 stitches increased for raglan).
Turn, tighten the strand, work back from the right side, increase for raglan to 2 stitches past where you turned last time by marker-2 (8 stitches increased for raglan).
Turn, tighten the strand, work back from the wrong side, increase for raglan to 2 stitches past marker-3 (8 stitches increased for raglan). Cut the strand.

YOKE:
= 124-128-132-136-140-144 stitches. Now work in the round as follows:

SIZES S, M, L and XL:
Start mid-back, work stocking stitch and increase for raglan on the body and sleeves (on each side of all 4 marker-stitches) every 2nd round 2-8-10-11 times = 140-192-212-224 stitches.
Continue to increase but now every 2nd increase is only on the body (4 stitches increased); you are now increasing every 2nd round on the body and every 4th round on the sleeves. Increase like this 18-15-14-16 times on the body (9-7-7-8 times on the sleeves). A total of 24-27-28-31 times on the body and 15-19-21-23 times on the sleeves = 248-280-296-320 stitches. Go to ALL SIZES.

SIZES XXL and XXXL:
Start mid-back, work stocking stitch and increase for raglan every round on the body 2-6 times and every 2nd round on the sleeves 1-3 times = 152-180 stitches.
Then increase on both the body and sleeves every 2nd round (on each side of all 4 marker-stitches) 10-7 times = 232-236 stitches.
Continue to increase, but now every 2nd increase is only on the body (4 stitches increased); you are now increasing every 2nd round on the body and every 4th round on the sleeves. Increase like this 18-22 times on the body (9-11 times on the sleeves). A total of 34-39 times on the body and 24-25 times on the sleeves = 340-368 stitches. Go to ALL SIZES.

ALL SIZES.
= 248-280-296-320-340-368 stitches.
Continue working without further increases until the yoke measures 21-23-25-27-29-31 cm measured mid-front after the rib on the neck.
Divide for the body and sleeves as follows: Work 37-42-43-48-51-58 stitches (half back piece), place the next 49-57-61-65-67-69 stitches on a thread for the sleeve, cast on 6-6-8-8-10-10 stitches (in side under sleeve), work 75-83-87-95-103-115 stitches (front piece), place the next 49-57-61-65-67-69 stitches on a thread for the sleeve, cast on 6-6-8-8-10-10 stitches (in side under sleeve), work 38-41-44-47-52-57 stitches (half back piece).
The body and sleeves are finished separately. The piece is now measured from here!

BODY:
= 162-178-190-206-226-250 stitches. Continue with stocking stitch in the round for a further 30 cm.
Knit 1 round and increase 18-22-22-26-26-34 stitches evenly spaced = 180-200-212-232-252-284 stitches.
Change to circular needle size 4 mm. Work rib (knit 2, purl 2) for 5 cm. Cast off a little loosely with knit over knit and purl over purl. The jumper measures approx. 62-64-66-68-70-72 cm from the shoulder down.

SLEEVES:
Place the 49-57-61-65-67-69 stitches from the thread on the one side of the piece on short circular needle/double pointed needles size 5 mm and knit up 1 stitch in each of the new stitches cast on under the sleeve = 55-63-69-73-77-79 stitches. Insert a marker in the middle of the new stitches under the sleeve; allow the marker to follow your work onwards, it is used when decreasing under the sleeve.
Continue with stocking stitch in the round for 4 cm. Now decrease 2 stitches mid-under the sleeve – read DECREASE TIP. Decrease like this every 9-5-3½-3-2½-2½ cm a total of 5-8-10-11-12-12 times = 45-47-49-51-53-55 stitches. Continue working until the sleeve measures 43-41-40-38-36-35 from the division (or to desired length. There is approx. 5 cm left). Knit 1 round and increase 7-5-7-5-7-5 stitches evenly spaced = 52-52-56-56-60-60 stitches. Change to double pointed needles size 4 mm and work rib (knit 2, purl 2) for 5 cm. Loosely cast off with knit over knit and purl over purl. The sleeve measures approx. 48-46-45-43-41-40 cm from the division.
Work the other sleeve in the same way.


ASSEMBLY:
Fold the neck double to the inside and fasten with a stitch in each raglan-line.

Diagram

diagram measurements

Each of our patterns has specific tutorial videos to help you.

Do you have a question? See a list of frequently asked questions (FAQ)

Knitting tension is what determines the final measurements of your work, and is usually measured per 10 x 10 cm. It is provided like so: number of stitches in width x number of rows in height - eg: 19 stitches x 26 rows = 10 x 10 cm.

The knitting tension is very individual; some people knit/crochet loosely while others work tightly. You adjust the knitting tension with the needle size, which is why the suggested needle size is only meant as a guide! You need to adjust this (up or down) to ensure that YOUR knitting tension matches the knitting tension provided in the pattern. If you work with a different knitting tension than provided you will have a different yarn consumption, and your work will have different measurements than what the pattern suggests.

The knitting tension also determines which yarns can replace each other. As long as you achieve the same knitting tension you can replace one yarn with another.

See DROPS lesson: How to measure your tension/gauge

See DROPS video: How to make a gauge tension swatch

The required amount of yarn is provided in grams, eg: 450 g. To calculate how many balls you’ll need you first need to know how many grams are in 1 ball (25g, 50g or 100g). This information is available if you click on the individual yarn quality on our pages. Divide the amount required with the amount of each ball. For example, if each ball is 50g (the most common amount), the calculation will be as follows: 450 / 50 = 9 balls.

The important thing when changing from one yarn to another is that the knitting/crochet tension remains the same. This is so that the measurements of the finished piece will be the same as on the sketch provided. It is easier to achieve the same knitting tension using yarns from the same yarn group. It is also possible to work with multiple strands of a thinner yarn to achieve the knitting tension of a thicker one. Please try our yarn converter. We recommend you to always work a test swatch.

Please NOTE: when changing yarn the garment might have a different look and feel to the garment in the photo, due to individual properties and qualities of each yarn.

See DROPS lesson: Can I use a different yarn than the one mentioned in the pattern?

All our yarns are categorised into yarn groups (from A to F) according to thickness and knitting tension – group A contains the thinnest yarns and group F the thickest. This makes it easier for you to find alternative yarns to our patterns, should you wish to switch yarn. All yarns within the same group have a similar knitting tension and can easily replace each other. However, different yarn qualities have different structures and properties which will give the finished work a unique look and feel.

Click here for an overview of the yarns in each yarn group

At the top of all our patterns you’ll find a link to our yarn calculator, which is a helpful tool should you wish to use a different yarn than suggested. By filling in the yarn quality you wish to replace, the amount (in your size) and number of strands, the calculator will present good alternative yarns with the same knitting tension. Additionally it will tell you how much you’ll require in the new qualities and whether you’ll need to work with multiple strands. Most skeins are 50g (some are 25g or 100g).

If the pattern is worked with multiple colours, every colour will have to be calculated separately. Similarly, if the pattern is worked with several strands of different yarns (for example 1 strand Alpaca and 1 strand Kid-Silk) you will have to find alternatives for each, individually.

Click here to see our yarn calculator

Since different yarns have different qualities and textures we have chosen to keep the original yarn in our patterns. However, you can easily find options among our available qualities by using our yarn calculator, or simply pick a yarn from the same yarn group.

It is possible that some retailers still have discontinued yarns in stock, or that someone has a few skeins at home that they would like to find patterns for.

The yarn calculator will provide both alternative yarn as well as required amount in the new quality.

If you think it's hard to decide what size to make, it can be a good idea to measure a garment you own already and like the size of. Then you can pick the size by comparing those measures with the ones available in the pattern's size chart.

You'll find the size chart at the bottom of the pattern.

See DROPS lesson: How to read size chart

The needle size provided in the pattern serves only as a guide, the important thing is to follow the knitting tension. And since knitting tension is very individual, you will have to adjust the needle size to ensure that YOUR tension is the same as in the pattern – maybe you’ll have to adjust 1, or even 2 needle sizes, up or down to achieve the correct tension. For this, we recommend that you work test swatches.

Should you work with a different knitting tension than the one provided, the measurements of the finished garment might deviate from the measurement sketch.

See DROPS lesson: How to measure your tension/gauge

See DROPS video: How to make a tension/gauge swatch

Working a garment top-down provides more flexibility and room for personal adjustment. For example it is easier to try the garment on while working, as well as making adjustments to length of yoke and shoulder caps.

The instructions are carefully explaining every step, in the correct order. Diagrams are adjusted to the knitting direction and are worked as usual.

The diagram depicts all rows/rounds, and every stitch seen from the right side. It is read from bottom to top, from right to left. 1 square = 1 stitch.

When working back and forth, every other row is worked from the right side and every other row is worked from the wrong side. When working from the wrong side, the diagram will have to be worked reversed: from left to right, knit stitches are purled, purl stitches are knit etc.

When working in the round every round is worked from the right side and the diagram are worked from right to left on all rounds.

See DROPS lesson: How to read knitting diagrams

The diagram depicts all rows/rounds, and every stitch seen from the right side. It is worked from bottom to top, from right to left.

When working back and forth every other row is worked from the right side: from right to left and every other row is worked from the wrong side: from left to right.

When working in the round, every row in the diagram are worked from the right side, from right to left.

When working a circular diagram you start in the middle and work your way outwards, counter clockwise, row by row.

The rows usually start with a given number of chain stitches (equivalent to the height of the following stitch), this will either be depicted in the diagram or explained in the pattern.

See DROPS lesson: How to read crochet diagrams

Instructions for working several diagrams after each other on the same row/round, will often be written like so: “work A.1, A.2, A.3 a total of 0-0-2-3-4 times". This means you work A.1 once, then A.2 is worked once, and A.3 is repeated (in width) the number of times provided for your size – in this case like so: S = 0 times, M = 0 times, L=2 times, XL= 3 times and XXL = 4 times.

The diagrams are worked as usual: begin with the first row in A.1, then work the first row in A.2 etc.

See DROPS lesson: How to read knitting diagrams

See DROPS lesson: How to read crochet diagrams

The total width of the garment (from wrist-to-wrist) will be larger in the larger sizes, despite the actual sleeves being shorter. The larger sizes have longer sleeve caps and wider shoulders, so there will be a good fit in all sizes.

The measurement sketch/schematic drawing provides information regarding the full length of the garment. If it’s a jumper or a jacket the length is measured from the highest point on the shoulder closest to the neckline, and straight down to the bottom of the garment. It is NOT measured from the tip of shoulder. Similarly, the length of yoke is measured from the highest point on the shoulder and down to where yoke is split into body and sleeves.

On a jacket measures are never taken along bands, unless specifically stated. Always measure inside band stitches when measuring the length.

See DROPS lesson: How to read a schematic drawing

Diagrams are often repeated on the round or in height. 1 repeat is the diagram the way it appears in the pattern. If it says to work 5 repeats of A.1 in the round, then you work A.1 a total of 5 times after/next to each other in the round. If it says to work 2 repeats of A.1 vertically/in height you work the entire diagram once, then begin again at the start and work the entire diagram one more time.

Chain stitches are slightly narrower than other stitches and to avoid working the cast-on edge too tight, we simply chain more stitches to begin with. The stitch count will be adjusted on the following row to fit the pattern and measurement sketch.

The rib edge is more elastic and will contract slightly compared to, for example, stocking stitch. By increasing before the rib edge, you avoid a visible difference in width between the rib edge and the rest of the body.

It’s very easy to cast off too tightly, and by making yarn overs while casting off (and simultaneously casting these off) you avoid a too tight cast off edge.

See DROPS video: How to bind off with yarn overs (yo)

To achieve an even increase (or decrease) you can increase on, for example: every 3rd and 4th row alternately, like so: work 2 rows and increase on the 3rd row, work 3 rows and increase on the 4th. Repeat this until the increase is complete.

See DROPS lesson: Increase or decrease 1 st on every 3rd and 4th row alternately

Should you prefer to work in the round instead of back and forth, you may of course adjust the pattern. You’ll need to add steeks mid-front (usually 5 stitches), and follow the instructions. When you would normally turn and work from the wrong side, simply work across the steek and continue in the round. At the end you’ll cut the piece open, pick up stitches to work bands, and cover the cut edges.

See DROPS video: How to knit steeks and cut open

Should you prefer to work back and forth instead of in the round, you may of course adjust the pattern so you work the pieces separately and then assemble them at the end. Divide the stitches for the body in 2, add 1 edge stitch in each side (for sewing) and work the front and back pieces separately.

See DROPS lesson: Can I adapt a pattern for circular needles into straight needles?

Pattern repeats can vary slightly in the different sizes, in order to get the correct proportions. If you’re not working the exact same size as the garment in the photo, yours might deviate slightly. This has been carefully developed and adjusted so that the complete impression of the garment is the same in all sizes.

Make sure to follow instructions and diagrams for your size!

If you have found a pattern you like which is available in women’s size it’s not very difficult to convert it to men’s size. The biggest difference will be the length of sleeves and body. Start working on the women size that you think would fit across the chest. The additional length will be worked right before you cast off for the armhole/sleeve cap. If the pattern is worked top-down you can add the length right after the armhole or before the first decrease on sleeve.

Regarding additional yarn amount, this will depend on how much length you add, but it is better with a skein too many than too few.

All yarns will have excess fibres (from production) that might come off as lint or shedding. Brushed yarns (ie hairier yarns) have more of these loose, excess fibres, causing more shedding.

Shedding also depends on what is worn under or over the garment, and whether this pulls at the yarn fibres. It’s therefore not possible to guarantee that there will be no shedding

Below are some tips on how to get the best result when working with hairier yarns:

1. When the garment is finished (before you wash it) shake it vigorously so the looser hairs come off. NOTE: do NOT use a lint roller, brush or any method that pulls at the yarn.

2. Place the garment in a plastic bag and put it in your freezer - the temperature will cause the fibres to become less attached to each other, and excess fibres will come off easier.

3. Leave in the freezer for a few hours before taking it out and shaking it again.

4. Wash the garment according to the instructions on the yarn label.

Pilling is a natural process that happens to even the most exclusive of fibers. It's a natural sign of wear and tear that is hard to avoid, and that is most visible in high friction areas of your garment like a sweater's arms and cuffs.

You can make your garment look as new by removing the pilling, using a fabric comb or a pill/lint remover.

Still can't find the answer you need? Then scroll down and leave your question so one of our experts can try to help you. This will be done normally within 5 to 10 working days.
In the meantime, you can read the questions and answers that others have left to this pattern or join the DROPS Workshop on Facebook to get help from fellow knitters/crocheters!

Post a comment to pattern DROPS 233-6

We would love to hear what you have to say about this pattern!

If you want to leave a question, please make sure you select the correct category in the form below, to speed up the answering process. Required fields are marked *.

Comments / Questions (21)

country flag Pesenti wrote:

Bonjour, Au sujet des rangs raccourcis vous répondez à un commentaire précédent : augmenter 4 mailles à chacun des rangs raccourcis hors il me semble qu’il n’y a que 4 rangs raccourcis dans l’explication ENCOLURE (avec chacun 8 augmentations par rang). Merci pour votre réponse

18.03.2024 - 14:33

DROPS Design answered:

Bonjour Mme Pesenti, on ne tricote que 4 rangs pour les rangs raccourcis (2 rangs sur l'endroit, 2 rangs sur l'envers), et on va augmenter 8 mailles à chaque fois soit 32 mailles au total. Il doit y avoir une faute de frappe dans la réponse précédente entre le nombre de fois et le nombre d'augmentations. Bon tricot!

18.03.2024 - 15:43

country flag Lejeune Nicole wrote:

Après l’encolure vous dites qu’il faut pour la taille L augmenter 10 fois et ensuite 14 fois pour les dos et devant Pour moi je compte 24 fois et vous dites qu’il s’agit de 28 fois Pouvez vous me dire d’où viennent les 4 fois supplémentaires ? Merci Nicole

14.03.2024 - 09:58

DROPS Design answered:

Bonjour Mme Lejeune, à la fin de l'encolure, vous avez 132 mailles, vous augmentez ensuite pour le raglan 10 fois 8 mailles au total (1 pour chaque demi-dos + 2 par manche + 2 pour le devant) soit 80 = 132 = 212 mailles. Vous augmentez ensuite tous les 2 rangs pour le dos/le devant et tous les 4 rangs pour les manches (alternativement 4 et 8 m), soit 14 x 4 + 7x4= 84 + 212=296 mailles quand toutes les augmentations sont faites. Vous aurez augmenté 4 fois pour l'encolure + 10 fois tous les 2 tours + 14 tous les 2 tours = 28 fois au total. Bon tricot!

14.03.2024 - 16:41

country flag Lejeune wrote:

Bonjour Je comprends les tours raccourcis, on laisse en attente les mailles du devant. Mais pour le raglan il faut faire 8 augmentations chaque tour. Si j’ai réalisé a l’endroit 1 jeté avant et après le marqueur je tricote les jetés au tour suivant sur l’envers. Comment faire en même temps des augmentations lorsque je tricote le second rang ? Il en est de même pour le 4 rangs. Comment avoir 32 points supplémentaires ? Merci pour l’information. Nicole

09.03.2024 - 08:18

DROPS Design answered:

Bonjour Mme Lejeune, vous augmentez sur l'envers comme indiqué sous RAGLAN, autrement dit, vous tricotez les jetés faits sur l'endroit comme indiqué sur l'envers, puis vous augmentez avant/après les marqueurs comme expliqué = avant/après la maille jersey du raglan. Vous augmentez ainsi 4 mailles à chacun des 8 rangs raccourcis = 32 augmentations au total (4 pour chaque demi-devant, 8 pour chaque manche et 8 pour le dos. Bon tricot!

11.03.2024 - 07:48

country flag SP wrote:

Hello! Thank you for the wonderful pattern. I am confused about the raglan increase. I understand it’s in short row, going back and forth. But what happens to the 23 stitches (L size) between stitch 3 and 2? If it’s beginning at 2 stitches before marker 3; and turning at 2 stitches after marker 2; there are 23 stitches of the front part not knitted on. Did I understand the instruction correctly? Is this how we shape the sweater?

01.03.2024 - 00:38

DROPS Design answered:

Hi SP, Yes, the short rows at the back of the neck shape the neck and make it a little higher at the back. The other stitches on the round will be incorporated when the short rows are finished. Happy knitting!

01.03.2024 - 08:09

country flag Viki wrote:

Megnéztem a 280 felosztását a német leírásban. Úgy már jó. 42+57+83+57+41

27.01.2024 - 20:39

country flag Viki wrote:

M-es méretben a raglán végén 280 szem van. A felosztás leírása 42 szem a fél háta 42 szem a keze 83 szem az eleje 42 szem a keze 41 szem a fél háta Ez összeadva 250 szem. Így maradt még 30 szemem.... Azt hova osszam fel? Köszönöm!

27.01.2024 - 20:33

DROPS Design answered:

Kedves Viki, köszönjük a megjegyzését, a minta javításra került, az M-es méretben mindkét oldalon 57 szemet kell az ujjához félretenni. Sikeres kézimunkázást.

11.03.2024 - 16:46

country flag Mariarosaria Bello wrote:

Dove dice tutte le taglie cosa si intende continuare a lavorare a strisce? Grazie

16.01.2024 - 21:05

DROPS Design answered:

Buonasera MariaRosaria, non ci sono strisce in questo modello. Buon lavoro!

17.01.2024 - 16:56

country flag Mariarosaria Bello wrote:

Un ultima domanda, per lo sprone non capisco il calcolo prima dice aumentare 15 volte sul corpo e 7 volte sulle maniche e poi dice per un totale di 27 volte sul corpo e 19 sulle maniche non capìsco il secondo calcolo ( 27/19)

09.01.2024 - 19:56

DROPS Design answered:

Buonasera Mariarosa, nel calcolo sono inclusi anche gli aumenti precedenti in cui si aumentava contemporaneamente sia sul corpo che sulle maniche: i totali degli aumenti sono corretti. Buon lavoro!

10.01.2024 - 16:33

country flag Mariarosaria Bello wrote:

Buongiorno per lo sprone non capisco come aumentare,cosa significa aumentare ogni secondo aumento e per le maniche ? Come devo procedere? Grazie

09.01.2024 - 13:13

DROPS Design answered:

Buongiormo Mariarosaria, in questo modello gli aumenti non sono uguali per il corpo e le maniche, ma in alcuni punti si aumenta ogni 2 ferri per il corpo e ogni 4 ferri per le maniche: deve seguire le indicazioni riportate via via nel modello. Buon lavoro!

09.01.2024 - 16:17

country flag Mariarosaria Bello wrote:

Buongiorno non riesco a capire come aumentare le maglie dal punto in cui spiega, ogni secondo aumento, aumentare solo sul corpo per lo sprone.

09.01.2024 - 13:09

DROPS Design answered:

Buonasera Mariarosaria, deve lavorare gli aumenti in modo diverso sulle maniche e sul corpo, come indicato. Buon lavoro!

09.01.2024 - 16:18