DROPS Snow
DROPS Snow
100% Wool
from 2.65 $ /50g
Get the yarn to make this pattern from 37.10$.

The yarn cost is calculated from the pattern’s smallest size and the yarn’s cheapest product type. Looking for an even better price? You might find it on the DROPS Deals!

DROPS SS24

Dreams of Ireland

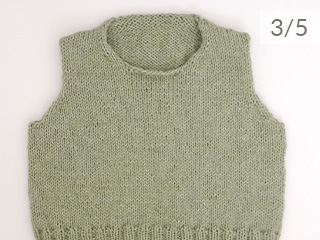
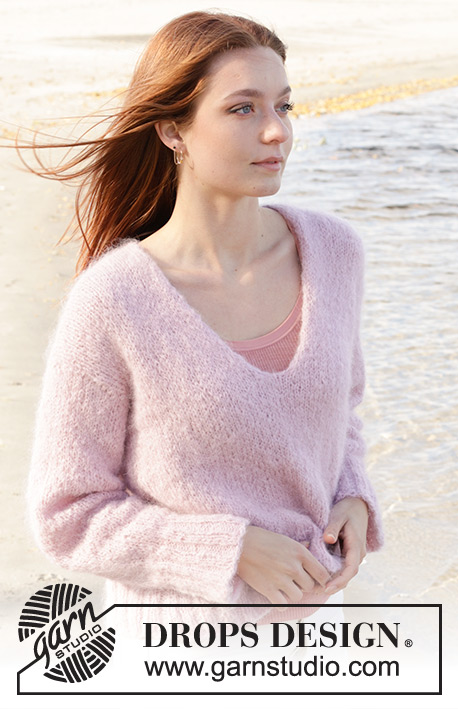
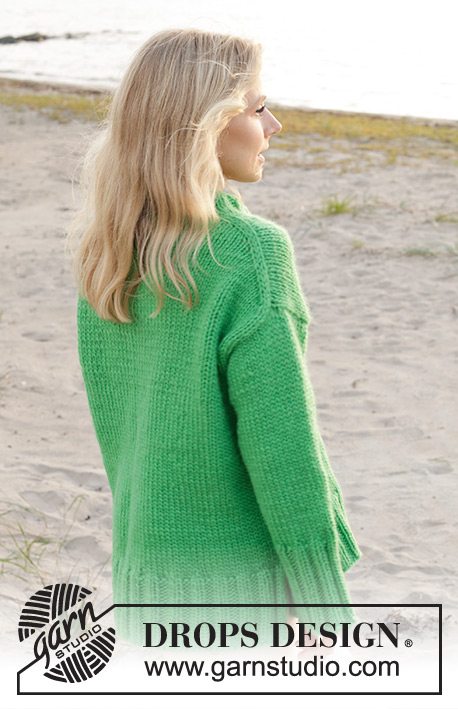
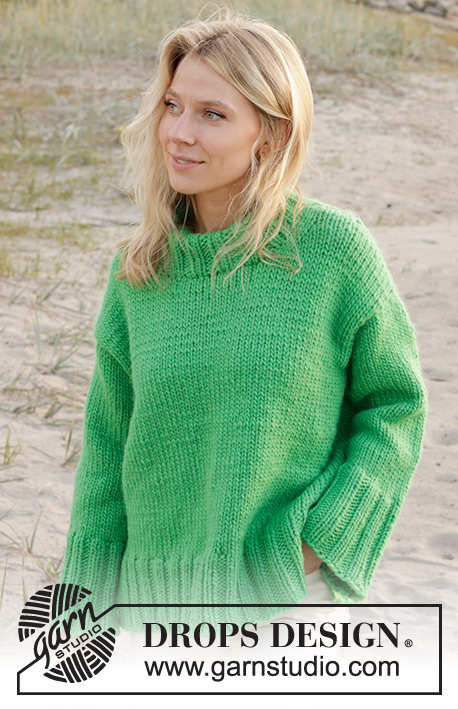
Knitted sweater with 1 strand DROPS Snow or 2 strands DROPS Air. The piece is worked top down with European/diagonal shoulders and double neck. Sizes S - XXXL.

DROPS 241-13
DROPS Design: Pattern ee-754
Yarn group E or C + C
-------------------------------------------------------

SIZES:
XS - S - M - L - XL - XXL

Finished measurements:
Chest measurements: 100-108-116-128-140-152 cm = 39⅜"-42½"-45¾"-50⅜"-55"-59¾"
Full length: 60-62-64-66-68-70 cm = 23⅝"-24⅜"-25¼"-26"-26¾"-27½"
All measurements in charts are in cm.

YARN:
DROPS SNOW from Garnstudio (belongs to yarn group E)
700-800-850-900-1000-1100 g color 103, parrot green

Or use:
DROPS AIR from GARNSTUDIO (belongs to yarn group C)
450-500-550-600-700-750 g color 43, parrot green

NEEDLES:
DROPS CIRCULAR NEEDLE SIZE 9 MM = US 13: Length 40 cm = 16" and 80 cm = 32".
DROPS CIRCULAR NEEDLE SIZE 8 MM = US 11: Length 40 cm = 16" and 80 cm = 32".
DROPS DOUBLE POINTED NEEDLES SIZE 9 MM = US 13.
DROPS DOUBLE POINTED NEEDLES SIZE 8 MM = US 11.
The technique MAGIC LOOP can be used – you then only need circular needle of 80 cm = 32" in each size.

KNITTING GAUGE:
10 stitches in width and 14 rows in height with stockinette stitch and 1 strand DROPS Snow or 2 strands DROPS Air = 10 x 10 cm = 4" x 4".
NOTE: Needle size is only a guide. If you get too many stitches on 10 cm = 4", change to a larger needle size. If you get too few stitches on 10 cm = 4", change to a smaller needle size.

-------------------------------------------------------

Alternative Yarn – See how to change yarns here
Yarn Groups A to F – Use the same pattern and change the yarn here
Yarn usage using an alternative yarn – Use our yarn converter here

-------------------------------------------------------

DROPS Snow
DROPS Snow
100% Wool
from 2.65 $ /50g
Get the yarn to make this pattern from 37.10$.

The yarn cost is calculated from the pattern’s smallest size and the yarn’s cheapest product type. Looking for an even better price? You might find it on the DROPS Deals!

Pattern instructions

NOTE: This pattern is written in American English. All measurements in charts are in cm. For conversion from inches to cm - click here. There are different terms for crocheting in American and British English. If this pattern includes crochet, click for "crochet terms" here. For this pattern in British English, please click here.
-------------------------------------------------------

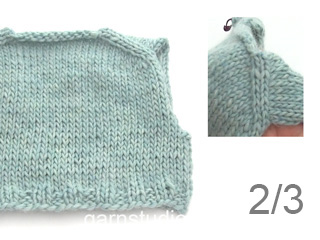
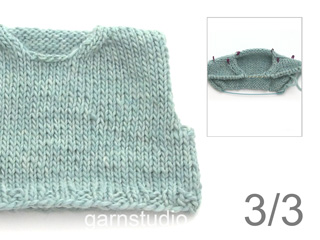
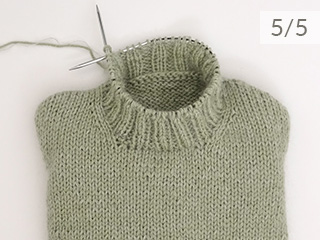
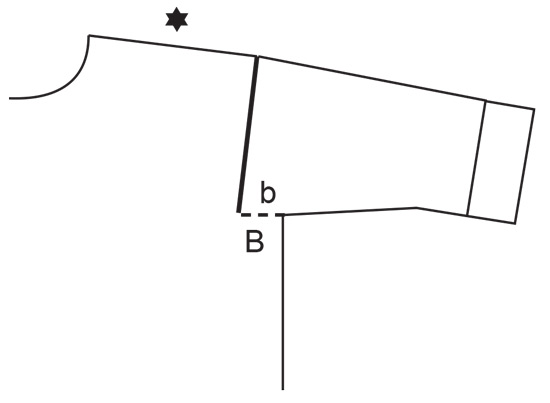
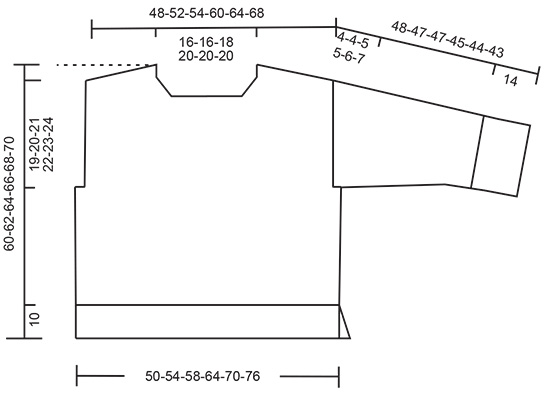
EXPLANATIONS FOR THE PATTERN:
-------------------------------------------------------

RIDGE/GARTER STITCH (worked back and forth):
Knit all rows.
1 ridge = knit 2 rows.

INCREASE TIP FROM RIGHT SIDE:
Increase AFTER MARKER:
Use the left needle to pick up the front strand between 2 stitches from the previous round, knit the back loop.
Increase BEFORE MARKER:
Use the left needle to pick up the back strand between 2 stitches from the previous round, knit the front loop.

INCREASE TIP FROM WRONG SIDE:
Increase AFTER MARKER:
Use the left needle to pick up the back strand between 2 stitches from the previous round, purl the front loop.
Increase BEFORE MARKER:
Use the left needle to pick up the front strand between 2 stitches from the previous round, purl the back loop.

DECREASE TIP (for sleeves):
Decrease 1 stitch on either side of the marker-thread as follows: Work until there are 3 stitches left before the marker-thread, knit 2 together, knit 2 (marker-thread sits between these 2 stitches), slip 1 stitch as if to knit, knit 1 and pass the slipped stitch over the knitted stitch.
-------------------------------------------------------

START THE PIECE HERE:

-------------------------------------------------------

SWEATER – SHORT OVERVIEW OF THE PIECE:
The top of the back piece is worked back and forth with circular needle, top down as far as the armholes. Stitches are knitted up along each shoulder, then stitches are cast on for the neck and the front piece is worked back and forth with circular needle, top down as far as the armholes.
The front and back pieces are joined and the body worked in the round with circular needle. Stitches are knitted up around the armholes and the sleeves worked first back and forth, then in the round with short circular needle/double pointed needles. The neck is worked to finish.

BACK PIECE:
Cast on 16-16-18-20-20-20 stitches with circular needle size 9 MM = US 13 and 1 strand DROPS Snow or 2 strands DROPS Air.
Purl 1 row from the wrong side.
Insert 1 marker inside 3 stitches on each side. Allow them to follow your work onwards, always inside the outermost 3 stitches.
Work stockinette stitch back and forth.
AT THE SAME TIME increase AFTER the marker at the beginning of the row (seen from the right side) and BEFORE the marker at the end of the row – read INCREASE TIP FROM RIGHT SIDE.
On the next row (wrong side) increase in the same way – read INCREASE TIP FROM WRONG SIDE.
Increase both from the right and wrong side a total of 16-18-18-20-22-24 times. After the last increase there are 48-52-54-60-64-68 stitches.
The piece is now measured from here! REMEMBER THE KNITTING GAUGE!
Continue with stockinette stitch until the piece measures 14-15-16-16-17-18 cm = 5½"-6"-6¼"-6¼"-6¾"-7", along the armhole. Cut the strand. Put piece aside and work front piece as explained below.

FRONT PIECE:
Start on the left shoulder (when the garment is worn).
Knit up 16-18-18-20-22-24 stitches inside 1 edge stitch along the left shoulder on the back piece (i.e. knit up 1 stitch in each row on the top edge of the back piece). Work stockinette stitch back and forth for 6 cm = 2⅜". Now increase at the beginning of each row from the right side after the 3 stitches - remember INCREASE TIP FROM RIGHT SIDE. Increase 1 stitch 4 times = 20-22-22-24-26-28 stitches. Work 1 row from the wrong side. Cut the strand, put piece aside and work the right shoulder as follows:

Knit up 16-18-18-20-22-24 stitches inside 1 edge stitch along the top of the right shoulder on the back piece. Work stockinette stitch back and forth for 6 cm = 2⅜". Now increase at the end of each row from the right side before the 3 stitches - remember INCREASE TIP FROM RIGHT SIDE. Increase 1 stitch 4 times = 20-22-22-24-26-28 stitches. After the last increase, work the last row from the wrong side.
On the next row from the right side work as follows: Stockinette stitch over the 20-22-22-24-26-28 stitches from the right shoulder, cast on 8-8-10-12-12-12 stitches for the neck at the end of the row and work stockinette stitch over the 20-22-22-24-26-28 stitches from the left shoulder = 48-52-54-60-64-68 stitches.
Work until the piece measures 24-25-26-28-29-30 cm = 9½"-9¾"-10¼"-11"-11⅜"-11¾" along the armhole.
Now join the front and back pieces for the body as follows:

BODY:
Work the 48-52-54-60-64-68 stitches from the front piece on the needle, cast on 2-2-4-4-6-8 stitches at the end of the row (side), work stockinette stitch over the 48-52-54-60-64-68 stitches from the back piece, cast on 2-2-4-4-6-8 stitches at the end of the row = 100-108-116-128-140-152 stitches.
Work stockinette stitch in the round until the piece measures 49-51-53-55-57-59 cm = 19¼"-20"-21"-21⅝"-22½"-23¼" – measured from the top of the shoulder and down the front piece.
Now divide for a split in each side:
Place the 50-54-58-64-70-76 stitches from the back piece on a thread or extra needle and work the stitches on the front piece.

FRONT PIECE:
Change to circular needle size 8 MM = US 11. Knit 1 row from the right side and increase 22-22-26-28-30-32 stitches evenly spaced = 72-76-84-92-100-108 stitches. Work as follows from the wrong side: 1 edge stitch in GARTER STITCH – read description above, * purl 2, knit 2 *, work from *-* until there are 3 stitches left, purl 2 and 1 edge stitch in garter stitch. Continue this rib for 10 cm = 4". Bind off. The sweater measures approx. 60-62-64-66-68-70 cm = 23⅝"-24⅜"-25¼"-26"-26¾"-27½" from the top of the shoulder.

BACK PIECE:
Place the stitches on circular needle size 8 MM = US 11. Work in the same way as the front piece.

LEFT SLEEVE:
Use circular needle size 9 MM = US 13 and knit up from the right side 24-25-26-28-29-30 stitches from the bottom of the armhole and to the top of the shoulder (along the front piece) and 14-15-16-16-17-18 stitches from the shoulder down to the bottom of the armhole (along the back piece) = 38-40-42-44-46-48 stitches.

Insert 1 marker in the middle of the stitches picked up. Work now back and forth in stockinette stitch with short rows for the sleeve cap, to gives a better shape to the sleeve.
1st row (from wrong side): work to 10 stitches after marker, turn.
2nd row (from right side): work to 10 stitches after marker, turn.
3rd row (from wrong side): work to 14 stitches after marker, turn.
4th row (from right side): work to 14 stitches after marker, turn.
5th row (from wrong side): work to the beginning of the row.


Work stockinette stitch back and forth for 4-4-5-5-6-7 cm = 1½"-1½"-2"-2"-2⅜"-2¾", measure from where the stitches were picked up (all length are measured mid on top of sleeve).
Now join the sleeve using short circular needle/double pointed needles size 9 MM = US 13 and continue in the round. Insert 1 marker-thread at the beginning of the round (mid-under sleeve). Allow the thread to follow your work onwards.
Start at the marker thread and work stockinette stitch in the round for until sleeve measures 6-6-7-7-8-9 cm = 2⅜"-2⅜"-2¾"-2¾"-3⅛"-3½". Now decrease 2 stitches under the sleeve – read DECREASE TIP.
Decrease like this every 11-11-11-7-6-5 cm = 4⅜"-4⅜"-4⅜"-2¾"-2⅜"-2" a total of 3-3-3-4-4-4 times = 32-34-36-36-38-40 stitches. Continue working until the sleeve measures 33-32-32-30-29-28 cm = 13"-12½"-12½"-11¾"-11⅜"-11". There is 15 cm = 6" left; try the sweater on and work to desired length before the rib. Knit 1 round and increase 12-14-16-16-18-16 stitches evenly spaced = 44-48-52-52-56-56 stitches. Change to double pointed needles size 8 MM = US 11. Work rib (knit 2, purl 2) for 14 cm = 5½". Bind off a little loosely. The sleeve measures approx. 48-47-47-45-44-43 cm = 19"-18½"-18½"-17¾"-17¼"-17".
Work the other sleeve in the same way, but first knitting up 14-15-16-16-17-18 stitches from the bottom of the armhole to the shoulder along the back piece, then 24-25-26-28-29-30 stitches from the shoulder and down the front piece. Sew the bottom of the armholes together – see sketch.

NECK:
Start on one shoulder and knit up from the right side, inside 1 edge stitch, 48 to 64 stitches around the neck, using short circular needle size 8 MM = US 11. Work rib in the round (knit 2, purl 2) for 9 cm = 3½". Bind off loosely. Fold the neck double to the inside and fasten with a stitch in each side.

This pattern has been corrected.

Updated online: 25.09.2023
A sleeve cap has been added on top of sleeve.

Diagram

All measurements in charts are in cm.

symbols = sew bottom of armholes: Sew b to B
symbols = stitches for left front shoulder (d) knitted up along left back shoulder (D), stitches for right front shoulder (e), knitted up along right back shoulder (E)
symbols = knitting-direction
diagram
diagram
diagram

Each of our patterns has specific tutorial videos to help you.

Do you have a question? See a list of frequently asked questions (FAQ)

Knitting tension is what determines the final measurements of your work, and is usually measured per 10 x 10 cm. It is provided like so: number of stitches in width x number of rows in height - eg: 19 stitches x 26 rows = 10 x 10 cm.

The knitting tension is very individual; some people knit/crochet loosely while others work tightly. You adjust the knitting tension with the needle size, which is why the suggested needle size only serve as a guide! You need to adjust this (up or down) to ensure that YOUR knitting tension matches the knitting tension provided in the pattern. If you work with a different knitting tension than provided you will have a different yarn consumption, and your work will have different measurements than what the pattern suggests.

The knitting tension also determines which yarns can replace each other. As long as you achieve the same knitting tension you can replace one yarn with another.

See DROPS lesson: How to measure your tension/gauge

See DROPS video: How to make a gauge tension swatch

The required amount of yarn is provided in grams, eg: 450 g. To calculate how many balls you’ll need you first need to know how many grams are in 1 ball (25g, 50g or 100g). This information is available if you click on the individual yarn quality on our pages. Divide the amount required with the amount of each ball. For example, if each ball is 50g (the most common amount), the calculation will be as follows: 450 / 50 = 9 balls.

The important thing when changing from one yarn to another is that the knitting/crochet tension remains the same. This is so that the measurements of the finished piece will be the same as on the sketch provided. It is easier to achieve the same knitting tension using yarns from the same yarn group. It is also possible to work with multiple strands of a thinner yarn to achieve the knitting tension of a thicker one. Please try our yarn converter. We recommend you to always work a test swatch.

Please NOTE: when changing yarn the garment might have a different look and feel to the garment in the photo, due to individual properties and qualities of each yarn.

See DROPS lesson: Can I use a different yarn than the one mentioned in the pattern?

All our yarns are categorised into yarn groups (from A to F) according to thickness and knitting tension – group A contains the thinnest yarns and group F the thickest. This makes it easier for you to find alternative yarns to our patterns, should you wish to switch yarn. All yarns within the same group have a similar knitting tension and can easily replace each other. However, different yarn qualities have different structures and properties which will give the finished work a unique look and feel.

Click here for an overview of the yarns in each yarn group

At the top of all our patterns you’ll find a link to our yarn converter, which is a helpful tool should you wish to use a different yarn than suggested. By filling in the yarn quality you wish to replace, the amount (in your size) and number of strands, the converter will present good alternative yarns with the same knitting tension. Additionally it will tell you how much you’ll require in the new qualities and whether you’ll need to work with multiple strands. Most skeins are 50g (some are 25g or 100g).

If the pattern is worked with multiple colours, every colour will have to be converted separately. Similarly, if the pattern is worked with several strands of different yarns (for example 1 strand Alpaca and 1 strand Kid-Silk) you will have to find alternatives for each, individually.

Click here to see our yarn converter

Since different yarns have different qualities and textures we have chosen to keep the original yarn in our patterns. However, you can easily find options among our available qualities by using our yarn converter, or simply pick a yarn from the same yarn group.

It is possible that some retailers still have discontinued yarns in stock, or that someone has a few skeins at home that they would like to find patterns for.

The yarn converter will provide both alternative yarn as well as required amount in the new quality.

If you think it's hard to decide what size to make, it can be a good idea to measure a garment you own already and like the size of. Then you can pick the size by comparing those measures with the ones available in the pattern's size chart.

You'll find the size chart at the bottom of the pattern.

See DROPS lesson: How to read size chart

The needle size provided in the pattern serves only as a guide, the important thing is to follow the knitting tension. And since knitting tension is very individual, you will have to adjust the needle size to ensure that YOUR tension is the same as in the pattern – maybe you’ll have to adjust 1, or even 2 needle sizes, up or down to achieve the correct tension. For this, we recommend that you work test swatches.

Should you work with a different knitting tension than the one provided, the measurements of the finished garment might deviate from the measurement sketch.

See DROPS lesson: How to measure your tension/gauge

See DROPS video: How to make a gauge tension swatch

Working a garment top-down provides more flexibility and room for personal adjustment. For example it is easier to try the garment on while working, as well as making adjustments to length of yoke and shoulder caps.

The instructions are carefully explaining every step, in the correct order. Diagrams are adjusted to the knitting direction and are worked as usual.

The diagram depicts all rows/rounds, and every stitch seen from the right side. It is read from bottom to top, from right to left. 1 square = 1 stitch.

When working back and forth, every other row is worked from the right side and every other row is worked from the wrong side. When working from the wrong side, the diagram will have to be worked reversed: from left to right, knit stitches are purled, purl stitches are knit etc.

When working in the round every round is worked from the right side and the diagram are worked from right to left on all rounds.

See DROPS lesson: How to read knitting diagrams

The diagram depicts all rows/rounds, and every stitch seen from the right side. It is worked from bottom to top, from right to left.

When working back and forth every other row is worked from the right side: from right to left and every other row is worked from the wrong side: from left to right.

When working in the round, every row in the diagram are worked from the right side, from right to left.

When working a circular diagram you start in the middle and work your way outwards, counter clockwise, row by row.

The rows usually start with a given number of chain stitches (equivalent to the height of the following stitch), this will either be depicted in the diagram or explained in the pattern.

See DROPS lesson: How to read crochet diagrams

Instructions for working several diagrams after each other on the same row/round, will often be written like so: “work A.1, A.2, A.3 a total of 0-0-2-3-4 times". This means you work A.1 once, then A.2 is worked once, and A.3 is repeated (in width) the number of times provided for your size – in this case like so: S = 0 times, M = 0 times, L=2 times, XL= 3 times and XXL = 4 times.

The diagrams are worked as usual: begin with the first row in A.1, then work the first row in A.2 etc.

See DROPS lesson: How to read knitting diagrams

See DROPS lesson: How to read crochet diagrams

The total width of the garment (from wrist-to-wrist) will be larger in the larger sizes, despite the actual sleeves being shorter. The larger sizes have longer sleeve caps and wider shoulders, so there will be a good fit in all sizes.

The measurement sketch/schematic drawing provides information regarding the full length of the garment. If it’s a jumper or a jacket the length is measured from the highest point on the shoulder (usually closest to the neckline), and straight down to the bottom of the garment. It is NOT measured from the tip of shoulder. Similarly, the length of yoke is measured from the highest point on the shoulder and down to where yoke is split into body and sleeves.

See DROPS lesson: How to read a schematic drawing

Diagrams are often repeated on the round or in height. 1 repeat is the diagram the way it appears in the pattern. If it says to work 5 repeats of A.1 in the round, then you work A.1 a total of 5 times after/next to each other in the round. If it says to work 2 repeats of A.1 vertically/in height you work the entire diagram once, then begin again at the start and work the entire diagram one more time.

Chain stitches are slightly narrower than other stitches and to avoid working the cast-on edge too tight, we simply chain more stitches to begin with. The stitch count will be adjusted on the following row to fit the pattern and measurement sketch.

The rib edge is more elastic and will contract slightly compared to, for example, stocking stitch. By increasing before the rib edge, you avoid a visible difference in width between the rib edge and the rest of the body.

It’s very easy to cast off too tightly, and by making yarn overs while casting off (and simultaneously casting these off) you avoid a too tight cast off edge.

See DROPS video: How to bind off with yarn overs (yo)

To achieve an even increase (or decrease) you can increase on, for example: every 3rd and 4th row alternately, like so: work 2 rows and increase on the 3rd row, work 3 rows and increase on the 4th. Repeat this until the increase is complete.

See DROPS lesson: Increase or decrease 1 st on every 3rd and 4th row alternately

Should you prefer to work in the round instead of back and forth, you may of course adjust the pattern. You’ll need to add steeks mid-front (usually 5 stitches), and follow the instructions. When you would normally turn and work from the wrong side, simply work across the steek and continue in the round. At the end you’ll cut the piece open, pick up stitches to work bands, and cover the cut edges.

See DROPS video: How to knit steeks and cut open

Should you prefer to work back and forth instead of in the round, you may of course adjust the pattern so you work the pieces separately and then assemble them at the end. Divide the stitches for the body in 2, add 1 edge stitch in each side (for sewing) and work the front and back pieces separately.

See DROPS lesson: Can I adapt a pattern for circular needles into straight needles?

Pattern repeats can vary slightly in the different sizes, in order to get the correct proportions. If you’re not working the exact same size as the garment in the photo, yours might deviate slightly. This has been carefully developed and adjusted so that the complete impression of the garment is the same in all sizes.

Make sure to follow instructions and diagrams for your size!

If you have found a pattern you like which is available in women’s size it’s not very difficult to convert it to men’s size. The biggest difference will be the length of sleeves and body. Start working on the women size that you think would fit across the chest. The additional length will be worked right before you cast off for the armhole/sleeve cap. If the pattern is worked top-down you can add the length right after the armhole or before the first decrease on sleeve.

Regarding additional yarn amount, this will depend on how much length you add, but it is better with a skein too many than too few.

All yarns will have excess fibres (from production) that might come off as lint or shedding. Brushed yarns (ie hairier yarns) have more of these loose, excess fibres, causing more shedding.

Shedding also depends on what is worn under or over the garment, and whether this pulls at the yarn fibres. It’s therefore not possible to guarantee that there will be no shedding

Below are some tips on how to get the best result when working with hairier yarns:

1. When the garment is finished (before you wash it) shake it vigorously so the looser hairs come off. NOTE: do NOT use a lint roller, brush or any method that pulls at the yarn.

2. Place the garment in a plastic bag and put it in your freezer - the temperature will cause the fibres to become less attached to each other, and excess fibres will come off easier.

3. Leave in the freezer for a few hours before taking it out and shaking it again.

4. Wash the garment according to the instructions on the yarn label.

Pilling is a natural process that happens to even the most exclusive of fibers. It's a natural sign of wear and tear that is hard to avoid, and that is most visible in high friction areas of your garment like a sweater's arms and cuffs.

You can make your garment look as new by removing the pilling, using a fabric comb or a pill/lint remover.

Still can't find the answer you need? Then scroll down and leave your question so one of our experts can try to help you. This will be done normally within 5 to 10 working days.
In the meantime, you can read the questions and answers that others have left to this pattern or join the DROPS Workshop on Facebook to get help from fellow knitters/crocheters!

You might also like...

Post a comment to pattern DROPS 241-13

We would love to hear what you have to say about this pattern!

If you want to leave a question, please make sure you select the correct category in the form below, to speed up the answering process. Required fields are marked *.

Comments / Questions (12)

country flag Lynn wrote:

Thanks for your reply. I am getting 13 stitches in 10 cm with Drops Wish using 8 mm needles. If I chose a pattern that gives me same tension can I still knit w Drops Wish on 8mm even if the pattern calls for a smaller size 7mm needle and less bulky group C yarn? For example, would pattern 236-35 work w 8mm and Wish as it gives me 13 stitches in 10cm, the same tension called for in 236-35?

20.11.2023 - 17:48

DROPS Design answered:

Dear Lynn, to get the correct measurements as in the chart, your tension should match the one stated in the pattern; so most important is always the number of stitches for 10 cm as given in the pattern, not the needle size as we all knit a different way, sometimes looser sometimes tighter, so adjust needle size to get the correct tension, ie in this pattern you need to have 10 sts x 14 rows in stocking stitch with a yarn group E as Wish- if you get 13 sts you should try again with larger needles until you get the correct tension. 236-35 is worked with 1 yarn group C + 1 yarn group A = 1 yarn group D as this one is 1 yarn group E. Happy knitting!

21.11.2023 - 08:51

country flag Lynn wrote:

Thank you for allowing me to break up my long question into 4 separate comment boxes.

18.11.2023 - 19:19

country flag Lynn wrote:

Terminology- are the FRONT PIECE and BACK PIECE Mill (8 mm) the ribbing and not the body? Is all the ribbing for front, back sleeves and neck all knit with 8mm needles? If I size down my needles from 9 mm to 8 mm as described above, then I would use 7 mm for all the ribbing?

18.11.2023 - 19:16

DROPS Design answered:

Dear Lynn, this jumper is worked top down, you first start with back piece, then work front piece - to have a better overview on how this will be worked, see the first 3 videos at the very bottom of the pattern where we show how to work an European Shoulder: back piece, front piece and front pieces together with back piece. Happy knitting!

20.11.2023 - 10:18

country flag Lynn wrote:

Are my calculations correct? Would I use the same formula to calculate for other sizes eg. S and M? Is it simply a matter of choosing a larger size sweater to make up for the losses in knitting with an 8 mm? As for height, I presume the adjustments will be easier because it means knitting more or less rounds and I can determine that as I go?

18.11.2023 - 19:15

country flag Lynn wrote:

For example, for size XS (body width 50 cm flat) using 8mm needles, I calculate the body will be 11.5 cm narrower (flat, one side OR 23 cm narrow circumference). 10 cm = 13 stitches 1 cm = 1.3 stitches Size XS body is 50 cm (flat) 50 cm x 1.3 stitches = 65 stitches (an extra 15 stitches) 15 stitches / 1.3 stitches = 11.5 cm Sweater body will be 11.5 cm narrower (i.e 50 cm - 11.5 cm = 38.5 cm). Are my calculations correct?

18.11.2023 - 19:13

country flag Lynn wrote:

DROPS 241-13 - Drops Wish yarn (equivalent to Snow) 1. Using smaller needles - Using circular needles size 8mm (body) and 7mm (rib) instead of 9mm and 8mm (prefer the tension of 8mm, 9 mm too loose) - Magic loop technique My gauge swatch (in the round) on 8 mm needles is 13 stitches wide and 18 rows height = 10x10 cm Is it okay to simply choose a larger size to make up for the difference in gauge?

18.11.2023 - 19:11

DROPS Design answered:

Dear Lynn, you will find all our patterns for jumpers with tension 15 to 12 stitches for 10 cm here - it might help you finding the most accurate pattern to follow. Happy knitting!

20.11.2023 - 10:16

country flag Lynn wrote:

Are my calculations correct? Would I use the same formula to calculate for other sizes eg. S and M? Is it simply a matter of choosing a larger size sweater to make up for the losses in knitting with an 8 mm? As for height, I presume the adjustments will be easier because it means knitting more or less rounds and I can determine that as I go?

18.11.2023 - 19:09

DROPS Design answered:

Dear Lynn, sorry we are not able to adjust every pattern to every single request, it might be wise to use as basis a pattern with the correct tension and the required measurements, your yarn store can be also able to help you further. Or ask other knitters for their help in our DROPS Workshop; thanks for your comprehension. Happy knitting!

20.11.2023 - 10:14

country flag Ricky Clement wrote:

Waarom beginnen bijna al de patronen vanaf boven en dan ook nog op een rondbreinaald.. Niet leuk liever gewoon normaal

21.02.2023 - 19:45

country flag McKenna wrote:

The Classic Fit Jumper

20.01.2023 - 22:07

country flag Rosa G wrote:

Green luck

18.01.2023 - 17:25