
Popular categories
Looking for a yarn?


|
|||||||||||||||||||
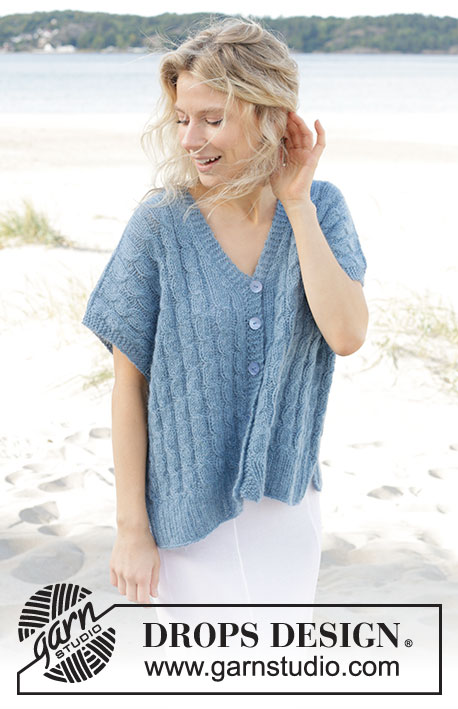
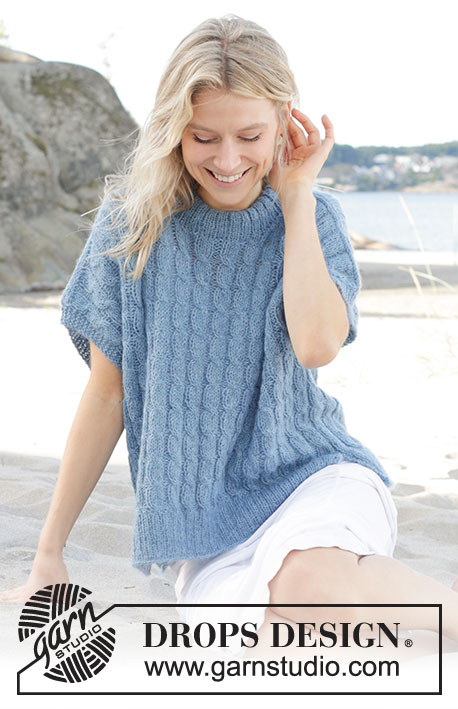
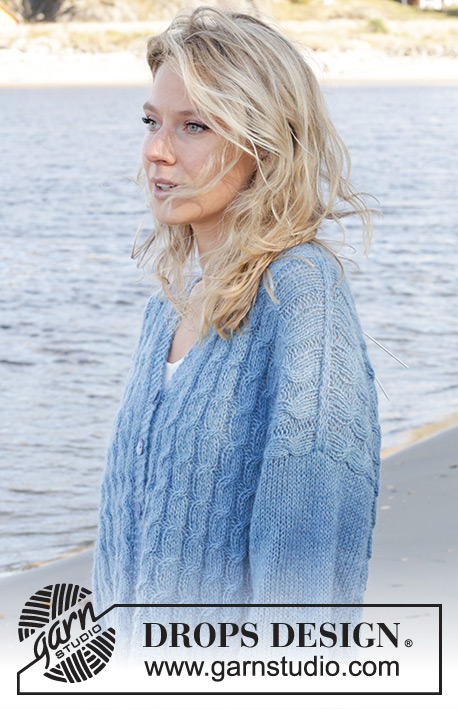
Bluebell Twist Cardigan |
|||||||||||||||||||
 |
 |
||||||||||||||||||
Knitted oversized jacket in DROPS Nord and DROPS Kid-Silk. Piece is knitted bottom up with cables, vents in the side, diagonal shoulder and V-neck. Size XS – XXL.
DROPS 239-23 |
|||||||||||||||||||
|
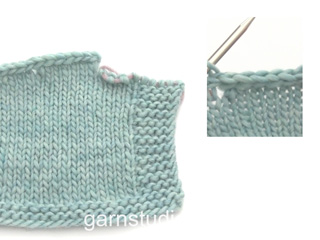
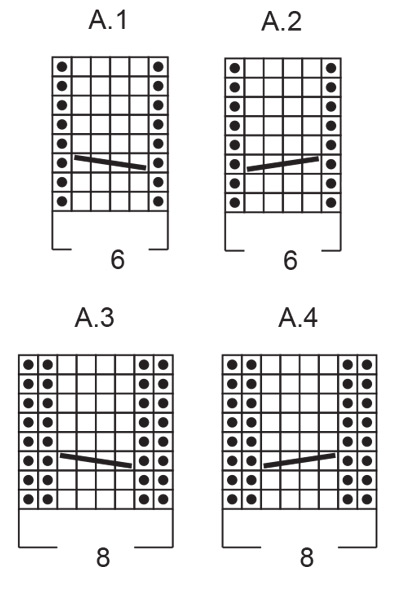
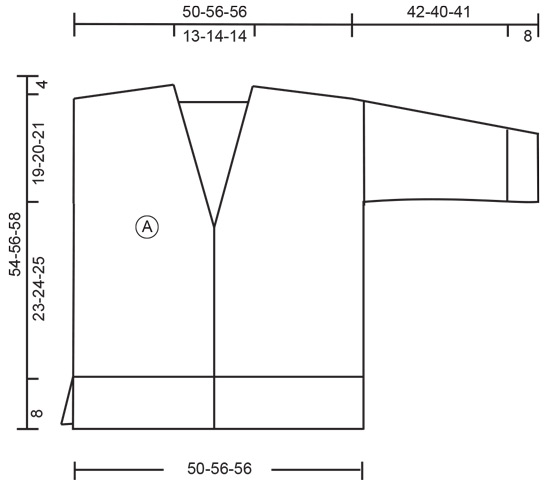
---------------------------------------------------------- EXPLANATION FOR THE PATTERN: ---------------------------------------------------------- GARTER STITCH (back and forth): Knit all rows. 1 ridge vertically = knit 2 rows. PATTERN: See diagrams A.1 to A.4. Diagrams show all rows in pattern seen from the right side. DECREASE TIP (applies to neck on front pieces): All decreases are done on a row from the right side! DECREASE 1 STITCH AT THE BEGINNING OF ROW AS FOLLOWS: Work 5 band stitches in garter stitch, purl 1, knit 1, slip 1 stitch knitwise, knit 1, pass slipped stitch over stitch worked DECREASE 1 STITCH AT THE END OF ROW AS FOLLOWS: Work until 9 stitches remain, knit 2 together, knit 1, purl 1 and 5 band stitches in garter stitch. KNITTING TOGETHER: FROM RIGHT SIDE: Slip 1 stitch knitwise, knit 1, pass slipped stitch over stitch worked. FROM WRONG SIDE: Purl 2 together. STOCKINETTE STITCH: When working from wrong side, purl and when working from right side, knit. INCREASE TIP (applies to sleeves): Work A.3 as before, knit 1, make 1 yarn over, knit until 1 stitch remains on round, make 1 yarn over and knit 1. On next row knit yarn overs twisted. Then work the new stitches in stockinette stitch. BUTTONHOLES (bottom up): Decrease for buttonholes on right band. 1 BUTTONHOLE = knit third and fourth stitch from edge together and make 1 yarn over. On next row knit yarn over to make hole. Decrease for buttonholes when piece measures: XS: 4, 13, 19, 25 and 31 cm = 1½", 5⅛", 7½", 9¾" and 12¼" S: 4, 13, 19, 25 and 31 cm = 1½", 5⅛", 7½", 9¾" and 12¼" M: 4, 13, 19, 25 and 31 cm = 1½", 5⅛", 7½", 9¾" and 12¼" L: 4, 11, 18, 25 and 32 cm = 1½", 4⅜", 7", 9¾" and 12½" XL: 5, 12, 19, 26 and 33 cm = 2", 4¾", 7½", 10¼" and 13" XXL: 6, 13, 20, 27 and 34 cm = 2⅜", 5⅛", 8", 10⅝" and 13⅜" ---------------------------------------------------------- START THE PIECE HERE: ---------------------------------------------------------- JACKET - SHORT OVERVIEW OF THE PIECE: Work from bottom up. First work front pieces and back piece back and forth separately until vent is done. Slip the parts together into a body and work back and forth up to armholes. Divide the body for front pieces and back piece and finish each part separately back and forth. Work sleeves bottom up in the round on double pointed needles. BACK PIECE: Cast on 98-110-110-122-134-134 stitches on circular needle size 4 MM = US 6 with 1 strand DROPS Nord and 1 strand DROPS Kid-Silk. Purl 1 row from wrong side. Work rib, begin from right side as follows: 2 edge stitches in GARTER STITCH - read explanation above, * purl 1, knit 2 *, work from *-* until 3 stitches remain, purl 1 and 2 edge stitches in garter stitch. Continue rib like this until piece measures 8 cm = 3⅛". Put piece aside and work the front pieces. LEFT FRONT PIECE: Cast on 54-60-60-66-72-72 stitches on circular needle size 4 MM = US 6 with 1 strand of each quality. Work 5 band stitches in garter stitch, purl the rest of row. Work rib, begin from right side as follows: 2 edge stitches in garter stitch, purl 1, * knit 2, purl 1 *, work from *-* until 6 stitches remain, knit 1 and 5 band stitches in garter stitch. Continue rib like this until piece measures 8 cm = 3⅛". Put piece aside and work the right front piece. RIGHT FRONT PIECE: Cast on 54-60-60-66-72-72 stitches on circular needle size 4 MM = US 6 with 1 strand of each quality. Purl until 5 stitches remain, 5 band stitches in garter stitch. Work rib, begin from right side as follows: 5 band stitches in garter stitch, knit 1, * purl 1, knit 2 *, repeat from *-* until 3 stitches remain, purl 1 and 2 band stitches in garter stitch. Decrease for BUTTONHOLES - read explanation above. Continue rib like this until piece measures 8 cm = 3⅛". On next row from right side work over all parts as follows: BODY: Work as follows over stitches on right front piece, begin from right side: 5 band stitches in garter stitch, continue with knit over knit and purl over purl over the next 47-53-53-59-65-65 stitches, knit the 2 edge stitches together (1 stitch decreased), insert 1 marker thread, work over back piece as follows: Knit the 2 edge stitches together (1 stitch decreased), work knit over knit and purl over purl over the next 94-106-106-118-130-130 stitches, knit the 2 edge stitches together (1 stitch decreased), insert 1 marker thread, work over left front piece as follows: Knit the 2 edge stitches together, work knit over knit and purl over purl over the next 47-53-53-59-65-65 stitches and finish with 5 band stitches in garter stitches = 202-226-226-250-274-274 stitches. Marker threads mark the sides of piece and should be used later when dividing for front pieces/back piece. Work knit over knit, purl over purl and garter stitch over garter stitch on next row from wrong side. Switch to circular needle size 5 MM = US 8 and work from right side as follows: 5 band stitches in garter stitch, work A.1 16-18-18-20-22-22 times in total, work A.2 16-18-18-20-22-22 times in total and finish with 5 band stitches in garter stitch. Continue the pattern like this vertically. REMEMBER THE KNITTING GAUGE! When piece measures 31-32-32-33-34-35 cm = 12¼"-12½"-12½"-13"-13⅜"-13¾", begin decrease for V-neck AT THE SAME TIME decrease for armholes, read the sections V-neck and Armholes before continuing. V-NECK: When piece measures 27-28-28-29-31-32 cm = 10⅝"-11"-11"-11⅜"-12¼"-12½", decrease 1 stitch inside 7 stitches in each side of piece on next row from right side – read DECREASE TIP. Work the stitches that do not fit an entire cable in stockinette stitch. Decrease like this every 6th row 2 times in total, then every 4th row 9-10-10-10-11-11 times in total. ARMHOLES: When piece measures 31-32-33-34-35-36 cm = 12¼"-12½"-13"-13⅜"-13¾"-14¼", make armholes and divide the piece for front pieces and back piece in the different sizes on next row from right side as follows: SIZE XS-S-M: Work as before until first marker thread (right front piece), then slip these stitches on a thread, work as before until next marker thread (back piece), then slip these stitches on a thread and work as before over the last stitches (left front piece). Now finish each part separately. SIZE L-XL-XXL: Work as before until 6 stitches remain before first marker thread (right front piece), then slip these stitches on a thread, bind off the next 12 stitches, work as before until 6 stitches remain before next marker thread (back piece), then slip these stitches on a thread, bind off the next 12 stitches for armhole and work as before over the last stitches (left front piece). Now finish each part separately. ALL SIZES: LEFT FRONT PIECE: Continue decrease for V-neck and pattern as before. Cast on 1 new edge stitch at the end of first row from wrong side. Work edge stitches in garter stitch until finished measurements. When neck decrease is done, 43-48-48-48-53-53 stitches remain on shoulder. When piece measures 49-51-53-55-57-59 cm = 19¼"-20"-21"-21⅝"-22½"-23¼", continue with knit over knit and purl over purl, i.e. the cables are done. When piece measures 50-52-54-56-58-60 cm = 19¾"-20½"-21¼"-22"-22¾"-23⅝", work diagonal shoulder as follows: DIAGONAL SHOULDER: Now work short rows over shoulder to give the shoulder a better shape, begin on next row from the neck as follows: Work until 6-6-6-6-8-8 stitches remain, turn and work back. Continue like this and work over 6-6-6-6-8-8 stitches less on every turn from the neck 4 times in total. On last row towards the neck work until 5 band stitches remain, slip the 5 band stitches on a thread and cast on 2 new stitches on needle = 40-45-45-45-50-50 stitches. Now work and bind off with i-cord edge over shoulder stitches as follows: Work stitches cast on with together with shoulder stitches. Work * 1 stitch in STOCKINETTE STITCH – read explanation above, work next stitch together with first/next stitch from shoulder – read KNITTING TOGETHER, pass the 2 stitches back on the needle they came from with strand on wrong side of piece, make sure not to tighten yarn too much *, work from *-* until all stitches from shoulder have been worked together with the 2 stitches that were cast on = 2 stitches remain. Bind off. Slip the 5 band stitches back on circular needle size 5 MM = US 8 and work in garter stitch back and forth for 8-9-9-9-9-9 cm = 3⅛"-3½"-3½"-3½"-3½"-3½". Bind off. RIGHT FRONT PIECE: Work as left front piece but cast on 1 new edge stitch at the end of first row from right side. BACK PIECE: = 96-108-108-108-120-120 stitches. Continue with pattern as before. At the end of the first 2 rows, cast on 1 new edge stitch = 98-110-110-110-122-122 stitches. Work edge stitches in garter stitch until finished measurements. When piece measures 49-51-53-55-57-59 cm = 19¼"-20"-21"-21⅝"-22½"-23¼", continue with knit over knit and purl over purl, i.e. the cables are done. When piece measures 50-52-54-56-58-60, bind off the middle 14-16-16-16-18-18 stitches for neck (42-47-47-47-52-52 stitches remain on each shoulder). Now finish each shoulder separately. On next row from the neck work as follows: Bind off 1 stitch for neck, work until 6-6-6-6-8-8 stitches remain, turn and work back. Work 6-6-6-6-8-8 stitches less on every row from the neck and bind off 1 stitch for neck on every row from the neck 4 times in total. On last row towards neck, cast on 2 new stitches at the end of row = 40-45-45-45-50-50 stitches. Now work and bind off with an edge over shoulder stitches as follows: Work stitches cast on with shoulder stitches as follows: Work * 1 stitch in stockinette stitch, work next stitch together with first/next stitch from shoulder, pass the 2 stitches back on the needle they came from with strand on wrong side of piece, make sure not to tighten yarn too much *, work from *-* until all stitches from shoulder have been worked together with the 2 stitches that were cast on = 2 stitches remain. Bind off. Work the other shoulder the same way. RIGHT SLEEVE: Cast on 57-60-60-63-63-66 stitches on double pointed needles size 4 MM = US 6 with 1 strand of each quality. Work rib (purl 1/knit 2). When rib measures 8 cm = 3⅛", switch to double pointed needles size 5 MM = US 8 and work pattern as follows: Work A.3 over the first 8 stitches, work in stockinette stitch and decrease 4-5-5-6-6-7 stitches evenly over the remaining stitches = 53-55-55-57-57-59 stitches. Continue pattern like this. When piece measures 12 cm = 4¾", increase 1 stitch on each side of A.3 - read INCREASE TIP! Increase like this every 5½-4-3½-3-2-2 cm = 2⅛"-1½"-1¼"-1⅛"-¾"-¾" 6-7-8-9-11-11 times in total = 65-69-71-75-79-81 stitches. SIZE XS-S-M: Bind off when sleeve measures 42-40-41 cm = 16½"-15¾"-16⅛". SIZE L-XL-XXL: When sleeve measures 38-36-37 cm = 15"-14¼"-14½", work sleeve cap back and forth on circular needle until finished measurements, i.e. divide the sleeve in the middle of A.3 and work knit over knit and purl over purl. Work until sleeve measures approx. 42-40-41 cm = 16½"-15¾"-16⅛", i.e. there is a vent of 4 cm = 1½" at the top of sleeve. Bind off. LEFT SLEEVE: Work as right sleeve but work A.4 instead of A.3. ASSEMBLY: Sew shoulder seams inside 1 stitch. Sew the band together mid back and sew it to the neckline on back piece. Sew the buttons on to left band. SIZE XS-S-M: Sew in sleeves inside 1 edge stitch. SIZE L-XL-XXL: Sew sleeve cap to armhole. Then sew vent at the top of sleeve to bottom of armhole. |
|||||||||||||||||||
Diagram explanations |
|||||||||||||||||||
|
|||||||||||||||||||
|
|||||||||||||||||||

|
|||||||||||||||||||
|
|||||||||||||||||||
|
Have you made this or any other of our designs? Tag your pictures in social media with #dropsdesign so we can see them! Do you need help with this pattern?You'll find tutorial videos, a Comments/Questions area and more by visiting the pattern on garnstudio.com. © 1982-2024 DROPS Design A/S. We reserve all rights. This document, including all its sub-sections, has copyrights. Read more about what you can do with our patterns at the bottom of each pattern on our site. |
|||||||||||||||||||


With over 40 years in knitting and crochet design, DROPS Design offers one of the most extensive collections of free patterns on the internet - translated to 17 languages. As of today we count 304 catalogs and 11422 patterns - 11417 of which are translated into English (US/in).
We work hard to bring you the best knitting and crochet have to offer, inspiration and advice as well as great quality yarns at incredible prices! Would you like to use our patterns for other than personal use? You can read what you are allowed to do in the Copyright text at the bottom of all our patterns. Happy crafting!
Comments / Questions (19)
Blöde Anleitung! Man muß dauernd hin- und herspringen. Ich merkte, daß ich Knopflöcher hätte machen müssen, als das Teil schon fast fertig war. Dann stand in der Anleitung, daß ab X Zentimeter GLEICHZEITIG für Armloch und V-Ausschnitt abgenommen wird. Das stimmt aber gar nicht. Anleitungen sollten so sein, wie man strickt, d.h. Knopflöcher und Abnahmetips gehören an passender(!) Stelle IN den Text und nicht irgendwo anders, wo man sie überlesen kann.
18.02.2024 - 22:15Man könnte doch die Ärmelmaschen direkt aufnehmen, damit das lästige Zusammen nähen entfällt, oder ?
31.12.2023 - 12:00DROPS Design answered:
Liebe Susi, ja wahrscheinlich, dann sollen Sie die Anleitung so anpassen. Viel Spaß beim stricken!
02.01.2024 - 11:00Hi, There are no directions for the band! Please help, thank you
12.08.2023 - 13:16DROPS Design answered:
Dear Mrs Berv, the front band stitches are worked at the same time as front stitches, ie the first 5 stitches from RS on right front piece and the last 5 stitches from RS on left front piece, work the front band stitches in garter stitch. Happy knitting!
14.08.2023 - 09:09Hej. Om jag vill ha den lite mindre, bara lite stor kan jag minska storleken på stickorna och i så fall vilken storlek på stickor rekommenderar nu? Hälsningar Helen
09.07.2023 - 10:07DROPS Design answered:
Hei Helen. Om man bytter ut strikkepinner for å få plagget mindre, vil ikke strikkefastheten og målene i oppskriften/målskissen stemme, så kan ikke garantere hvordan jakken da vil bli. mvh DROPS Design
24.07.2023 - 11:50I’m knitting DROPS 239-23 but stop when doing the armholes SIZE L. What should I do with “then slip these stitches (6) on a thread, bind ……”? Should I put them back on the needle and continue knitting them when finish each part separately? Thank you so much for your answer.
12.05.2023 - 17:13DROPS Design answered:
Dear Jo, you don't slip the 6 stitches. You slip the stitches you have already worked (from the right front), then cast off the next 12 stitches, that is, the 6 stitches before and after the marker. Continue like this, repeating this on the back. The stitches in the left front piece are worked normally and are the ones you will start working after the armholes. Happy knitting!
14.05.2023 - 19:04Hva betyr att maskene må vere delelig med 2+1
03.05.2023 - 08:27Ik wil dit patroon van DROPS Air maken. Hoeveel bollen heb ik dan nodig?
05.04.2023 - 17:22DROPS Design answered:
Dag Marloes,
Voor een vervangend garen kun je de garenvervanger gebruiken. Hiervan vindt je een link onderaan de materialenlijst bij ieder patroon.
12.04.2023 - 20:38Hei, Jeg forstår ikke hva jeg skal gjøre med de 6 maskene som er satt på tråd ved ermehull. Skal jeg felle av 12 masker ved en side og sette 6 masker på tråd ved den andre siden? Hilsen Hani
30.03.2023 - 20:00Wie strickt man die Blende weiter für das Rückenteil?
09.03.2023 - 19:45DROPS Design answered:
Liebe Mimi, die Blende strickt man wie in diesem Video, dh am Ende von jedem Vorderteil strickt man die letzten 5 BlendenMaschen krausrechts bis die Blende ca 8-9 cm (siehe Größe) misst. Dann sind beide zusammengenäht und am Halsauschnnitt genäht. Viel Spaß beim stricken!
10.03.2023 - 09:32Welche Grösse trägt denn das Model im Bild? Ist der Cardigan oversized gestrickt?
20.02.2023 - 23:00DROPS Design answered:
Liebe Mimi, ja genau die Jacke ist oversized gestrickt - unsere Modelle tragen meisens entweder S oder M, aber um Ihre Größe zu finden, messen Sie eine ähnliche Jacke die Sie gerne haben, und vergleichen Sie diese Maßnahmen mit den in der Maßskizze - hier lesen Sie mehr. Viel Spaß beim stricken!
21.02.2023 - 10:08