DROPS Cotton Merino
DROPS Cotton Merino
50% Wool, 50% Cotton
from 3.55 £ /50g
DROPS Kid-Silk
DROPS Kid-Silk
75% Mohair, 25% Silk
from 4.60 £ /25g
Get the yarn to make this pattern from 54.95£.

The yarn cost is calculated from the pattern’s smallest size and the yarn’s cheapest product type. Looking for an even better price? You might find it on the DROPS Deals!

DROPS SS24

Tip of the Iceberg

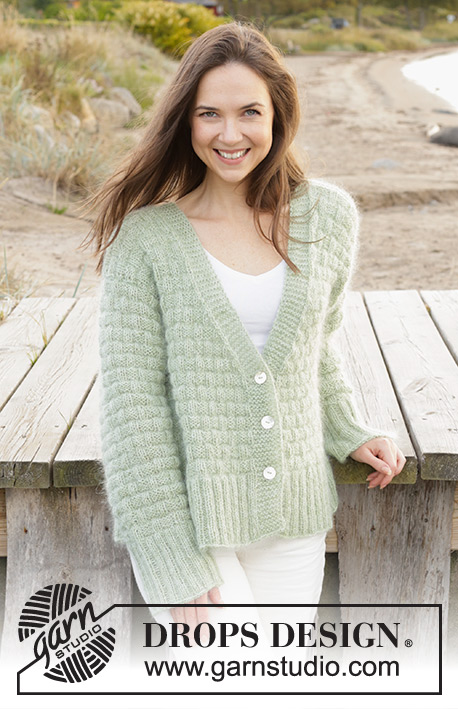
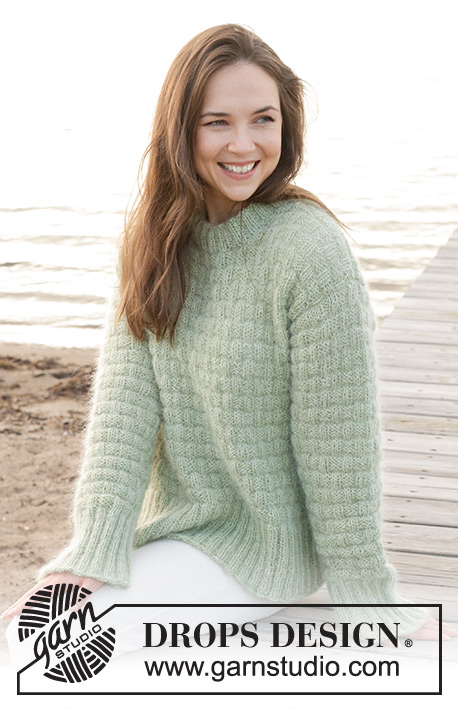
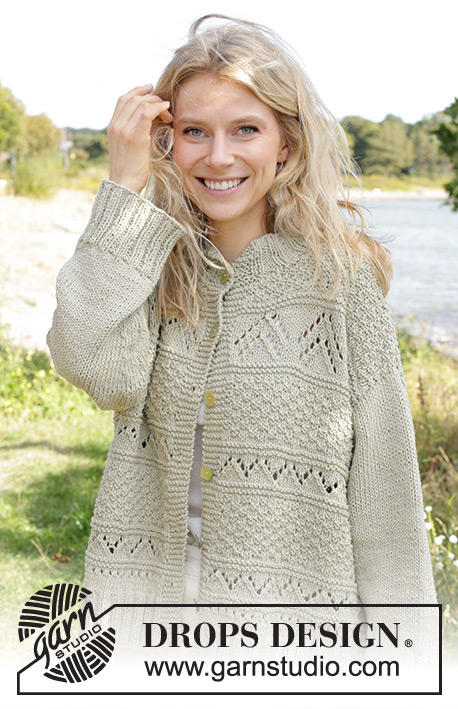
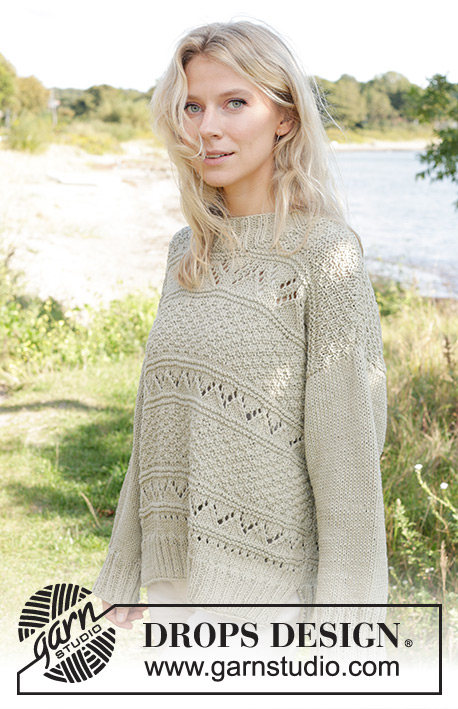
Knitted jumper in DROPS Cotton Merino or DROPS Sky and DROPS Kid-Silk. The piece is worked bottom up, with relief-pattern, lace pattern and splits in the sides. Sizes S - XXXL.

DROPS 239-1
DROPS Design: Pattern cm-146
Yarn group B + A
-------------------------------------------------------

SIZES:
S - M - L - XL - XXL - XXXL

YARN:
DROPS COTTON MERINO from Garnstudio (belongs to yarn group B)
450-500-550-600-650-700 g colour 01, off white
And use:
DROPS KID-SILK from Garnstudio (belongs to yarn group A)
125-125-150-150-175-200 g colour 01, off white

Or use:
DROPS SKY from Garnstudio (belongs to yarn group B)
250-300-300-350-400-400 g colour 01, white
And use:
DROPS KID-SILK from Garnstudio (belongs to yarn group A)
125-125-150-150-175-175 g colour 01, off white

NEEDLES:
DROPS CIRCULAR NEEDLE SIZE 5.5 MM: Length 40 cm and 80 cm.
DROPS CIRCULAR NEEDLE SIZE 4 MM: Length 40 cm and 80 cm.
DROPS DOUBLE POINTED NEEDLES SIZE 5.5 MM.
DROPS DOUBLE POINTED NEEDLES SIZE 4 MM.
The technique MAGIC LOOP can be used – you then only need circular needle of 80 cm in each size.

KNITTING TENSION:
16 stitches in width and 20 rows in height with stocking stitch and 1 strand of each quality = 10 x 10 cm.
NOTE: Needle size is only a guide. If you get too many stitches on 10 cm, change to a larger needle size. If you get too few stitches on 10 cm, change to a smaller needle size.

-------------------------------------------------------

Alternative Yarn – See how to change yarns here
Yarn Groups A to F – Use the same pattern and change the yarn here
Yarn usage using an alternative yarn – Use our yarn converter here

-------------------------------------------------------

DROPS Cotton Merino
DROPS Cotton Merino
50% Wool, 50% Cotton
from 3.55 £ /50g
DROPS Kid-Silk
DROPS Kid-Silk
75% Mohair, 25% Silk
from 4.60 £ /25g
Get the yarn to make this pattern from 54.95£.

The yarn cost is calculated from the pattern’s smallest size and the yarn’s cheapest product type. Looking for an even better price? You might find it on the DROPS Deals!

Pattern instructions

NOTE: This pattern is written in British English. All measurements in charts are in cm. For conversion from cm to inches - click here. There are different terms for crocheting in British and American English. If this pattern includes crochet, click for "crochet terms" here. For this pattern in American English, please click here.
-------------------------------------------------------

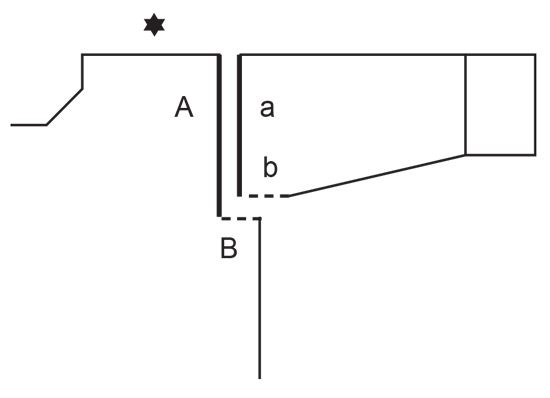
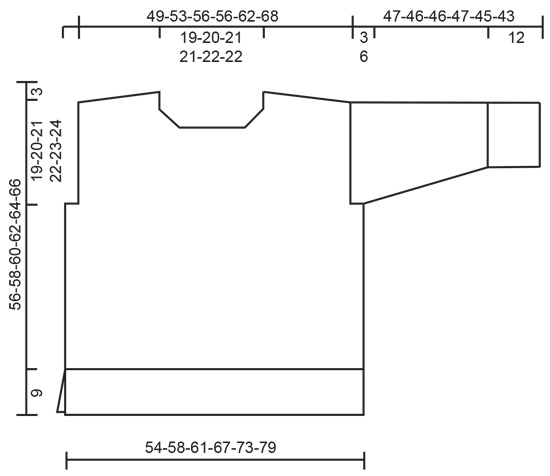
EXPLANATIONS FOR THE PATTERN:
-------------------------------------------------------

RIDGE/GARTER STITCH (worked back and forth):
Knit all rows.
1 ridge = knit 2 rows.

PATTERN:
See diagrams A.1 to A.4. The diagrams show all rows in the pattern from the right side.

DECREASE TIP (for neck):
All decreases are worked from the right side:
BEGINNING OF ROW (working from the neck):
1 edge stitch in garter stitch, knit 2, slip 1 stitch as if to knit, knit 1 and pass the slipped stitch over the knitted stitch.
END OF ROW (working towards the neck):
Work until there are 5 stitches left, knit 2 together, knit 2 and 1 edge stitch in garter stitch.

INCREASE TIP (for sleeves):
Increase 1 stitch on each side of the marker-stitch by making 1 yarn over. On the next round work the yarn overs twisted to avoid holes, then work the new stitches into the pattern.

-------------------------------------------------------

START THE PIECE HERE:

-------------------------------------------------------

JUMPER – SHORT OVERVIEW OF THE PIECE:
The back and front pieces are worked separately, back and forth on circular needle, bottom up. The sleeves are worked in the round with double pointed needles/short circular needle, bottom up as far as the sleeve cap, which is then finished back and forth. The neck is worked after the piece has been sewn together.

BACK PIECE:
Cast on 122-134-138-150-166-178 stitches with circular needle size 4 mm and 1 strand of each quality (2 strands). Purl 1 row from the wrong side. Work the next row as follows from the right side: 2 stitches in GARTER STITCH – read description above, * knit 2, purl 2 *, work from *-* until there are 4 stitches left, knit 2 and 2 stitches in garter stitch. Continue this rib for 9 cm.
Knit 1 row from the right side and decrease 35-42-41-43-49-51 stitches evenly spaced, in addition cast on 1 stitch at the beginning and end of this row (edge stitches) = 89-94-99-109-119-129 stitches.
Change to circular needle size 5.5 mm. Work stocking stitch with 1 edge stitch in garter stitch on each side. REMEMBER THE KNITTING TENSION!
When the piece measures 12-12-13-13-14-14 cm, start the pattern as well as decreasing for the armholes, neck and diagonal shoulders. Read sections PATTERN, ARMHOLES, NECK and DIAGONAL SHOULDERS before continuing.

PATTERN:
Work the first row as follows from the right side: 1 edge stitch in garter stitch, work A.1 until there is 1 stitch left, 1 edge stitch in garter stitch - NOTE: On each row with lace pattern where the pattern does not fit (applies to all sizes apart from M), knit the last stitch before the edge stitch). Continue this pattern.
When A.1 is finished, work as follows: 1 edge stitch in garter stitch, work A.2 until there are 3 stitches left, 2 stitches in stocking stitch, 1 edge stitch in garter stitch. Continue this pattern until A.2 has been worked 4-4-4-5-5-6 times in height.
After A.2, work as follows from the right side: 1 edge stitch in garter stitch, work A.3 until there is 1 stitch left, 1 edge stitch in garter stitch. When A.3 is finished the piece measures approx. 47-47-48-50-51-53 cm from the cast-on edge. Continue with stocking stitch and 1 edge stitch in garter stitch on each side to finished length.

ARMHOLES:
When the piece measures 34-35-36-37-38-39 cm from the cast-on edge, cast off 5-5-5-10-10-10 stitches at the beginning of the next 2 rows = 79-84-89-89-99-109 stitches.

NECK:
When the piece measures 53-55-57-59-61-63 cm, cast off the middle 29-30-31-31-33-33 stitches for the neck and finish each shoulder separately. Decrease 1 stitch for the neck on the next row from the right side – read DECREASE TIP = 24-26-28-28-32-37 stitches on the shoulder.

DIAGONAL SHOULDERS:
AT THE SAME TIME, when the piece measures 53-55-57-59-61-63 cm, place stitches on a thread for the diagonal shoulders (work the stitches first to avoid having to cut the strand). Place stitches on a thread from the side as follows: 8-9-9-9-11-12 stitches 2 times, then the remaining 8-8-10-10-10-13 stitches.
When all the stitches are on the thread, place them back on circular needle size 5.5 mm. Work 1 row of stocking stitch; to avoid a hole in the transition between stitches being placed on the thread, pick up the strand between 2 stitches and work it twisted together with the first stitch on the left needle. Cast off. Work the other shoulder in the same way.

FRONT PIECE:
Cast on and work in the same way as the back piece, until A.3 is finished in height – remember to cast off for the armholes. There are 79-84-89-89-99-109 stitches and the piece measures approx. 47-47-48-50-51-53 cm from the cast-on edge. Continue with stocking stitch and 1 edge stitch in garter stitch on each side.
When the piece measures 49-50-51-53-54-56 cm, place the middle 23-24-23-23-23-23 stitches on a thread for the neck and finish each shoulder separately. Read sections NECK and DIAGONAL SHOULDERS before continuing.

NECK:
Decrease 1 stitch for the neck on each row from the right side – remember DECREASE TIP, 4-4-5-5-6-6 times.

DIAGONAL SHOULDERS:
AT THE SAME TIME, when the piece measures 53-55-57-59-61-63 cm, place stitches on a thread for the diagonal shoulders (work the stitches first to avoid having to cut the strand). Place stitches on a thread from the side as follows: 8-9-9-9-11-12 stitches 2 times, then the remaining 8-8-10-10-10-13 stitches.
When all the stitches are on the thread, place them back on circular needle size 5.5 mm. Work 1 row of stocking stitch; to avoid a hole in the transition between stitches being placed on the thread, pick up the strand between 2 stitches and work it twisted together with the first stitch on the left needle. Cast off. Work the other shoulder in the same way.

SLEEVES:
Cast on 72-76-76-80-84-84 stitches with double pointed needles size 4 mm and 1 strand of each quality (2 strands). Knit 1 round, then work rib (knit 2, purl 2) in the round for 12 cm.
Knit 1 round and decrease 21-23-21-23-27-25 stitches evenly spaced = 51-53-55-57-57-59 stitches. Insert 1 marker in the last stitch on the round. Allow the marker to follow your work onwards – it is used when increasing under the sleeve.
Change to double pointed needles size 5.5 mm and work stocking stitch.
When the piece measures 14 cm, increase 2 stitches under the sleeve – read INCREASE TIP. Increase like this every 6½-5-5-4-3-2½ cm a total of 5-6-6-7-8-9 times = 61-65-67-71-73-77 stitches.
AT THE SAME TIME when the sleeve measures 20-19-19-20-18-16 cm, work A.4 on the whole round – NOTE: The last stitch on the round follows the pattern with knit/purl but not with a hole. Work A.4 two times in height. If the finished length is not reached after working A.4, continue with stocking stitch.
AT THE SAME TIME when the sleeve measures 44-43-43-41-39-37 cm, work the sleeve cap back and forth, from mid-under the sleeve, continuing the pattern. Cast off when the sleeve measures 47-46-46-47-45-43 cm.

ASSEMBLY:
Sew the shoulder seams inside the cast-off edge.
Sew the side seams inside the 1 edge stitch – start at the bottom of the armhole and work down to the rib (leaving 9 cm split). Sew the sleeve cap to the armhole inside the 1 edge stitch, then sew together the bottom of the armhole – see sketch.

DOUBLE NECK:
Start at one shoulder seam and knit up from the right side (inside the 1 edge stitch, using short circular needle size 4 mm and 1 strand of each quality) 88-92-100-100-104-104 stitches including the stitches from the thread in front. The stitch-count should be divisible by 4.
Work rib in the round (purl 2, knit 2) for 9 cm. Cast off with knit over knit and purl over purl, making 1 yarn over after each 4th stitch which is then cast off as a normal stitch.
Fold the neck double to the inside and sew down. To avoid the neck being tight and rolling outwards, it is important that the seam is elastic.

This pattern has been corrected.

Updated online: 26.05.2023
New diagrams A.1 to A.4

Diagram

symbols = knit from right side, purl from wrong side
symbols = purl from right side, knit from wrong side
symbols = between 2 stitches make 1 yarn over
symbols = knit 2 together
symbols = slip 1 stitch as if to knit, knit 2 together and pass the slipped stitch over the knitted-together stitches
symbols = Sew a to A and b to B
diagram
diagram
diagram

Each of our patterns has specific tutorial videos to help you.

Do you have a question? See a list of frequently asked questions (FAQ)

Knitting tension is what determines the final measurements of your work, and is usually measured per 10 x 10 cm. It is provided like so: number of stitches in width x number of rows in height - eg: 19 stitches x 26 rows = 10 x 10 cm.

The knitting tension is very individual; some people knit/crochet loosely while others work tightly. You adjust the knitting tension with the needle size, which is why the suggested needle size is only meant as a guide! You need to adjust this (up or down) to ensure that YOUR knitting tension matches the knitting tension provided in the pattern. If you work with a different knitting tension than provided you will have a different yarn consumption, and your work will have different measurements than what the pattern suggests.

The knitting tension also determines which yarns can replace each other. As long as you achieve the same knitting tension you can replace one yarn with another.

See DROPS lesson: How to measure your tension/gauge

See DROPS video: How to make a gauge tension swatch

The required amount of yarn is provided in grams, eg: 450 g. To calculate how many balls you’ll need you first need to know how many grams are in 1 ball (25g, 50g or 100g). This information is available if you click on the individual yarn quality on our pages. Divide the amount required with the amount of each ball. For example, if each ball is 50g (the most common amount), the calculation will be as follows: 450 / 50 = 9 balls.

The important thing when changing from one yarn to another is that the knitting/crochet tension remains the same. This is so that the measurements of the finished piece will be the same as on the sketch provided. It is easier to achieve the same knitting tension using yarns from the same yarn group. It is also possible to work with multiple strands of a thinner yarn to achieve the knitting tension of a thicker one. Please try our yarn converter. We recommend you to always work a test swatch.

Please NOTE: when changing yarn the garment might have a different look and feel to the garment in the photo, due to individual properties and qualities of each yarn.

See DROPS lesson: Can I use a different yarn than the one mentioned in the pattern?

All our yarns are categorised into yarn groups (from A to F) according to thickness and knitting tension – group A contains the thinnest yarns and group F the thickest. This makes it easier for you to find alternative yarns to our patterns, should you wish to switch yarn. All yarns within the same group have a similar knitting tension and can easily replace each other. However, different yarn qualities have different structures and properties which will give the finished work a unique look and feel.

Click here for an overview of the yarns in each yarn group

At the top of all our patterns you’ll find a link to our yarn calculator, which is a helpful tool should you wish to use a different yarn than suggested. By filling in the yarn quality you wish to replace, the amount (in your size) and number of strands, the calculator will present good alternative yarns with the same knitting tension. Additionally it will tell you how much you’ll require in the new qualities and whether you’ll need to work with multiple strands. Most skeins are 50g (some are 25g or 100g).

If the pattern is worked with multiple colours, every colour will have to be calculated separately. Similarly, if the pattern is worked with several strands of different yarns (for example 1 strand Alpaca and 1 strand Kid-Silk) you will have to find alternatives for each, individually.

Click here to see our yarn calculator

Since different yarns have different qualities and textures we have chosen to keep the original yarn in our patterns. However, you can easily find options among our available qualities by using our yarn calculator, or simply pick a yarn from the same yarn group.

It is possible that some retailers still have discontinued yarns in stock, or that someone has a few skeins at home that they would like to find patterns for.

The yarn calculator will provide both alternative yarn as well as required amount in the new quality.

If you think it's hard to decide what size to make, it can be a good idea to measure a garment you own already and like the size of. Then you can pick the size by comparing those measures with the ones available in the pattern's size chart.

You'll find the size chart at the bottom of the pattern.

See DROPS lesson: How to read size chart

The needle size provided in the pattern serves only as a guide, the important thing is to follow the knitting tension. And since knitting tension is very individual, you will have to adjust the needle size to ensure that YOUR tension is the same as in the pattern – maybe you’ll have to adjust 1, or even 2 needle sizes, up or down to achieve the correct tension. For this, we recommend that you work test swatches.

Should you work with a different knitting tension than the one provided, the measurements of the finished garment might deviate from the measurement sketch.

See DROPS lesson: How to measure your tension/gauge

See DROPS video: How to make a tension/gauge swatch

Working a garment top-down provides more flexibility and room for personal adjustment. For example it is easier to try the garment on while working, as well as making adjustments to length of yoke and shoulder caps.

The instructions are carefully explaining every step, in the correct order. Diagrams are adjusted to the knitting direction and are worked as usual.

The diagram depicts all rows/rounds, and every stitch seen from the right side. It is read from bottom to top, from right to left. 1 square = 1 stitch.

When working back and forth, every other row is worked from the right side and every other row is worked from the wrong side. When working from the wrong side, the diagram will have to be worked reversed: from left to right, knit stitches are purled, purl stitches are knit etc.

When working in the round every round is worked from the right side and the diagram are worked from right to left on all rounds.

See DROPS lesson: How to read knitting diagrams

The diagram depicts all rows/rounds, and every stitch seen from the right side. It is worked from bottom to top, from right to left.

When working back and forth every other row is worked from the right side: from right to left and every other row is worked from the wrong side: from left to right.

When working in the round, every row in the diagram are worked from the right side, from right to left.

When working a circular diagram you start in the middle and work your way outwards, counter clockwise, row by row.

The rows usually start with a given number of chain stitches (equivalent to the height of the following stitch), this will either be depicted in the diagram or explained in the pattern.

See DROPS lesson: How to read crochet diagrams

Instructions for working several diagrams after each other on the same row/round, will often be written like so: “work A.1, A.2, A.3 a total of 0-0-2-3-4 times". This means you work A.1 once, then A.2 is worked once, and A.3 is repeated (in width) the number of times provided for your size – in this case like so: S = 0 times, M = 0 times, L=2 times, XL= 3 times and XXL = 4 times.

The diagrams are worked as usual: begin with the first row in A.1, then work the first row in A.2 etc.

See DROPS lesson: How to read knitting diagrams

See DROPS lesson: How to read crochet diagrams

The total width of the garment (from wrist-to-wrist) will be larger in the larger sizes, despite the actual sleeves being shorter. The larger sizes have longer sleeve caps and wider shoulders, so there will be a good fit in all sizes.

The measurement sketch/schematic drawing provides information regarding the full length of the garment. If it’s a jumper or a jacket the length is measured from the highest point on the shoulder closest to the neckline, and straight down to the bottom of the garment. It is NOT measured from the tip of shoulder. Similarly, the length of yoke is measured from the highest point on the shoulder and down to where yoke is split into body and sleeves.

On a jacket measures are never taken along bands, unless specifically stated. Always measure inside band stitches when measuring the length.

See DROPS lesson: How to read a schematic drawing

Diagrams are often repeated on the round or in height. 1 repeat is the diagram the way it appears in the pattern. If it says to work 5 repeats of A.1 in the round, then you work A.1 a total of 5 times after/next to each other in the round. If it says to work 2 repeats of A.1 vertically/in height you work the entire diagram once, then begin again at the start and work the entire diagram one more time.

Chain stitches are slightly narrower than other stitches and to avoid working the cast-on edge too tight, we simply chain more stitches to begin with. The stitch count will be adjusted on the following row to fit the pattern and measurement sketch.

The rib edge is more elastic and will contract slightly compared to, for example, stocking stitch. By increasing before the rib edge, you avoid a visible difference in width between the rib edge and the rest of the body.

It’s very easy to cast off too tightly, and by making yarn overs while casting off (and simultaneously casting these off) you avoid a too tight cast off edge.

See DROPS video: How to bind off with yarn overs (yo)

To achieve an even increase (or decrease) you can increase on, for example: every 3rd and 4th row alternately, like so: work 2 rows and increase on the 3rd row, work 3 rows and increase on the 4th. Repeat this until the increase is complete.

See DROPS lesson: Increase or decrease 1 st on every 3rd and 4th row alternately

Should you prefer to work in the round instead of back and forth, you may of course adjust the pattern. You’ll need to add steeks mid-front (usually 5 stitches), and follow the instructions. When you would normally turn and work from the wrong side, simply work across the steek and continue in the round. At the end you’ll cut the piece open, pick up stitches to work bands, and cover the cut edges.

See DROPS video: How to knit steeks and cut open

Should you prefer to work back and forth instead of in the round, you may of course adjust the pattern so you work the pieces separately and then assemble them at the end. Divide the stitches for the body in 2, add 1 edge stitch in each side (for sewing) and work the front and back pieces separately.

See DROPS lesson: Can I adapt a pattern for circular needles into straight needles?

Pattern repeats can vary slightly in the different sizes, in order to get the correct proportions. If you’re not working the exact same size as the garment in the photo, yours might deviate slightly. This has been carefully developed and adjusted so that the complete impression of the garment is the same in all sizes.

Make sure to follow instructions and diagrams for your size!

If you have found a pattern you like which is available in women’s size it’s not very difficult to convert it to men’s size. The biggest difference will be the length of sleeves and body. Start working on the women size that you think would fit across the chest. The additional length will be worked right before you cast off for the armhole/sleeve cap. If the pattern is worked top-down you can add the length right after the armhole or before the first decrease on sleeve.

Regarding additional yarn amount, this will depend on how much length you add, but it is better with a skein too many than too few.

All yarns will have excess fibres (from production) that might come off as lint or shedding. Brushed yarns (ie hairier yarns) have more of these loose, excess fibres, causing more shedding.

Shedding also depends on what is worn under or over the garment, and whether this pulls at the yarn fibres. It’s therefore not possible to guarantee that there will be no shedding

Below are some tips on how to get the best result when working with hairier yarns:

1. When the garment is finished (before you wash it) shake it vigorously so the looser hairs come off. NOTE: do NOT use a lint roller, brush or any method that pulls at the yarn.

2. Place the garment in a plastic bag and put it in your freezer - the temperature will cause the fibres to become less attached to each other, and excess fibres will come off easier.

3. Leave in the freezer for a few hours before taking it out and shaking it again.

4. Wash the garment according to the instructions on the yarn label.

Pilling is a natural process that happens to even the most exclusive of fibers. It's a natural sign of wear and tear that is hard to avoid, and that is most visible in high friction areas of your garment like a sweater's arms and cuffs.

You can make your garment look as new by removing the pilling, using a fabric comb or a pill/lint remover.

Still can't find the answer you need? Then scroll down and leave your question so one of our experts can try to help you. This will be done normally within 5 to 10 working days.
In the meantime, you can read the questions and answers that others have left to this pattern or join the DROPS Workshop on Facebook to get help from fellow knitters/crocheters!

You might also like...

Post a comment to pattern DROPS 239-1

We would love to hear what you have to say about this pattern!

If you want to leave a question, please make sure you select the correct category in the form below, to speed up the answering process. Required fields are marked *.

Comments / Questions (17)

country flag Flores Hélène wrote:

Bonjour, je ne comprends pas les explications pour l'encolure et biais des épaules. Merci pour votre réponse.

24.02.2024 - 17:58

DROPS Design answered:

Bonjour Mme Florès, vous allez mettre en attente les mailles des épaules en début de rang à partir de l'emmanchure (par ex pour le dos: en début de rang sur l'endroit pour l'épaule droite, en début de rang sur l'envers pour l'épaule gauche), et en même temps, vous devrez rabattre les mailles de l'encolure = en début de rang sur l'envers pour l'épaule droite/en début de rang sur l'endroit pour l'épaule gauche. Quand ces rangs raccourcis sont faits, vous tricotez 1 rang sur toutes les mailles de l'épaule et rabattez au rang suivant. Bon tricot!

26.02.2024 - 08:33

country flag CURIEUX Suzanne wrote:

Bonjour, très intéressée par le modèle pull écru diagramme de points mousse , Jersey présenté sur la page d accueil pinterest , je voudrais les explications pour le réaliser. Merci de votre aide ..a bientôt j espère

13.01.2024 - 09:07

DROPS Design answered:

Bonjour Mme Curieux, retrouvez les explications en français ici. Bon tricot!

15.01.2024 - 08:13

country flag Hennie Cramer wrote:

Patr 239-1 Er staat in de beschrijving van het achterpand niet dat na A3 A4 gebreid moet worden Hoe kan dat?

24.09.2023 - 14:48

DROPS Design answered:

Dag Hennie,

Klopt, A.4 wordt op de mouwen gebreid.

27.09.2023 - 20:35

country flag Hennie wrote:

Wordt in het telpatroon uitsluitend de heengaan naaldgegeven ? Het betreft model 239-1 A-1

08.09.2023 - 21:58

DROPS Design answered:

Dag Hennie,

In de telpatronen zijn altijd alle naalden weergegeven, dus zowel de heengaande als de teruggaande naalden.

13.09.2023 - 20:45

country flag Christine wrote:

Bonjour, quelle option est la plus douce pour la peau pour une personne avec une sensibilité à la laine? Drops Ctoton-Merino ou Drops Sky avec Kid-Silk? Merci!

26.08.2023 - 12:28

DROPS Design answered:

Bonjour Christine, je vous recommande de contacter votre magasin pour toute assistance personnalisée au choix de la meilleure laine adéquate, ce sera bien plus facile pour eux de vous conseiller la laine idéale, même par mail ou téléphone. Bon tricot!

28.08.2023 - 13:22

country flag ZUMAGLIA wrote:

Je ne comprends absolument rien aux explications de Drops. J'ai l'habitude de tricoter Phildar, Pingoon, Annie Blatt, je n'ai JAMAIS eu autant de difficultés pour comprendre et pourtant je tricote depuis plus de 40 ans ! Bien à vous.

22.08.2023 - 20:03

DROPS Design answered:

Bonjour Mme Zumaglia, nos modèles sont écrits par des scandinaves et donc peuvent paraître déroutants car écrits d'une autre façon que celle dont vous avez l'habitude; vous pouvez volontiers utiliser cet espace pour poser votre question si les vidéos/leçons du bas de page n'ont pu vous aider, nous vous aiderons volontiers. Bon tricot!

23.08.2023 - 09:18

country flag NELLY PREVOT wrote:

Merci pour votre réponse reçue le 26 mai alors que la demande était du 5 mai ! Heureusement j'étais absente pendant ce temps. Vous n'avez toujours pas répondu à ma question : que signifie les 2 petits ovals de chaque côté du point ? vous répondez à côté et impossible de voir explicitement les changements sur le schéma ! Par ailleurs je ne commanderai plus à l'avenir de modèles chez vous car les explications ne sont pas claires. Désolée.

26.05.2023 - 15:20

DROPS Design answered:

Bonjour Mme Prevot, je suis désolée si j'ai mal compris votre question, le triangle noir correspond à la diminution tricotée dans la vidéo dont j'ai indiqué le lien, et les ovales sont les jetés (3ème symbole de la légende); le rang 3 de A.2 va donc se tricoter ainsi: 2 m end, 1 jeté, le triangle noir = glissez 1 m à l'end, 2 m ens à l'end, passez la m glissée par-dessus la m tricotée, 1 jeté. Il peut être sage d'actualiser la page et d'imprimer à nouveau les diagrammes pour être certaine qu'ils soient justes désormais. Bon tricot!

26.05.2023 - 15:25

country flag NELLY PREVOT wrote:

Toujours une incompréhension : j'ai terminé le diagramme A.1 ; je suis le A.2 et 1° je me retrouve sur l'envers et sur les deux premiers rangs de A2 ce sont des symboles carré blanc ensuite je ne comprends pas du tout du tout votre symbole triangle noir (le 5ème) avec les petits 0 de chaque côté. Merci de détailler clairement : merci.

05.05.2023 - 15:52

DROPS Design answered:

Bonjour Mme Prevot, effectivement, les diagrammes avaient un défaut, ils ont été maintenant corrigés, merci pour votre retour. Nous montrons dans cette vidéo comment tricoter le symbole triangle noir = 5ème symbole dans la légende; dans ce diagramme, vous devrez faire 1 jeté (cf 3ème symbole) avant et 1 jeté après (le nombre de mailles doit rester le même). Bon tricot!

26.05.2023 - 13:05

country flag Nelly wrote:

Drops Design 239-1 Je ne comprends pas le diagramme : que signifie le petit 0 devant le trait oblique noir et les deux 0 de part et d'autre du triangle noir ? Les explications du diagramme le troisième à partir du haut (faire 1 jeté entre 2 mailles) ou est-il dans le modèle ? Que signifie "tension" pour vous ? Si l'on tricote avec l'aiguille circulaire en AR à quoi cela sert-il ? Merci pour votre prompte réponse. Cordialement.

25.04.2023 - 09:34

DROPS Design answered:

Bonjour Nelly, la "tension" correspond à l'échantillon, lorsque vous tricotez l'ouvrage, vous devez conserver la même façon de tricoter que pour votre échantillon pour conserver les mêmes mesures (adaptez la taille des aiguilles si besoin). Le 1er rang de A.1 va se tricoter ainsi: 2 m ens à l'end, 1 jeté - pour le triangle, cf 5ème symbole de lé légende. On tricote avec des aiguilles circulaires pour avoir suffisamment de place pour y loger toutes les mailles (cf cette leçon. Bon tricot!

25.04.2023 - 14:40

country flag Justyna wrote:

Czy między schematem a1 i a2 nie brakuje jednego rzędu prawych oczek? Schemat a1 kończy się rzędem odchodzącym lewych oczek, a2 zaczyna się więc od lewych oczek w rzędzie powrotnym, co oznacza, że ażurowy wzór w trzecim rzędzie jest robiony w rzędzie powrotnym, czyli na lewej stronie robótki.

11.03.2023 - 14:08

DROPS Design answered:

Witaj Justyno, masz rację. Inaczej w schemacie A.2 narzuty byłyby wykonywane na lewej stronie robótki. Zgłoszę to do sekcji projektów. Dziękuję za zwrócenie uwagi i pozdrawiam!

13.03.2023 - 15:50