DROPS Snow
DROPS Snow
100% Wool
from 2.65 $ /50g
Get the yarn to make this pattern from 7.95$.

The yarn cost is calculated from the pattern’s smallest size and the yarn’s cheapest product type. Looking for an even better price? You might find it on the DROPS Deals!

DROPS SS24

Christmas Stripes Socks

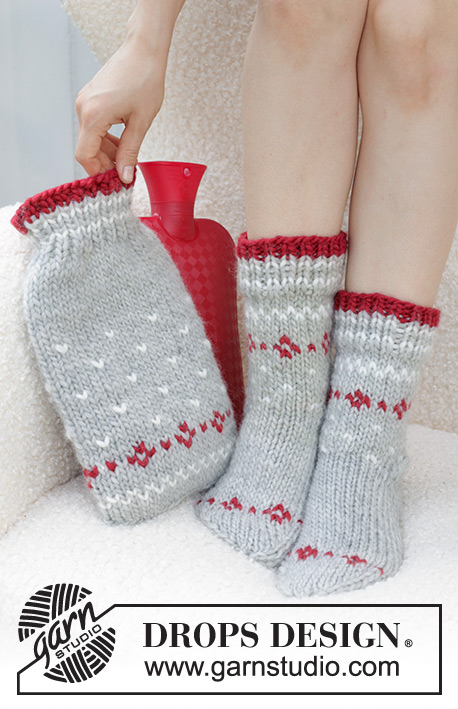
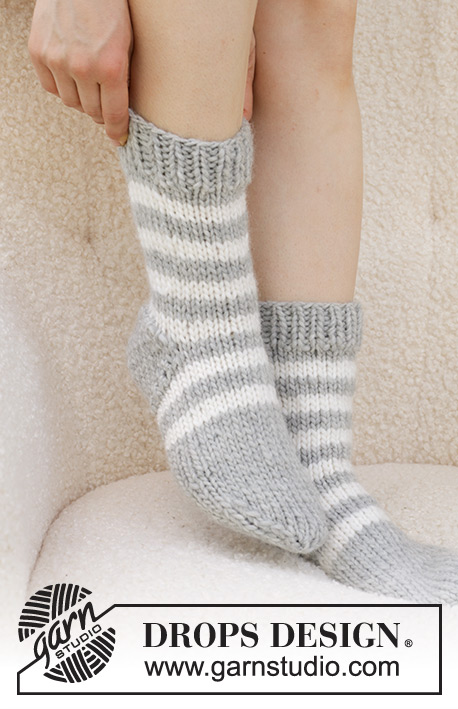
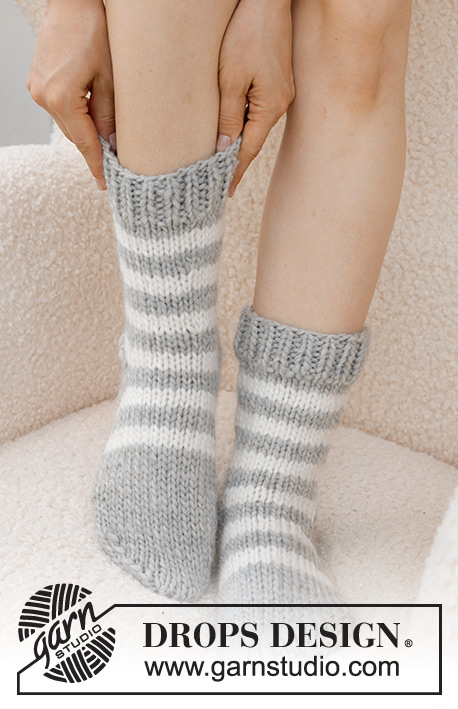
Knitted socks in DROPS Snow. Piece is knitted top down with stockinette pattern and stripes. Size 35 to 43 = US 4 ½ to 12 ½ Theme: Christmas.

DROPS 234-74
DROPS design: Pattern ee-750
Yarn group E or C + C
----------------------------------------------------------

SIZE:
35/37 - 38/40 - 41/43 = US 4 1/2/6 1/2 – 7 1/2/9 1/2 - 10 1/2/12 1/2
Foot length: 22-24-26 cm = 8¾"-9½"-10¼"
Leg height down to heel: Approx. 15-15-18 cm = 6"-6"-7"

YARN:
DROPS SNOW from Garnstudio (belongs to yarn group E)
100-150-150 g color 53, light grey
50-50-50 g color 01, off white

NEEDLES:
DROPS DOUBLE POINTED NEEDLES SIZE 6 MM = US 10

KNITTING GAUGE:
13 stitches in width and 17 rows vertically in stockinette stitch = 10 x 10 cm = 4" x 4".
NOTE! Remember that needle size is only a suggestion. If you have too many stitches on 10 cm = 4" switch to larger needles. If you have too few stitches on 10 cm = 4" switch to smaller needles.

-------------------------------------------------------

Alternative Yarn – See how to change yarns here
Yarn Groups A to F – Use the same pattern and change the yarn here
Yarn usage using an alternative yarn – Use our yarn converter here

-------------------------------------------------------

DROPS Snow
DROPS Snow
100% Wool
from 2.65 $ /50g
Get the yarn to make this pattern from 7.95$.

The yarn cost is calculated from the pattern’s smallest size and the yarn’s cheapest product type. Looking for an even better price? You might find it on the DROPS Deals!

Pattern instructions

NOTE: This pattern is written in American English. All measurements in charts are in cm. For conversion from inches to cm - click here. There are different terms for crocheting in American and British English. If this pattern includes crochet, click for "crochet terms" here. For this pattern in British English, please click here.
----------------------------------------------------------

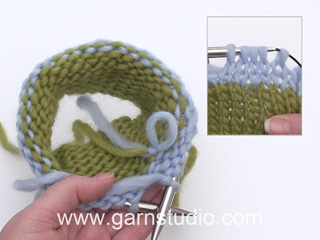
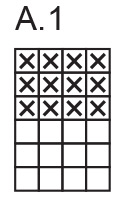
EXPLANATION FOR THE PATTERN:

----------------------------------------------------------

PATTERN:
See diagram A.1. Work the entire pattern in stockinette stitch.

INCREASE TIP (applies to wedge heel):
Begin 1 stitch before marker thread, make 1 yarn over, knit 2 (marker thread is in the middle of these 2 stitches), make 1 yarn over (= 2 stitches increased). On next row purl yarn overs twisted to avoid holes.

DECREASE TIP (applies to wedge heel and decrease for toes):
All decreases are done from the right side!
Work until 2 stitches remain before marker thread, knit 2 together, marker thread, knit 2 twisted together.

WEDGE HEEL:
Work wedge heel in stockinette stitch back and forth on needle.
Insert 1 marker thread in the middle of the 16-18-18 heel stitches - move the marker thread upwards when working, it is used when increasing and decreasing in the middle of heel.
ROW 1 (= right side): Knit until 5 stitches remain - increase at the same time 1 stitch on each side of marker thread - read INCREASE TIP, turn.
ROW 2 (= wrong side): Purl until 5 stitches remain - purl yarn overs twisted, turn.
ROW 3 (= right side): Knit until 4 stitches remain - increase at the same time 1 stitch on each side of marker thread - remember INCREASE TIP, turn.
ROW 4 (= wrong side): Purl until 4 stitches remain - purl yarn overs twisted, turn.
ROW 5 (= right side): Knit until 3 stitches remain - increase at the same time 1 stitch on each side of marker thread, turn.
ROW 6 (= wrong side): Purl until 3 stitches remain - purl yarn overs twisted, turn.
ROW 7 (= right side): Knit until 2 stitches remain - increase at the same time 1 stitch on each side of marker thread, turn.
ROW 8 (= wrong side): Purl until 2 stitches remain - purl yarn overs twisted, turn = 24-26-26 stitches.
Now continue the same way but without increasing on each side of marker thread, until all stitches have been worked back and forth. Insert 1 marker in the middle of row - this should be used later to measure the length of foot.

Now knit 1 round over all stitches (also stitch on thread mid on top of foot) with color light grey. Then slip the 12-12-14 stitches on top of foot back on thread.
Then work opposite, i.e. work stockinette stitch back and forth but turn when 1 stitch more remains in each side of every row as follows:
ROW 1 (= right side): Knit until 1 stitch remains, turn.
ROW 2 (= wrong side): Purl until 1 stitch remains, turn.
ROW 3 (= right side): Knit until 2 stitches remain - decrease at the same time 1 stitch on each side of marker thread– read DECREASE TIP - turn.
ROW 4 (= wrong side): Purl until 2 stitches remain, turn.

ROW 5 (= right side): Knit until 3 stitches remain - decrease at the same time 1 stitch on each side of marker thread – remember DECREASE TIP, turn.
ROW 6 (= wrong side): Purl until 3 stitches remain, turn.
ROW 7 (= right side): Knit until 4 stitches remain - decrease at the same time 1 stitch on each side of marker thread, turn.
ROW 8 (= wrong side): Purl until 4 stitches remain, turn.
ROW 9 (= right side): Knit until 5 stitches remain – decrease at the same time 1 stitch on each side of marker thread, turn = 16-18-18 stitches.
ROW 10 (= wrong side): Purl all stitches.
When you turn, there might be a hole. Try to tighten the yarn as much as possible or pick up the yarn between 2 stitches and work it twisted with first stitch on left needle.

----------------------------------------------------------

START THE PIECE HERE:

----------------------------------------------------------

SOCKS - SHORT OVERVIEW OF THE PIECE:
Worked in the round on double pointed needles, top down.

SOCK:
Cast on 36-38-40 stitches on double pointed needles size 6 MM = US 10 with color light grey in DROPS Snow. Work rib (knit 1/purl 1) for 4 cm = 1½".
Knit 2 rounds with color light grey and decrease at the same time 4 stitches evenly on first round= 32-34-36 stitches.
Work A.1 (repeat A.1 vertically).
When piece measures 6 cm = 2⅜", decrease 2 stitches evenly = 30-32-34 stitches. Repeat decrease when piece measures 12 cm = 4¾" = 28-30-32 stitches.
When A.1 has been worked 3-3-4 times vertically and last stripes is worked with color off white, piece measures approx. 15-15-18 cm = 6"-6"-7". REMEMBER THE KNITTING GAUGE!

Insert 1 marker at beginning of round = mid back.
Now work heel on short rows as explained below (work entire heel in color light grey):
Knit 1 row over all stitches.
Keep the first 8-9-9 stitches on needle for heel, slip the next 12-12-14 stitches on 1 thread (mid on top of foot), and keep the last 8-9-9 stitches on needle for heel.
Work WEDGE HEEL = read explanation above.

After wedge heel continue in the round over all stitches as follows:
Work A.1 in the round over all stitches 2 times in total vertically to form 2 stripes with off white after heel, then work with color light grey AT THE SAME TIME on first round after heel decrease 4-0-2 stitches evenly = 24-30-30 stitches.
When piece measures 18-19-21 cm = 7"-7½"-8¼" from marker on heel - measured under foot, begin decrease for toes.
Insert 1 new marker in each side of sock so that there are 12-15-15 stitches both on top of foot and under foot.
Work in stockinette stitch in the round AT THE SAME TIME on first round decrease 1 stitch on each side of both markers - read DECREASE TIP. Decrease like this every other round 3-3-4 times in total, and then on every round 1-2-1 time in total = 8-10-10 stitches remain. On next round knit all stitches together 2 by 2 = 4-5-5 stitches remain.
Sock measures approx. 22-24-26 cm = 8¾"-9½"-10¼" from marker on heel.
Cut the yarn and pull yarn through stitches, tighten together and fasten.
Remove all markers/marker threads.

Work the other sock the same way.

This pattern has been corrected.

Updated online: 19.04.2023
New yarn amount: DROPS SNOW from Garnstudio 100-150-150 g color 53, light grey 50-50-50 g color 01, off white

Diagram

All measurements in charts are in cm.

symbols = off white
symbols = light grey
diagram
Do you have a question? See a list of frequently asked questions (FAQ)

Knitting tension is what determines the final measurements of your work, and is usually measured per 10 x 10 cm. It is provided like so: number of stitches in width x number of rows in height - eg: 19 stitches x 26 rows = 10 x 10 cm.

The knitting tension is very individual; some people knit/crochet loosely while others work tightly. You adjust the knitting tension with the needle size, which is why the suggested needle size only serve as a guide! You need to adjust this (up or down) to ensure that YOUR knitting tension matches the knitting tension provided in the pattern. If you work with a different knitting tension than provided you will have a different yarn consumption, and your work will have different measurements than what the pattern suggests.

The knitting tension also determines which yarns can replace each other. As long as you achieve the same knitting tension you can replace one yarn with another.

See DROPS lesson: How to measure your tension/gauge

See DROPS video: How to make a gauge tension swatch

The required amount of yarn is provided in grams, eg: 450 g. To calculate how many balls you’ll need you first need to know how many grams are in 1 ball (25g, 50g or 100g). This information is available if you click on the individual yarn quality on our pages. Divide the amount required with the amount of each ball. For example, if each ball is 50g (the most common amount), the calculation will be as follows: 450 / 50 = 9 balls.

The important thing when changing from one yarn to another is that the knitting/crochet tension remains the same. This is so that the measurements of the finished piece will be the same as on the sketch provided. It is easier to achieve the same knitting tension using yarns from the same yarn group. It is also possible to work with multiple strands of a thinner yarn to achieve the knitting tension of a thicker one. Please try our yarn converter. We recommend you to always work a test swatch.

Please NOTE: when changing yarn the garment might have a different look and feel to the garment in the photo, due to individual properties and qualities of each yarn.

See DROPS lesson: Can I use a different yarn than the one mentioned in the pattern?

All our yarns are categorised into yarn groups (from A to F) according to thickness and knitting tension – group A contains the thinnest yarns and group F the thickest. This makes it easier for you to find alternative yarns to our patterns, should you wish to switch yarn. All yarns within the same group have a similar knitting tension and can easily replace each other. However, different yarn qualities have different structures and properties which will give the finished work a unique look and feel.

Click here for an overview of the yarns in each yarn group

At the top of all our patterns you’ll find a link to our yarn converter, which is a helpful tool should you wish to use a different yarn than suggested. By filling in the yarn quality you wish to replace, the amount (in your size) and number of strands, the converter will present good alternative yarns with the same knitting tension. Additionally it will tell you how much you’ll require in the new qualities and whether you’ll need to work with multiple strands. Most skeins are 50g (some are 25g or 100g).

If the pattern is worked with multiple colours, every colour will have to be converted separately. Similarly, if the pattern is worked with several strands of different yarns (for example 1 strand Alpaca and 1 strand Kid-Silk) you will have to find alternatives for each, individually.

Click here to see our yarn converter

Since different yarns have different qualities and textures we have chosen to keep the original yarn in our patterns. However, you can easily find options among our available qualities by using our yarn converter, or simply pick a yarn from the same yarn group.

It is possible that some retailers still have discontinued yarns in stock, or that someone has a few skeins at home that they would like to find patterns for.

The yarn converter will provide both alternative yarn as well as required amount in the new quality.

If you think it's hard to decide what size to make, it can be a good idea to measure a garment you own already and like the size of. Then you can pick the size by comparing those measures with the ones available in the pattern's size chart.

You'll find the size chart at the bottom of the pattern.

See DROPS lesson: How to read size chart

The needle size provided in the pattern serves only as a guide, the important thing is to follow the knitting tension. And since knitting tension is very individual, you will have to adjust the needle size to ensure that YOUR tension is the same as in the pattern – maybe you’ll have to adjust 1, or even 2 needle sizes, up or down to achieve the correct tension. For this, we recommend that you work test swatches.

Should you work with a different knitting tension than the one provided, the measurements of the finished garment might deviate from the measurement sketch.

See DROPS lesson: How to measure your tension/gauge

See DROPS video: How to make a gauge tension swatch

Working a garment top-down provides more flexibility and room for personal adjustment. For example it is easier to try the garment on while working, as well as making adjustments to length of yoke and shoulder caps.

The instructions are carefully explaining every step, in the correct order. Diagrams are adjusted to the knitting direction and are worked as usual.

The diagram depicts all rows/rounds, and every stitch seen from the right side. It is read from bottom to top, from right to left. 1 square = 1 stitch.

When working back and forth, every other row is worked from the right side and every other row is worked from the wrong side. When working from the wrong side, the diagram will have to be worked reversed: from left to right, knit stitches are purled, purl stitches are knit etc.

When working in the round every round is worked from the right side and the diagram are worked from right to left on all rounds.

See DROPS lesson: How to read knitting diagrams

The diagram depicts all rows/rounds, and every stitch seen from the right side. It is worked from bottom to top, from right to left.

When working back and forth every other row is worked from the right side: from right to left and every other row is worked from the wrong side: from left to right.

When working in the round, every row in the diagram are worked from the right side, from right to left.

When working a circular diagram you start in the middle and work your way outwards, counter clockwise, row by row.

The rows usually start with a given number of chain stitches (equivalent to the height of the following stitch), this will either be depicted in the diagram or explained in the pattern.

See DROPS lesson: How to read crochet diagrams

Instructions for working several diagrams after each other on the same row/round, will often be written like so: “work A.1, A.2, A.3 a total of 0-0-2-3-4 times". This means you work A.1 once, then A.2 is worked once, and A.3 is repeated (in width) the number of times provided for your size – in this case like so: S = 0 times, M = 0 times, L=2 times, XL= 3 times and XXL = 4 times.

The diagrams are worked as usual: begin with the first row in A.1, then work the first row in A.2 etc.

See DROPS lesson: How to read knitting diagrams

See DROPS lesson: How to read crochet diagrams

The total width of the garment (from wrist-to-wrist) will be larger in the larger sizes, despite the actual sleeves being shorter. The larger sizes have longer sleeve caps and wider shoulders, so there will be a good fit in all sizes.

The measurement sketch/schematic drawing provides information regarding the full length of the garment. If it’s a jumper or a jacket the length is measured from the highest point on the shoulder (usually closest to the neckline), and straight down to the bottom of the garment. It is NOT measured from the tip of shoulder. Similarly, the length of yoke is measured from the highest point on the shoulder and down to where yoke is split into body and sleeves.

See DROPS lesson: How to read a schematic drawing

Diagrams are often repeated on the round or in height. 1 repeat is the diagram the way it appears in the pattern. If it says to work 5 repeats of A.1 in the round, then you work A.1 a total of 5 times after/next to each other in the round. If it says to work 2 repeats of A.1 vertically/in height you work the entire diagram once, then begin again at the start and work the entire diagram one more time.

Chain stitches are slightly narrower than other stitches and to avoid working the cast-on edge too tight, we simply chain more stitches to begin with. The stitch count will be adjusted on the following row to fit the pattern and measurement sketch.

The rib edge is more elastic and will contract slightly compared to, for example, stocking stitch. By increasing before the rib edge, you avoid a visible difference in width between the rib edge and the rest of the body.

It’s very easy to cast off too tightly, and by making yarn overs while casting off (and simultaneously casting these off) you avoid a too tight cast off edge.

See DROPS video: How to bind off with yarn overs (yo)

To achieve an even increase (or decrease) you can increase on, for example: every 3rd and 4th row alternately, like so: work 2 rows and increase on the 3rd row, work 3 rows and increase on the 4th. Repeat this until the increase is complete.

See DROPS lesson: Increase or decrease 1 st on every 3rd and 4th row alternately

Should you prefer to work in the round instead of back and forth, you may of course adjust the pattern. You’ll need to add steeks mid-front (usually 5 stitches), and follow the instructions. When you would normally turn and work from the wrong side, simply work across the steek and continue in the round. At the end you’ll cut the piece open, pick up stitches to work bands, and cover the cut edges.

See DROPS video: How to knit steeks and cut open

Should you prefer to work back and forth instead of in the round, you may of course adjust the pattern so you work the pieces separately and then assemble them at the end. Divide the stitches for the body in 2, add 1 edge stitch in each side (for sewing) and work the front and back pieces separately.

See DROPS lesson: Can I adapt a pattern for circular needles into straight needles?

Pattern repeats can vary slightly in the different sizes, in order to get the correct proportions. If you’re not working the exact same size as the garment in the photo, yours might deviate slightly. This has been carefully developed and adjusted so that the complete impression of the garment is the same in all sizes.

Make sure to follow instructions and diagrams for your size!

If you have found a pattern you like which is available in women’s size it’s not very difficult to convert it to men’s size. The biggest difference will be the length of sleeves and body. Start working on the women size that you think would fit across the chest. The additional length will be worked right before you cast off for the armhole/sleeve cap. If the pattern is worked top-down you can add the length right after the armhole or before the first decrease on sleeve.

Regarding additional yarn amount, this will depend on how much length you add, but it is better with a skein too many than too few.

All yarns will have excess fibres (from production) that might come off as lint or shedding. Brushed yarns (ie hairier yarns) have more of these loose, excess fibres, causing more shedding.

Shedding also depends on what is worn under or over the garment, and whether this pulls at the yarn fibres. It’s therefore not possible to guarantee that there will be no shedding

Below are some tips on how to get the best result when working with hairier yarns:

1. When the garment is finished (before you wash it) shake it vigorously so the looser hairs come off. NOTE: do NOT use a lint roller, brush or any method that pulls at the yarn.

2. Place the garment in a plastic bag and put it in your freezer - the temperature will cause the fibres to become less attached to each other, and excess fibres will come off easier.

3. Leave in the freezer for a few hours before taking it out and shaking it again.

4. Wash the garment according to the instructions on the yarn label.

Pilling is a natural process that happens to even the most exclusive of fibers. It's a natural sign of wear and tear that is hard to avoid, and that is most visible in high friction areas of your garment like a sweater's arms and cuffs.

You can make your garment look as new by removing the pilling, using a fabric comb or a pill/lint remover.

Still can't find the answer you need? Then scroll down and leave your question so one of our experts can try to help you. This will be done normally within 5 to 10 working days.
In the meantime, you can read the questions and answers that others have left to this pattern or join the DROPS Workshop on Facebook to get help from fellow knitters/crocheters!

You might also like...

Post a comment to pattern DROPS 234-74

We would love to hear what you have to say about this pattern!

If you want to leave a question, please make sure you select the correct category in the form below, to speed up the answering process. Required fields are marked *.

Comments / Questions (3)

country flag Gitte wrote:

Hej Jeg forstår ikke, om jeg skal strikke ALLE masker INKLUSIV de to sidste på hver pind, eller alle masker UDEN de to sidste på hver pind, når jeg strikker kilehælen efter Pind 8. Da der står således: “ 8. PIND (vrangen): Strik vrang til der er 2 masker tilbage - omslagene strikkes drejet vrang, vend = 24-26-26 masker. Nu fortsættes der på samme måde, men uden at tage ud på hver side af mærketråden, til det er strikket frem og tilbage over alle masker. ”

23.11.2023 - 11:01

DROPS Design answered:

Hei Gitte. Du fortsetter å strikke på samme måte, altså på neste pinne strikker du til det gjenstår 1 maske - husk at nå skal det ikke økes ved merketråden, snu. Strikk vrang til det gjenstår 1 maske. Snu, strikk rett over alle masker, snu strikk vrang over alle masker. Sett 1 merke midt på pinnen - dette merket skal brukes senere til å måle fotens lengde fra. mvh DROPS Design

27.11.2023 - 07:56

country flag Britt Angell Nilsen wrote:

Hei:) Jeg har fått noen nøster Drops Snow garn. På "magebåndet" står det at man bør bruke pinne 9mm! På denne oppskriften anbefaler dere settpinner 6 ? Hva skal jeg bruke? Takk for svar:)

24.04.2023 - 09:52

DROPS Design answered:

Hei Britt. Pinne str. er kun en generell veiledning. Det kan forandre seg ut fra hva man skal strikke. Til sokker er det kjekt at de er stramt strikket slik at det holder seg bedre og sitter godt på foten. mvh DROPS Design

24.04.2023 - 14:11

country flag Heike Sanford wrote:

The amount of yarn needed for these socks is incorrect! You only need 100 g in light grey and 50 g for the off white. And there would still be plenty of yarn left.

13.04.2023 - 19:44