
Popular categories
Looking for a yarn?


|
|||||||
Silver Skyline |
|||||||
 |
 |
||||||
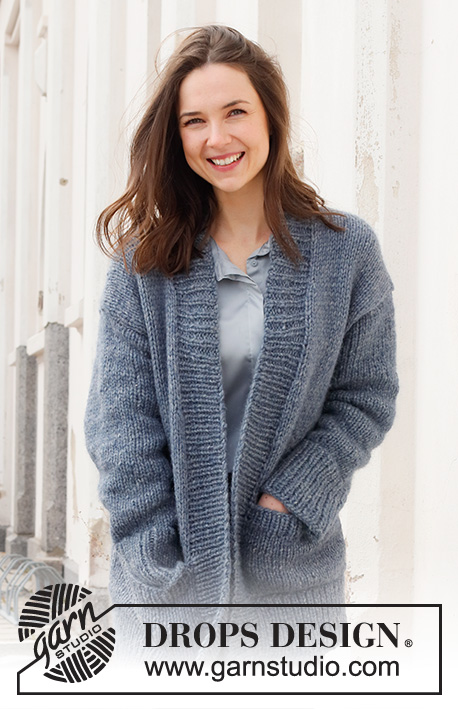
Knitted jacket in DROPS Wish or DROPS Andes. The piece is worked top down, with round yoke and double neck. Sizes
DROPS 228-34 |
|||||||
|
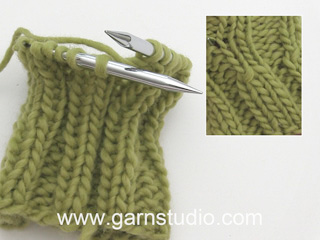
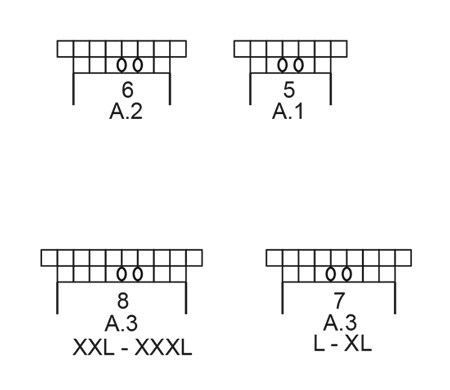
------------------------------------------------------- EXPLANATIONS FOR THE PATTERN: ------------------------------------------------------- RIDGE/GARTER STITCH (worked back and forth): Knit all rows. 1 ridge = knit 2 rows. PATTERN: See diagrams A.1 to A.3. Choose diagram for your size (applies to A.3 in sizes L, XL, XXL and XXXL). The diagrams show all rows in the pattern from the right side. INCREASE TIP (evenly spaced): To work out how to increase evenly, count the total number of stitches on the needle (e.g. 66 stitches) minus the bands (e.g. 8 stitches) and divide the remaining stitches by the number of increases to be made (e.g. 11) = 5.5. In this example, increase by making 1 yarn over after alternately each 5th and 6th stitch. Do not increase on the bands. On the next row work the yarn overs twisted to avoid holes. DECREASE TIP (for sleeves): Decrease 1 stitch on either side of the marker thread as follows: Work until there are 3 stitches left before the marker thread, knit 2 together, knit 2 (marker thread sits between these 2 stitches), slip 1 stitch as if to knit, knit 1 and pass the slipped stitch over the knitted stitch (2 stitches decreased). BUTTONHOLES: Work buttonholes on the right band (when the garment is worn). Work from the right side when there are 3 stitches left on the row as follows: Make 1 yarn over, knit 2 together and knit 1. On the next row (wrong side), knit the yarn over to leave a hole. The first buttonhole is worked on the first row after the rib on the neck. Then the other 5-5-6-6-6-6 buttonholes are worked with approx. 9½-10-9-9-9½-9½ cm = 3 5/9"-4"-3½"-3½"-3 5/9"-3 5/9" between each one. BINDING-OFF TIP: To avoid the bind-off edge being tight you can bind off with a larger size needle. If the edge is still tight, make 1 yarn over after approx. each 6th stitch at the same time as binding off; the yarn overs are bind off as normal stitches. ------------------------------------------------------- START THE PIECE HERE: ------------------------------------------------------- JACKET – SHORT OVERVIEW OF THE PIECE. The neck and yoke are worked back and forth with circular needle, from mid front and top down. The yoke is divided for body and sleeves and the body continued back and forth with circular needle. The sleeves are worked in the round with double pointed needles/short circular needle, top down. DOUBLE NECK: Cast on 80-85-90-90-95-100 stitches (including 4 band stitches on each side towards mid-front) with circular needle size 6 MM = US 10 and DROPS Wish or DROPS Andes. Purl 1 row (= wrong side). The next row is worked as follows from the right side: 4 band stitches in GARTER STITCH – read description above, * knit 2, purl 3 *, work from *-* until there are 6 stitches left, knit 2 and 4 band stitches in garter stitch. When the rib measures 4 cm = 1½", decrease 1 stitch in each purled section = 66-70-74-74-78-82 stitches. Continue the new rib until the neck measures 16 cm = 6¼". When the rib is finished, knit 1 row where you increase 11-12-13-18-24-25 stitches evenly spaced – read INCREASE TIP = 77-82-87-92-102-107 stitches. Remember the BUTTONHOLES on the right band – read description above. Purl 1 row from the wrong side (yarn overs purled twisted and bands knitted). Change to circular needle size 8 MM = US 11. Insert 1 marker after the band at the beginning of the row; the yoke is measured from this marker! YOKE: Continue with stockinette stitch and 4 band stitches in garter stitch on each side. REMEMBER THE KNITTING GAUGE! When the piece measures 4 cm = 1½" from the marker increase as follows: INCREASE 1: 4 band stitches in garter stitch, 2 stitches in stockinette stitch, A.1 until there are 6 stitches left (= 13-14-15-16-18-19 repeats of 5 stitches), 2 stitches in stockinette stitch, 4 band stitches in garter stitch. When A.1 has been completed there are 103-110-117-124-138-145 stitches. Continue with stockinette stitch and 4 band stitches in garter stitch on each side until the piece measures 9-10-10-11-12-13 cm = 3½"-4"-4"-4⅜"-4¾"-5⅛" from the marker. INCREASE 2: 4 band stitches in garter stitch, 3-3-4-4-5-3 stitches in stockinette stitch, A.2 until there are 6-7-7-8-9-6 stitches left (= 15-16-17-18-20-22 repeats of 6 stitches), 2-3-3-4-5-2 stitches in stockinette stitch, 4 band stitches in garter stitch. When A.2 has been completed there are 133-142-151-160-178-189 stitches on the needle. Continue with stockinette stitch and 4 band stitches in garter stitch on each side until the piece measures 14-16-17-19-20-22 cm = 5½"-6¼"-6¾"-7½"-8"-8¾" from the marker. Continue the different sizes as follows: SIZES S and M: 4 band stitches in garter stitch, 3-4 stitches in stockinette stitch, A.2 until there are 6-8 stitches left (= 20-21 repeats of 6 stitches), 2-4 stitches in stockinette stitch, 4 band stitches in garter stitch. When A.2 has been completed there are 173-184 stitches. SIZES L, XL, XXL and XXXL: 4 band stitches in garter stitch, 2-3-5-3 stitches in stockinette stitch, A.3 – choose diagram for your size, until there are 5-6-9-6 stitches left (= 20-21-20-22 repeats of 7-7-8-8 stitches), 1-2-5-2 stitches in stockinette stitch, 4 band stitches in garter stitch. When A.3 has been completed there are 191-202-218-233 stitches. ALL SIZES: Continue with stockinette stitch and 4 band stitches in garter stitch on each side until the piece measures 20-22-24-26-28-30 cm = 8"-8¾"-9½"-10¼"-11"-11¾" from the marker – adjust so the next row is from the wrong side. Now divide for the body and sleeves as follows: Work 28-29-31-32-36-39 stitches (= right front piece), place the next 35-37-38-40-40-42 stitches on 1 thread for the sleeve, cast on 4-6-8-8-10-10 stitches (= in side under sleeve), work 47-52-53-58-66-71 stitches (= back piece), place the next 35-37-38-40-40-42 stitches on 1 thread for the sleeve, cast on 4-6-8-8-10-10 stitches (= in side under sleeve), work the remaining 28-29-31-32-36-39 stitches (= left front piece). The body and sleeves are finished separately. THE PIECE IS NOW MEASURED FROM HERE! BODY: = 111-122-131-138-157-169 stitches. Continue with stockinette stitch and 4 band stitches in garter stitch on each side for 30 cm = 11¾". Try the jacket on and work to desired length – there is approx. 4 cm = 1½" left to finished length. Knit 1 row from the right side and increase 23-24-27-28-32-33 stitches evenly spaced = 134-146-158-166-190-202 stitches. Change to circular needle size 6 MM = US 10 and work rib as follows: 4 band stitches in garter stitch, * knit 2, purl 2 *, work from *-* until there are 6 stitches left, knit 2 and 4 band stitches in garter stitch. Continue this rib for 4 cm = 1½". Bind off with knit over knit and purl over purl – read BINDING-OFF TIP. The jacket measures approx. 58-60-62-64-66-68 cm = 22¾"-23⅝"-24⅜"-25¼"-26"-26¾" from the shoulder down. SLEEVES: Place the 35-37-38-40-40-42 stitches from the thread on the one side of the piece on double pointed needles/short circular needle size 8 MM = US 11 and knit up 1 stitch in each of the 4-6-8-8-10-10 stitches cast on under the sleeve = 39-43-46-48-50-52 stitches. Insert a marker thread in the middle of the new stitches under the sleeve. Allow the thread to follow your work onwards; it will be used when decreasing. Start at the marker thread and work stockinette stitch in the round for 4 cm = 1½". Now decrease 2 stitches under the sleeve – read DECREASE TIP. Decrease like this every 6-5-3½-3-3-2 cm = 2⅜"-2"-1¼"-1⅛"-1⅛"-¾" a total of 6-7-8-9-9-10 times = 27-29-30-30-32-32 stitches. Continue working until the sleeve measures 37-35-34-32-30-28 cm = 14½"-13¾"-13⅜"-12½"-11¾"-11" (shorter measurements in larger sizes due to wider neck and longer yoke). Try the jacket on and work to desired length – approx. 8 cm = 3⅛" to finished length. Knit 1 round and increase 5-7-6-10-8-8 stitches evenly spread = 32-36-36-40-40-40 stitches. Change to double pointed needles size 6 MM = US 10 and work rib (knit 2, purl 2) for 8 cm = 3⅛". Bind off with knit over knit and purl over purl – remember BINDING-OFF TIP. The sleeve measures approx. 45-43-42-40-38-36 cm = 17¾"-17"-16½"-15¾"-15"-14¼" from the division. Work the other sleeve in the same way. ASSEMBLY: Fold the neck double to the inside and sew down. To avoid the neck being tight and rolling outwards, it is important that the seam is elastic. Sew together the ends of the neck with small stitches. Sew the buttons onto the left band. |
|||||||
Diagram explanations |
|||||||
|
|||||||
|
|||||||

|
|||||||
|
Have you made this or any other of our designs? Tag your pictures in social media with #dropsdesign so we can see them! Do you need help with this pattern?You'll find tutorial videos, a Comments/Questions area and more by visiting the pattern on garnstudio.com. © 1982-2024 DROPS Design A/S. We reserve all rights. This document, including all its sub-sections, has copyrights. Read more about what you can do with our patterns at the bottom of each pattern on our site. |
|||||||


With over 40 years in knitting and crochet design, DROPS Design offers one of the most extensive collections of free patterns on the internet - translated to 17 languages. As of today we count 304 catalogs and 11422 patterns - 11417 of which are translated into English (US/in).
We work hard to bring you the best knitting and crochet have to offer, inspiration and advice as well as great quality yarns at incredible prices! Would you like to use our patterns for other than personal use? You can read what you are allowed to do in the Copyright text at the bottom of all our patterns. Happy crafting!
Comments / Questions (10)
SVP, Pourquoi il y a une tel différence de besoin en laine entre la Drop Snow et la Drop Andes; soit 166% de plus alors que le nombre de mailles et de rangs est le même pour les deux échantillons et qu'il n'y a qu'une différence de 5 mètres de moins pour 50 mètres pour la Drop Andes ?
22.11.2023 - 06:37DROPS Design answered:
Bonjour Catherine, Andes se présente sous la forme de pelotes de 100 g / 90 m et Wish sous forme de 50 g / 70 m; autrement dit pour 500 g Wish, on a 700 m, et pour 700 m Andes, il faut 7,77 pelotes Andes, soit 800 g. Bon tricot!
22.11.2023 - 09:12Habe die Jacke in XXXL mit Andes gestrickt. 1300 g sehr großzügig bemessen. Obwohl ich die Ärmel 4 cm länger und das Rumpfteil ca. 10 cm länger gestrickt habe, habe ich nur ca. 1150 g verbraucht. (Dabei hatte ich extra mehr bestellt, weil ich sie länger haben wollte.)
07.02.2023 - 20:52Dear all, is it possible to use PUNA for the pattern 228-34 which is knitted with WISH??? If yes, how much yarn will be required??? Many thanks for the beautiful models and patterns!!!
08.07.2022 - 15:40DROPS Design answered:
Dear Vasiliki Orphanou! Please lookyarn alternative lesson here. Try knitting a swatch with 2 yarns of Puna and see if you get similar knitting tension. Happy knitting!
08.07.2022 - 21:27Is een mooi patroon en verstaanbare uitleg
27.04.2022 - 08:44Silver Skyline-koftan. Förstår inte följande direktiv: "När resåren mäter 4 cm, minskas det 1 maska i varje avigt parti = 66-70-74-74-78-82 maskor." Vad menas med varje avigt parti? I resårstickningen för halsen räknar jag till 23 ggr aviga maskor. Förstår inte hur jag ska minska 16 m, och varför jag efter att halsen är färdigstickad ska öka endast 13 m? Jag stickar således L d.v.s. 90 m till att börja med som sedan ska minskas till 74. Och slutligen ökas med endast 13 m.
22.11.2021 - 09:31DROPS Design answered:
Hej Laila. Du har ska ha 16 partier med aviga maskor om du stickar storlek L. 90m - (4 m x 2) framkantsmaskor - 2 rm = 80m som ska stickas resår. 80m/5m= 16 partier. Du ökar och minskar på detta sätt för att resåren ska blir fin/passa när den sedan viks. Mvh DROPS Design
22.11.2021 - 09:50Hola. Podría utilizar drops snow para este modelo? Gracias.
29.09.2021 - 12:27DROPS Design answered:
Hola Catalina, si claro. Buen trabajo!
29.09.2021 - 14:29Danke für die zauberhaften neuen Modelle. Viele Grüße
06.08.2021 - 19:38Danke für die zauberhaften neuen Modelle. Viele Grüße
06.08.2021 - 19:37Beautiful
05.08.2021 - 05:16I would call this cardigan " imbrase" as it seems just as cozy as a hug.
03.08.2021 - 14:48