
Looking for a yarn?


Comments / Questions (20)
![]() Paola wrote:
Paola wrote:
Je tricote le dos . je souhaite savoir si quand je glisse les 6 mailles du biais je les tricotes puis je glisse. Ou je glisse et je laisse en attente.
11.08.2025 - 14:48DROPS Design answered:
Bonjour Paola, tricotez les mailles avant de les mettre en attente, ainsi, vous n'aurez pas à couper le fil. Bon tricot!
11.08.2025 - 16:45
![]() Vermeeren Lutgarde wrote:
Vermeeren Lutgarde wrote:
Voor het rechtervoorpand: Als ik het goed begrijp begin je met de voorbies vanaf dat je de steken hebt afgekant voor het armsgat aan de andere zijde en dit tot in de kraag (24 steken voor mijn maat)?
03.01.2025 - 16:07
![]() Lutgarde Vermeeren wrote:
Lutgarde Vermeeren wrote:
Een vraag over de voorbiezen: Zo voorkomt u dat de ribbels in de voorbiezen in elkaar trekken in de hoogte: brei 1 ribbel over alleen de buitenste 20-20-20-24-28-28 steken na ongeveer elke 5 cm. In het rechtervoorpand staat dat als je 2 ribbels hebt gebreid je met de knoopsgaten moet beginnen, loopt de voorbies erna door tot boven? Of mag je maar 1 ribbel breien elke 5 cm?
26.12.2024 - 10:20DROPS Design answered:
Dag Lutgarde,
De voorbies loopt inderdaad door tot het einde en het zijn nu de buitenste 20-20-20-24-28-28 steken in plaats van 4 steken. Dus de bies loopt eigenlijk door in de kraag.
02.01.2025 - 20:36
![]() Lutgarde Vermeeren wrote:
Lutgarde Vermeeren wrote:
Op het einde van het rugpand staat geschreven: Begin aan de goede kant en brei recht over alle steken, maar voorkom gaatjes in de overgangen, waar steken op de draad zijn gezet: neem de dwarsdraad op tussen 2 steken en brei deze gedraaid recht samen met de eerste steek op de linkernaald. Ik begrijp niet goed welke dwarsdraden ik moet opnemen ? Alvast bedankt voor het antwoord.
19.10.2024 - 13:45DROPS Design answered:
Dag Lutgarde,
De draad die de 2 steken van de vorige naald op de rechter en linker naald met elkaar verbind zet je op de linker naald en deze brei je gedraaid samen met de eerstvolgende steek op de linker naald.
20.10.2024 - 18:56
![]() Vermeeren Lutgarde wrote:
Vermeeren Lutgarde wrote:
Bij de beschrijving van de knoopsgaten staat 1 omslag, bedoelen ze dat het gaatje maar 1 steek betreft, of moet je meerdere omslagen na mekaar doen om een groter knoopsgat te verkrijgen, las dat de knopen 22 mm zijn. Alvast bedankt voor je antwoord.
06.06.2024 - 13:16DROPS Design answered:
Dag Vermeeren Lutgarde,
Om een knoopsgat te maken brei je 2 steken samen en maak je direct daarna een omslag. Op de volgende naald brei je de omslag, recht zodat er een gaatje ontstaat. Dit gaatje zou voldoende groot moeten zijn voor de knoop.
12.06.2024 - 16:48
![]() Monika wrote:
Monika wrote:
Hallo zusammen, eine Frage zum Rückenteil. Ich stricke Größe M mit 110 M, jetzt kommt die Schulterschräge dazu sind beidseitig 6x6M und 1x10 M stillzulegen, ergibt für mich einen Rest von 18 Maschen. Zusätzlich sollen für den Halsausschnitt 19 M und dann beidseitig 2 M abgekettet werden. Soviele habe ich gar nicht mehr. Wo liegt hier mein Fehler ?
17.10.2021 - 14:44DROPS Design answered:
Liebe Monika, es soll auch bei der 7. Reihe zugenommen werden = 121 M. Dann nehmen Sie 3 M beidseiting für den Armausschnitt = 115 M; es sind 19 M + 2 M auf beiden Seiten für den Halsausschnitt abgekettet (= totalt 2+19+2=23 M) und die verkürzten Reihen 6 Mal auf 6 Maschen gestrickt = 10 M Schulter + (6M x 6) + 23 M + (6 M x 6) + 10 M Schulter = 115 M. Kann es Ihnen helfen?
18.10.2021 - 09:25
![]() Jose Gagnon wrote:
Jose Gagnon wrote:
I’am having a problem with the back piece. For size large I have 19 stiches in the middle and it measures 64cm. When I finish the shoulders it says that it should measure 66 cm at the highest point of the shoulder. I followed the pattern as best I could and it measures 61 cm at the highest. Each piece is now finished but I seemed to have a problem with the assembly of the back. Anyone can help me by maybe show me a picture of the back piece completed so I can see what’s wrong ?
28.03.2021 - 19:11DROPS Design answered:
Dear Mrs Gagnon, you cast off for neck when piece measures 64 cm then continue each shoulder separately for 2 more cm continuing to slip sts for shoulder on a thread= piece measures 66 cm in total. Now work 1 row from RS over the 50 sts on shoulder, 1 row from WS and cast off (= 1 ridge on top of shoulder). Hope this helps. Happy knitting!
06.04.2021 - 08:27
![]() Lianne Ippel wrote:
Lianne Ippel wrote:
Ik heb een vraag over het rechter voorpand en dan met name de tip voor het breien: de buitenste 20 steken zijn dat de bedoelen ze dan de voorbies steken (Dus rechts aan de goede kant) of juist de steken aan de andere kant (links aan de goede kant) ?
10.07.2020 - 16:58DROPS Design answered:
Dag Lianne,
Ja, deze tip voor het breien geldt inderdaad voor de 20 biessteken die bij het breien op het rechter voorpand aan de rechter kant zitten, gezien vanaf de goede kant.
12.07.2020 - 14:43
![]() Katja Schmidtpott wrote:
Katja Schmidtpott wrote:
Ik zie steeds vaker dat er op rondbreinaalden gebreid wordt. Ik vind het bijna onmogelijk om daarmee te breien. Is er een manier om zulke patroon om te zetten van rondbrei- naar normale naalden?
14.04.2019 - 22:41
![]() Heike wrote:
Heike wrote:
Liebes Garnstudio Team, ich habe die Jacke \"Zoey\" genau nach Maschenprobe in Größe L gestrickt und habe nun 4,5 Knäuel der Wolle übrig. In der Anleitung waren 800 g als Verbrauch angegeben. Ist das vielleicht ein Fehler, oder habe ich die Anleitung nicht richtig verstanden?
25.03.2019 - 08:23
|
||||||||||
Zoey#zoeycardigan |
||||||||||
 |
 |
|||||||||
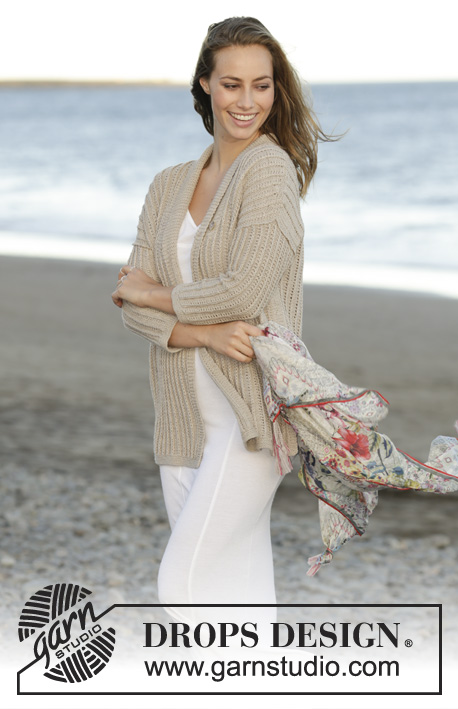
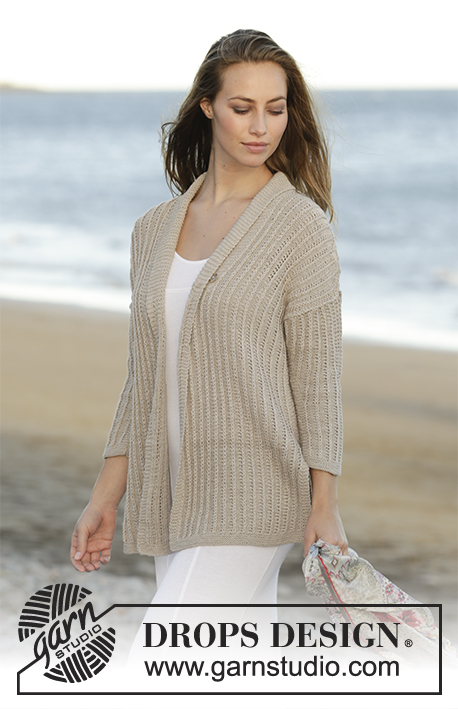
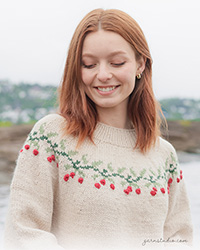
Knitted jacket with textured pattern in DROPS Cotton Merino. Sizes S - XXXL.
DROPS 178-3 |
||||||||||
|
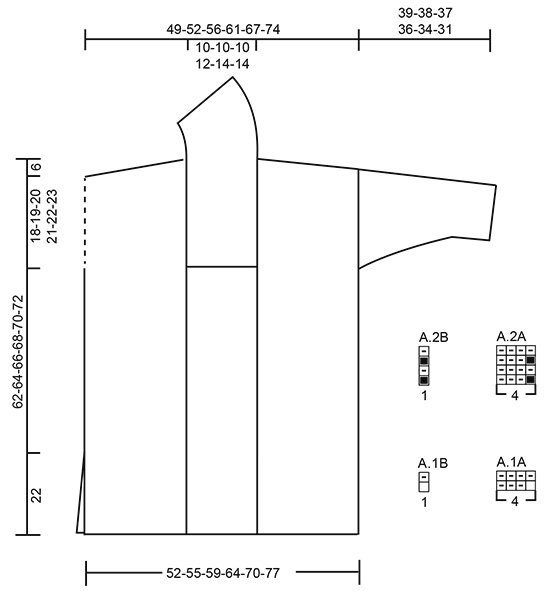
RIDGE/GARTER STITCH (worked back and forth): 1 ridge = Knit 2 rows. PATTERN: See diagrams A.1 and A.2. The diagrams show all the rows in the pattern seen from the right side. INCREASE TIP-1: To work out how to increase evenly, count the total number of stitches on the needle (e.g. 104 stitches), minus the edge stitches (e.g. 4 stitches in each side) and divide the remaining stitches by the number of increases to be made (e.g. 9) = 10.6. In this example increase after alternately the 10th and 11th stitch. Do not increase across the edge stitches. INCREASE TIP-2 (for the sleeves): All increases are from the right side! Increase as follows: Work 1 edge stitch in garter stitch, make 1 yarn over, work as before until there is 1 stitch left on the needle, make 1 yarn over and finish with 1 edge stitch in garter stitch (= 2 stitches increased). On the next row knit the yarn overs twisted to prevent holes (the increased stitches are worked in to A.2A as you go). KNITTING TIP (for the 20-20-20-24-28-28 band stitches towards mid front): To prevent the ridges in the band tightening in height work 1 ridge over just the outermost 20-20-20-24-28-28 stitches after approx. every 5 cm / 2". NOTE: When turning in the middle of the piece, tighten the strand before continuing to prevent holes. BUTTONHOLES: When you have worked 2 ridges over the 20-20-20-24-28-28 band stitches on the right front piece bind off from the right side for 2 buttonholes as follows: Knit 3, knit 2 together, make 1 yarn over, knit until there are 5 stitches left on the band, make 1 yarn over, knit 2 together and knit the final 3 band stitches. On the next row knit the yarn overs so that there are holes. ---------------------------------------------------------- JACKET: The piece is worked back and forth with circular needle in sections which are sewn together at the end. BACK PIECE: Cast on 104-110-118-128-140-154 stitches with circular needle size 3.5 mm / US 4 and Cotton Merino. Work 4 RIDGES – see description above. AT THE SAME TIME on row 7 (= right side) increase 9-11-11-13-13-15 stitches evenly along the row – READ INCREASE TIP-1 = 113-121-129-141-153-169 stitches. Change to circular needle size 4.5 mm / US 7 and work 2 rows stockinette stitch with 4 edge stitches in garter stitch in each side. The next row is worked as follows from the right side: 4 edge stitches in garter stitch, work A.1A until there are 5 stitches left on the needle (= 26-28-30-33-36-40 repeats of 4 stitches), work A.1B (= 1 stitch) and finish with 4 edge stitches in garter stitch. Work back as shown in A.1 with 4 edge stitches in garter stitch in each side. The next row is worked as follows from the right side: 4 edge stitches in garter stitch, work A.2A until there are 5 stitches left on the needle, work A.2B (= 1 stitch) and finish with 4 edge stitches in garter stitch. Continue A.2 upwards with 4 edge stitches in garter stitch in each. REMEMBER THE GAUGE! When the piece measures 38-39-40-41-42-43 cm / 15-15¼"-15¾"-16⅛"-16½"-17" bind off 3 stitches at the beginning of the next 2 rows for the armholes = 107-115-123-135-147-163 stitches. Continue A.2 as before with 1 edge stitch in garter stitch in each side. When the piece measures 56-58-60-62-64-66 cm / 22"-22¾"-23⅝"-24⅜"-25¼"-26" place the stitches on 1 thread in each side for the diagonal shoulders (to avoid cutting the strand you are working with work the stitches before placing them on the thread for the diagonal shoulder). Place the first 6-6-7-7-8-9 stitches at the beginning of the row on 1 thread, work the row and place the first 6-6-7-7-8-9 stitches at the beginning of the next row on 1 thread. Continue in this way by placing 6-6-7-7-8-9 stitches on the threads a total of 6 times in each side, then place the last 6-10-8-12-10-12 stitches on the thread for the diagonal shoulder in each side. AT THE SAME TIME when the piece measures 60-62-64-66-68-70 cm / 23⅝"-24⅜"-25¼"-26"-26¾"-27½" bind off the middle 19-19-19-23-27-27 stitches for the neck and then each shoulder is finished separately. Continue to place stitches on the thread for the diagonal shoulder and bind off 2 stitches on the next row from the neck. When all stitches have been bind off for the neck/placed on the thread there are 42-46-50-54-58-66 stitches on the thread on each shoulder and the piece measures approx. 62-64-66-68-70-72 cm / 24⅜"-25¼"-26"-26¾"-27½"-28⅜" from the highest point on the shoulder and down. Place the stitches from the thread on circular needle size 3.5 mm / US 4. Start from the right side and knit across all stitches, but to prevent holes in the transition where the stitches were placed on the thread, pick up the strand between 2 stitches and knit twisted together with the first stitch on the left-hand needle. Knit 1 row from the wrong side and bind off in knit from the right side (it is important that the bind-off edge is not tight). Work the other shoulder in the same way. RIGHT FRONT PIECE: Cast on 61-64-68-75-83-90 stitches with circular needle size 3.5 mm / US 4 and Cotton Merino. Work 4 ridges. AT THE SAME TIME on row 7 (= right side) increase 4-5-5-6-6-7 stitches evenly along the row = 65-69-73-81-89-97 stitches. Change to circular needle size 4.5 mm / US 7 and work 2 rows stockinette stitch with 4 edge stitches in garter stitch in each side. The next row from the right side is worked as follows: 4 band stitches in garter stitch towards mid front, work A.1A until there are 5 stitches left on the needle (= 14-15-16-18-20-22 repeats of 4 stitches), work A.1B (= 1 stitch) and finish with 4 edge stitches in garter stitch towards the side. Work back as shown in A.1 with 4 edge stitches in garter stitch in each side. The next row is worked as follows from the right side: 4 edge stitches in garter stitch, work A.2A until there are 5 stitches left on the needle, work A.2B (= 1 stitch) and finish with 4 edge stitches in garter stitch. Continue A.2 upwards with 4 edge stitches in garter stitch in each side. When the piece measures 38-39-40-41-42-43 cm / 15-15¼"-15¾"-16⅛"-16½"-17" bind off the first 3 stitches at the beginning of the row from the side (i.e. from the wrong side) for the armhole = 62-66-70-78-86-94 stitches. The next row is worked as follows from the right side: Work garter stitch across the first 20-20-20-24-28-28 stitches (= band – READ KNITTING TIP), continue A.2 as before until there is 1 stitch left on the needle and finish with 1 edge stitch in garter stitch towards the armhole. Continue the pattern as follows – Remember the BUTTONHOLES on the band – see description above. When the piece measures 56-58-60-62-64-66 cm / 22"-22¾"-23⅝"-24⅜"-25¼"-26" place stitches on 1 thread for the diagonal shoulder in the same way as for the back piece (the stitches are placed on the thread on every row from the wrong side), i.e. place 6-6-7-7-8-9 stitches on the thread a total of 6 times, then place the last 6-10-8-12-10-12 stitches on the thread. When all the 42-46-50-54-58-66 stitches are placed on the thread for the diagonal shoulder there are 20-20-20-24-28-28 band stitches remaining on the needle for the collar. Continue with garter stitch back and forth over these stitches as follows: * Work 1 ridge over all the stitches, work 1 ridge over just the outermost 16-16-16-20-24-24 stitches towards mid front *, repeat from *-* until the collar measures approx. 7-7-7-8-9-9 cm / 2¾"-2¾"-2¾"-3"-3½"-3½" innermost at the narrowest, measured from where the last stitches were placed on the thread for the diagonal shoulder and bind off loosely. Place the stitches from the thread on the shoulder back on to circular needle size 3.5 mm / US 4. Start from the right side and knit 2 rows in the same way as for the back piece before binding off in knit from the right side. LEFT FRONT PIECE: Cast on in the same way as for the right front piece and work as for the right front piece but in reverse. In other words, after the ridges at the start of the piece, work 2 rows stockinette stitch with 4 edge stitches in garter stitch in each side. The next row from the right side is worked as follows: 4 edge stitches in garter stitch, work A.1A until there are 5 stitches left on the needle (= 14-15-16-18-20-22 repeats of 4 stitches), work A.1B (= 1 stitch) and finish with 4 edge stitches in garter stitch towards mid front. Work back as shown in A.1 with 4 edge stitches in garter stitch in each side. When the piece measures 38-39-40-41-42-43 cm / 15-15¼"-15¾"-16⅛"-16½"-17" bind off the first 3 stitches at the beginning of the row from the side (i.e. from the right side) for the armhole = 62-66-70-78-86-94 stitches and finish the row as follows: 1 edge stitch in garter stitch towards the armhole, continue A.2 as before until there are 20-20-20-24-28-28 stitches left on the needle and work garter stitch over these stitches (= band). Continue the pattern in this way. When the piece measures 56-58-60-62-64-66 cm / 22"-22¾"-23⅝"-24⅜"-25¼"-26" place stitches on 1 thread for the diagonal shoulder in the same way as for the right front piece and back piece (the stitches are placed on the thread on every row from the right side). Work the rest of the left front piece in the same way as the right front piece. SLEEVE: Cast on 50-50-54-58-58-62 stitches with circular needle size 3.5 mm / US 4 and Cotton Merino. Work 4 ridges. AT THE SAME TIME on row 7 (= right side) increase 4 stitches evenly along the row in all sizes = 54-54-58-62-62-66 stitches. Change to circular needle size 4.5 mm / US 7 and work 2 rows stockinette stitch with 1 edge stitch in garter stitch in each side. The next row is worked as follows from the right side: 1 edge stitch in garter stitch, work A.1A until there is 1 stitch left on the needle (= 13-13-14-15-15-16 repeats of 4 stitches), finish with 1 edge stitch in garter stitch. Work back as shown in A.1A with 1 edge stitch in garter stitch in each side. The next row is worked as follows from the right side: 1 edge stitch in garter stitch, work A.2A until there is 1 stitch left on the needle, finish with 1 edge stitch in garter stitch. Continue A.2A with 1 edge stitch in garter stitch in each side. When the piece measures 5-5-4-3-3-5 cm / 2"-2"-1½"-1"-1"-2" increase 1 stitch in each side – READ INCREASE TIP-2. Increase in this way a total of 14-16-16-16-18-18 times in S: Every 6th row, in M, L and XL: Alternately every 4th and 6th row, in XXL: Every 4th row and in XXXL: Alternately every 2nd and 4th row = 82-86-90-94-98-102 stitches on the needle. When the piece measures 37-36-35-34-32-29 cm / 14½"-14¼"-13¾"-13½"-12½"-11½" insert 1 marker in each side. Work 4 rows back and forth in A.2A as before, then bind off 5 stitches at the beginning of the next 2 rows before the remaining stitches are bind off (make sure the bind-off edge is not tight). Work the other sleeve in the same way. ASSEMBLY: Sew the shoulder seams inside the bind-off edge so that there are 2 ridges on the shoulder. Sew in the sleeves so that the seam is shown in the right side (the marker in each side of the sleeves should match with the armhole on the front and back pieces). Sew the seams under the sleeves inside the 1 edge stitch in garter stitch. Sew the side seams on the front and back pieces from the armhole and down – sew in the outermost loop of the outermost stitch so that the seam is flat, but stop when there is approx. 22 cm / 8¾" left in each side (= split). Sew the collar together mid back (make sure the seam turns in when the collar is turned down). Sew the collar to the neckline at the back of the neck. Sew the buttons onto the left band. |
||||||||||
Diagram explanations |
||||||||||
|
||||||||||
 |
||||||||||
Have you finished this pattern?Tag your pictures with #dropspattern #zoeycardigan or submit them to the #dropsfan gallery. Do you need help with this pattern?You'll find 31 tutorial videos, a Comments/Questions area and more by visiting the pattern on garnstudio.com. © 1982-2025 DROPS Design A/S. We reserve all rights. This document, including all its sub-sections, has copyrights. Read more about what you can do with our patterns at the bottom of each pattern on our site. |
||||||||||

With over 40 years in knitting and crochet design, DROPS Design offers one of the most extensive collections of free patterns on the internet - translated to 17 languages. As of today we count 319 catalogs and 12042 patterns - 12032 of which are translated into English (US/in).
We work hard to bring you the best knitting and crochet have to offer, inspiration and advice as well as great quality yarns at incredible prices! Would you like to use our patterns for other than personal use? You can read what you are allowed to do in the Copyright text at the bottom of all our patterns. Happy crafting!
Post a comment to pattern DROPS 178-3
We would love to hear what you have to say about this pattern!
If you want to leave a question, please make sure you select the correct category in the form below, to speed up the answering process. Required fields are marked *.