
Popular categories
Looking for a yarn?


Comments / Questions (6)
![]() Carina wrote:
Carina wrote:
Hola Esta chaqueta quedaría bien en Drops Alpaca? Gracias
27.11.2024 - 11:51DROPS Design answered:
Hola Carina, la chaqueta quedaría bien en Drops Alpaca :) No olvide hacer una muestra. Happy knitting!
28.11.2024 - 10:04
![]() Jelly Zwaan wrote:
Jelly Zwaan wrote:
Hallo, ik heb een vraag over het inzetten van de mouwen. Bij de laatste twee cm. moest ik averechtse tricotsteek breien. Op de foto's is dat averechtse randje niet te zien. Hoe zet ik de mouwen er in?
08.08.2024 - 11:37DROPS Design answered:
Dag Jelly,
Klopt, het is de bedoeling dat de 2 cm averechte tricotsteek wegvalt bij het innaaien van de mouwen en het functioneert als een beleg om over de naad van de panen heen vast te maken. Dit staat niet goed uitgelegd bij de afwerking in het Nederlandstalige patroon.
09.08.2024 - 13:31
![]() Tine Lindhardt Vindeløv wrote:
Tine Lindhardt Vindeløv wrote:
Fortsættelse af anden besked: Glemte lige. Jeg har lavet strikke prøve med 2 tråde Nord påmind 3,5 og det passer med denne model. Men det hjælper ikke, når jeg ikke kan styre 2 farver i hver 2 tråde ifm mønster
27.08.2023 - 19:24DROPS Design answered:
Hei Tine. Se vår kommentar på ditt forrige spørsmål. mvh DROPS Design
11.09.2023 - 08:17
![]() Tine Lindhardt Vindeløv wrote:
Tine Lindhardt Vindeløv wrote:
Planen var at lave denne jakke i Drop Nord - med 2tråde så det bliver en tyk tæt vinter jakke. Men jeg syntes det er for svært at strikke mønster med to farver, hvor hver er to tråde. Drop Nord var fordi den er flot, stikker vanter i den nu, og gætter den er slidstærk pga akrylen. Men er Karisma eller Lima slidstærk nok. Har lige haft en Fjellraven 100%uld cardigan, der blev slidt i stykker på albuerne, under armene og kanterne. Det vil jeg gerne undgå. Hvad vil I anbefale?
27.08.2023 - 19:22DROPS Design answered:
Hej Tine, hvis du hellere vil strikke den i en tråd, så kan du bruge 1 tråd fra garngruppe C (istedet for 2 fra A) og da kan vi anbefale DROPS Nepal eller DROPS Alaska :)
08.09.2023 - 15:03
![]() Britta wrote:
Britta wrote:
Wunderschön und wirklich tolle Farben. Aber ich würde mich niemals trauen, da am Ende mit der Schere ranzugehen...
23.08.2013 - 11:52
![]() Anik Julia Seehann wrote:
Anik Julia Seehann wrote:
Hallihallo, ich überlege, ob ich das Juli-Angebot nutze, um diese schöne Jacke zu stricken. Dazu wollte ich fragen, wie lang die Rundstricknadel am besten sein soll, da die Jacke ja komplett in Runden gestrickt wird. Ich würde es ganz prima finden, wenn in den Anleitung dazu eine Angabe gemacht werden könnte. Vielen Dank im voraus und für die tollen Ideen mit schöner Wolle. Herzliche Grüße Anik
18.07.2012 - 21:06DROPS Design answered:
Für solche Kleidungsstücke benutzt man in der Regel 80 cm Rundnadeln.
02.08.2012 - 18:04
|
||||||||||||||||
Prairie Ocean |
||||||||||||||||
 |
 |
|||||||||||||||
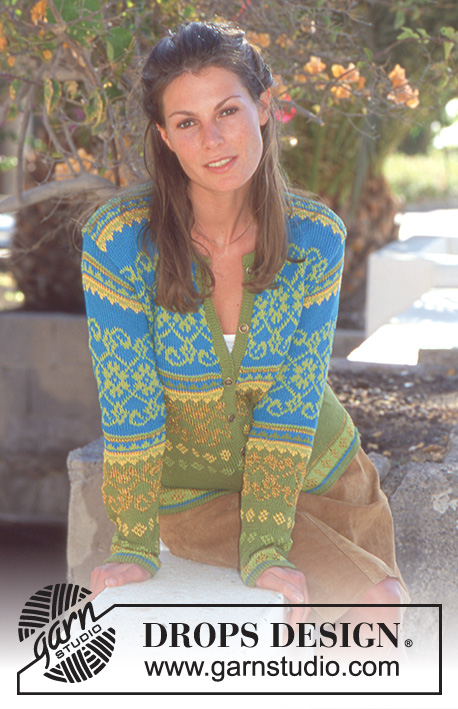
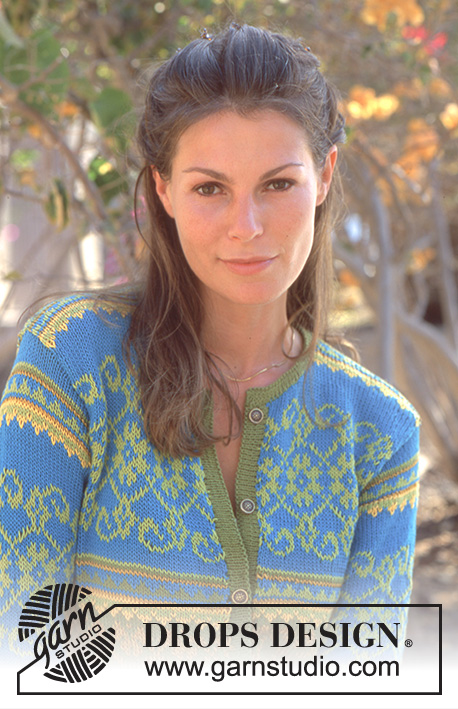
DROPS Cardigan in Safran and Cotton Viscose
DROPS 69-13 |
||||||||||||||||
|
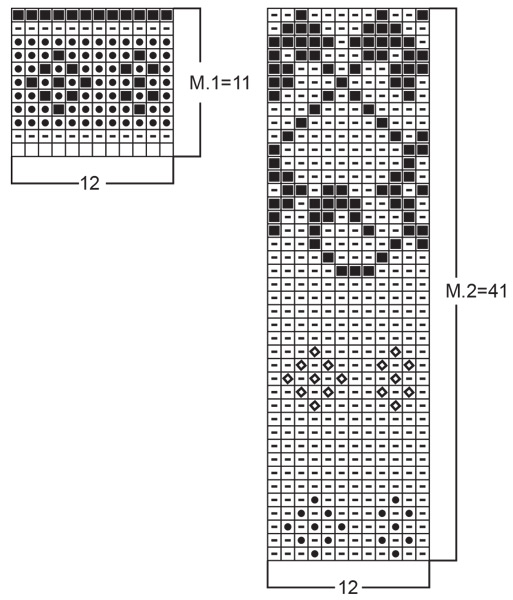
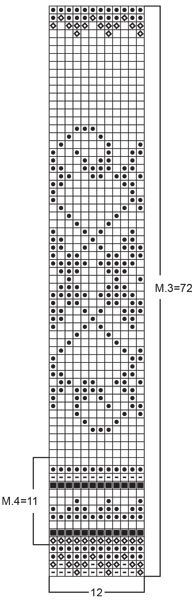
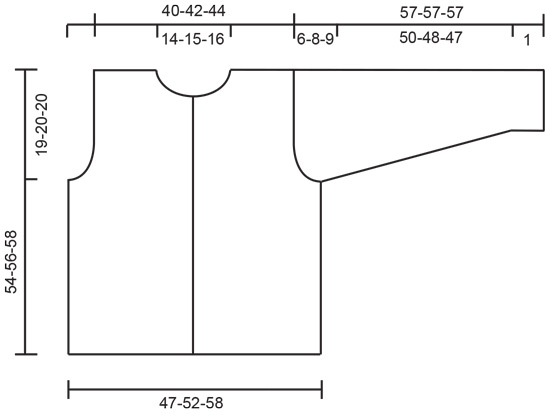
Gauge: 23 sts x 30 rows = 10 x 10 cm [4" x 4"] on larger needles in stockinette st. Border: Knit 4 rows stockinette st, P 1 row (right side row, for the folding edge - measure the piece from here), 4 rows stockinette st. Pattern: See charts. The pattern is seen from the right side and is knit entirely in stockinette st. «M.1 = 11 p = ca 4 cm» = «Pattern 1 = 11 rows = approx. 4 cm [1.5"]» «M.2 = 42 p = 14 cm» = «Pattern 2 = 42 rows = 14 cm [5.5"]» «M.3 = 72 p = 24 cm» = «Pattern 3 = 72 rows = 24 cm [9.5"]» «M.4 = 11 p = ca 4 cm» = «Pattern 4 = 11 rows = approx. 4 cm [1.5"]» Body: The cardigan is knit in the round after border with steeks for armholes and center front. Cast on 219-243-267 sts on smaller circular needles with olive green. Knit border back and forth on needles - see instructions above. Change to larger circular needles, inc 3 sts and join = 222-246-270 sts (the 3 new sts + 1 edge st from each side = 5 steek sts – do not knit these sts in the pattern). Knit Pattern 1 then continue with olive green. When the piece measures 12-14-16 cm [4.75"-5.5"-6.25"] knit Pattern 2, then Pattern 3 and then Pattern 4 (knit any rows remaining after Pattern 4 with turquoise to finished dimensions). At the same time, when the piece measures 35-36-38 cm [13.75"-14⅛"-14⅞"] knit the next row as follows: 5 steek sts at center front, 48-54-59 sts for the front, bind off 12-12-14 sts for armhole, 97-109-119 sts for the back, bind off 12-12-14 sts for armhole, 48-54-59 sts for the front. On the next row cast on 5 sts over the bound off armhole sts at each side (these sts are for the steek and are not knit in the pattern) = 208-232-252 sts. Then dec 1 st at each side of the 5 armhole steek sts every other row 2-5-8 times = 200-212-220 sts. When the piece measures 46-48-50 cm [18⅛"-18⅞"-19.75"] bind off the center front 17-19-21 sts (incl. 5 steek sts) for the neck = 183-193-199 sts. Knit the rest back and forth on needles. Bind off at each side for neck every other row: 2 sts 2 times and 1 st 6 times = 163-173-179 sts. When the piece measures 52-54-56 cm [20.5"-21.25"-22"] bind off the center back 29-31-33 sts for the neck. Dec 1 st at each back neck edge every other row 2 times = 65-69-71 sts at each side. Bind off when the piece measures 54-56-58 cm [21.25"-22"-22⅞"]. Sleeve: Cast on 48-48-60 sts on smaller double-pointed needles with olive green; join and place a marker at the join. Knit border - see instructions above. Change to larger double pointed needles and knit Pattern 1, then continue with olive green. When the piece measures 8 cm [3⅛"] inc 1 st each side of marker 17-19-14 times every 7-6-8 rows = 82-86-88 sts. At the same time when the piece measures 12 cm [4.75"] knit Pattern 2, the Pattern 3 and then Pattern 4, then knit the rest with turquoise. When sleeve measures 51-49-48 cm [20"-19.25"-18⅞"] divide piece at marker and knit back and forth on the needles. When the piece measures 54-52-51 cm [21.25"-20.5"-20"], put sts on st holders at each side every other row as follows: 3 sts 1 time, 2 sts 3-6-7 times and 3 sts 1 time. The piece measures approx. 57-57-57 cm [22.5"]. Put all sts back on needles and continue with turquoise. Knit reverse stockinette st for 2 cm [0.75"], increasing 10 sts evenly distributed on 1st row. Bind off. Assembly: Sew a marker thread in the center of the steek sts on either side and at the center front. Sew two machine seams around the marker thread, 1st seam = 1/2 st from the marker thread, 2nd seam = 1/2 st from first seam. Cut steeks for armholes and at the center front. Sew shoulder seams. Button band: Pick up approx. 110 to 120 sts along left button band on smaller circular needles with olive green. Knit as follows (seen from the right side): stockinette st for 2 cm [0.75"], P 1 row for the folding edge, stockinette st for 2 cm [0.75"]. Bind off. Repeat along right button band, but after 1 cm [⅜"] make 6 buttonholes evenly distributed along button band. Place the bottom buttonhole 1 cm [⅜"] from bottom edge and top buttonhole approx. 7-7.5-8 cm [2.75"-3"-3⅛"] from top edge (there will be a buttonhole on the neckband) – 1 buttonhole = bind off 2 sts and cast on 2 new sts on the next row. Make corresponding buttonholes on the facing. Fold button bands against wrong side and sew facings down. Neck: Pick up approx. 90 to 110 sts around the neck (incl. over button bands) on smaller needles with olive green. Knit as follows (seen from the right side): 5 rows stockinette st - at the same time after 2 rows make a buttonhole over the others on button bands, P 1 row for folding edge, 5 rows stockinette st. Make corresponding buttonhole on facing. Bind off. Fold neckband against wrong side and sew facing down. Assembly: Fold border around lower edge of Body and sleeves against wrong side and stitch down. Sew in sleeves and then fold facing on sleeve caps over cut edge on Body and stitch down. Sew on buttons. |
||||||||||||||||
Diagram explanations |
||||||||||||||||
|
||||||||||||||||
 |
||||||||||||||||
 |
||||||||||||||||
 |
||||||||||||||||
Have you finished this pattern?Tag your pictures with #dropspattern or submit them to the #dropsfan gallery. Do you need help with this pattern?You'll find 22 tutorial videos, a Comments/Questions area and more by visiting the pattern on garnstudio.com. © 1982-2026 DROPS Design A/S. We reserve all rights. This document, including all its sub-sections, has copyrights. Read more about what you can do with our patterns at the bottom of each pattern on our site. |
||||||||||||||||


With over 40 years in knitting and crochet design, DROPS Design offers one of the most extensive collections of free patterns on the internet - translated to 17 languages. As of today we count 325 catalogs and 12298 patterns - 12288 of which are translated into English (US/in).
We work hard to bring you the best knitting and crochet have to offer, inspiration and advice as well as great quality yarns at incredible prices! Would you like to use our patterns for other than personal use? You can read what you are allowed to do in the Copyright text at the bottom of all our patterns. Happy crafting!
Post a comment to pattern DROPS 69-13
We would love to hear what you have to say about this pattern!
If you want to leave a question, please make sure you select the correct category in the form below, to speed up the answering process. Required fields are marked *.