
Popular categories
Looking for a yarn?


Comments / Questions (42)
![]() Marie wrote:
Marie wrote:
Bonjour Je ne comprends pas comment tricoter le motif en effet miroir. Est ce qu’après la maille du milieu devant je dois continuer le diagramme de gauche à droite ? Merci de votre réponse
27.04.2026 - 16:28DROPS Design answered:
Bonjour Marie, tout à fait, notez quelle est votre dernière maille puis tricotez le motif en sens inverse en lisant de gauche à droite, ainsi il sera symétrique. Bon tricot!
28.04.2026 - 08:16
![]() Sylvie wrote:
Sylvie wrote:
Bonjour Je tricote la taille L/XL et je ne comprends pas les augmentations : si j’augmente de chaque côté de la maille avec marqueur 18 fois j’augmente 18X8 =144 Puis 25x4 =100 m J’arrive à 340 m et pas 276
24.03.2026 - 15:09DROPS Design answered:
Bonjour Sylvie, en fait, on va augmenter 19 fois au total au milieu devant et au milieu dos et 26 fois au total à chaque épaule (la 1ère fois + encore 18 / 25 fois), autrement dit, vous allez augmenter 19 x 2 m tous les 4 tours au milieu devant et au milieu dos (19x4=76 m), et, en même temps, augmenter 26 x 2 m à chaque épaule tous les 2 tours (26x4=102 m), vous aurez ainsi: 96+76+102=274 mailles. Bon tricot!
24.03.2026 - 15:49
![]() Liuba wrote:
Liuba wrote:
Buongiorno, vorrei adattare questo modello per una versione maschile. Come potrei farlo? Sarebbe bello trovare sul vostro sito qualche modello di poncho anche per gli uomini. Vi seguo da anni e colgo occasione di fare i miei più sinceri complimenti per il vostro lavoro. Vi ringrazio in anticipo
03.02.2026 - 15:10DROPS Design answered:
Buonasera Liuba, per un'assistenza così personalizzata può rivolgersi al suo rivenditore DROPS di fiducia. Buon lavoro!
04.02.2026 - 23:43
![]() Henriette wrote:
Henriette wrote:
Hej, jeg ville gerne strikke den her opskrift men jeg er meget i tvivl omkring garnet, jeg døjer med at komme til at klø af rent uld, men kan se garnet her er af kun 65 %uld. Findes der et andet garn man kan bruge eller vil alpacan gøre at det ikke klør ?
29.07.2025 - 11:47DROPS Design answered:
Hei Henriette. Om et garn klør eller ikke er ganske varierende fra person til person. Er du usikker, anbefaler jeg deg til å oppsøke en butikk som har garnet og hold det inntil halsen din. Da vil du fort kjenne om garnet er noe for deg. mvh DROPS Design
11.08.2025 - 14:18
![]() Marie-Pierre Guillot wrote:
Marie-Pierre Guillot wrote:
Je ne comprends pas comment en ayant 4 sections de 23 mailles on arrive à 96, non 23x 4 ça fait 92 donc il y a trop de mailles et pourtant c’est bien écrit qu’après le 3eme marqueur on tricote les 23 restantes mais il en reste 25…c’est bien mal expliqué et je suis bloquée
13.01.2024 - 20:27Marie-Pierre Guillot answered:
Ouf j’ai réussi donc ne tenez pas compte de ma question précédente.
13.01.2024 - 21:02
![]() Anita wrote:
Anita wrote:
Ik heb de meerdering gedaan zodat ik op 276 steken kom en mijn werk heeft de goede lengte. als het volgende stukje lees komt er dan de meerdering naar 280 steken meteen na de laatste meerdering in waarop je op 276 of kom er eerst nog een naald over heen in tricosteek?
08.02.2022 - 11:19DROPS Design answered:
Dag Anita,
Als je 276 steken op de naald hebt en de juiste lengte, brei je daarna 1 naald in tricotsteek waarbij je tegelijkertijd in diezelfde naald meerdert naar 280 steken.
11.02.2022 - 14:46
![]() Nicole S wrote:
Nicole S wrote:
Ich würde diesen Poncho gerne meiner Tochter sticken. Sie trägt im Moment die Grösse 152. Kann ich einfach 24 Maschen weniger als bei der grösse S anschlagen? Also mit 70 Maschen beginnen? Merci für Ihre Rückantwort.
11.05.2020 - 17:21DROPS Design answered:
Liebe Nicole, leider können wir jeder Anleitung nach jedem individuellen Frage anpassen und einzelne Modelle auf individuellen Wunsch hin umrechnen. Wenn sie Hilfe damit brauchen, wenden Sie sich bitte an Ihrem DROPS Laden, dort hilft man Ihnen gerne weiter. Viel Spaß beim stricken!
12.05.2020 - 09:11
![]() Alicia wrote:
Alicia wrote:
Bonjour ! Je me pose une question au niveau des diminutions. Je viens de finir le col en côtes sur 12cm. Il est écrit de répartir 32 diminutions sur le premier tour de jersey. Qu'entendez vous par là ? Merci d'avance.
12.01.2020 - 23:11DROPS Design answered:
Bonjour Alicia, vous tricotez 1 tour endroit sur vos 120 mailles, et diminuez 32 mailles à intervalles réguliers sur ce tour = il reste 88 m. découvrez ici comment diminuer à intervalles réguliers. Bon tricot!
13.01.2020 - 10:23
![]() Janke wrote:
Janke wrote:
Als reactie op de vraag van Janet: helpt het als je het telpatroon ondersteboven houdt? In dat geval klopt A1 volgens mij precies met de foto. En omdat je het patroon vanaf de hals (dus eigenlijk ondersteboven) breit, is dat misschien logisch. Ik vind het een geweldig patroon, ben aan het puzzelen op andere kleurtjes.
19.09.2018 - 13:11DROPS Design answered:
Hallo Janke, Dat is ook een goede tip. Dankjewel!
19.09.2018 - 16:02
![]() Janet wrote:
Janet wrote:
Ik wil beginnen met het inbreien, maar heb het idee dat ik een stuk van het telpatroon niet heb. Wat komt er na A1? A2 zou logisch zijn, maar er zit nog een patroon tussenin die niet hier op de site staat. Kunt u mij daaraan helpen?
15.09.2018 - 10:31DROPS Design answered:
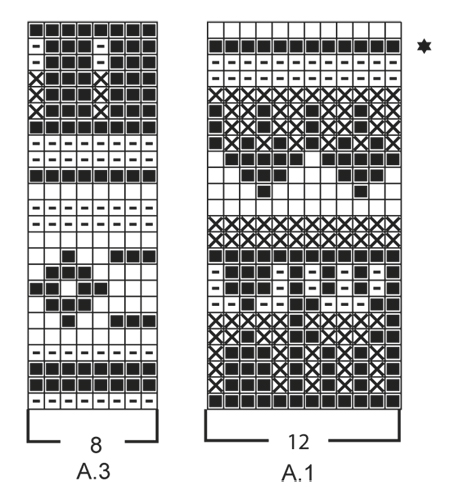
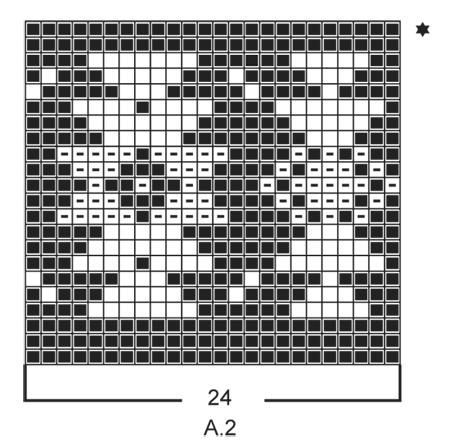
Dag Janet, Ik heb de telpatronen nagekeken, en alle telpatronen die je nodig hebt staan erop. Je breit van boven naar beneden en in telpatroon A.1 is zowel de rand met zwart als basiskleur, als de rand waarin beige/camel de hoofdtoon voert, opgenomen.
17.09.2018 - 12:47
|
||||||||||||||||
Southwest#southwestponcho |
||||||||||||||||
 |
 |
|||||||||||||||
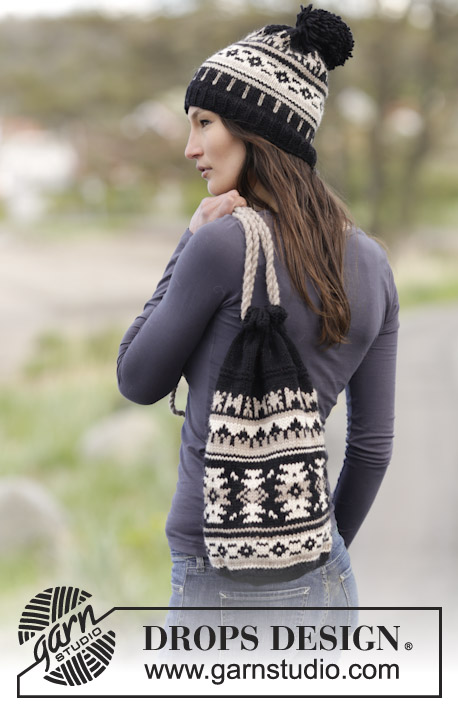
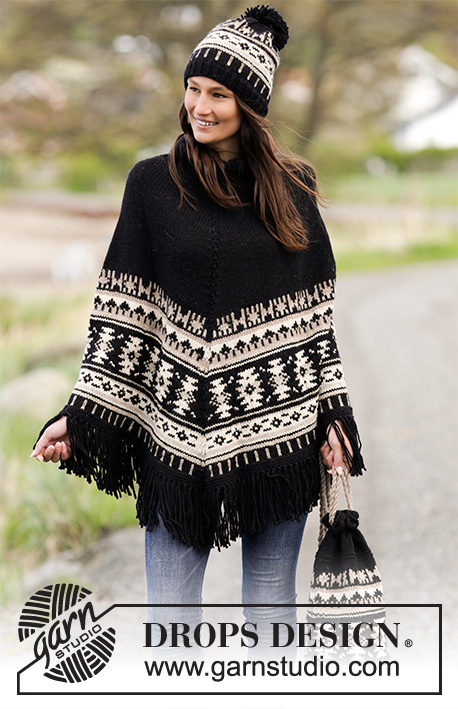
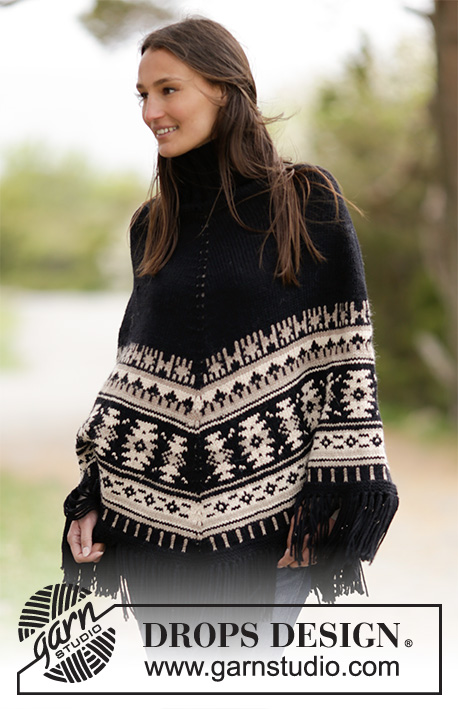
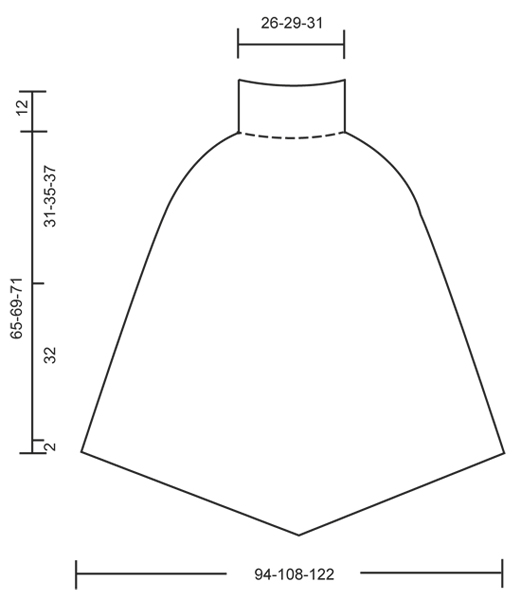
Knitted DROPS poncho with graphic pattern, fringes, high collar in rib, worked top down in ”Nepal”. Size: S - XXXL.
DROPS 165-20 |
||||||||||||||||
|
GARTER ST (worked in the round): * K 1 round and P 1 round *, repeat from *-*. 1 ridge = 2 rounds. PATTERN: See diagrams A.1 to A.3. All sts in pattern are worked in stockinette st. KNITTING TIP: To avoid the knitting gauge to tighten when working pattern, it is important not to tighten the strands on back side of piece. Switch to a higher needle no when working pattern if the pattern is somewhat tight. INCREASE TIP: Inc 1 st on each side of every marker by making a YO. On next round K YOs mid front and mid back to make holes. K YOs on each side of marker on shoulders twisted (i.e. work in back loop of st instead of front) to avoid holes. DECREASE TIP: Dec 1 st by K 2 sts tog. ---------------------------------------------------------- PONCHO: Worked in the round on circular needle, top down in stockinette st. Work neck in rib. Rounds start mid back. Cast on 120-132-144 sts on circular needle size 4.5 mm / US 7 with black. Work rib = K 3/P 3 for 12 cm / 4¾". Switch to circular needle size 5 mm / US 8. Work 2 rounds in stockinette st while on 1st round dec 32-36-40 sts evenly - READ DECREASE TIP = 88-96-104 sts. Insert a marker here. NOW MEASURE THE PIECE FROM HERE. Now insert 4 markers in the piece as follows: Insert a marker in first st (= mid back), work 21-23-25 sts, insert a marker in next st (= right shoulder), work 21-23-25 sts, insert a marker in next st, (= mid front), work 21-23-25 sts, insert a marker in next st (= left shoulder), work the remaining 21-23-25 sts. REMEMBER THE KNITTING GAUGE On next round beg inc. NOTE: Inc is different towards mid front/mid back and on each shoulder - READ INCREASE TIP. INCREASE MID FRONT AND MID BACK: Repeat inc on each side of st with marker every 4th round 16-18-19 more times. INCREASE ON EACH SHOULDER: Repeat inc on each side of st with marker every other round 18-25-34 more times. When inc are done, there are 232-276-324 sts on round and piece measures approx. 31-35-37 cm / 12¼"-13¾"-14½" from marker on neck (measured along inc mid back) as follows: Work 1 round in stockinette st while inc 0-4-4 sts (i.e. 0-2-2 sts on each side between marker mid front and mid back) = 232-280-328 sts. Then continue inc mid front and mid back every 4th round as before until finished measurements, AT THE SAME TIME work pattern - READ KNITTING TIP. NOTE: Work YOs and st with marker mid front and mid back in base color in pattern on every round until finished measurements. K 1 (= mid back), work A.1 (= 12 sts) 9-11-13 times in width, work the first 7 sts in A.1, K next st (= mid front), work A.1 9-11-13 times in width, work the first 7 sts in A.1. Continue like this in the round. Work the new inc sts in pattern, i.e. work st before st with marker in pattern from 8th st in A.1. Work st after st with marker so that the pattern is reversed on each side of st with marker. On next to last round in A.1 inc 4 sts evenly in all sizes (i.e. 2 sts in every section between st with marker front and back). When entire A.1 has been worked vertically, there are 260-308-356 sts on round. Now work as follows: K 1 (= mid back), work A.2 (= 24 sts) 5-6-7 times in width, work the first 9 sts in A.2, K 1 (= mid front), work A.2 5-6-7 times in width, work the first 9 sts in A.2. Continue like this in the round. Work the new inc sts in pattern, i.e. work st before st with marker in pattern from 10th st in A.2. Work st after st with marker so that pattern is reversed on each side of st with marker. On last round in A.2 inc 16 sts evenly in all sizes (i.e. 8 sts in every section between st with marker front and back). When entire A.2 has been worked vertically, there are 296-344-392 sts on round. Now continue with pattern as follows: K 1 (= mid back), work A.3 (= 8 sts) 18-21-24 times in width, work the first 3 sts in A.3, K next st (= mid front), work A.3 18-21-24 times in width, work the first 3 sts in A.3. Continue like this in the round. Work the new inc sts in pattern, i.e. work st before st with marker in pattern from 4th st in A.3. Work st after st with marker so that pattern is reversed on each side of st with marker. When entire A.3 has been worked vertically, there are 320-368-416 sts on round. Switch to circular needle size 4.5 mm / US 7 (or use 2 circular needles) and work 3 ridges in GARTER ST - see explanation above, with black, AT THE SAME TIME on first ridge inc 18-21-23 sts evenly = 338-389-439 sts. Bind off. Fasten off. FRINGES: Fasten fringes along the entire edge at the bottom as follows: 1 fringe = cut 2 lengths of 35 cm / 13¾" black. Place them double and thread loop through st in bind-off edge, pull the yarn ends through the loop. Repeat approx. every 4th st around the entire round - adjust to get a fringe in mid st front and back. Cut fringes to a length of approx. 13 cm / 5". ---------------------------------------------------------- Hat and bag: See DROPS 165-21 or "Related patterns" in pattern on website. ---------------------------------------------------------- |
||||||||||||||||
Diagram explanations |
||||||||||||||||
|
||||||||||||||||
 |
||||||||||||||||
 |
||||||||||||||||
 |
||||||||||||||||
Have you finished this pattern?Tag your pictures with #dropspattern #southwestponcho or submit them to the #dropsfan gallery. Do you need help with this pattern?You'll find 18 tutorial videos, a Comments/Questions area and more by visiting the pattern on garnstudio.com. © 1982-2026 DROPS Design A/S. We reserve all rights. This document, including all its sub-sections, has copyrights. Read more about what you can do with our patterns at the bottom of each pattern on our site. |
||||||||||||||||


With over 40 years in knitting and crochet design, DROPS Design offers one of the most extensive collections of free patterns on the internet - translated to 17 languages. As of today we count 324 catalogs and 12291 patterns - 12281 of which are translated into English (US/in).
We work hard to bring you the best knitting and crochet have to offer, inspiration and advice as well as great quality yarns at incredible prices! Would you like to use our patterns for other than personal use? You can read what you are allowed to do in the Copyright text at the bottom of all our patterns. Happy crafting!
Post a comment to pattern DROPS 165-20
We would love to hear what you have to say about this pattern!
If you want to leave a question, please make sure you select the correct category in the form below, to speed up the answering process. Required fields are marked *.