
Popular categories
Looking for a yarn?


Comments / Questions (55)
![]() Eva Juhlin wrote:
Eva Juhlin wrote:
Jag förstår inte hur jag ska göra när jag kommer till halskanten. Det står ” …sätts de yttersta 21 m i varje sida mot mitt fram på 1 tråd mitt fram till hals på de 2 nästa v”. Vad menas med de 2 nästa v? Ska jag göra detta i början av 2v?
22.10.2025 - 15:54DROPS Design answered:
Hei Eva. Jo, når arbeidet måler 51 cm strikk de 21 første maskene, sett de på en tråd. Strikk pinnen ut, snu, strikk de første 21 maskene og sett disse på 1 tråd. Nå har du satt masker på tråd og siden du strikket de først slipper du å klippe tråden. Fortsett frem og tilbake og fell til hals. mvh DROPS Design
27.10.2025 - 13:04
![]() Anna wrote:
Anna wrote:
Hej, jaki powinien być obwód rękawa w dolnej i środkowej części dla rozmiaru S? Na zdjęciu rękaw wygląda na przylegający do ciała, a mi wychodzi raczej luźny (poza ściągaczem). Pozdrawiam serdecznie ☺️ Ania
21.01.2025 - 16:23DROPS Design answered:
Witaj Aniu, na wys. 20 cm (po dodaniu 1-szych 2 oczek) rękaw ma 76 oczek, tzn. że jego obwód wynosi ok. 30 cm. Na wys. 49 cm będzie mieć ok. 33 cm obwodu. Jeżeli zależy Ci na węższym rękawie, to możesz: 1. zmienić rozmiar drutów, na którym go przerabiasz (na mniejsze), 2. nie dodawać 12 oczek za ściągaczem, albo dodać ich mniej. Osobiście wybrałabym drugą opcję i dostosowywała szerokość rękawa na bieżąco go przymierzając. Pozdrawiamy!
22.01.2025 - 08:14
![]() Sabine wrote:
Sabine wrote:
Hallo, ich würde den Cardigan gern mit einem geraden Rumpf, also ohne die schmalere Taille stricken. Was muss ich dafür anders machen? Haben Sie dafür einen Tipp? Viele Grüße, Sabine
04.01.2025 - 23:17DROPS Design answered:
Liebe Sabine, dann sollen Sie die Maschenanzahl beim Anschlag so anpassen, daß Sie schon die Maschenanzahl nach allen Zunahmen an den Seiten haben; beachten Sie, daß das Muster auch stimmt. Viel Spaß beim Stricken!
06.01.2025 - 09:33
![]() Inge wrote:
Inge wrote:
Hello, I love this pattern but I do not like the fact that it is knitted in the round. It is never very comfortable to wear these constructions, they lose their structure, and they are a bore to knit. So I am recalculating everything so that I can knit it in parts and sew it up. I do not mind the sewing, and it gives a better structure to the cardigan.
07.02.2023 - 01:50
![]() Catherine Gorecki wrote:
Catherine Gorecki wrote:
Bonjour, je viens de placer sur mon aiguille circulaire les mailles du corps et des manches, après avoir rabatues les mailles sous l'emmenchure. Je commence le raglan. J'ai beaucoup de mal à tricoter les mailles au niveau de la manche. Il y a une tension importante qui déforme le tricot en tirant sur les mailles. Avez-vous une astuce pour éviter cela ?
24.11.2021 - 04:37DROPS Design answered:
Bonjour Mme Gorecki, vous pouvez utiliser deux aiguilles circulaires ou laisser les mailles des manches sur les doubles pointes -ou même pourquoi pas la technique du magic loop pendant les premiers rangs, après quelques rangs, la tension aura disparu. Bonne continuation!
24.11.2021 - 07:56
![]() Jayne wrote:
Jayne wrote:
Hello, I am knitting Sweet as Honey and am confused with the yoke section. I am knitting size large, when the piece reaches 50cms the pattern says “slip the outermost 19 sts in each side towards mid front on 1 st holder for neck on the next 2 rows. Does this mean the stitches of A.1 (9sts) and 10sts of A.5A? If these are on a st holder won’t the bands be too short? Please can you help me to understand the pattern. I am so close to finishing it. Thank you very much.
06.08.2020 - 21:11DROPS Design answered:
Dear Jayne, the first 19 sts you put on a thread on each side are the 9 sts A.1/A.3 (= front band sts) + the 10 first/last stitches worked in A.5A/A.5D. In other words, at the beginning of RS row, work the first 19 sts as before and slip them on a thread for neck, finish row as before, turn, work the first 19 sts from WS as before and slip these sts on a thread, continue row as before, turn and cast off now at the beg of every row from each side (RS and WS) 3 sts 1 time and 2 sts 2 times then 1 st until raglan dec are done (at the same time, continue raglan decreases as before). Happy knitting!
07.08.2020 - 07:45
![]() Marit Eriksson wrote:
Marit Eriksson wrote:
Finnes denne modellen som genser også?
10.05.2020 - 12:29DROPS Design answered:
Hej Nej det gör den dessvärre inte. Mvh DROPS Design
11.05.2020 - 08:58
![]() Brigitte wrote:
Brigitte wrote:
Pour le dessin du dos en taille xl, ne faut-il pas tricoter A5C avant A5B pour avoir 3 petites torsades avant le point ajouré si l’on tricote le dos séparément des devants ?
06.12.2019 - 15:28DROPS Design answered:
Bonjour Brigitte, au milieu dos, on va tricoter en taille XL et vu sur l'endroit: A.5B (= 34 m: 2 m env, 2 petites torsades espacées de 2 m env puis le point ajouré), et A.5C (= 27 m: 2m env, 1 petite torsade, le point ajouré et 3 petites torsades espacées de 2 m env). Avant A.5B et après A.5C (entre le point fantaisie du devant droit et le dos +après le point fantaisie du dos et avant celui du devant gauche, on tricote les côtés en jersey). Bon tricot!
06.12.2019 - 16:13
![]() Kim wrote:
Kim wrote:
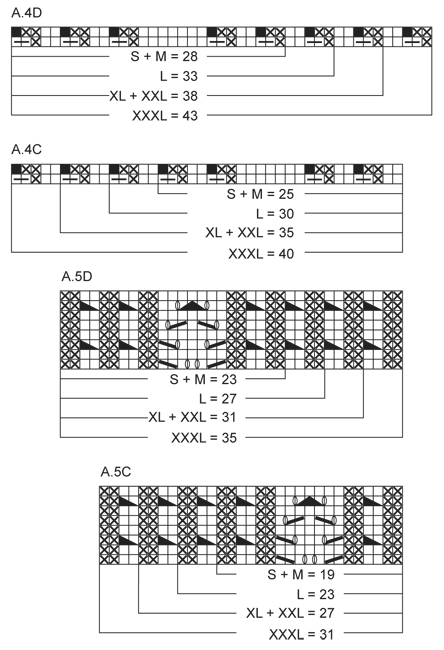
Pour le dos et les devants, après les côtes, je n’arrive pas à obtenir le même nombre de mailles total en commençant les diagrammes. Par exemple, en taille XXL : 9 (A.1) + 38 (A.4A) + 2 (torsade) + 68 (A.2 après 17 diminutions, car sur 85 m. j’ai 17 sections de 3 m. env.) + 38 (A.4B) + 35 (A.4C) + 2 (torsade) + 68 (même calcul) + 38 (A.4D) + 9 (A.3) = 307 mailles au lieu de 281 mailles. Pourriez-vous me dire où je me trompe ?
25.06.2018 - 17:40DROPS Design answered:
Bonjour Kim, au 1er rang de A.4A à D on diminue des mailles (= 2 m ens à l'env) soit 7 m dans A.4A et A.4D et 6 m dans A.4B et A.4C, ce sont les 26 m de différence que vous avez pour obtenir les 307 m. Bon tricot!
26.06.2018 - 08:13
![]() Jacqueline Veerbeek wrote:
Jacqueline Veerbeek wrote:
A4B eindigt met 5steken recht A4C niet die eindigt met een mindering Klopt dit wel de patroondelen zijn zo toch niet gelijk
08.06.2018 - 08:32DROPS Design answered:
Dag Jacqueline, A.4b en A.4c sluiten op elkaar en zijn a.h.w. elkaars spiegelbbeld. Het klopt dat ze op een verschillende manier eindigen. Als je het patroon precies volgt zoals beschreven zou je goed uit moeten komen.
08.06.2018 - 10:52
|
||||||||||||||||||||||||||||
Sweet As Honey#sweetashoneycardigan |
||||||||||||||||||||||||||||
 |
 |
|||||||||||||||||||||||||||
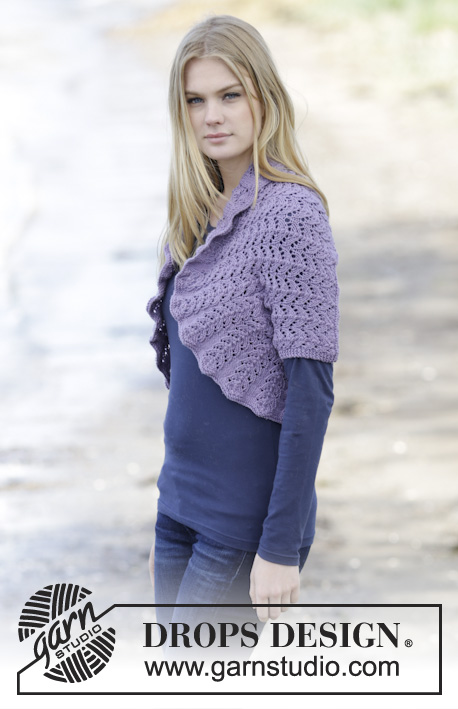
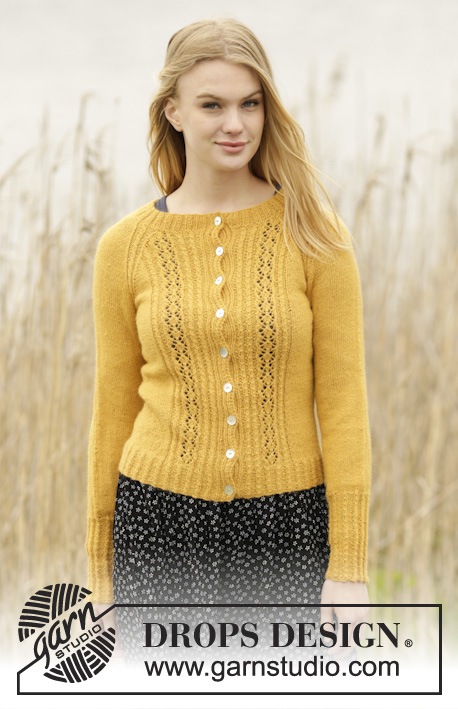
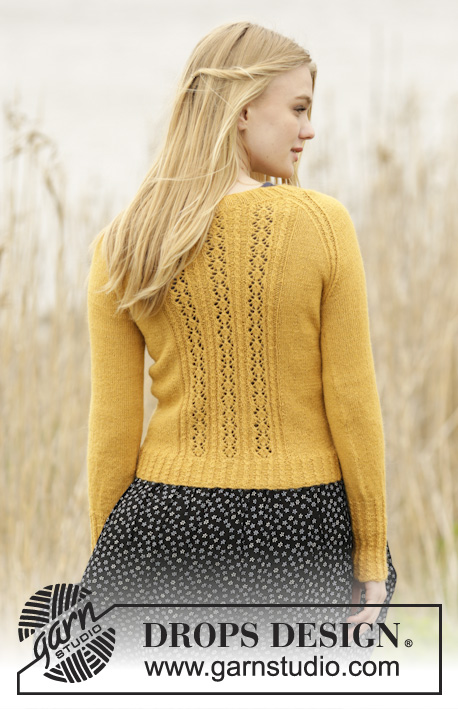
Knitted DROPS jacket with lace pattern, small cables and raglan in ”Alpaca”. Size: S - XXXL.
DROPS 166-42 |
||||||||||||||||||||||||||||
|
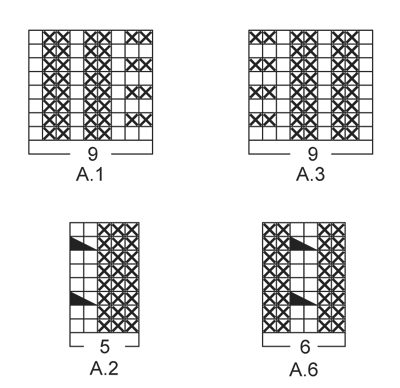
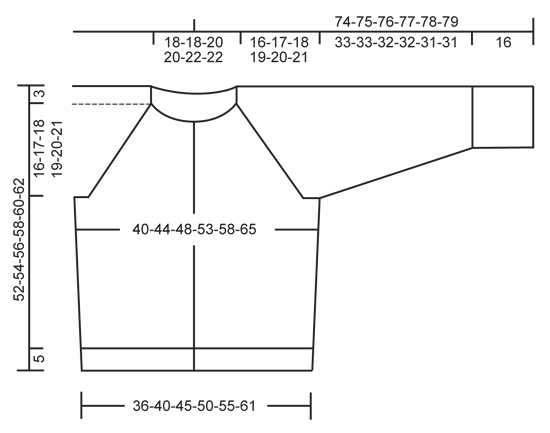
GARTER ST (back and forth): K all rows. 1 ridge = K2 rows. PATTERN: See diagrams A.1 to A.6. The diagrams show all rows in pattern seen from RS. BUTTONHOLES: Dec for buttonholes on right band. P tog fourth and fifth st from edge and make 1 YO. Dec for buttonholes when piece measures: SIZE S: 2, 8, 14, 20, 26, 32, 38 and 43 cm / ¾",3",5½",8",10¼",12½",15",17" SIZE M: 2, 8, 14, 20, 26, 32, 38 and 44 cm / ¾",3",5½",8",10¼",12½",15",17¼" SIZE L: 2, 8, 14, 20, 26, 32, 38 and 44 cm / ¾",3",5½",8",10¼",12½",15",17¼" SIZE XL: 2, 8, 15, 21, 28, 34, 41 and 47 cm / ¾",3",6",8¼",11",13½",16",18½" SIZE XXL: 2, 8, 15, 21, 28, 34, 41 and 47 cm / ¾",3",6",8¼",11",13½",16",18½" SIZE XXXL: 2, 9, 15, 22, 28, 35, 41 and 48 cm / ¾",3½",6",8¾",11",13¾",16",19" NOTE: Dec the last buttonhole on neck edge. INCREASE TIP: Beg 3 sts before marker in the side, make 1 YO, work 6 sts in stockinette st (marker is in the middle of these 6 sts), make 1 YO (= 2 sts inc). On next row work YOs twisted to avoid holes. Work inc sts in stockinette st. RAGLAN: Dec for raglan on each side of A.6. DEC AS FOLLOWS FROM RS: Beg 2 sts before A.6, K 2 tog, work A.6 (= 6 sts), slip 1 st as if to K, K 1, psso (= 2 sts dec). DEC AS FOLLOWS FROM WS: Beg 2 sts before A.6, P 2 twisted tog, work A.6 (= 6 sts), P 2 tog (= 2 sts dec). ---------------------------------------------------------- BODY: Worked back and forth on circular needle from mid front. Cast on 231-251-281-311-341-381 sts (includes 9 band sts each side towards mid front) on circular needle size 2.5 mm / US 1.5 with Alpaca. P 1 row from WS. Work next row as follows from RS: Work A.1 (= 9 band sts), work rib with cables according to diagram A.2 until 12 sts remain on needle, finish P 3 and A.3 (= 9 band sts). Continue rib like this until piece measures 5 cm / 2". Remember BUTTONHOLES on right band - see explanation above. Work next row as follows from RS: Work A.1 as before over band, work A.4A (= 28-28-33-38-38-43 sts), work the last 2 sts in A.2 (= cable), work A.2 as before over the next 50-60-65-70-85-95 sts AT THE SAME TIME dec all 3 P (in A.2) to 2 P by P 2 tog in every P-section, work A.4B (= 28-28-33-38-38-43 sts – see beg in diagram for correct size), work A.4C (= 25-25-30-35-35-40 sts), work the last 2 sts in A.2 (= cable), work A.2 as before over the next 50-60-65-70-85-95 sts AT THE SAME TIME DEC all 3 P (in A.2) to 2 P, work A.4D (= 28-28-33-38-38-43 sts – see beg in diagram for correct size) and finish with A.3 as before over band. When next row from WS has been worked with K over K and P over P as shown in diagram there are 193-209-233-257-281-313 sts on needle. Switch to circular needle size 3 mm / US 2.5 and work next row from RS as follows: Work A.1 as before over band, A.5A (= 23-23-27-31-31-35 sts), stockinette st over the next 42-50-54-58-70-78 sts, A.5B (= 26-26-30-34-34-38 sts – see beg in diagram for correct size), A.5C (= 19-19-23-27-27-31 sts), stockinette st over the next 42-50-54-58-70-78 sts, A.5D (= 23-23-27-31-31-35 sts – see beg in diagram for correct size) and finish with A.3 as before over band. Insert 1 marker 53-57-63-69-75-83 sts in from each side (= 87-95-107-119-131-147 sts between markers on back piece). Continue pattern like this. REMEMBER THE KNITTING GAUGE When piece measures 10 cm / 4", inc 1 st on each side of markers in the sides - READ INCREASE TIP (= 4 sts inc). Repeat inc every 4½-4½-6-6-6-6 cm / 1¾"-1¾"-2⅜"-2⅜"-2⅜"-2⅜" a total of 5-5-4-4-4-4 times = 213-229-249-273-297-329 sts. When piece measures 33-34-35-36-37-38 cm / 13"-13⅜"-13¾"-14¼"-14½"-15", work next row from WS as follows: Work 54-58-62-68-73-81 sts as before (= left front piece), bind off 8-8-10-10-12-12 sts for armhole, work 89-97-105-117-127-143 sts as before (= back piece), bind off 8-8-10-10-12-12 sts for armhole, work the remaining 54-58-62-68-73-81 sts as before (= right front piece). Put piece aside and knit the sleeves. SLEEVE: Worked in the round on double pointed needles. Cast on 60-60-65-65-70-70 sts on double pointed needles size 2.5 mm / US 1.5 with Alpaca. K 1 round. Then continue rib in the round according to diagram A.2. When piece measures 16 cm / 6¼", switch to double pointed needles size 3 mm / US 2.5. K 1 round while AT THE SAME TIME inc 12-12-13-13-12-12 sts evenly = 72-72-78-78-82-82 sts. Work in stockinette st in the round. When piece measures 20 cm / 8", inc 2 sts mid under sleeve. Repeat inc every 9-5-8½-4-5-3½ cm / 3½"-2"-3¼"-1½"-2"-1¼" a total of 4-6-4-7-6-8 times = 80-84-86-92-94-98 sts. When piece measures 49-49-48-48-47-47 cm / 19¼"-19¼"-19"-19"-18½"-18½", bind off the middle 8-8-10-10-12-12 sts mid under sleeve = 72-76-76-82-82-86 sts remain on needle. Put piece aside and make another sleeve. YOKE: Slip sleeves on to same circular needle as body where armholes were bound off (without working them first) = 341-365-381-417-437-477 sts. Insert 1 marker in every transition between sleeves and body = 4 markers. READ ALL OF THE FOLLOWING SECTION BEFORE CONTINUING! Continue back and forth with stockinette st, A.1/A.3 over bands, A.5A/A.5D in each side towards mid front and A.5B/A.5C mid back. AT THE SAME TIME work A.6 in every transition between body and sleeve (marker is in the middle of A.6) and on 1st row from RS beg dec for RAGLAN – see explanation above (= 8 sts dec). Repeat dec for raglan on every other row (i.e. every row from RS) 24-25-28-28-32-33 times in total and then every row (i.e. both from RS and WS) 4-5-2-5-1-2 times in total. AT THE SAME TIME when piece measures 46-48-50-51-53-54 cm / 18"-19"-19¾-20"-21"-21¼", slip the outermost 13-15-19-21-24-29 sts in each side towards mid front on 1 stitch holder for neck on the next 2 rows (work them before slipping them on stitch holder to avoid cutting the yarn). Continue back and forth as before while AT THE SAME TIME bind off for neck at beg of every row in each side as follows: bind off 3 sts 1 time and 2 sts 2-2-2-2-3-3 times. Continue to bind off 1 st in each side at beg of every row until dec for raglan are finished. After all dec for raglan and neck, approx. 73-77-85-91-101-113 sts remain on needle. NECK: Pick up from RS approx. 117-125-141-153-173-197 sts on circular needle size 2.5 mm / US 1.5 with Alpaca. K 1 row from WS. Then K 1 row from RS while at the same time adjust to 138-138-146-150-158-162 sts. Then work from WS as follows: 2 edge sts in GARTER ST - see explanation above, work rib (= P 2/K 2) ending rib with P 2 and 2 edge sts in garter st. After 1 cm / ⅜" dec for 1 buttonhole over the other holes on band. When rib measures 3 cm / 1", bind off with K over K and P over P and K over sts in garter st on band. ASSEMBLY: Sew the openings under the sleeves. Sew on buttons. |
||||||||||||||||||||||||||||
Diagram explanations |
||||||||||||||||||||||||||||
|
||||||||||||||||||||||||||||
 |
||||||||||||||||||||||||||||
 |
||||||||||||||||||||||||||||
 |
||||||||||||||||||||||||||||
 |
||||||||||||||||||||||||||||
Have you finished this pattern?Tag your pictures with #dropspattern #sweetashoneycardigan or submit them to the #dropsfan gallery. Do you need help with this pattern?You'll find 31 tutorial videos, a Comments/Questions area and more by visiting the pattern on garnstudio.com. © 1982-2026 DROPS Design A/S. We reserve all rights. This document, including all its sub-sections, has copyrights. Read more about what you can do with our patterns at the bottom of each pattern on our site. |
||||||||||||||||||||||||||||


With over 40 years in knitting and crochet design, DROPS Design offers one of the most extensive collections of free patterns on the internet - translated to 17 languages. As of today we count 325 catalogs and 12298 patterns - 12288 of which are translated into English (US/in).
We work hard to bring you the best knitting and crochet have to offer, inspiration and advice as well as great quality yarns at incredible prices! Would you like to use our patterns for other than personal use? You can read what you are allowed to do in the Copyright text at the bottom of all our patterns. Happy crafting!
Post a comment to pattern DROPS 166-42
We would love to hear what you have to say about this pattern!
If you want to leave a question, please make sure you select the correct category in the form below, to speed up the answering process. Required fields are marked *.