
Popular categories
Looking for a yarn?


Comments / Questions (28)
![]() Cathy wrote:
Cathy wrote:
Bonjour, pour commencer le dos, il faut tricoter une maille lisière à l'endroit à la fin des rangs envers pour l'épaule droite. Pour l'épaule gauche, en sens inverse, il faut tricoter une maille lisière à l'endroit au début des rangs envers, non ? Il est indiqué "1 m lis au point mousse en début de rang sur l'endroit". S'agit-il d'une erreur ? Ou je n'ai pas compris les indications ? Merci d'avance pour vos lumières
02.05.2024 - 19:14DROPS Design answered:
Bonjour Cathy, la maille lisière au point mousse se trouve côté emmanchure, pas côté encolure; autrement dit, l'épaule droite du dos commence par le côté encolure sur l'endroit pour se terminer par le côté emmanchure, et inversement l'épaule gauche du dos commence par le côté emmanchure pour se terminer par le côté encolure. Les épaules droites et gauches sont les côtés droits/gauches quand on porte le pull. Bon tricot!
03.05.2024 - 07:55
![]() Bosnyak wrote:
Bosnyak wrote:
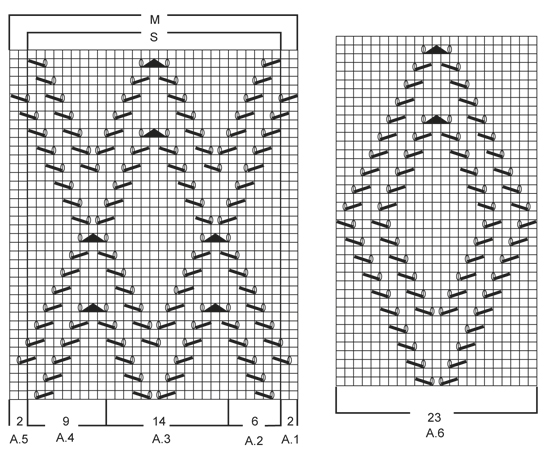
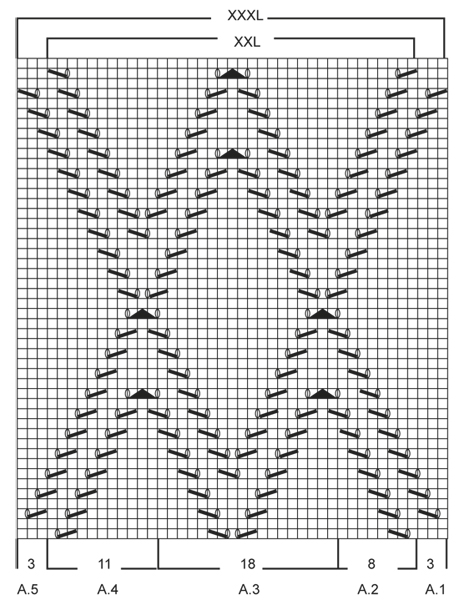
Je ne comprends pas vous dites:Tricoter 1 m lis au point mousse, 0-1-0-1-0-1 fois A.1, A.2, 4 fois A.3 dans toutes les tailles, A.4, 0-1-0-1-0-1 fois A.5, 1 m lis au point mousse. mais les encoche pour la taille L ne comprennent pas A1 et A5 donc le diagramme correspondant a la taille L est de A2 àA5 je suis perdue
30.01.2022 - 12:05DROPS Design answered:
Bonjour Mme Bosnyak, en L tricotez ainsi: 1 m lisière au point mousse, A.2, 4xA.3, A.4, 1 m lis au point mousse. Dans cette taille, vous ne tricotez ni A.1 ni A.5. Bon tricot!
31.01.2022 - 09:42
![]() BosnyakYolande wrote:
BosnyakYolande wrote:
En ce qui concerne les mailles lisieres est ce que elles sont comprises dan le graphique ou en plus merci
28.01.2022 - 13:06DROPS Design answered:
Bonjour Mme Bosnyak, les mailles lisières ne figurent pas dans les diagrammes, elles figurent en revanche dans les explications, cf dos par ex: 1 m lis au point mousse, 0 ou 1 fois A.1 selon la taille, A.2, 4 fois A.3, A.4, 0 ou 1 fois A.5 selon la taille et 1 m lis au point mousse. Bon tricot!
28.01.2022 - 13:59
![]() Isabelle wrote:
Isabelle wrote:
Bonjour comment adapter un patron aux aiguilles circulaires en aiguilles droites svp? Merci beaucoup de votre réponse. Cordialement
19.10.2019 - 05:13DROPS Design answered:
Bonjour Isabelle, ce modèle se tricote en différentes parties en allers et retours sur aiguille circulaire pour avoir suffisamment de place pour toutes les mailles, seul le col se tricote ici en rond. Vous pourrez lire ici comment adapter un modèle sur aiguilles droites. Bon tricot!
21.10.2019 - 13:48
![]() Andrea wrote:
Andrea wrote:
Hallo liebes Team, fehlt nicht bei dem Muster am Ärmel die obere Spitze, also das erste Mal 2 M zusammenstr., 1 Umschlag? Schöne Grüße
29.09.2019 - 21:17DROPS Design answered:
Liebe Andrea, oben am Anfang vom Ärmel stricken Sie die 1. Reihe A.6 = 2 M re zs, 1 Umschlag, 1 Masche re, 1 Umschlag, 1 M abheben, 1 M re, die abgehobene M überziehen. = die mittlere Masche ist "die obere Spitze". Viel Spaß beim stricken!
30.09.2019 - 11:40
![]() Romkje wrote:
Romkje wrote:
Het patroon klopt niet. Er staat bij voor- en achterpand aangegeven dat je A2 en A3 vier keer moet herhalen voor alle maten. Dan kom je veel steken tekort als je M breit. Na veel rekenwerk kwam ik er achter dat je geen vier, maar drie keer moet herhalen.
30.03.2018 - 17:42
![]() Christine wrote:
Christine wrote:
Bonjour, Merci pour ce très joli modèle que je tricote en taille S. Je voudrais savoir comment tricoter les mailles qui se trouvent à cheval entre A2/A3 ou A3/A4 quand on doit répéter 4 fois A3? (exemple 9ème rang du diagramme) Merci d'avance pour votre réponse
21.02.2018 - 08:41DROPS Design answered:
Bonjour Christine, au 9ème rang par ex, vous tricotez A.2 et faites 1 jeté (= 6 m dans A.2) et tricotez ensuite la m suivante ensemble à l'end avec la 1ère m de A.3 et ainsi de suite. À la fin de A.3, faites 1 jeté (= dernière m de A.3) et tricotez la dernière m de A.3 avec la 1ère m du A.3 suivant (= 1ère m du A.3 suivant). Veillez à toujours bien avoir le bon nombre de mailles dans chaque diagramme, aidez-vous de marqueurs si besoin. Bon tricot!
21.02.2018 - 09:30
![]() Anne Gro Berge Karlsen wrote:
Anne Gro Berge Karlsen wrote:
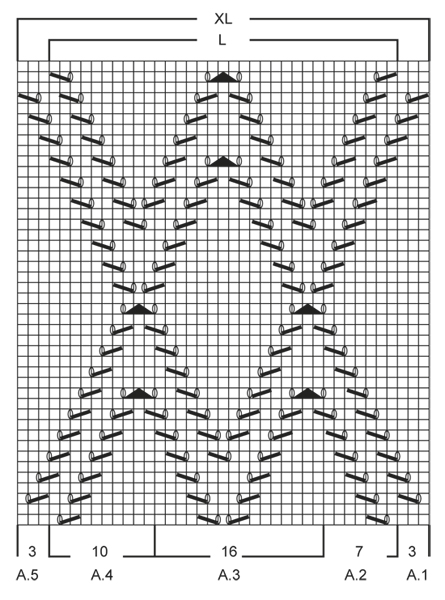
Det er feil i mønster for str M. Det står at A2 skal strikkes 4 ganger, men skal bare strikkes 1 gang. Kan dere korrigere dette på nye mønster
30.10.2017 - 11:01
![]() Sylvie wrote:
Sylvie wrote:
Bonjour, Je tricote la taille S de ce joli modèle, mais arrivée au 9 ème rang je me trouve avec des mailles en plus sur tous les diagrammes. Merci pour votre réponse
21.09.2017 - 20:22DROPS Design answered:
Bonjour Sylvie, vous devez toujours bien avoir le même nombre de mailles, les diminutions du point ajouré sont toutes compensées par 1 jeté. En taille S vous tricotez: 1 m lis, 1 x A.2 (= 6 m), 4 x A.3 (= 4 x 14 m = 56 m), 1 x A.4 (= 9 m) et 1 m lis. N'hésitez pas à ajouter des marqueurs entre chaque diagramme à répéter pour pouvoir bien vous repérer et vérifier votre nombre de mailles. Bon tricot!
22.09.2017 - 09:49Maria Santos wrote:
Takk for svar. I mönsterdiagrammet er det i A2= 6 m og i A3 =14 m, tilsammen = 20 m (ikke 56 m som i deres svar). Dette er i störrelse S og M, men jeg strikker störrelse L. Det er i hht. mönsterdiagram A2 =7 m og A3 = 16 m, tilsammen 23 m. I hht oppskrift skal disse to (A2 og A3) strikkes 4 ganger i störrelse L. Er det jeg som er dum eller er deres svar ikke riktig?
12.01.2017 - 19:04DROPS Design answered:
Hej Maria. Ok, men det aendrer ikke meget i hvordan du skal strikke. Du skal laese paa samme maade: strikk 1 kant-m rille, A.1 0 gang, A.2, A.3 4 ganger i alle str, A.4, A.5 0 gang, 1 kant-m rille: 1+0+7+(4x16)+10+0+1 = 83 masker strikket
17.01.2017 - 14:43
|
||||||||||||||||
Summer Diamond#summerdiamondsweater |
||||||||||||||||
 |
 |
|||||||||||||||
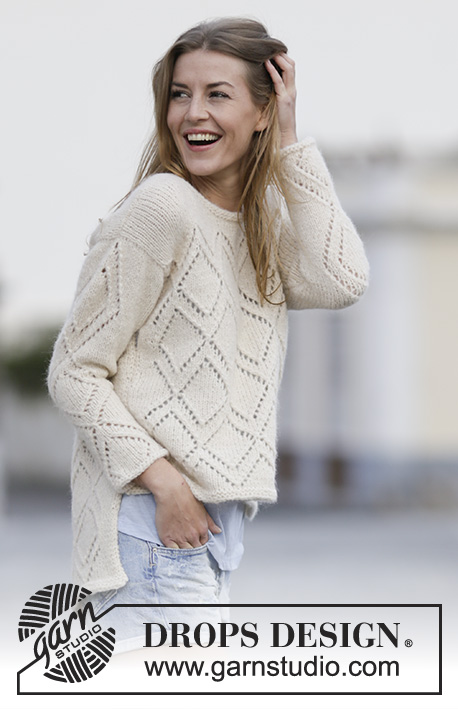
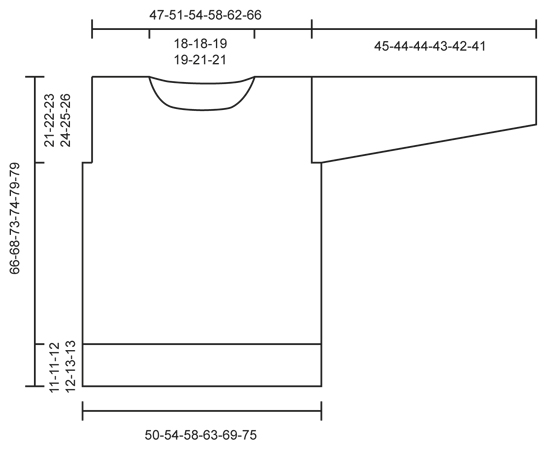
Knitted DROPS jumper with lace pattern, worked top down in ”Air”. Size S-XXXL.
DROPS 159-7 |
||||||||||||||||
|
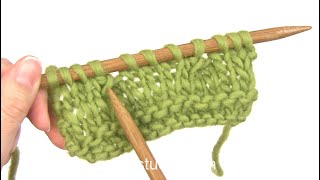
GARTER ST (worked in the round): * K 1 round and P 1 round *, repeat from *-*. 1 ridge = 2 rounds. GARTER ST (back and forth): K all rows. 1 ridge = K2 rows. PATTERN: See diagrams A.1 to A.6. The diagrams show all rows in pattern seen from RS. DECREASE TIP: Dec inside 1 edge st in garter st. All dec are done from RS! Dec before 1 edge st as follows: K 2 tog. Dec after 1 edge st as follows: Slip 1 st as if to K, K 1, psso. ---------------------------------------------------------- JUMPER: Worked back and forth, top down, in several parts and sewn tog when finished. Jumper is longer at the back than at the front. BACK PIECE: Work right shoulder as follows: Cast on 23-25-27-30-31-34 sts on circular needle size 6 mm / US 10 with Air. Work in stockinette st until 1 st remains, 1 edge st in GARTER ST - see explanation above. Continue like this back and forth until piece measures 3 cm / 1". Now cast on 1 new st at the end of next row from WS = 24-26-28-31-32-35 sts. Put piece aside and work left shoulder as follows: Cast on and work as right shoulder but reversed, i.e. work in stockinette st with 1 edge st in garter st at the beg of row from RS. When piece measures 3 cm / 1", cast on 1 new st at the end of row from RS = 24-26-28-31-32-35 sts. At the end of next row from RS cast on 25-25-27-27-29-29 sts and the work the 24-26-28-31-32-35 sts from right shoulder on to needle = 73-77-83-89-93-99 sts. REMEMBER THE KNITTING GAUGE Continue in stockinette st with 1 edge st in garter st in each side until piece measures 11-13-13-14-14-14 cm / 4½"-5"-5"-5½"-5½"-5½". Now continue with pattern - see diagram for size. NOTE: In size S, L and XL work sts that do not fit the pattern between A.1 and A.2, and A.4 and A.5 in stockinette st. Work 1 edge st in garter st, A.1 0-1-0-1-0-1 time, A.2, A.3 4 times in all sizes, A.4, A.5 0-1-0-1-0-1 time, 1 edge st in garter st. Continue like this back and forth until piece measures 21-22-23-24-25-26 cm / 8¼"-8¾"-9"-9½"-9¾"-10¼". At the end of the next 2 rows cast on 2-3-3-4-6-8 new sts for armholes = 77-83-89-97-105-115 sts. Work the new sts in stockinette st with 1 edge st in garter st in each side. Continue like this until piece measures 64-66-71-72-77-77 cm / 25¼"-26"-28"-28½"-30½"-30½" in total, adjust after one whole or half repetition vertically. Switch to circular needle size 5.5 mm / US 9 and work 2 ridges over all sts, AT THE SAME TIME on 1st row in ridge inc 5-5-6-6-7-7 sts evenly = 82-88-95-103-112-122 sts. Loosely bind off. FRONT PIECE: Work left shoulder as follows: Cast on 23-25-27-30-31-34 sts on circular needle size 6 mm / US 10 with Air. Work in stockinette st until 1 st remains, 1 edge st in GARTER ST - see explanation above. Continue like this back and forth until piece measures 5-6-6-7-7-7 cm / 2"-2½"-2½"-2¾"-2¾"-2¾". Now cast on new sts for neck at the end of next row from WS: Cast on 1 st 2-2-2-2-3-3 times, 2 sts 1 time in all sizes and 3 sts 1 time in all sizes = 30-32-34-37-39-42 sts. Put piece aside and work right shoulder as follows: Cast on and work as left shoulder but reversed. I.e. work in stockinette st with 1 edge st in garter st at the beg of row from RS and cast on sts for neck at the end of row from RS = 30-32-34-37-39-42 sts. At the end of next row from RS cast on 13-13-15-15-15-15 sts and the work the sts from left shoulder on to needle = 73-77-83-89-93-99 sts. When piece measures 11-13-13-14-14-14 cm / 4½"-5"-5"-5½"-5½"-5½", work pattern as on back piece and cast on sts for armhole in each side when piece measures 21-22-23-24-25-26 cm / 8¼"-8¾"-9"-9½"-9¾"-10¼". Continue as on back piece until piece measures 53-55-59-60-64-64 cm / 21"-21½"-23¼"-23½"-25¼"-25¼" in total, adjust after one whole or half repetition vertically. NOTE: Front piece is shorter than back piece. Switch to circular needle size 5.5 mm / US 9 and work 2 ridges over all sts, AT THE SAME TIME on 1st row in ridge inc 5-5-6-6-7-7 sts evenly = 82-88-95-103-112-122 sts. Loosely bind off. ASSEMBLY: Place front piece against back piece and sew shoulder seams. Sew inside cast-on edge and sew/graft one and one st neatly tog. Fasten off. SLEEVE: The sleeve is worked back and forth on circular needle. Pick up 65-69-71-75-77-81 sts (includes 1 edge st in each side) evenly from RS along sleeve opening on body on circular needle size 6 mm / US 10 with Air. P 1 row from WS. Now work pattern as follows: 1 edge st in garter st, 20-22-23-25-26-28 sts in stockinette st, pattern A.6 (= 23 sts), 20-22-23-25-26-28 sts in stockinette st, 1 edge st in garter st. Continue pattern like this. When piece measures 4 cm / 1½", beg dec in each side of sleeve - READ DECREASE TIP. Repeat dec every 2-2-2-2-1½-1½ cm / ¾"-¾"-¾"-¾"-½"-½" 14-15-15-17-18-19 more times = 35-37-39-39-39-41 sts. When sleeve measures 44-43-43-42-41-40 cm / 17¼"-17"-17"-16½"-16"-15¾", switch to circular needle size 5.5 mm / US 9 and work 2 ridges, AT THE SAME TIME on 1st row in ridge inc 2-2-2-3-3-4 sts evenly = 37-39-41-42-42-45 sts. Loosely bind off. ASSEMBLY: Sew underarm and side seams in one inside 1 edge st in garter st. NECK EDGE: Beg mid back and pick up approx. 70-90 sts evenly around the neck on a short circular needle size 5.5 mm / US 9 with Air. Work 2 ridges in GARTER ST in the round on circular needle - see explanation above. Loosely bind off. |
||||||||||||||||
Diagram explanations |
||||||||||||||||
|
||||||||||||||||
 |
||||||||||||||||
 |
||||||||||||||||
 |
||||||||||||||||
 |
||||||||||||||||
Have you finished this pattern?Tag your pictures with #dropspattern #summerdiamondsweater or submit them to the #dropsfan gallery. Do you need help with this pattern?You'll find 24 tutorial videos, a Comments/Questions area and more by visiting the pattern on garnstudio.com. © 1982-2026 DROPS Design A/S. We reserve all rights. This document, including all its sub-sections, has copyrights. Read more about what you can do with our patterns at the bottom of each pattern on our site. |
||||||||||||||||


With over 40 years in knitting and crochet design, DROPS Design offers one of the most extensive collections of free patterns on the internet - translated to 17 languages. As of today we count 324 catalogs and 12290 patterns - 12280 of which are translated into English (US/in).
We work hard to bring you the best knitting and crochet have to offer, inspiration and advice as well as great quality yarns at incredible prices! Would you like to use our patterns for other than personal use? You can read what you are allowed to do in the Copyright text at the bottom of all our patterns. Happy crafting!
Post a comment to pattern DROPS 159-7
We would love to hear what you have to say about this pattern!
If you want to leave a question, please make sure you select the correct category in the form below, to speed up the answering process. Required fields are marked *.