
Popular categories
Looking for a yarn?


Comments / Questions (17)
![]() Mahuya Ray wrote:
Mahuya Ray wrote:
Could you please change the pattern so that I would be able to make it on straight needles. I can not follow the instructions to use circular needles Thank you..
23.11.2024 - 19:34
![]() Romy wrote:
Romy wrote:
Bitte könnten sie mir helfen. Ich komme mit den Kragen Anfang nicht weiter. Wie Stricke ich den richtig damit er auch die Biegung hat denn von hinten sieht man nichts romy wäre sehr dankbar über eine antwort
26.09.2021 - 10:00DROPS Design answered:
Liebe Romy, den Kragen stricken Sie mit verkürzten Reihen damit es Höher an der ausser Seite wird: beim linken Schulter/Vorderteil schlagen Sie 11 M und stricken Sie (1. Reihe = Hinreihe): 2 Reihen über alle Maschen 2 Reihen über die 6 ersten Maschen; diese 4 Reihen bis diei Arbeit 8 cm bei der kürzeren Seite misst), bei der nächsten Hinreihe stricken Sie diese 11 Maschen dann sofort die stillgelegten Maschen für den linken Vorderteil, jetzt sind Maschen für Kragen + Vorderteil auf derselben Nadel. Viel Spaß beim stricken!
27.09.2021 - 08:23
![]() Carolyn Jones wrote:
Carolyn Jones wrote:
Can you please help. I have completed this pattern to the point of starting the left side collar where I cast on 11 stitches and knit these in the short rows pattern as instructed. When the piece is 3 1/8 inches am I attaching the 11 stitches at the short row side then continuing on? I'm confused at this point. Thank you for your advice.
02.09.2021 - 21:32DROPS Design answered:
Dear Mrs Jones, correct, after you have worked the short rows for 3/8 inches, work one row from RS over the 11 stitches and add now the stitches from left front piece working them so that you have now 63-70-77-81 sts on needle (= seen from RS: 11 sts from collar and 52-59-66-70 sts from shoulder). Happy knitting!
03.09.2021 - 07:24
![]() Carolyn wrote:
Carolyn wrote:
Can you please tell me whether there are any errors in this pattern. Should there be an edge after completing the 3 garter ridges for the back? The pattern continues right into the design and there does not appear to be a garter edge. Is this correct? Thank you.
24.08.2021 - 14:57DROPS Design answered:
Dear Carolyn, the jacket is worked bottom up and starts with an edge in garter stitch (worked here with 3 ridges), then continue with the lace pattern, with A.1/A.2 on each side (no extra edge stitches worked in garter stitch before casting on the new sts for sleeves. Happy knitting!
24.08.2021 - 16:53
![]() Patricia wrote:
Patricia wrote:
Milles excuses c'est moi qui me suis trompée désolée...
13.03.2019 - 12:16
![]() Patricia wrote:
Patricia wrote:
Sur la taille S il y a une erreur : en effet, de *à* ça fait 75 m. plus A4 (11 m.) plus A2 (7m.), ça fait 93 et non 97...
13.03.2019 - 12:14
![]() Patricia wrote:
Patricia wrote:
Dans quel sens lit on les diagrammes? Merci!
12.03.2019 - 20:51DROPS Design answered:
Bonjour Patricia. Comment lire des diagrammes tricot vous trouverez dans la lecon ICI. Bon tricot!
12.03.2019 - 22:10
![]() Christine wrote:
Christine wrote:
Je vous remercie pour votre réponse, mais ma question portait sur la hauteur : faut-il tricoter des rangs raccourcis sur la bordure tous les 10 rangs de haut en bas (jusqu'à la fin) ou uniquement sur ce qui correspond aux 4 premiers motifs c'est à dire à la bordure d'encolure ?
11.03.2019 - 18:06DROPS Design answered:
Bonjour Christine, les rangs raccourcis se tricotent à partir du moment où on tricote les mailles du devant gauche (après le col) jusqu'en bas, tous les 10 rangs tricotés sur toutes les mailles et jusqu'à la fin. Bon tricot!
12.03.2019 - 09:30
![]() Christine wrote:
Christine wrote:
Bonjour, Faut-il tricoter les rangs raccourcis uniquement sur les 4 premiers motifs du devant ou sur toute la bordure jusqu'en bas (correspondant à 10 motifs) ? Merci
10.03.2019 - 21:48DROPS Design answered:
Bonjour Christine, les rangs raccourcis se tricotent juste sur les mailles des bordures devant (au début de l'épaule: 2 rangs sur 11 m, 2 rangs sur 6 m, puis pour le devant, 2 rangs sur les 11 m de la bordure devant seulement). Bon tricot!
11.03.2019 - 11:04
![]() Charlene Lenig wrote:
Charlene Lenig wrote:
Could you please explain what to do where the pattern says Work A3 over A1 and A2in each side. I do not understand what to do there.
25.10.2016 - 05:52DROPS Design answered:
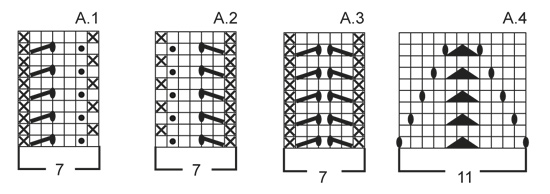
Dear Mrs Lenig, each row start first with A.1 (= 7 sts) and ends with A.2 (= 7 sts), when you have worked these diagrams a total of 6-7 times in height, work A.3 over the sts previously worked in A.1 and work A.3 over the sts previously worked in A.1, ie A.1 will not be worked anymore. Happy knitting!
25.10.2016 - 09:45
|
||||||||||||||||||||||
Coffee Break#coffeebreakcardigan |
||||||||||||||||||||||
|
|
||||||||||||||||||||||
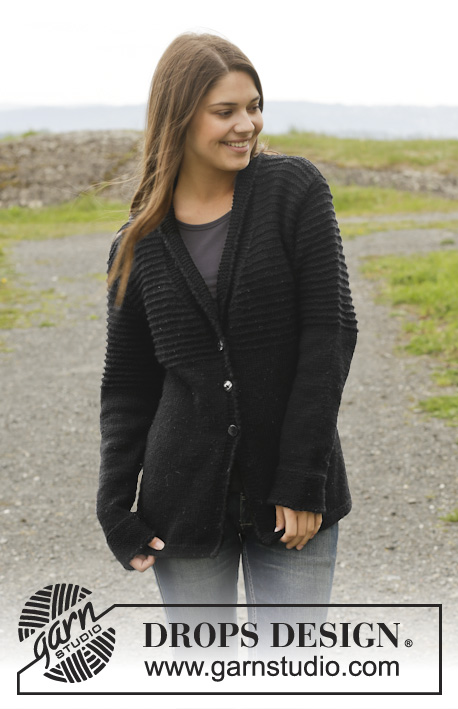
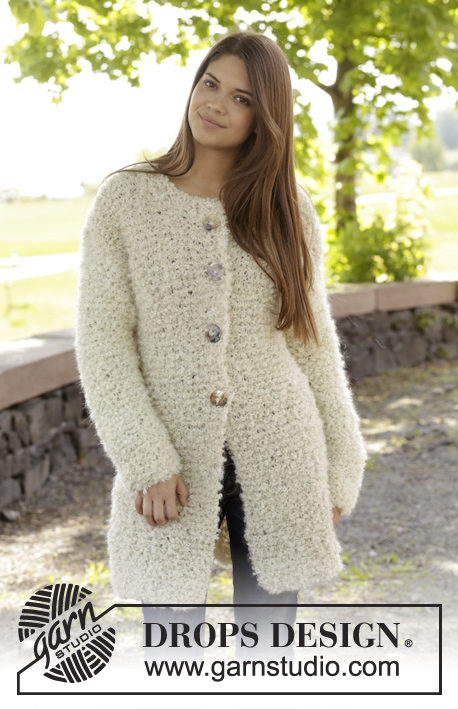
Knitted DROPS jacket with lace pattern and shawl collar in "Cloud" or "Snow". Size: S - XXXL.
DROPS 157-46 |
||||||||||||||||||||||
|
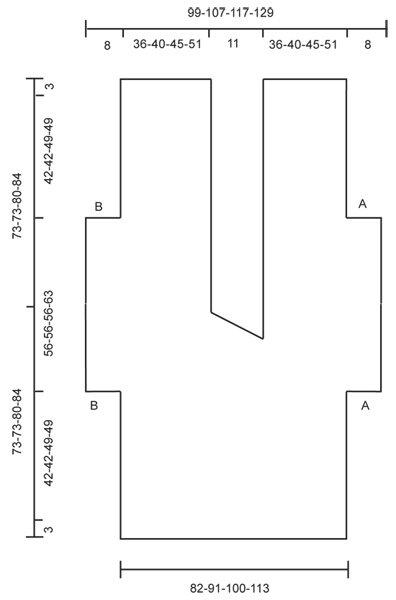
MEASURING TIP: Because of the weight of the yarn the jacket will stretch when worn. All measurements should be done when piece is flat. GARTER ST (back and forth on needle): K all rows. 1 ridge = K2 rows. PATTERN: See diagrams A.1-A.4. The diagrams show all rows in pattern seen from RS. SHORT ROWS: For every 10th row work short rows over bands sts in garter st as follows: Work as follows on left front piece, beg from RS: Work the 11 band sts in garter st, turn piece, tighten yarn and work back, turn piece and work as before over all sts. Work as follows on right front piece, beg from WS: Work the 11 band sts in garter st, turn piece, tighten yarn and work back, turn piece and work as before over all sts. ---------------------------------------------------------- JACKET: Worked back and forth on circular needle. Beg at the bottom of back piece, cast on for sleeves and work over shoulder. Then bind off for neck, finish each shoulder/front piece separately, dec for sleeves and continue on front piece. Measurements on chart and in pattern have been taken when piece is flat - READ MEASURING TIP. BACK PIECE: Cast on 97-111-125-133 sts on circular needle size 8 mm / US 11 with Cloud or Snow. Work 3 ridges in GARTER ST - see explanation above. Then work PATTERN as follows on next row (= RS): SIZE S: A.1 (= 7 sts), * A.4 (= 11 sts), A.3 (= 7 sts) *, repeat from *-* 3 more times, A.4, A.2 (= 7 sts). Size M/L: A.1 (= 7 sts), * A.4 (= 11 sts), A.3 (= 7 sts) *, repeat from *-* 1 more time, A.3, A.4, A.3, * A.3, A.4 *, repeat from *-* 1 more time, A.2 (= 7 sts). SIZE XL/XXL: A.1 (= 7 sts), A.3 (= 7 sts), * A.4 (= 11 sts), A.3 *, repeat from *-* 1 more time, A.3, A.4, A.3, * A.3, A.4 *, repeat from *-* 1 more time, A.3, A.2 (= 7 sts). SIZE XXXL: A.1 (= 7 sts), * A.4 (= 11 sts), A.3 (= 7 sts) *, repeat from *-* 5 more times, A.4, A.2 (= 7 sts). Continue like this back and forth until 6-6-7-7 whole repetitions have been worked vertically. REMEMBER THE GAUGE! Piece now measures approx. 45-45-52-52 cm / 17¾"-17¾"-20½"-20½"". On next row from RS work A.3 over A.1 and A.2 in each side, AT THE SAME TIME cast on 9 sts at the end of the next 2 rows for sleeves = 115-129-143-151 sts. Work the new sts in garter st. Continue like this with pattern and garter st over the outermost 9 sts in each side until 4 repetitions have been worked vertically from the new sts cast on for sleeve (= 10-10-11-11 repetitions in total). NOTE! In size XXXL continue with 6 more rows pattern after 4th repetition vertically. Then work over the first 52-59-66-70 sts. Slip the worked sts on a stitch holder (= right shoulder/front piece). Then bind off the middle 11 sts in A.4 for neck = 52-59-66-70 sts remain on left shoulder/front piece. Cut the yarn and put piece aside. Piece now measures 73-73-80-84 cm / 28¾"-28¾"-31½"-33". Insert a marker here. NOW MEASURE THE PIECE FROM HERE. Now work left collar before continuing on left shoulder/front piece. LEFT SHOULDER/FRONT PIECE: Cast on 11 sts on circular needle size 8 mm / US 11 with Cloud or Snow. Work in garter st back and forth, AT THE SAME TIME work short rows, beg from RS: * 2 rows over all sts, 2 rows back and forth over the first 6 sts *, repeat from *-* until piece measures 8 cm / 3⅛" on the shorter side - adjust so that next row is a row from RS. Then work 1 row in garter st over these 11 sts, work sts from left front piece on to same needle = 63-70-77-81 sts. Continue pattern and garter st as before until a total of 4 repetitions of A.4 have been worked vertically from marker on shoulder (NOTE: In size XXXL work 4 repetitions + 4 rows), AT THE SAME TIME work SHORT ROWS - see explanation above. At the beg of next row from WS, bind off the outermost 9 sts in garter st = 54-61-68-72 sts for front piece. On next row from RS work as before until 7 sts remain, work A.2 over the remaining 7 sts. Continue pattern and short rows over band. When 6-6-7-7 repetitions have been worked vertically after sts dec for sleeve (= 10-10-11-11 repetitions in total + 4 rows in XXXL from marker on shoulder), work 3 ridges over all sts. Loosely bind off. RIGHT SHOULDER/FRONT PIECE: Work as left shoulder/front piece but reversed. I.e. cast on sts for shawl collar and work short rows with beg from WS. When shawl collar measures 8 cm / 3" at the shortest - adjust so that last row is from WS - work sts from stitch holder (right shoulder/front piece) from WS = 63-70-77-81 sts on needle. Continue as on left front piece with pattern - remember SHORT ROWS. When all repetitions for sleeve have been worked, bind off the outermost 9 sts for sleeve from RS. Then work A.1 over the outermost 7 sts in the side (i.e. over A.3). Continue until all repetitions have been worked. Work 3 ridges and loosely bind off. ASSEMBLY: Sew the collar tog mid back and sew it to the neck. Fold the jacket double at the marker on the shoulder, and sew underarm seams neatly tog st by st (See figure: sew A against A, and B against B). Cut the yarn and fasten. |
||||||||||||||||||||||
Diagram explanations |
||||||||||||||||||||||
|
||||||||||||||||||||||
 |
||||||||||||||||||||||
 |
||||||||||||||||||||||
Have you finished this pattern?Tag your pictures with #dropspattern #coffeebreakcardigan or submit them to the #dropsfan gallery. Do you need help with this pattern?You'll find 23 tutorial videos, a Comments/Questions area and more by visiting the pattern on garnstudio.com. © 1982-2026 DROPS Design A/S. We reserve all rights. This document, including all its sub-sections, has copyrights. Read more about what you can do with our patterns at the bottom of each pattern on our site. |
||||||||||||||||||||||


With over 40 years in knitting and crochet design, DROPS Design offers one of the most extensive collections of free patterns on the internet - translated to 17 languages. As of today we count 324 catalogs and 12290 patterns - 12280 of which are translated into English (US/in).
We work hard to bring you the best knitting and crochet have to offer, inspiration and advice as well as great quality yarns at incredible prices! Would you like to use our patterns for other than personal use? You can read what you are allowed to do in the Copyright text at the bottom of all our patterns. Happy crafting!
Post a comment to pattern DROPS 157-46
We would love to hear what you have to say about this pattern!
If you want to leave a question, please make sure you select the correct category in the form below, to speed up the answering process. Required fields are marked *.