
Popular categories
Looking for a yarn?


|
|
Black Pearl |
|
|
|
|
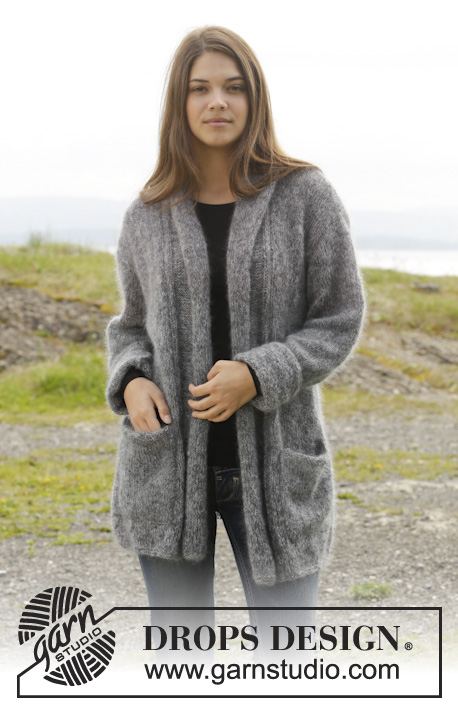
Knitted DROPS jacket in "Cotton Merino" or "Belle". Size: S - XXL.
DROPS 157-41 |
|
|
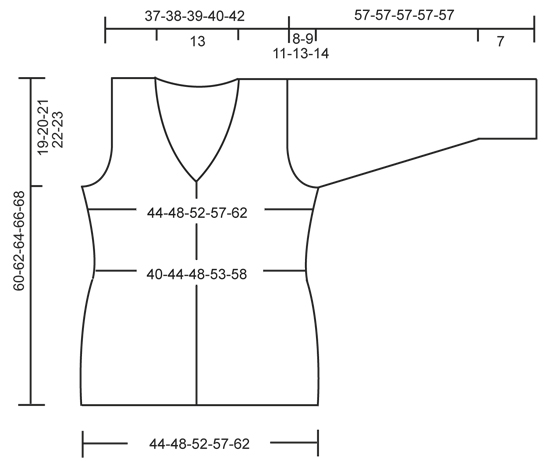
GARTER ST (back and forth on needle): K all rows. 1 ridge = K2 rows. PATTERN (1st row = WS): *K 1 row from WS, K 1 row from RS, P 1 row from WS and K 1 row from RS *, repeat from *-*. INCREASE TIP (applies to collar): Inc by working 2 sts in the second and next last st. DECREASE TIP (applies to neckline): All dec are done from RS! Dec inside 5 band sts + inc sts for collar. Dec as follows before sts in garter st: K 2 tog. Dec as follows after sts in garter st: Slip 1 st as if to K, K 1, psso. BUTTONHOLES: Dec for buttonholes on right band. 1 buttonhole = K tog 3rd and 4th st from mid front and make 1 YO. Dec for buttonholes when piece measures: SIZE S: 21, 28 and 35 cm / 8 1/4",11",13 3/4" SIZE M: 22, 29 and 36 cm / 8 3/4",11½",14 1/4" SIZE L: 23, 30 and 37 cm / 9",11 3/4",14½" SIZE XL: 24, 31 and 38 cm / 9½",12 1/4",15" SIZE XXL: 25, 32 and 39 cm / 9 3/4",12",15 1/4" ---------------------------------------------------------- BACK PIECE: Worked back and forth on circular needle to make room for all the sts. Cast on 90-98-106-116-126 sts (includes 1 edge st in each side) on circular needle size 4 mm / US 6 with Cotton Merino. Work 5 ridges in GARTER ST - see explanation above. Switch to circular needle size 4.5 mm / US 7 and continue in stockinette st. REMEMBER THE GAUGE! When piece measures 5-6-7-8-9 cm / 2"-2½"-2 3/4"-3"-3½", dec 1 st in each side every 4 cm / 1½'' 4 times = 82-90-98-108-118 sts. When piece measures 24-25-26-27-28 cm / 9½"-9 3/4"-10 1/4"-10½"-11", inc 1 st in each side every 4 cm / 1½'' 4 times in total = 90-98-106-116-126 sts. At the same time when piece measures 35 cm / 13 3/4", work PATTERN - see explanation above - over all sts until finished measurements. When piece measures 41-42-43-44-45 cm / 16"-16½"-17"-17 1/4"-17 3/4", bind off for armhole in each side on every other row: 4 sts 1 time, 3 sts 0-1-1-2-2 times, 2 sts 1-1-2-2-4 times and 1 st 2-2-3-4-3 times = 74-76-78-80-84 sts. When piece measures 58-60-62-64-66 cm / 22 3/4"-23½"-24½"-25 1/4"-26", bind off the middle 22 sts for neck. Continue to dec on each side of neck on every other row: 1 st 2 times = 24-25-26-27-29 sts remain on each shoulder. Bind off when piece measures 60-62-64-66-68 cm / 23 5/8''-24 3/8''-25¼''-26''-26¾''. LEFT FRONT PIECE: Worked back and forth on circular needle. Cast on 50-54-58-63-68 sts (includes 1 edge st in the side and 5 band sts towards mid front) on circular needle size 4 mm / US 6 with Cotton Merino. Work 5 ridges, switch to needles size 4.5 mm / US 7 and continue in stockinette st and 5 band sts in garter st. At the same time when piece measures 5-6-7-8-9 cm / 2"-2½"-2 3/4"-3"-3½", dec and inc in the side as on back piece = 50-54-58-63-68 sts. Read all of the following section before continuing. When piece measures 35 cm / 13 3/4'', work pattern over all sts (except band which is worked in garter st) until finished measurements. Collar: When piece measures 35-36-37-38-39 cm / 13 3/4"-14 1/4"-14½"-15"-15 1/4", inc 2 sts inside first band st towards mid front. On next row work 1 ridge only over the outermost 7 sts towards mid front (do not work the other sts on needle). Then work all sts - at the same time inc 1 st inside outermost band st - SEE INCREASE TIP: 10 times on every other row and then 4 times on every 4th row = 16 sts inc for collar - work the inc sts in garter st. Neckline: At the same time when piece measures 39-40-41-42-43 cm / 15 1/4"-15 3/4"-16 1/8"-16½"-17", dec for neckline - SEE DECREASE TIP! 1 st on every other row 18 times. Armholes: At the same time when piece measures 41-42-43-44-45 cm / 16"-16½"-17"-17 1/4"-17 3/4", bind off for armhole in the side as on back piece. After all bind off for armhole and neck line, 40-41-42-43-45 sts remain on needle. Work until piece measures 60-62-64-66-68 cm / 23 5/8''-24 3/8''-25¼''-26''-26¾''. Now bind off 24-25-26-27-29 sts on shoulder = 16 collar sts in garter st remain on needle. Collar: Continue to work in garter st over collar as follows: * 1 ridge over all sts, 1 ridge over only the outermost 10 sts towards mid front *, repeat from *-* until collar measures approx. 7 cm / 2¾'' at the inside (it will then measure approx. 14 cm / 5½'' at the edge). Slip the sts on 1 stitch holder. RIGHT FRONT PIECE: Cast on and work as left but bind off for armhole and neck in the opposite side. Dec in addition for BUTTONHOLES - see explanation above - on band. SLEEVE: Worked back and forth on circular needle. Cast on 47-47-49-53-53 sts (includes 1 edge st in each side) on circular needle size 4 mm / US 6 with Cotton Merino. Read all of the following section before continuing. Work in garter st for 7 cm / 2¾'', switch to circular needle size 4.5 mm / US 7 and continue in stockinette. At the same time after ridges, inc 1 st in each side every 3.5-3-2.5-2.5-2 cm / 1 1/4"-1 1/8"-7/8"-7/8"-3/4" 12-14-15-15-17 times in total = 71-75-79-83-87 sts. At the same time when sleeve measures 38-36-34-32-30 cm / 15"-14 1/4"-13½"-12½"-11 3/4", work PATTERN - see explanation above - until finished measurements. When sleeve measures 49-48-46-44-43 cm / 19 1/4"-19"-18"-17 1/4"-17", bind off for sleeve cap in each side on every other row: 4 sts 1 time, 3 sts 1 time, 2 sts 2 times, 1 st 3-4-6-7-11 times, then bind off 2 sts in each side until piece measures 56 cm / 22'', then dec 3 sts 1 time each side. Bind off the remaining sts, the piece measures approx. 57 cm / 22½''. ASSEMBLY: Sew the shoulder seams. Sew collar tog mid back with invisible stitches and sew collar on to neck line at the back of neck. Sew in sleeves. Sew sleeve and side seams in one inside 1 edge st. Sew the buttons on to the left band. CROCHET EDGE: Crochet an edge with 2 strands Cotton Merino on hook size 5 mm / H/8 along left band, around the collar and down along right band as follows: Work reverse crochet, i.e. work sc from left to right. |
|
|
|
|
Have you made this or any other of our designs? Tag your pictures in social media with #dropsdesign so we can see them! Do you need help with this pattern?You'll find tutorial videos, a Comments/Questions area and more by visiting the pattern on garnstudio.com. © 1982-2024 DROPS Design A/S. We reserve all rights. This document, including all its sub-sections, has copyrights. Read more about what you can do with our patterns at the bottom of each pattern on our site. |


With over 40 years in knitting and crochet design, DROPS Design offers one of the most extensive collections of free patterns on the internet - translated to 17 languages. As of today we count 304 catalogs and 11422 patterns - 11417 of which are translated into English (US/in).
We work hard to bring you the best knitting and crochet have to offer, inspiration and advice as well as great quality yarns at incredible prices! Would you like to use our patterns for other than personal use? You can read what you are allowed to do in the Copyright text at the bottom of all our patterns. Happy crafting!
Comments / Questions (28)
Hello Drops team. I have a question on the collar increases: I understand that the row directly after the first 2 stitch increase is a short row where we knit the band stitches only, and then 1 increase is made for the collar every other row 10 times and then every 4th row 4 times giving 16 increased sts. All good. But is there only one short row at the start or do we make a short row before each increase on the collar? Thank you for your lovely patterns and website.
29.06.2023 - 15:22DROPS Design answered:
Dear Dani, yes there is only one short row (2 rows over the outermost 7 stitches towards mid front), that will not be repeated again - the next short rows will only be worked for the collar section after you have cast off shoulder stitches. Working these short rows will let the neckline lie nicely. Happy knitting!
29.06.2023 - 15:39You start with 5 STS in garter st for the trim, then you add 16sts gradually, should have 21sts Why is it that in the end you cast off 16 sts
19.11.2022 - 03:41DROPS Design answered:
Dear Ellen, the 16 stitches are the neck stitches. When we are finishing the shoulders, we cast off all stitches except the 16 stitches, which are for the neck and we continue working later on. Happy knitting!
21.11.2022 - 00:32Hello Can you please tell me what the crochet detail at the end is for if you already have the band? The picture isn't clear What effect does it give and how many rows do you crochet?
16.11.2022 - 09:55DROPS Design answered:
Dear Ellen, you will crochet an edge with reverse double crochets (UK-English)/single crochet (US-English) along the opening of the jacket: starting at the bottom of left front piece, work along the whole edge, then along the collar and down along right front piece. Happy crocheting!
16.11.2022 - 10:11What does 5 band st in garter st mean?
10.11.2022 - 06:05DROPS Design answered:
Hi Ellen, This means the first 5 stitches and the last 5 stitches on each row are the bands (where the buttons and buttonholes are sewn/worked. These stitches are knitted on all rows (which is the definition of garter stitch). Happy crafting!
10.11.2022 - 06:47Hi, my name is Filiz and have some questions. in sizse small left front piece it says when piece measures 35 cm work pattern and inc 2 sts inside first band st towards mid front. So, should i work from WS? if yes, where can i inc 2 sts and 1 st after short rows? How can i avoid the holes after short rows? Pls pls pls explain clearly cause i've been trying to knit it since 4 days and no success! Thx.
01.08.2019 - 18:36DROPS Design answered:
Dear Filiz, the increases for collar are worked from RS, so that you will increase on left front piece at the end of row from WS. To avoid holes at the transition between short rows, you can tighten the thread (see here) or use the wrap & turn method (see here from RS and here from WS. Happy knitting!
07.08.2019 - 09:27Pr le devant j'ai un soucis : il me reste bien les 24m pour lepaule mais jai 21m point mousse et le modele dit 16 ! Selon moi 5 pt mousse de base + 16 augm = 21 ! C est vrai ou pas ? Merci de me corriger
15.04.2019 - 19:13DROPS Design answered:
Bonjour Mme Helias, en taille S vous devez avoir 19 m jersey et 21 m point mousse (= 40 m): vous aviez 45 m + 5 m point mousse et diminuez 18 m pour l'encolure + 8 m pour l'emmanchure = il reste 19 m + les 5 m de bordure devant + 2 augm + 14 augm = 21 m. Vous rabattez les 24 premières mailles pour l'épaule = il reste 16 m pour le col. Bon tricot!
23.04.2019 - 10:21Beste team van Dropsdesign. Ik zou graag zien hoe je de bies achteraan de hals samennaait. Is daar een video van aub? Groeten Sheila
08.02.2018 - 20:41DROPS Design answered:
Hallo Sheila, Misschien heb je wat aan deze video waarin wordt uitgelegd hoe je een naad met ribbelsteek in elkaar naait. (In het patroon is het wel ietsje anders, omdat der ribbel van het achterpand zeg maar dwars op de bies zit.)
12.03.2018 - 09:55Een vraag over de kraag, je hebt 5 biessteken en daar komen er 2 bij vervolgens meerder je er nog eens 16, uiteindelijk heb je dus 23 steken voor de kraag, klopt dit?
26.01.2018 - 20:30DROPS Design answered:
Hoi Jenny, De eerste 2 steken die je meerdert zitten ook bij die 16 steken in die je totaal meerdert voor de kraag, waardoor je op een totaal komt van 21 steken.
28.01.2018 - 19:16Comment faire l'échantillon ? Nombres de mailles,nombre de rangs pour égaler à combien de cm. Merci à l'avance
21.02.2017 - 15:10DROPS Design answered:
Bonjour Mme Pouliot, vous trouverez toutes les informations sur l'échantillon sous l'onglet "Fournitures" et de plus amples informations sur l'échantillon ici. Bon tricot!
21.02.2017 - 17:19Ik begrijp het laatste stukje van de kraag niet. Kunt u dat duidelijker uitleggen? Hoe kan ik de ribbel over alleen 10 steken breien en de volgende naald over alle steken breien? Moet ik dan iedere keer aan en afhechten?
04.12.2016 - 16:42DROPS Design answered:
Hoi Diana. Je hebt 16 st over voor de kraag. Je breit nu verkorte toeren, dus eerst over de eerste 10 st (dus brei 10 st, keer het werk en brei terug). Brei over alle st. Dan wordt de ene kant breder dan de andere. Zie ook deze video:
05.12.2016 - 14:37