
Popular categories
Looking for a yarn?


Comments / Questions (32)
![]() Francesca wrote:
Francesca wrote:
Buona sera scrivete di avviare 63 m per lo scaldacollo solo che lavorando il motivo di 4 m Dr e 4 m rv alla fine del giro restano 3 maglie e non 4 da lavorare a rovescio ..... è giusto? Ma non credo. Potete per favore dirmi se dwve essere cosi? Perché ho sul ferro 63 maglie esatte. Grazie
13.03.2026 - 23:27DROPS Design answered:
Buongiorno Francesca, il cappello è lavorato a spirale, per cui il lavoro verrà spostato di una maglia ad ogni giro, come spiegato nel testo, deve lavorare 4 maglie rovescio e poi ricominciare. Buon lavoro!
14.03.2026 - 11:09
![]() Mary Mitchell wrote:
Mary Mitchell wrote:
Is it possible to use circular needles for the whirlwind hat?
16.03.2025 - 19:13DROPS Design answered:
Dear Mary, yes, you can work with a circular needle; if you want to use a long circular needle you can use the magic loop technique. Happy knitting!
16.03.2025 - 22:06
![]() Ioana wrote:
Ioana wrote:
Hello, I am currently knitting this beatiful hat and I was wondering whether it would be possible to mantain the initial spiral patter while decreasing. Could you provide me with some instructions in this regard if possible. thank you, best regards
24.01.2024 - 18:53DROPS Design answered:
Dear Ioana, for this hat the designer chose to finish with stocking stitch, if you like to continue the pattern as before, you might have to make your own adjustments. Happy knitting!
25.01.2024 - 08:47
![]() Sue wrote:
Sue wrote:
I was wondering if I could knit this in a worsted weight yarn. I have been looking for a hat that is off the face, this is perfect. But chunky yarn hurts my hands so I do not knit with it any more. I hope you can help. Thanks so much..
02.02.2021 - 17:59DROPS Design answered:
Dear Sue, what about these patterns: Chinook or Belinda's Dream - the spiral pattern is not exaclty the same but could inspire you. Happy knitting!
03.02.2021 - 09:19
![]() Lola wrote:
Lola wrote:
Hola, puedo hacer el gorro con agujas rectas? Cómo sería el patrón entonces?
12.01.2021 - 21:41DROPS Design answered:
Hola Lola, no, es para las agujas de doble punta. Mira los videos DROPS, ellos pueden ajudarte. Buen trabajo!
13.01.2021 - 18:59
![]() Belinda Lance wrote:
Belinda Lance wrote:
When starting the decrease rows the pattern says to "dec 1 st on right side of every marker " SO to see if I understand correctly. There are nine stitches before the starting of the first marker so would I knit 8 then knit the last stitch before the first marker with the first stich after the first marker?
05.11.2020 - 03:48DROPS Design answered:
Hi Belinda, To decrease, knit together the 2 stitches to the right of the markers. Happy knitting!
05.11.2020 - 07:08
![]() Belinda Lance wrote:
Belinda Lance wrote:
For the first round of the spiral pattern it is (K4, P4, K4, P4, K4, P4, K4, P4, K4, P4, K4, P4, K4, P3) which is a total of 55 stitches. So for the second round would I start with a P1, and then K4, P4 and so on?
02.11.2020 - 21:02DROPS Design answered:
Dear Mrs Lance, just continue working K4,P4 until piece measures 18 cm, this means, when you come to the end of the round, slip marker and continue without disrupting the pattern. this video shows another spiral pattern but could help you to understand how to work in the round. Happy knitting!
03.11.2020 - 08:40
![]() Annika wrote:
Annika wrote:
Buongiorno,non sarebbe opportuno scrivere/correggere che il numero di maglie è uguale ad un multiplo di 8 +1?
13.01.2020 - 13:47DROPS Design answered:
Buongiorno Annika. 8+7 e corretto. Durante il lavoro in tondo, il motivo si sposterà di 1 m su ogni giro e formerà un motivo a spirale. Buon lavoro!
23.05.2020 - 11:09
![]() Claudia wrote:
Claudia wrote:
Buenos días. Pienso tejer con agujas circulares el cuello. Para hacer el patrón en espiral, cuando dicen "tejer *4d, 4r*" se refieren a que hay que tejer esa secuencia en cada vuelta? Gracias.
21.10.2019 - 11:23DROPS Design answered:
Hola Claudia. Si, es correcto, tienes que trabajar siempre 4 derechos, 4 reveses en todas las vueltas. No te olvides de que, para obtener el dibujo en espiral, tienes que tener un número de puntos múltiplo de 8 + 7.
21.10.2019 - 23:53
![]() Gayle Schultz wrote:
Gayle Schultz wrote:
When it says to “knit sts together 2 by 2 = 10” for the end of the hat, what does that mean? Knit 2 tog then knit 2 sts until you have 10 sts? That’s not something I’ve heard before. Thanks for clarification
11.10.2019 - 06:26DROPS Design answered:
Dear Mrs Schultz, when 19 sts remain on needle, work the stitches tog 2 by 2 until there are 10 sts left on needle (= K2 tog x 9, then K tog last st on round with the first st on round = 10 sts remain). Happy knitting!
11.10.2019 - 09:35
|
|
Whirlwind#whirlwindset |
|
|
|
|
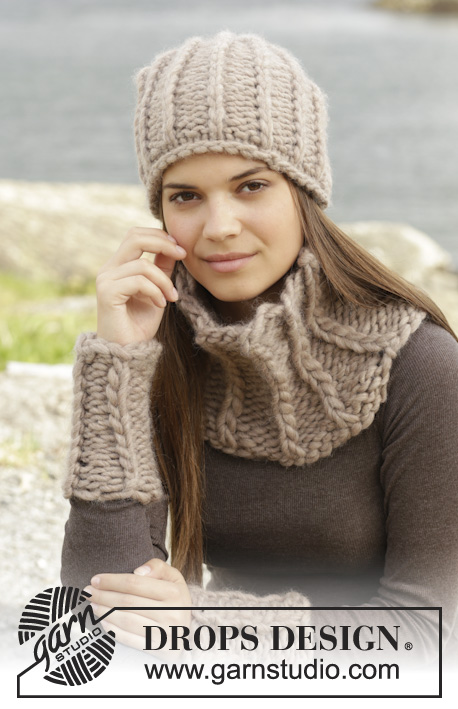
Knitted DROPS hat and neck warmer with spiral pattern in ”Snow”.
DROPS 157-38 |
|
|
SPIRAL PATTERN: * K 4, P 4 *, repeat from *-* in the round. Pattern is over 8 sts and no of sts are divisible by 8 + 7. When working in the round, the pattern will displace 1 st on every round and form a spiral pattern. ---------------------------------------------------------- HAT: Worked in the round on double pointed needles. Cast on 55 sts on double pointed needles size 8 mm / US 11 with Snow. Work SPIRAL PATTERN – see explanation above – until piece measures 18 cm / 7''. REMEMBER THE GAUGE! K 1 round AT THE SAME TIME insert 6 markers in piece with 9 sts between every marker and 10 sts before last marker. Continue in stockinette st AT THE SAME TIME on next round dec 1 st on right side of every marker by K 2 tog, repeat every other round 5 more times = 19 sts. On next round K sts tog 2 by 2 = 10 sts on needle. Cut the yarn and pull it through the remaining sts, tighten tog and fasten. NECK WARMER: Worked in the round on double pointed needles. Cast on 63-71 sts on double pointed needles size 8 mm / US 11 with Snow. Work SPIRAL PATTERN - see explanation above. REMEMBER THE GAUGE! bind off in spiral pattern when piece measures 18-24 cm / 7"-9½". |
|
Have you finished this pattern?Tag your pictures with #dropspattern #whirlwindset or submit them to the #dropsfan gallery. Do you need help with this pattern?You'll find 13 tutorial videos, a Comments/Questions area and more by visiting the pattern on garnstudio.com. © 1982-2026 DROPS Design A/S. We reserve all rights. This document, including all its sub-sections, has copyrights. Read more about what you can do with our patterns at the bottom of each pattern on our site. |


With over 40 years in knitting and crochet design, DROPS Design offers one of the most extensive collections of free patterns on the internet - translated to 17 languages. As of today we count 324 catalogs and 12252 patterns - 12242 of which are translated into English (US/in).
We work hard to bring you the best knitting and crochet have to offer, inspiration and advice as well as great quality yarns at incredible prices! Would you like to use our patterns for other than personal use? You can read what you are allowed to do in the Copyright text at the bottom of all our patterns. Happy crafting!
Post a comment to pattern DROPS 157-38
We would love to hear what you have to say about this pattern!
If you want to leave a question, please make sure you select the correct category in the form below, to speed up the answering process. Required fields are marked *.