
Popular categories
Looking for a yarn?


Comments / Questions (73)
![]() Nassera wrote:
Nassera wrote:
Quelle est la référence couleur en vert foncé ? Merci
12.06.2026 - 17:55
![]() Elisabeth wrote:
Elisabeth wrote:
Bonjour, peut-on avec une aiguille circulaire le tricoter en mettant les trois parties ? Merci pour vos indications.
10.06.2026 - 18:55DROPS Design answered:
Bonjour Elisabeth, possiblement, vous devrez alors juste supprimer les mailles lisières, placez un marqueur à la transition dos/devants et suivez bien les indications pour chaque partie. Divisez ensuite aux emmanchures pour terminer chaque partie séparément. Bon tricot!
11.06.2026 - 17:13
![]() Lilianne wrote:
Lilianne wrote:
Is the wrong Side worked only with p St ?
01.05.2026 - 12:50DROPS Design answered:
Dear Lilianne, correct from the wrong side you will purl all stitches in diagrams (= every odd numbered rows in diagrams). Happy knitting!
04.05.2026 - 08:26
![]() Annica wrote:
Annica wrote:
Nog måste det vara fel på vänster mönster överdel!!
19.04.2026 - 19:15DROPS Design answered:
Hei Annica. Vi skal hjelpe deg så godt vi kan, men fint om du kan opplyse hva du mener er feil, er det i teksten eller i diagrammet og HUSK å oppgi hvilken størrelse du strikker? mvh DROPS Design
20.04.2026 - 11:10
![]() Pannier Élisabeth wrote:
Pannier Élisabeth wrote:
Bonjour je reviens vers vous concernant le diagramme M5A. Entre la 9ème ligne et la. 18 ème il y a une grande zone sans dessin alors que sur la photo le dessin va bien jusqu’au bord de l'encolure! Pouvez-vous m’apporter une réponse svp.
13.02.2026 - 16:03
![]() Zaplatana wrote:
Zaplatana wrote:
Hej mam pytanie - jak mam zamknąć oczka na środku robótki "zamknąć na dekolt 26 oczek środkowych". Czy to znaczy że oczka lewego ramienia np powinnam przełożyć na drut pomocniczy, przerobić prswe ramię po zamknięciu środkowych, i nową włóczką kontynuować lewe? Z góry dzięki!
04.02.2026 - 16:46DROPS Design answered:
Witaj, przerabiasz prawe ramię, zamykasz oczka na dekolt i przerabiasz najpierw lewe ramię nitką z tego motka. Prawe ramię oczekuje na później. Jak zakończysz lewe ramię, odcinasz nitkę. Dołączasz nitkę do prawego ramienia i przerabiasz prawe ramię. Pozdrawiamy!
04.02.2026 - 20:12
![]() Pannier wrote:
Pannier wrote:
Bonjour Le diagramme M5A n’est pas symétrique au diagramme M4A. En effet du rang 9 au rang 20 il y a une grande zone de jersey sans dessin, ce qui n\'apparaît pas sur la photo. Le dessin va bien jusqu’au bord de l\'encolure. Comment cela se fait-il? Merci
04.02.2026 - 08:10
![]() Pannier wrote:
Pannier wrote:
Le diagramme du decant gauche me semble faux, une grande zone jersey apparaît dans le diagramme, où trouver le diagramme corrigé.? Merci
03.02.2026 - 13:40DROPS Design answered:
Bonjour Mme Pannier, les explications sont justes ainsi. Pour le devant droit, vous avez 9 à 21 m jersey sur le côté (après M.1, vu sur l'endroit), pour le devant gauche, vous avez 9 à 21 m jersey sur le côté (après la m lis, soit avant M.1, vu sur l'endroit) = vous avez ainsi le même nombre de mailles pour les 2 devants avant/après le point ajouré (et le même nombre que pour le dos). Bon tricot!
03.02.2026 - 17:52
![]() Karol wrote:
Karol wrote:
Hi! First, thanks for the pattern. In the decreases of the back side, it says in the video that for the decreases of the armholes we use PSSO. In the video shows to knit two together and then pass the slide stitch. This leaves to two stitches together. When purling on the wrong side, should I then take these two as a single one?
20.09.2025 - 19:14
![]() Denise B wrote:
Denise B wrote:
Pour le devant droit, le 1er rang de M4 se fait sur 26 mailles. Comme on diminue 1maille après les 3 mailles au point mousse il ne reste que 25 mailles pour le motif soit 12 + 13. Hors le diagramme montre 13+13. Pouvez-vous me guider. Merci
20.07.2025 - 05:13
|
|||||||||||||
Summer Vines Vest#summervinesvest |
|||||||||||||
|
|
|||||||||||||
DROPS Top in Muskat
DROPS 73-6 |
|||||||||||||
|
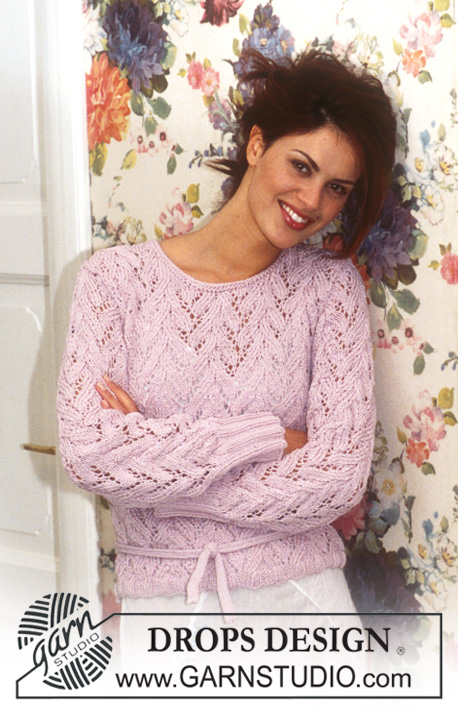
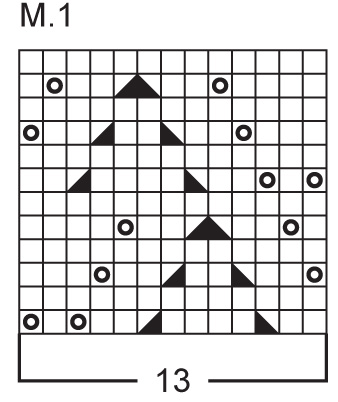
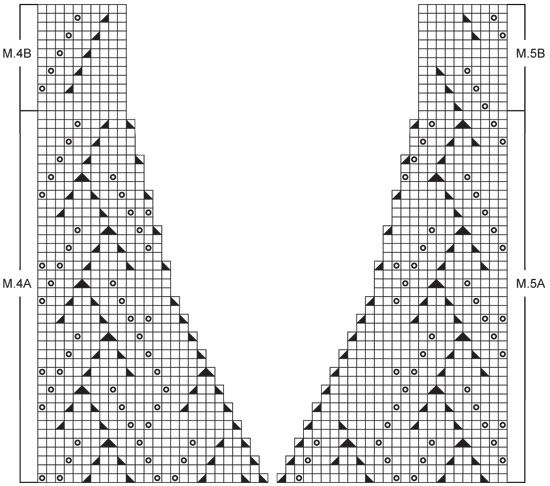
Gauge: 20 sts x 26 rows = 10 x 10 cm on larger needles in pattern. 1 repeat of Pattern 1 = 7 cm wide. Garter st, when knitting flat: Knit all sts, all rows. Pattern: See diagrams M.1 - M.5. The pattern is seen from the right side. Note: Patterns 2 and 3 (armhole shaping) are different for each size - use the chart for your size. NB: On the garment, the lace pattern (by mistake) is shown with a couple of holes too small, but follow the diagram and possibly see DROPS Design Model no. 73-5 to see how the pattern will look when the diagram is worked. Knitting tips (for armhole): All decs are made on right side rows. Dec 1 st inside 3 edge sts knit in garter st as follows: After 3 sts: Slip 1 as if to knit, K 1, psso. Before 3 sts: K 2 tog. Buttonhole: Make buttonholes along right button band. 1 buttonhole = bind off the center st of buttonband and yo over the bound off st on the next row. Make buttonhole when the piece measures (for all sizes): 2 cm, 6.5 cm, 11 cm, 15.5 cm and 20 cm. ---------------------------------------------------------------------- Back: Cast on 72-80-88-96 sts on smaller needles. Knit 6 rows garter st. Change to larger needles and continue as follows: K 1 (edge st), 9-13-17-21 sts stockinette st, Pattern 1 over 52 sts (4 repeats), 9-13-17-21 sts stockinette st, K 1 (edge st). When the piece measures 5 cm inc 1 st at each side every 2 cm a total of 5 times = 82-90-98-106 sts - knit the increased sts in stockinette st. When the piece measures 17 cm knit 4 rows garter st over 6-6-7-8 sts at each side (knit the remaining sts as before). On the next row bind off the outermost 3-3-4-5 sts at each side for armhole. Then dec 1 st at armholes inside 3 garter st edge sts every other row 2-5-7-9 times - see knitting tips = 72-74-76-78 sts remain. Continue with 3 sts garter st and 7-8-9-10 sts stockinette st at each side of Pattern 1. When the piece measures 35-36-37-38 cm knit 4 rows garter st over the center 32 sts - knit the remaining sts as before. Then bind off the center 26 sts for the neck = 23-24-25-26 sts remain on each shoulder. Knit pattern as before with 3 sts in garter st at each neck edge. Bind off when the piece measures approx. 37-38-39-40 cm. Right front: Cast on 39-43-47-51 sts on smaller needles. Knit 6 rows garter st, change to larger needles and knit the next row as follows from center front edge: K 3 (buttonband sts knit in garter st throughout), Pattern 1 over 26 sts (2 repeats), 9-13-17-21 sts stockinette st and K 1 (edge st). Make buttonholes along buttonband - see instructions above. When the piece measures 5 cm inc at the side as on back = 44-48-52-56 sts (knit the increased sts in stockinette st). When the piece measures 17 cm knit 4 rows garter st over 6-6-7-8 sts at the side (knit the remaining sts as before). On the next row bind off the outermost 3-3-4-5 sts at the side for armhole. Then shape armhole as on back. At the same time when the piece measures approx. 20 cm - adjust to end after a complete repeat of Pattern 1 - knit and bind off for the neck following Pattern 4A - dec for neck inside 3 button band sts knit in garter st. Knit the remaining sts in each row as before. After all armhole and neck shaping is complete 23-24-25-26 sts remain on shoulder. Continue with Pattern 4B and remaining sts in stockinette st and garter st until piece measures approx. 37-38-39-40 (match back). Bind off. Left front: Cast on as right front and knit 6 rows garter st, change to larger needles. Knit the next row as follows from side: K 1 (edge st), 9-13-17-21 sts stockinette st, Pattern 1 over 26 sts (2 repeats) and 3 sts in garter st (buttonband). Inc at the side and shape armhole as on right front. For neck shaping follow Pattern 5A, then continue with Pattern 5B. Bind off when piece matches right front. Assembly: Sew shoulder- and side seams using edge sts as seam allowance. Sew on buttons. |
|||||||||||||
Diagram explanations |
|||||||||||||
|
|||||||||||||
 |
|||||||||||||
 |
|||||||||||||
 |
|||||||||||||
Have you finished this pattern?Tag your pictures with #dropspattern #summervinesvest or submit them to the #dropsfan gallery. Do you need help with this pattern?You'll find 13 tutorial videos, a Comments/Questions area and more by visiting the pattern on garnstudio.com. © 1982-2026 DROPS Design A/S. We reserve all rights. This document, including all its sub-sections, has copyrights. Read more about what you can do with our patterns at the bottom of each pattern on our site. |
|||||||||||||


With over 40 years in knitting and crochet design, DROPS Design offers one of the most extensive collections of free patterns on the internet - translated to 17 languages. As of today we count 325 catalogs and 12298 patterns - 12288 of which are translated into English (US/in).
We work hard to bring you the best knitting and crochet have to offer, inspiration and advice as well as great quality yarns at incredible prices! Would you like to use our patterns for other than personal use? You can read what you are allowed to do in the Copyright text at the bottom of all our patterns. Happy crafting!
Post a comment to pattern DROPS 73-6
We would love to hear what you have to say about this pattern!
If you want to leave a question, please make sure you select the correct category in the form below, to speed up the answering process. Required fields are marked *.