
Popular categories
Looking for a yarn?


Comments / Questions (83)
![]() Karin wrote:
Karin wrote:
Ich würde gerne den kraus re gestickten Teil in einer anderen Farbe stricken. Wieviel Wolle müsste ich hierfür einrechnen (für M)? Danke!
28.12.2024 - 20:55
![]() Nicole Zwick wrote:
Nicole Zwick wrote:
Hallo, kann ich die Jacke nur Kraus rechts Stricken und mit einem iCord am Schluss umstricken? Hätte gerne einen Janker. Danke vorab
03.06.2023 - 13:21DROPS Design answered:
Liebe Frau Zwich, wahrscheinlich, aber beachten Sie, daß Sie mehr Garn brauchen würden - gerne kann Ihnen damit Ihr DROPS Händler (auch per Telefon oder per E-Mail) weiterhelfen. Viel Spaß beim stricken!
05.06.2023 - 10:03
![]() Daniela wrote:
Daniela wrote:
Buingiorno, le misure indicate sul diagramma corrispondono alle misure del corpo o comprendono anche la vestibilitá? Grazie!
17.01.2023 - 11:58DROPS Design answered:
Buonasera Daniela, le misure corrispondono a quelle finali del modello, per cui deve trovare un capo simile con cui confrontarlo. Buon lavoro!
17.01.2023 - 22:12
![]() Shanthi wrote:
Shanthi wrote:
Can this pattern be used for men ? Do you have simple, round neck cardigan sweater patterns for men? Preferably using worsted weight yarn. Awaiting your reply.
28.04.2022 - 16:40DROPS Design answered:
Hi Shanti, If you search for 'jumpers/jackets for men with round yoke' in the search box, the patterns we have available will be listed. Happy crafting!
29.04.2022 - 07:02
![]() Claire wrote:
Claire wrote:
Hi is it possible to knit the sleeves on circular needles rather than double pointed ones and if so how big a cable would I need?
19.04.2022 - 20:56DROPS Design answered:
Hi Claire, Yes, you can use a circular needle and the Magic Loop technique (see video) for the sleeves. There are no circular needles short enough to work the bottom of the sleeve, without using the Magic Loop technique. Happy knitting!
20.04.2022 - 07:02
![]() Connie wrote:
Connie wrote:
Hallo, ich konnte Dank der sehr guten Anleitung die Jacke problemlos nacharbeiten. Diese Jacke ist jetzt eines meiner Lieblingsstücke. Die Wolle ist wunderbar weich, die Passform perfekt. vielen Dank für diese schöne Modell grüsse connie
10.07.2021 - 10:56
![]() Benalana wrote:
Benalana wrote:
Bonjour, J'ai tricoté la taille M, qui normalement me va bien. L'empiècement est bon mais à partir du dessous des manches, le gilet est très serré, j'ai même du mal à fermer les boutons, ça tire. Y a t-il un moyen pour agrandir le bas pour qu'il soit plus ample? Merci d'avance.
22.06.2021 - 08:49DROPS Design answered:
Bonjour Mme Benalana, Aviez-vous pensé à vérifier les mesures d'un gilet similaire que vous avez avec celles du schéma? Vous pouvez peut-être essayer de le redéfaire à partir de l'empiècement et le terminer de haut en bas en ajustant les diminutions comme vous les préfèreriez, voire en augmentant (pour une forme en trapèze). cette vidéo pourra peut-être vous aider. Contactez votre magasin ou posez votre question dans notre DROPS Workshop pour des idées supplémentaires. Bon tricot!
22.06.2021 - 16:27
![]() Clara wrote:
Clara wrote:
Bonjour, peut on tricoter ce modèle avec des aiguilles normales (pas circulaires)? merci
04.06.2021 - 15:05DROPS Design answered:
Bonjour Clara, tout à fait, on utilise ici une aiguille circulaire pour avoir suffisamment de place pour y loger toutes les mailles - pour les manches, reportez-vous à cette leçon. Bon tricot!
04.06.2021 - 16:43
![]() Khelifi wrote:
Khelifi wrote:
Je ne comprends pas comment faire la rehausse pour l'encolure dos. Merci de votre aide
11.12.2020 - 17:18DROPS Design answered:
Bonjour Mme Khelifi, la réhausse se compose de rangs raccourcis, tricotez le 1er rang sur l'endroit en laissant 25 à 30 m sur l'aiguille gauche (= non tricotées), tournez et tricotez le rang suivant en laissant 25 à 30 m non tricotées, tournez et continuez ainsi jusqu'à ce que tous les rangs raccourcis soient terminés (laissez toujours plus de mailles non tricotées), puis tricotez jusqu'à la fin du rang d'un côté, tournez et tricotez jusqu'à la fin du rang de l'autre côté. Bon tricot!
14.12.2020 - 07:15
![]() Francesconi wrote:
Francesconi wrote:
Bonsoir, Ce modèle se tricote de bas en haut ? Car si c'est de haut en bas, j'ai commencé par le dos et devant, 183 m. Et ça me paraît bien grand pour une l'encolure.... Merci d'avance de votre réponse .
10.12.2020 - 22:07DROPS Design answered:
Bonjour Mme Francesconi, ce modèle se tricote de bas en haut, en une seule partie jusqu'aux emmanchures, puis vous rabattez les mailles des emmanchures, tricotez les manches séparément et terminez par l'empiècement en plaçant les manches au-dessus des mailles rabattues pour les emmanchures. Bon tricot!
11.12.2020 - 07:26
|
|
Scarlet#scarletcardigan |
|
|
|
|
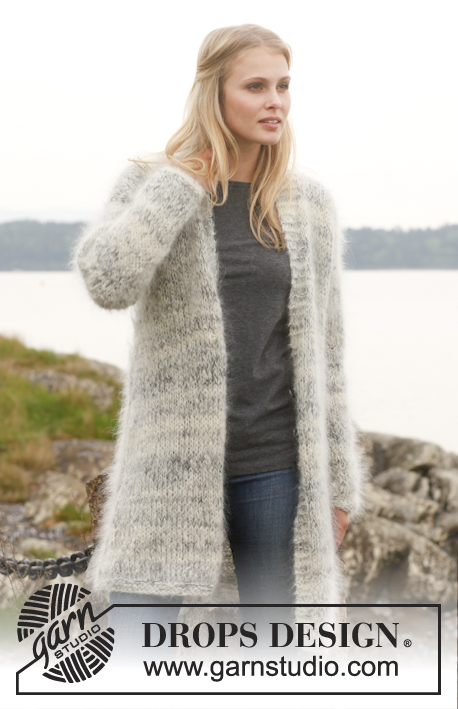
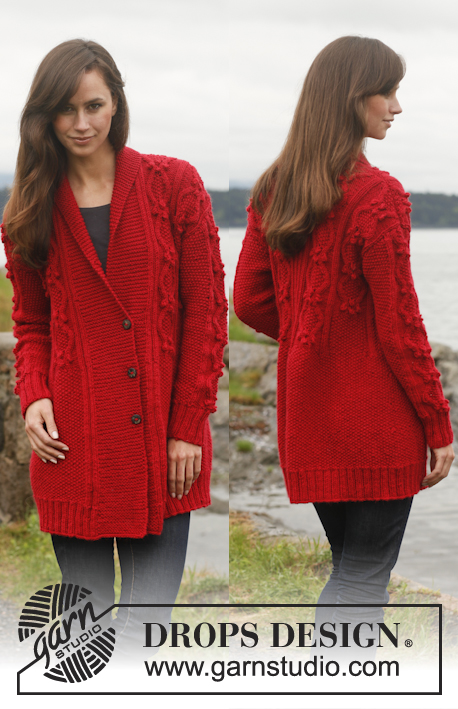
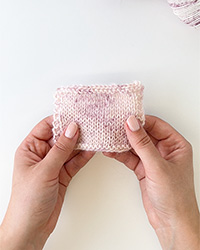
Knitted DROPS jacket with round yoke in garter st in "Nepal". Size: S - XXXL.
DROPS 150-6 |
|
|
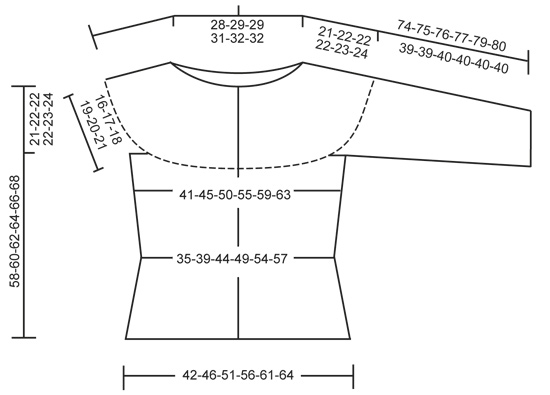
GARTER ST (back and forth on needle): K all rows. 1 ridge = K 2 rows. GARTER ST (in the round on double pointed needles): * K 1 round and P 1 round *, repeat from *-*. 1 ridge = 2 rounds. DECREASE TIP (applies to the body): Dec as follows before marker: K 2 tog. Dec as follows after marker: Slip 1 st as if to K, K 1, psso. RAGLAN: Dec on each side of markers. Dec as follows BEFORE marker: K 2 tog. Dec as follows AFTER marker: Slip 1 st as if to K, K 1, psso. BUTTONHOLES: bind off for buttonholes on right band. 1 button hole = bind off 4th st from mid front. On next row cast on 1 new st over the bind off st. Bind off for buttonholes when piece measures: SIZE S: 8, 16, 24, 32, 40, 48 and 56, cm / 3⅛", 6 ¼", 9½", 12½", 15 ¾", 19" and 22" SIZE M: 10, 18, 26, 34, 42, 50 and 58 cm / 4", 7", 10¼", 13⅜", 16½", 19¾" and 22¾" SIZE L: 12, 20, 28, 36, 44, 52 and 60 cm / 4¾", 8", 11", 14¼", 17¼", 20½" and 23⅝" SIZE XL: 13, 20, 27, 34, 41, 48, 55 and 62 cm / 5⅛", 8", 10⅝", 13⅜", 16⅛", 19", 21⅝" and 24⅜" SIZE XXL: 15, 22, 29, 36, 43, 50, 57 and 64 cm / 6", 8¾", 11⅜", 14 ¼" 17", 19 ¾" and 22½" SIZE XXXL: 10, 18, 26, 34, 42, 50, 58 and 66 cm / 4", 7", 10¼", 13⅜", 16½", 19¾", 22¾" and 26" ---------------------------------------------------------- BODY: Worked back and forth on circular needle. Cast on 153-171-183-201-219-231 sts on circular needle size 4 mm / US 6 with Nepal. Insert 2 markers in the piece; 41-46-48-53-58-61 sts in from each side (back piece = 71-79-87-95-103-109 sts). Work 3 RIDGES in garter st - see explanation above. Switch to circular needle size 5 mm / US 8 and continue in stockinette st with 6 sts in garter st in each side (= bands) REMEMBER THE GAUGE! When piece measures 7 cm / 2¾", dec 1 st on each side of both markers - READ DECREASE TIP! Repeat dec every 2½ cm / ⅞" 5 more times (= 6 times in total) = 129-147-159-177-195-207 sts. AT THE SAME TIME when piece measures 8-10-12-13-15-10 cm / 3⅛"-4"-4¾"-5⅛"-6"-4", beg to bind off for BUTTONHOLES on right band - see explanation above! When piece measures 25 cm / 9¾", inc 1 st on each side of both markers by K 2 sts in the st before and after the markers. Repeat inc every 2-2½-2½-3-3½-3½ cm / ¾"-⅞"-⅞"-1⅛"-1¼"-1¼" 4 more times (= 5 times in total) = 149-167-179-197-215-227 sts. When piece measures 37-38-40-42-43-44 cm / 14½"-15"-15¾"-16½"-17"-17¼", bind off the middle 8 sts each side for armholes from RS (i.e. bind off 4 sts on each side of each marker) = 133-151-163-181-199-211 sts remain on needle. Put piece aside and knit the sleeves. SLEEVE: Worked in the round on double pointed needles. Cast on 38-40-42-44-46-48 sts on double pointed needles size 4 mm / US 6 with Nepal. Work 3 RIDGES in garter st - see explanation above! Switch to double pointed needles size 5 mm / US 8. Insert 1 marker at beg of round (= mid under sleeve). Continue in stockinette st. AT THE SAME TIME when piece measures 8 cm / 3", inc 1 st on each side of marker by K 2 sts in the st before and after the marker. Repeat inc every 3½-3-3-3-2½-2½ cm / 1 ¼"-1⅛"-1⅛"-1⅛"-⅞"-⅞" 7-8-9-9-10-11 more times (= 8-9-10-10-11-12 times in total) = 54-58-62-64-68-72 sts. When piece measures 39-39-40-40-40-40 cm / 15¼"-15¼"-15¾"-15¾"-15¾"-15¾", bind off 8 sts mid under sleeve (i.e. bind off 4 sts on each side of marker) = 46-50-54-56-60-64 sts remain on needle. Put piece aside and make another sleeve. YOKE: Slip sleeves on to same circular needle size 5 mm / US 8 as body = 225-251-271-293-319-339 sts. Insert 1 marker in all transitions between sleeves and body (= 4 markers). 1st row = from WS: Continue in stockinette st with 6 sts in garter st in each side towards mid front, AT THE SAME TIME on next row from RS dec for RAGLAN (= 8 dec per dec row) - see explanation above! Repeat dec on every row from RS 1-2-2-2-3-4 more times (= 2-3-3-3-4-5 times in total) = 209-227-247-269-287-299 sts. Switch to circular needle size 4 mm / US 6 and work in garter st for 6 cm / 2⅜" AT THE SAME TIME on last row from WS dec 28-32-36-44-52-52 sts evenly (do not dec over bands) = 181-195-211-225-235-247 sts. Work in garter st for 6 cm / 2⅜" AT THE SAME TIME on last row from WS dec 32-32-32-36-40-40 sts evenly (do not dec over bands) = 149-163-179-189-195-207 sts. Work in garter st for 5 cm / 2". On next row from RS, dec 45-54-70-72-76-88 sts evenly = 104-109-109-117-119-119 sts. K 1 row from WS. Continue to work an elevation in the neck with short rows as follows (1st row = from RS): K until 25-27-27-29-30-30 sts remain on needle, turn and K back until 25-27-27-29-30-30 sts remain in the other side. Turn and K until 32-34-34-36-37-37 sts remain on needle, turn and K back until 32-34-34-36-37-37 sts remain in the other side. Turn and K until 39-41-41-43-44-44 sts remain on needle, turn and K back until 39-41-41-43-44-44 sts remain in the other side. Turn and K until 45-47-47-50-52-52 sts remain on needle, turn and K back until 45-47-47-50-52-52 sts remain in the other side. Turn piece and K the rest of row, then P 1 row (= from WS) and K 1 row (= from RS). K 2 rows over all sts. Bind off from WS. Piece measures approx. 58-60-62-64-66-68 cm / 22¾"-23⅝"-24⅜"-25¼"-26"-26¾". ASSEMBLY: Sew the openings under the sleeves tog. Sew the buttons on to left front piece. |
|
 |
|
Have you finished this pattern?Tag your pictures with #dropspattern #scarletcardigan or submit them to the #dropsfan gallery. Do you need help with this pattern?You'll find 20 tutorial videos, a Comments/Questions area and more by visiting the pattern on garnstudio.com. © 1982-2026 DROPS Design A/S. We reserve all rights. This document, including all its sub-sections, has copyrights. Read more about what you can do with our patterns at the bottom of each pattern on our site. |


With over 40 years in knitting and crochet design, DROPS Design offers one of the most extensive collections of free patterns on the internet - translated to 17 languages. As of today we count 320 catalogs and 12110 patterns - 12100 of which are translated into English (US/in).
We work hard to bring you the best knitting and crochet have to offer, inspiration and advice as well as great quality yarns at incredible prices! Would you like to use our patterns for other than personal use? You can read what you are allowed to do in the Copyright text at the bottom of all our patterns. Happy crafting!
Post a comment to pattern DROPS 150-6
We would love to hear what you have to say about this pattern!
If you want to leave a question, please make sure you select the correct category in the form below, to speed up the answering process. Required fields are marked *.