
Popular categories
Looking for a yarn?


Comments / Questions (101)
![]() Patricia Lannegrand wrote:
Patricia Lannegrand wrote:
Bonjour, Je suis sur le demi devant taille S/M ou doit on mettre les mailles en attente 10 est ce après la bordure Je ne comprends pas 5 mailles pour la bordure 14 avant les 3 m env et 44 m endroit pour finir merci par avance de votre aide
07.08.2025 - 17:58DROPS Design answered:
Bonjour Mme Lannegrand, à 47 cm de hauteur totale, vous allez tricoter les 10 premières mailles comme avant et les mettre en attente (ces mailles seront reprises ensuite pour le col); terminez le rang comme avant, tournez et tricotez le rang suivant. Tournez et commencez maintenant à rabatte au début de chaque rang à partir de l'encolure: 1 x 2 m et 2 x 1 m; il va vous rester 51 mailles que vous tricotez comme avant et que vous rabattez à 55 cm de hauteur totale. Bon tricot!
08.08.2025 - 07:51
![]() Fabienne B wrote:
Fabienne B wrote:
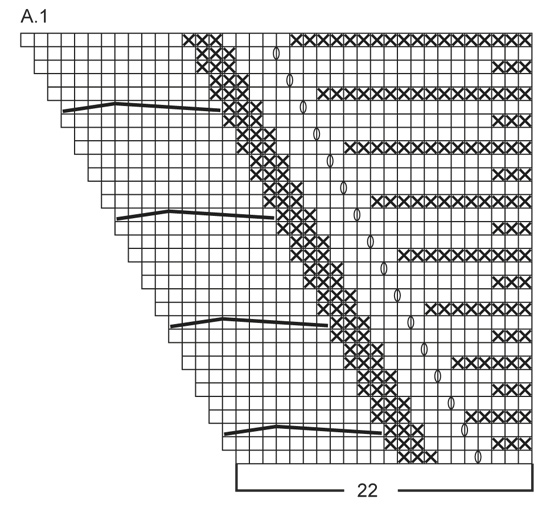
Bonjour. Je ne comprends pas le schéma A1. Quand on tricote la torsade, si les 8 mailles, on les tricote ensemble 2 par 2, il ne reste que 4 mailles sur les 8. Et pourtant on garde toujours le même nombre de mailles. Merci par avance pour votre aide.
15.07.2025 - 18:00DROPS Design answered:
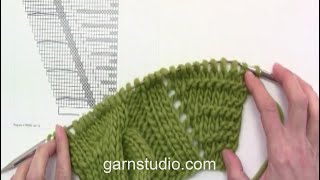
Bonjour Fabienne, nos avons la video specifique pour ce schema ICI. Bon tricot!
16.07.2025 - 16:07
![]() Sylvie wrote:
Sylvie wrote:
Bonjour. Je fais la taille S Doit on faire 10 torsades en hauteur ou 10 fois les diagrammes A1 et A2 en hauteur,,? En fin de torsades combien reste t'il de maille jersey entre A1 et A2 ? Merci pour votre zide
10.07.2025 - 01:13DROPS Design answered:
Bonjour Sylvie, il s'agit bien de 10 torsades en hauteur. A la fin des torsades, on a seulement des mailles des diagrammes A.1 et A.2, la section en jersey (du milieu) disparait. Bon tricot!
19.07.2025 - 22:49
![]() Barbara Seppoloni wrote:
Barbara Seppoloni wrote:
Buonasera posso realizzare il modello con i ferri dritti? Grazie
10.03.2025 - 21:23DROPS Design answered:
Buonasera Barbara, il modello è lavorato in piano, per cui può utilizzare anche i ferri dritti. Buon lavoro!
18.03.2025 - 20:40
![]() Betsy wrote:
Betsy wrote:
This is for pattern Dove 150-12. On the bottom of page 2, the last line, what do you mean by plaited? Is that the same at cables?
12.02.2024 - 01:39DROPS Design answered:
Hi Betsy, Yes, that means to cable. Happy knitting!
12.02.2024 - 08:05
![]() Luz Uribe wrote:
Luz Uribe wrote:
Hola, empecé el patrón por la espalda y terminé la primera serie de A1, A2 y no sé cómo continuar... no entiendo "cuando los puntos de A1 y A2 se han cruzado 10 veces verticalmente..." No hay una foto de la parte de atrás del tejido... me quedo suspendida mientras llega su respuesta, gracias!
06.01.2024 - 01:43DROPS Design answered:
Hola Luz, quiere decir cuando se hayan trabajado 10 trenzas en A.1 y A.2. Entonces continúas sin aumentos ni trenzas.
08.01.2024 - 00:12
![]() Francoise Viallard wrote:
Francoise Viallard wrote:
Bonjour, je souhaiterai faire ce modèle 3 fois que je detricote car il me manque des mailles je comme avec 130 et avec les mailles torses et les mailles ensembles sans jetées sauf celle tous les 2 rangs il me manque 4 mailles. Je ne comprends pas trop, je ne suis pas une novice. Pouvez vous m'expliquer SVP Merci
15.12.2023 - 20:08DROPS Design answered:
Bonjour Mme Viallard, quand vous tricotez les diagrammes, votre nombre total de mailles doit rester le même, vous allez juste diminuer le nombre de mailles jersey tricotées entre A.1 et A.2, suivez bien les diagrammes (mettez éventuellement un marqueur après A.1 et avant A.2 pour mieux vous repérer dans le nombre de mailles et vérifier après chaque rang). Bon tricot!
18.12.2023 - 08:12
![]() Lea wrote:
Lea wrote:
Bonjour il est noté après avoir croisé 10 fois au total.... sur le diagramme il n'y a que 4 croisement comment faire la suite? doit je recommencer depuis le bas du diagramme ? Merci de votre réponse
23.09.2023 - 08:27DROPS Design answered:
Bonjour Lea, continuez le motif exactement comme avant pour les mailles point mousse et les augmentations et continuez les torsades jusqu'à ce que vous ayez fait 10 torsades au total en hauteur. Bon tricot!
25.09.2023 - 08:33
![]() ANNA MARIA GUZZI wrote:
ANNA MARIA GUZZI wrote:
Grazie per risposta alla richiesta di foto del dietro. tuttavia dalla vs foto si evidenzia che ad un certo punto si interrompono gli intrecci , ma continuano gli aumenti con gettato . Nella scheda invece dite di NON eseguirli sia per davanti che dietro. Giusto per vs evidenza sulla scheda con traduzione in italiano . Saluti.
09.07.2023 - 16:24
![]() ANNA MARIA GUZZI wrote:
ANNA MARIA GUZZI wrote:
Buonasera . per favore posso vedere una foto della parte dietro del poncho donna Dove 150-12?grazie mille - anna
01.07.2023 - 20:50DROPS Design answered:
Buongiorno Anna Maria, purtroppo non abbiamo altre foto disponibili del modello. Buon lavoro!
05.07.2023 - 08:24
|
||||||||||||||||
Dove#dovecardigan |
||||||||||||||||
 |
 |
|||||||||||||||
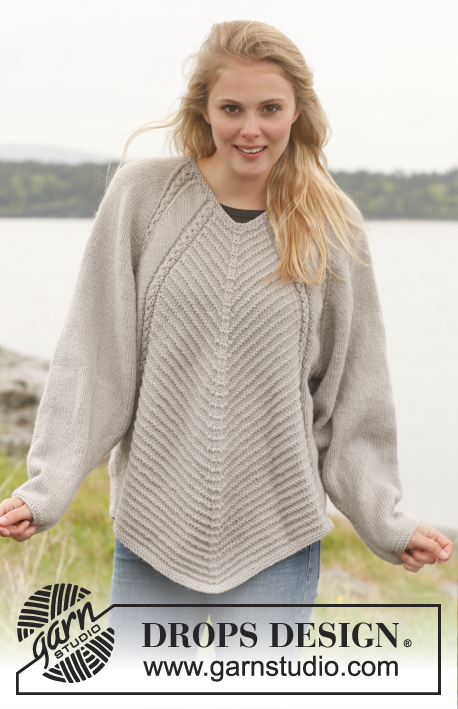
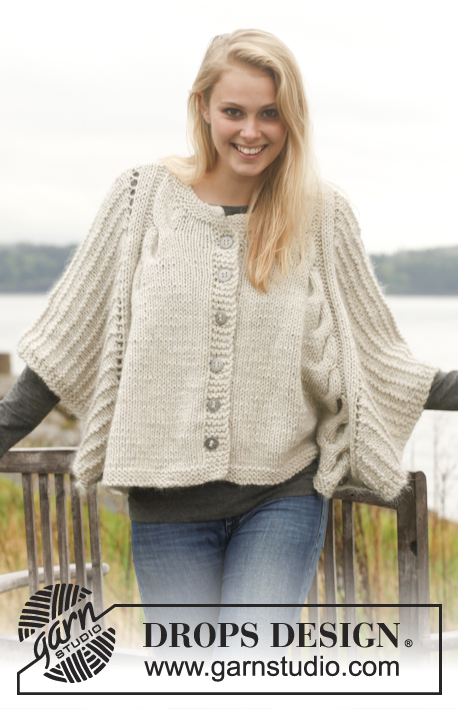
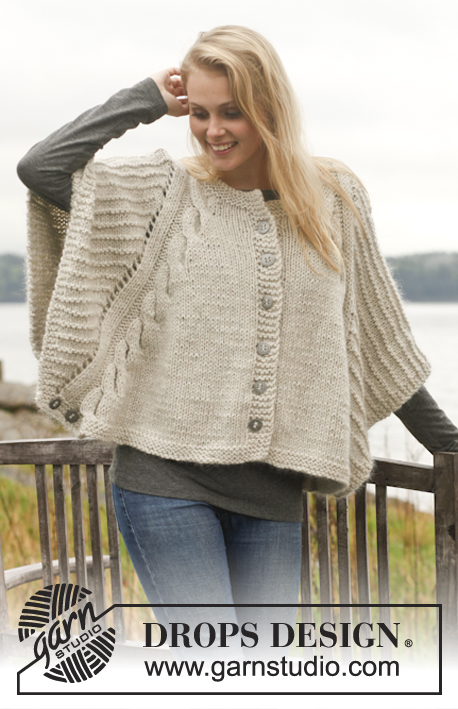
Knitted DROPS poncho with cables and textured pattern in "Nepal" and "Kid-Silk". Size: S - XXXL.
DROPS 150-12 |
||||||||||||||||
|
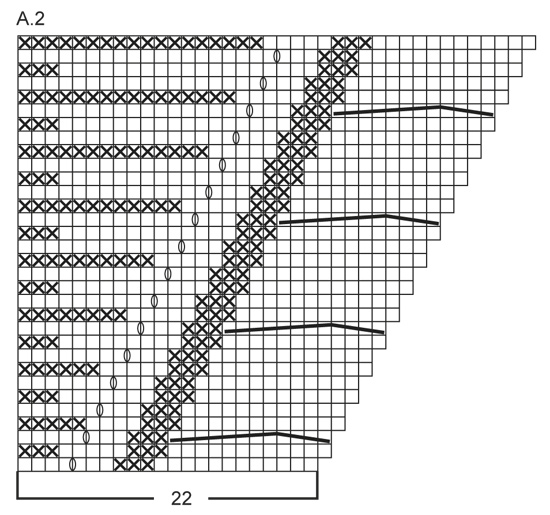
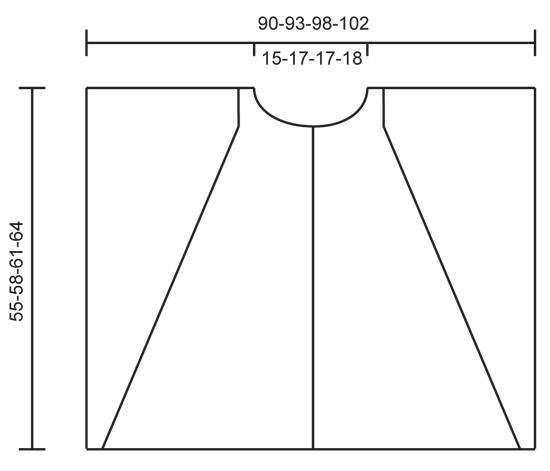
GARTER ST (back and forth on circular needle): K all rows. 1 ridge = K2 rows. PATTERN: See diagrams A.1 and A.2. The diagrams show all rows in pattern seen from RS. BUTTONHOLE: Dec for buttonholes on right band. 1 buttonhole = K tog third and fourth st from mid front and make 1 YO. Dec for buttonholes when piece measures: SIZE S/M: 7, 15, 23, 31, 39 and 47 cm / 2 ¾", 6", 9", 12¼", 15¼" and 18½" SIZE L: 8, 16, 25, 33, 42 and 50 cm / 3⅛", 6¼" 9¾", 13", 16½" and 19¾" SIZE XL/XXL: 7, 16, 25, 34, 43 and 52 cm / 2 ¾", 6¼", 9¾", 13⅜", 17" and 20½" SIZE XXXL: 8, 18, 27, 37, 46 and 55 cm / 3⅛", 7", 10⅝", 14½", 18" and 21⅝" ---------------------------------------------------------- BACK PIECE: Worked back and forth on circular needle. Cast on 108-112-118-122 sts on circular needle size 6 mm / US 10 with 1 strand of each yarn (= 2 strands). Work 3 ridges in GARTER ST - see explanation above. Switch to circular needle size 7 mm / US 10.75 and work next row from RS as follows: Work 4 sts in garter st, K 3, P 3, 88-92-98-102 sts in stockinette st, AT THE SAME TIME inc 12 sts by working 2 sts in each of the first 6 sts and 2 sts in each of the last 6 sts in stockinette st (= 12 sts inc), P 3, K 3, 4 sts in garter st = 120-124-130-134 sts in total on needle. Work 1 row as follows from WS: 4 sts in garter st, P 3, K 3, 100-104-110-114 sts in stockinette st, K 3, P 3, 4 sts in garter st. On next row from RS work as follows: Work A.1 (= 22 sts), work 76-80-86-90 sts in stockinette st and work A.2 (= 22 sts). Continue pattern like this, i.e. on every other row the section in stockinette st in the middle gets smaller while A.1 and A.2 get bigger – no of sts does not vary. When A.1 and A.2 have been worked 10-11-11-12 times in total vertically in each side, continue A.1 and A.2 without YOs and cable (work sts over cable in stockinette st). When piece measures 53-56-59-62 cm / 21"-22"-23¼"-24⅜", bind off the middle 16-18-18-20 sts for neck and finish each shoulder separately. Continue to bind off 1 st on the next row towards the neckline = 51-52-55-56 sts remain on each shoulder. Continue until piece measures 55-58-61-64 cm / 21⅝"-22¾"-24"-25¼" and bind off. Repeat on the other shoulder. RIGHT FRONT PIECE: Cast on 59-61-64-66 sts (includes 5 band sts towards mid front) on circular needle size 6 mm / US 10 with 1 strand of each yarn. Work 3 ridges in garter st. Switch to circular needle size 7 mm / US 10.75 and work as follows from RS: 5 band sts in garter st, work 44-46-49-51 sts in stockinette st, AT THE SAME TIME inc 6 sts by working 2 sts in each of the last 6 sts in stockinette st (= 6 sts inc), P 3, K 3, 4 sts in garter st = 65-67-70-72 sts in total on needle. Work 1 row as follows from WS: 4 sts in garter st, P 3, K 3, 50-52-55-57 sts in stockinette st, 5 band sts in garter st. On next row from RS work as follows: 5 band sts in garter st, 38-40-43-45 sts in stockinette st and then pattern according to diagram A.2 (= 22 sts). Continue pattern like this, i.e. section in stockinette st towards mid front gets smaller while A.2 gets bigger (no of sts does not vary). Remember BUTTONHOLES on band - see explanation above. NOTE: When A.2 have been worked 9-10-10-11 times in total vertically, continue A.2 without cable (work sts over cable in stockinette st) until A.2 has been worked for as many row as for back piece with increases, then continue without the increase, just as on back piece. AT THE SAME TIME when piece measures approx. 47-50-52-55 cm / 18½"-19¾"-20½"-21½" (make sure that 1 row has been worked after last buttonhole and plaiting in A.2 has been finished), slip the first 10-11-11-12 sts towards mid front on 1 stitch holder for neck (work sts before slipping them on stitch holder to avoid cutting the yarn in piece). Then bind off at beg of every row from neck: 2 sts 1 time and 1 st 2 times = 51-52-55-56 sts remain on shoulder. Continue until piece measures 55-58-61-64 cm / 21½"-22¾"-24"-25¼" - adjust according to back piece, bind off. LEFT FRONT PIECE: Cast on and work as right but reversed. Work pattern according to diagram A.1 instead of A.2. ASSEMBLY: Sew the shoulder seams. Sew 2 decorative buttons at the bottom of edge in garter st 3 and 9 cm / 1" and 3½" from edge in each side (sew through both layers so that front and back piece is tog at the edge in each side at the bottom of garment). NECK EDGE: Pick up approx. 60 to 70 sts from RS around the neck (includes sts on stitch holders mid front) with 1 strand of each yarn on circular needle size 6 mm / US 10. Work 3 ridges in garter st back and forth. Loosely bind off with K from WS. |
||||||||||||||||
Diagram explanations |
||||||||||||||||
|
||||||||||||||||
 |
||||||||||||||||
 |
||||||||||||||||
 |
||||||||||||||||
Have you finished this pattern?Tag your pictures with #dropspattern #dovecardigan or submit them to the #dropsfan gallery. Do you need help with this pattern?You'll find 21 tutorial videos, a Comments/Questions area and more by visiting the pattern on garnstudio.com. © 1982-2026 DROPS Design A/S. We reserve all rights. This document, including all its sub-sections, has copyrights. Read more about what you can do with our patterns at the bottom of each pattern on our site. |
||||||||||||||||


With over 40 years in knitting and crochet design, DROPS Design offers one of the most extensive collections of free patterns on the internet - translated to 17 languages. As of today we count 325 catalogs and 12298 patterns - 12288 of which are translated into English (US/in).
We work hard to bring you the best knitting and crochet have to offer, inspiration and advice as well as great quality yarns at incredible prices! Would you like to use our patterns for other than personal use? You can read what you are allowed to do in the Copyright text at the bottom of all our patterns. Happy crafting!
Post a comment to pattern DROPS 150-12
We would love to hear what you have to say about this pattern!
If you want to leave a question, please make sure you select the correct category in the form below, to speed up the answering process. Required fields are marked *.