
Popular categories
Looking for a yarn?


Comments / Questions (20)
![]() Manuela Antonelli wrote:
Manuela Antonelli wrote:
Buongiorno, non riesco a capire la descrizione del dietro. Lavorare come davanti, quando ho calato per la spalla, arrivo a 36 punti, come faccio a calare tutti i punti? Non capisco
02.04.2025 - 12:31DROPS Design answered:
Buonasera Manuela, a 36 maglie deve continuare a lavorare solo con il filato indicato ma sempre seguendo le indicazioni del davanti. Buon lavoro!
12.04.2025 - 17:51
![]() Gabi wrote:
Gabi wrote:
Ich präzisiere meine Fragestellung noch einmal: Ich stricke den Ärmel, bis 38M verbleiben (größte Größe). Dann - so verstehe ich es - ist die Schulter fertig. Warum soll dort plötzlich weitergestrickt werden? Zu keinem Zeitpunkt habe ich 36M auf der Nadel, oder etwa doch? Wo soll das sein?????? Lieben Dank im Voraus!
25.06.2018 - 17:19
![]() Gabi wrote:
Gabi wrote:
Liebes Drops Team, lieben Dank für die schnelle Antwort. Sorry immer noch nicht verstanden, rechtes Rückenteil Schulter 36 M drauf also fertig, ist für mich das Ende. Wie soll ich weiter stricken? Bitte um Antwort. Lieben Dank im voraus Gabi?
25.06.2018 - 13:12DROPS Design answered:
Liebe Gabi, Ihre Frage wurde unser Designteam weitergeleitet, danke im voraus für Ihren Geduld.
26.06.2018 - 08:06
![]() Gabi wrote:
Gabi wrote:
Liebes Drops Team, ich bin beim rechten Rückenteil. Wenn ich insgesamt noch 36 M auf der Nadel habe, dann in der jeweiligen Farbe stricken Die Abnahmen bis alle M abgenommen sind. Verstehe ich nicht, bei 36 M sind doch schon alle M verbraucht, also Ende. Bitte um eine Antwort Lieben Dank im voraus
24.06.2018 - 16:36DROPS Design answered:
Liebe Gabi, wenn 36 M übrig sind, stricken sie jetzt nur mit Bomull-Lin oder Paris, und dann wie bei dem linken Vorderteil (= Rechten Rückentil) weiter stricken, bis alle Abnahmen fertig sind = es bleibt die selben Maschenanzahl am Ende von jedem Rückenteil wie am Ende vom jeden Vorderteil. Viel Spaß beim stricken!
25.06.2018 - 09:04
![]() Alex wrote:
Alex wrote:
The instructions for the sleeve say to: "When piece measures 20-21-22-23-24-25 cm / 8''-8¼''-8¾''-9''-9½''-9¾'' from the last marker (measured straight up along the side), dec for shoulder as follows: K tog the last 2 sts at end of every row from RS until 29-31-32-34-36-38 sts remain on needle". But the pattern doesn't say what to do with those stitches that are left. Bind off? Put them on a stitch holder and incorporate them into the edging somehow? Please help.
11.04.2018 - 23:01DROPS Design answered:
Dear Alex, cast off the remaining sts at the end of sleeve. Happy knitting!
12.04.2018 - 08:49
![]() Ingrid Boogaart wrote:
Ingrid Boogaart wrote:
Ook weer een apart vest
14.01.2013 - 16:30
![]() Moni wrote:
Moni wrote:
Das Muster ist wirklich schön, würde mir das Teil aber etwas kürzer stricken.
11.01.2013 - 21:41
![]() Waltraud wrote:
Waltraud wrote:
"Oman" ist mein Namensvorschlag
07.01.2013 - 22:47
![]() Gudula wrote:
Gudula wrote:
Sehr harmonisches Muster wäre ein Favorit für mich
05.01.2013 - 19:14
![]() Laila Hallvig wrote:
Laila Hallvig wrote:
Sommerlig
04.01.2013 - 18:43
|
||||
Valentina#valentinacardigan |
||||
 |
 |
|||
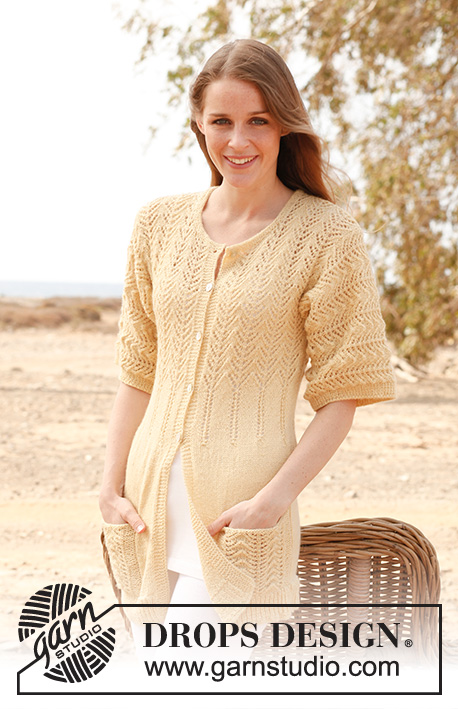
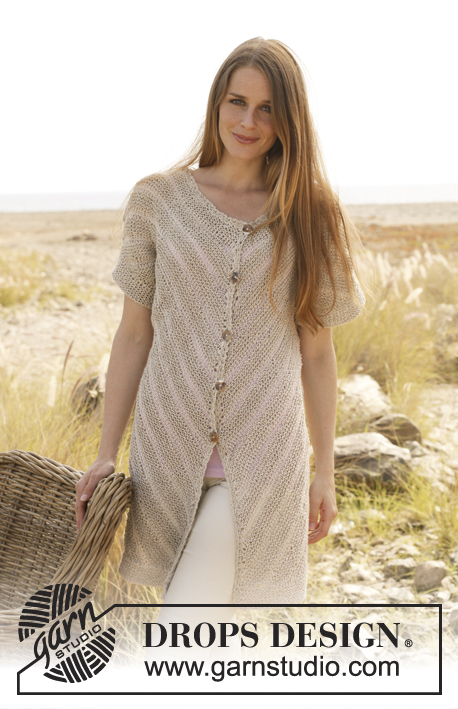
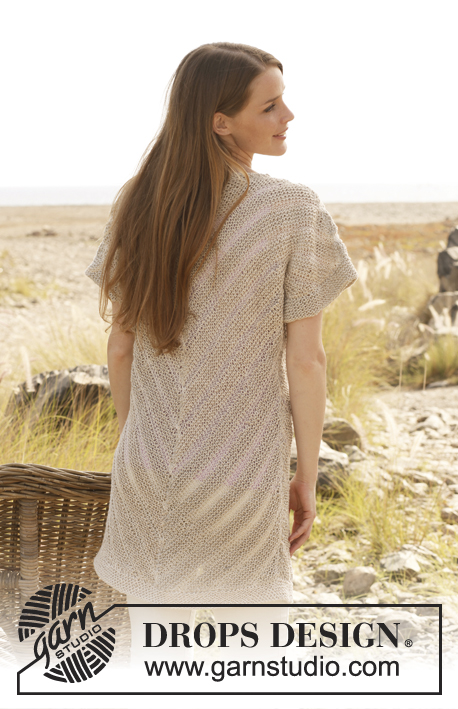
Knitted DROPS vest worked diagonally in ”Bomull-Lin” or ”Paris” and ”Lace”. Size: S - XXXL.
DROPS 146-29 |
||||
|
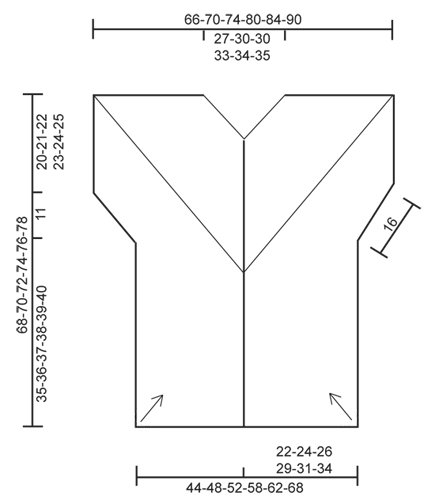
GARTER ST (back and forth on needle): K all rows. 1 ridge = 2 rows K. PATTERN: Work pattern as follows: 10 rows Bomull Lin or Paris 4 rows Lace Repeat these 14 rows, carry along the yarn not worked with at the side when working the other yarn. NOTE! Lace must be worked loosely so that the knitting gauge is the same as with Bomull-Lin/Paris. ---------------------------------------------------------- VEST: The vest is worked in 4 parts. Arrows on chart show the knitting direction. The entire vest is worked in GARTER ST - see explanation above. REMEMBER THE KNITTING GAUGE - Incorrect gauge will affect the shape of the garment! RIGHT FRONT PIECE: Worked back and forth on circular needle to make room for all the sts. Cast on 3-3-4-4-4-4 sts on circular needle size 6 mm / US 10 with Bomull-Lin or Paris. Work in GARTER ST and PATTERN - see explanation above (1st row = RS). AT THE SAME TIME inc 1 st at beg of every row by working 2 sts in first st on all rows until there are 47-51-56-62-66-72 sts on needle. Then dec 1 st at beg of row from mid front (= from RS) by K tog the first 2 sts. Repeat dec at beg of every row from RS until finished measurements. AT THE SAME TIME continue inc towards the side as before by working 2 sts in first st at beg of every row from WS (no of sts will thus not vary) until piece measures 35-36-37-38-39-40 cm / 13¾"-14¼"-14½"-15"-15¼"-15¾" - measured straight up along the side of the vest (not in knitting direction) - see chart. SLEEVE: Insert 1 marker in the side. Now cast on new sts at the end of every row from RS (i.e. towards the side) for sleeve as follows: Cast on 6 new sts towards the side 4 times in total (= 24 sts inc). Insert another marker in the side. NOTE: Remember to continue dec mid front as before the entire way until finished measurements = 67-71-76-82-86-92 sts in total on needle. After last inc for sleeve, continue inc towards the side as before (i.e. work 2 sts in first st on every row from WS). When piece measures 20-21-22-23-24-25 cm / 8"-8¼"-8¾"-9"-9½"-9¾" from the last marker (measured straight up along the side), dec for shoulder as follows: K tog the last 2 sts at end of every row from RS until 29-31-32-34-36-38 sts remain on needle (i.e. dec both at the beg and end of every row from RS, there are no more inc on WS). LEFT FRONT PIECE: Cast on and work as right piece but reversed. All dec/inc explained at the beg of row are now done at the end of row and vice verse. BACK PIECE: The back piece is worked in 2 parts and sewn tog mid back. RIGHT BACK PIECE: Cast on and work as on left front piece. When 35-35-36-36-36-36 sts remain, finish knitting the piece with Bomull-Lin or Paris. Continue dec until all sts have been dec. Insert 1 marker on the shoulder 13.5-15-15-16.5-17-17.5 cm / 5¼"-6"-6"-6½"-6¾"-6⅞" in from mid back (marks the neck line). LEFT BACK PIECE: Cast on and work as right front piece. When 35-35-36-36-36-36 sts remain, finish knitting the piece with Bomull-Lin or Paris. Continue dec until all sts have been dec. Insert 1 marker on the shoulder 13.5-15-15-16.5-17-17.5 cm / 5¼"-6"-6"-6½"-6¾"-6⅞" in from mid back (marks the neck line). ASSEMBLY: Place back piece edge to edge and sew tog mid back in front loop of outermost sts. Sew shoulder seams edge to edge from outer edge on sleeve until marker at the neck in each side. SLEEVE EDGE: Pick up 60-63-66-69-72-75 sts along the edge on sleeve (from both front and back piece). Work in garter st back and forth with Bomull-Lin or Paris for 4 cm / 1½". Bind off. Repeat on the edge of the other sleeve. ASSEMBLY: Sew underarm seam and side seam in one in front loop of outermost st to avoid a chunky seam. BOTTOM EDGE: Pick up 132-144-156-174-186-204 sts along bottom edge on jacket (front pieces and back pieces). Work in garter st with Bomull-Lin or Paris for 4 cm / 1½". Bind off. CROCHET EDGE: Work an edge with Bomull-Lin or Paris on hook size 5 mm / H/8 around the opening on jacket as follows: Work sc's up right front piece, around the neck and down along left front piece. Turn and work back as follows: ch 1, 1 sc in first sc, * ch 1, 1 sc in next sc *, repeat from *-*. Fasten off. Sew the buttons on left front piece, the upper button 1 cm / ½" below the neck, the bottom button approx. 30 cm / 11¾" from bottom edge. Sew on the remaining buttons evenly between bottom and upper button. Button the jacket in the crochet edge. |
||||
Diagram explanations |
||||
|
||||
 |
||||
Have you finished this pattern?Tag your pictures with #dropspattern #valentinacardigan or submit them to the #dropsfan gallery. Do you need help with this pattern?You'll find 10 tutorial videos, a Comments/Questions area and more by visiting the pattern on garnstudio.com. © 1982-2026 DROPS Design A/S. We reserve all rights. This document, including all its sub-sections, has copyrights. Read more about what you can do with our patterns at the bottom of each pattern on our site. |
||||


With over 40 years in knitting and crochet design, DROPS Design offers one of the most extensive collections of free patterns on the internet - translated to 17 languages. As of today we count 325 catalogs and 12298 patterns - 12288 of which are translated into English (US/in).
We work hard to bring you the best knitting and crochet have to offer, inspiration and advice as well as great quality yarns at incredible prices! Would you like to use our patterns for other than personal use? You can read what you are allowed to do in the Copyright text at the bottom of all our patterns. Happy crafting!
Post a comment to pattern DROPS 146-29
We would love to hear what you have to say about this pattern!
If you want to leave a question, please make sure you select the correct category in the form below, to speed up the answering process. Required fields are marked *.