
Popular categories
Looking for a yarn?


Comments / Questions (145)
![]() Petra wrote:
Petra wrote:
Hallo Drops-Team, Leider ist bei mir der Halsausschnitt viel zu klein ausgefallen und die Ärmel sind zu eng. Was kann ich da falsch gemacht haben? LG Petra
30.12.2025 - 23:06DROPS Design answered:
Hi Patra, perhaps your knitting is too tight? Did you make a swatch first?
30.01.2026 - 10:33
![]() Ami Sundén wrote:
Ami Sundén wrote:
Jag får inte till avmaskningen till och på ärmarna. Är mönstret fel eller är det jag som har fel?
30.09.2025 - 10:24DROPS Design answered:
Hej Ami. I den minsta storleken så avmaskar du såhär till ärmkulle: när arbetet mäter 29 cm maskas det av 3 maskor på varje sida av markören (som sitter mitt under ärmen), efter det maskas det av i i varje sida i början på varje v: 2 m 3 gånger, sedan maskas det av 2 m i varje sida tills arb mäter 33 cm, maska av 3 m 1 gång i varje sida. Maska av de resterande m, arb mäter ca 34 cm. Vad av detta är det som du inte får att stämma? Mvh DROPS Design
02.10.2025 - 07:45
![]() Dea Turri wrote:
Dea Turri wrote:
Devo raccogliere le maglie per ilbordo del collo. C'è scritto di riprendere 74-94 maglie. Come decidere se 74 o 94? Perché lo scollo sia giusto e non troppo largo bisogna diminuire mentre si fanno i 6 ferri a legaccio? Grazie
30.08.2025 - 16:30DROPS Design answered:
Buonasera Dea, non ci sono diminuzioni sul bordo del collo, può riprendere il numero di maglie che le sembra più appropriato. Buon lavoro!
30.08.2025 - 19:56
![]() Hetty wrote:
Hetty wrote:
Thank you for your assistance. I’ve made countless items through Garnstudio and this would be the most challenging by far.
16.06.2025 - 14:17
![]() Hetty wrote:
Hetty wrote:
Could you explain the maths of the right front to me? I begin with 58 stitches, later I will place 14 sts on the stitch holder, then decrease (4x2, 2x1) =12 sts. At the same time decrease every other row of the sleeve edge. And I’m supposed to have 24 stitches on the cast off edge of the shoulder. It doesn’t add up please explain with number of rows not just length. I’m at 33 cms with 46 sts left. I’m not even at the point where I put sts on the stitch holder at centre front!
15.06.2025 - 13:16DROPS Design answered:
Dear Hetty, you have 58 sts, then decrease 8 sts for the armhole (= 50 sts left). When piece measures 34-37 cm you should place 14 sts on the stitch holder (= 50-14 = 36 sts). Then you cast off for the neck 2 sts 4 times (= 36-8 = 28) and 1 st 4 times (= 28-4 = 24 sts) So you have 24 sts left. Happy knitting!
16.06.2025 - 00:51
![]() Hetty Stok wrote:
Hetty Stok wrote:
I’m knitting this in the 5/6 size, with Drops Baby Merino. I’ve done my comparisons with yarn weight and length. I bought 200g of yarn and I’m an average tension knitter. So why do I have the sense that I’m going to run out of yarn? I won’t get two sleeves from a 50g ball, and I’m halfway through the my second ball with 20cms of the main body done. That leaves one ball for the entire bodice. Is this enough?
01.06.2025 - 07:02DROPS Design answered:
Dear Hetty, have you done the swatch before starting to work the cardigan? Have you checked that the gauge of the honeycomb pattern is as stated in the pattern? You should have bought 4 balls of DROPS Baby Merino (since you need 200gr and they are 50gr balls). As you can check with the yarn amounts for the different sizes, you should have enough for your size but you won't have much leftover yarn (since you need the same amount for the smaller size and you need 50gr more for the larger size). So you need to carefully check your gauge and the measurements of the piece as you work to ensure that you will have enough yarn for the piece. Happy knitting!
01.06.2025 - 23:13
![]() Elisabeth Karlsson wrote:
Elisabeth Karlsson wrote:
Räcker verkligen 200 g till den här tröjan 5-6 år? My honey mvh Elisabeth
15.04.2025 - 10:06
![]() Susi wrote:
Susi wrote:
Jeg vil gerne strikke denne i en mindre str. - str. 2 år. Kan det lade sig gøre at tilpasse opskriften til det og hvordan gøres det? Mange hilsner fra Susi Balck
01.04.2025 - 19:47
![]() Marja Oja wrote:
Marja Oja wrote:
Hei, pitääkö jakussa pituuden ollessa 24 cm todella lisätä silmukoita? Piirroksessa jakku kaventuu ennen kädenteitä ja mallineule A osaa. Ystävällisin terveisin Marja
01.04.2025 - 16:12DROPS Design answered:
Hei, työhön tehdään lisäyksiä, koska muuten jakusta tulisi liian kapea, kun neulotaan hunajakennoneuletta.
02.04.2025 - 17:45
![]() Ann DiDomenico wrote:
Ann DiDomenico wrote:
I am confused about the directions for the sleeve cap. I understand the first part (2 stitches 3 times) and the second part (1 stitch x times) but I’m not sure what is meant by “then bind off 2 stitches in each side until piece measures x.” Do I bind off these two stitches once and then knit even on the remaining stitches until I reach the required measurement, or continue binding off the two stitches multiple times until I reach the required measurement.
16.03.2025 - 23:53DROPS Design answered:
Dear Ann, it means that you continue binding off 2 stitches at the beginning of every row in each side until the piece reaches the necessary length. Happy knitting!
17.03.2025 - 00:06
|
||||||||||
My honey#myhoneycardigan |
||||||||||
 |
 |
|||||||||
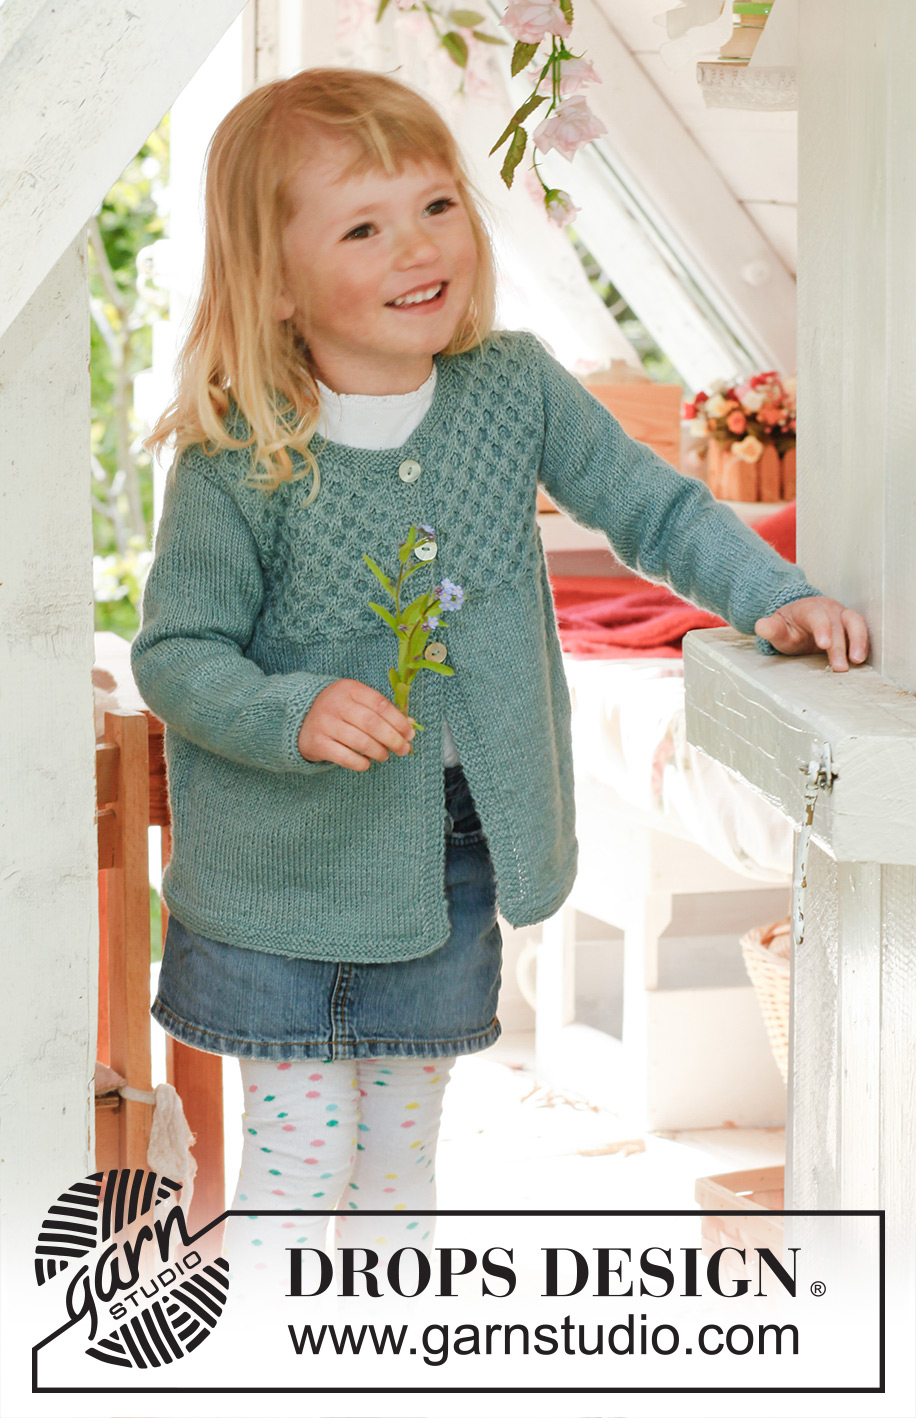
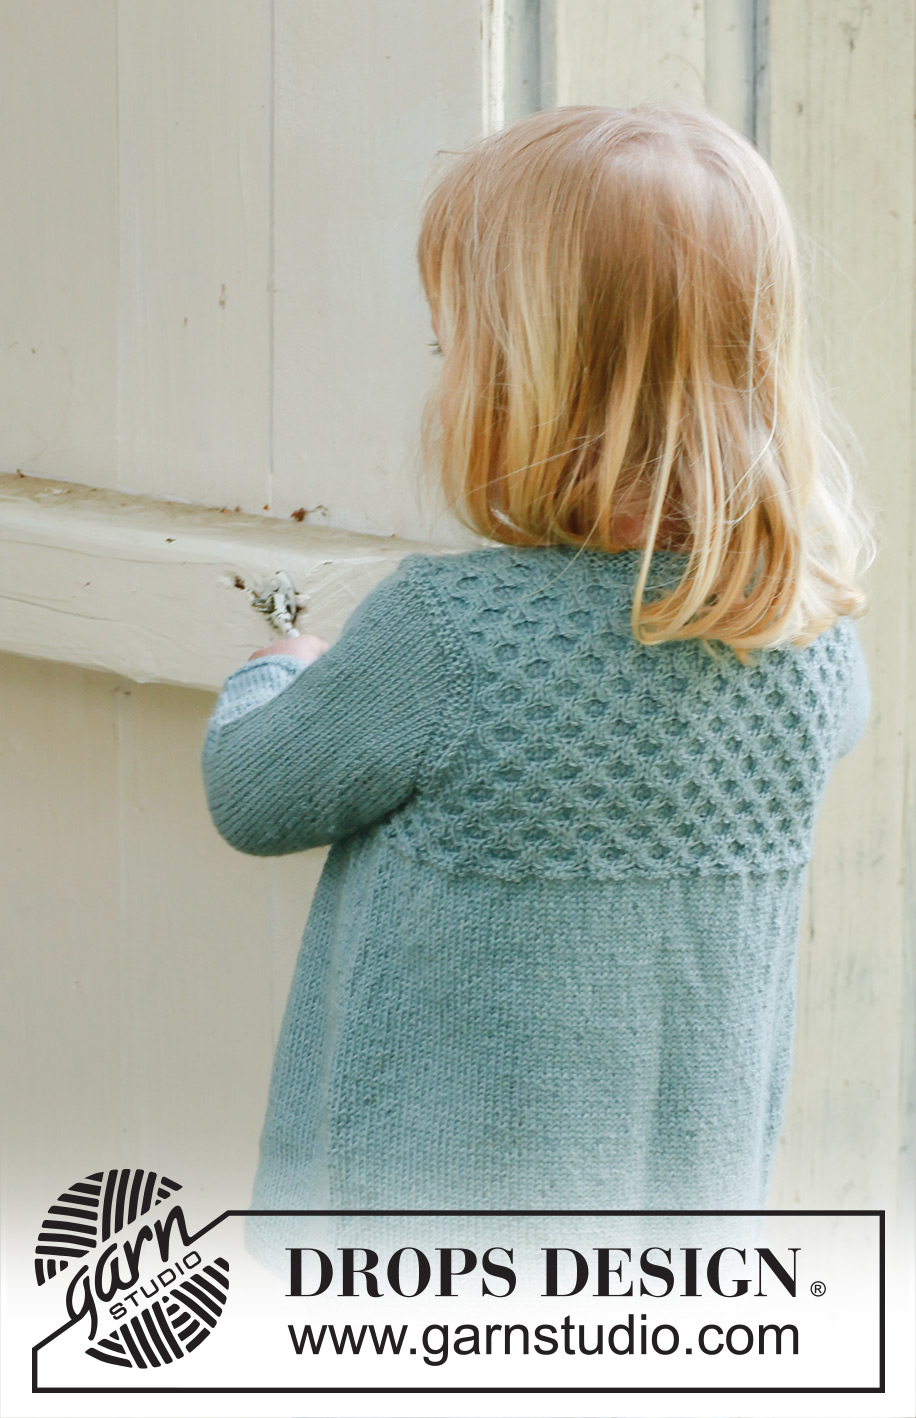
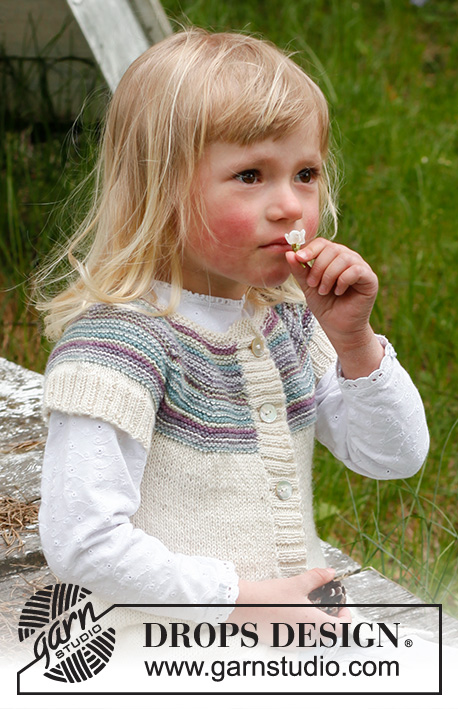
Knitted jacket with honeycomb pattern in DROPS Alpaca. Size children 3 to 12 years.
DROPS Children 23-19 |
||||||||||
|
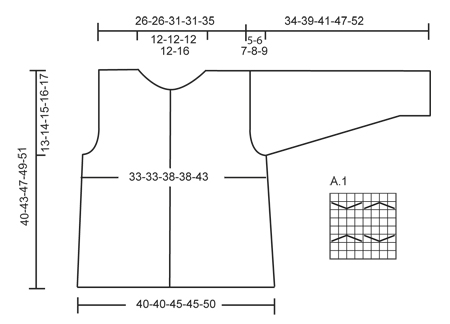
GARTER ST (back and forth on needle): K all rows. GARTER ST (in the round): * K 1 round and P 1 round *, repeat from *-*. PATTERN: See diagram A.1. Diagram shows the pattern from RS. BUTTON HOLES: Bind off for button holes on right band. 1 button hole = bind off 3rd st from mid front. On next row cast on 1 new st over the bound off st. Bind off for button holes when piece measures: Size 3/4: 21, 27 and 33 cm / 8¼", 10⅝" and 13" Size 5/6: 24, 30 and 36 cm / 9½", 11¾" and 14¼" Size 7/8: 25, 30, 35 and 40 cm / 9¾",11¾",13¾" and 15¾" Size 9/10: 27, 32, 37 and 42 cm / 10⅝",12½",14½" and 16½" Size 11/12: 29, 34, 39 and 44 cm / 11⅜",13⅜",15¼" and 17¼". DECREASE TIP (applies to armholes): All dec are done from RS. Dec inside 3 sts in garter st. Work sts that do not fit A.1 in stockinette st. Dec after 3 sts in garter st as follows: Slip 1 st as if to K, K 1, psso. Dec before 3 sts in garter st as follows: K 2 tog. --------------------------------------------------------- JACKET: Worked back and forth on circular needle. Cast on 202-202-226-226-250 sts on circular needle size 3 mm / US 2.5 with Alpaca. P 1 row from WS. Then work 6 rows in garter st - see explanation above. REMEMBER THE GAUGE! Then work in stockinette st but work the 5 outermost sts (= band) in each side in garter st until finished measurements. When piece measures 24-26-28-29-30 cm / 9½"-10¼"-11"-11⅜"-11¾", K1 row from RS and AT THE SAME TIME inc 34-34-42-42-50 sts evenly = 236-236-268-268-300 sts on needle. K1 row on WS. Work next row from RS as follows: 5 sts in garter st, K 1, diagram A.1 over the next 224-224-256-256-288 sts, finish with K 1 (i.e stockinette st) and 5 sts in garter st. Continue like this and remember to bind off for button holes - see explanation above. Insert 2 markers in the piece; 62-62-70-70-78 sts in from each side (back piece = 112-112-128-128-144 sts). When piece measures 27-29-32-33-34 cm / 10⅝"-11⅜"-12½"-13"-13⅜", work 2 rows in garter st over 8 sts on each side of markers, work the other sts as before. On next row bind off 4 sts on each side of every marker and finish each piece separately. BACK PIECE: = 104-104-120-120-136 sts. Work as follows seen from RS: 3 sts in garter st, K 1, diagram A.1 over the next 96-96-112-112-128 sts, finish with K 1 and 3 sts in garter st. At the same time dec for armholes in each side every other row as follows - read DECREASE TIP: 1 st 8 times = 88-88-104-104-120 sts. When piece measures 38-41-45-47-49 cm / 15"-16⅛"-17¾"-18½"-19¼", bind off the middle 40-40-40-40-56 sts for neck = 24-24-32-32-32 sts remain on each shoulder. Finish each part separately. Bind off when piece measures 40-43-47-49-51 cm / 15¾"-17"-18½"-19¼"-20". RIGHT FRONT PIECE: = 58-58-66-66-74 sts. Work as follows seen from RS: 5 sts in garter st, K 1, A.1 over the next 48-48-56-56-64 sts, finish with K 1 and 3 sts in garter st. Dec for armhole in the side as on back piece. Remember to bind off for button holes. AT THE SAME TIME when piece measures 34-37-41-43-45 cm / 13⅜"-14½"-16⅛"-17"-17¾", put 14-14-14-14-22 sts towards mid front on a stitch holder. Then bind off for neck in beg of every row from neck side: 2 sts 4 times, and 1 st 4 times – work the sts that do not fit A.1 in stockinette st. After all bind offs, 24-24-32-32-32 sts remain on shoulder. Bind off when piece measures 40-43-47-49-51 cm / 15¾"-17"-18½"-19¼"-20". LEFT FRONT PIECE: Work as right front piece but reversed. SLEEVE: Worked in the round on double pointed needles. Cast on 44-48-48-52-52 sts on double pointed needles size 3 mm / US 2.5 with Alpaca. Insert a marker at the beg of round. Work 6 rounds in garter st, then work in stockinette st until finished measurements. When piece measures 5 cm / 2", inc 1 st on each side of marker, repeat every 3½-4-3½-4½-4 cm / 1¼"-1½"-1¼"-1¾"-1½" a total of 7-7-8-8-9 times = 58-62-64-68-70 sts. When piece measures 29-33-34-39-43 cm / 11⅜"-13"-13⅜"-15¼"-17", bind off 3 sts on each side of marker, now work piece back and forth. Then bind off for sleeve cap at beg of every row, in each side as follows: 2 sts 3 times and 1 st 0-1-3-5-6 times, then bind off 2 sts in each side until piece measures 33-38-40-46-51 cm / 13"-15"-15¾"-18"-20", bind off 3 sts 1 time in each side. Bind off the remaining sts, piece measures approx. 34-39-41-47-52 cm / 13⅜"-15¼"-16⅛"-18½"-20½". ASSEMBLY: Sew the shoulder seams. Sew in sleeves. Sew the buttons on to left front piece. NECK EDGE: Pick up 74 to 94 sts (including sts on stitch holders) around the neck on circular needle size 3 mm / US 2.5. Work 6 rows in garter st. Bind off. |
||||||||||
Diagram explanations |
||||||||||
|
||||||||||
 |
||||||||||
Have you finished this pattern?Tag your pictures with #dropspattern #myhoneycardigan or submit them to the #dropsfan gallery. Do you need help with this pattern?You'll find 15 tutorial videos, a Comments/Questions area and more by visiting the pattern on garnstudio.com. © 1982-2026 DROPS Design A/S. We reserve all rights. This document, including all its sub-sections, has copyrights. Read more about what you can do with our patterns at the bottom of each pattern on our site. |
||||||||||


With over 40 years in knitting and crochet design, DROPS Design offers one of the most extensive collections of free patterns on the internet - translated to 17 languages. As of today we count 324 catalogs and 12252 patterns - 12242 of which are translated into English (US/in).
We work hard to bring you the best knitting and crochet have to offer, inspiration and advice as well as great quality yarns at incredible prices! Would you like to use our patterns for other than personal use? You can read what you are allowed to do in the Copyright text at the bottom of all our patterns. Happy crafting!
Post a comment to pattern DROPS Children 23-19
We would love to hear what you have to say about this pattern!
If you want to leave a question, please make sure you select the correct category in the form below, to speed up the answering process. Required fields are marked *.