
Popular categories
Looking for a yarn?


Comments / Questions (42)
![]() Kalinda Duscha wrote:
Kalinda Duscha wrote:
Hilfe Noppen. Stricke ich es wie in dem Video=Hilfe vom 9.7.2018 "How to Work a bubble" Oder Video "How to Work a bubble over 7 stitches" Oder: 7 Maschen aufnehmen, wenden, 7 Maschen links, wenden,7 Maschen rechts, drüberziehen. Bei Facebook/ Drops habe ich gefragt und geguckt und keine Hilfe gefunden.
08.02.2025 - 21:48DROPS Design answered:
Liebe Frau Duscha, vielleicht kann Ihnen dieses Video helfen - beachten Sie nur, daß im Video, die 7 Maschen sofort zusammen gestrickt werden, bei diesem Modell soll man diese Maschen zusammen bei der nächsten Reihe stricken werden. Viel Spaß beim Stricken!
10.02.2025 - 10:24
![]() Rosemarie wrote:
Rosemarie wrote:
128 Maschen erbringen nur 40cm nicht 60cm wie kann ich es verbreiten? M1b oder was sonst vielen Dank
04.03.2021 - 14:06DROPS Design answered:
Liebe Rosemarie, versuchen Sie mit grösseren Nadeln - hier lesen Sie mehr über die Maschenprobe - nach Stricken wird es noch gespannt (siehe dieses Video). Viel Spaß beim stricken!
04.03.2021 - 15:51
![]() Hélène wrote:
Hélène wrote:
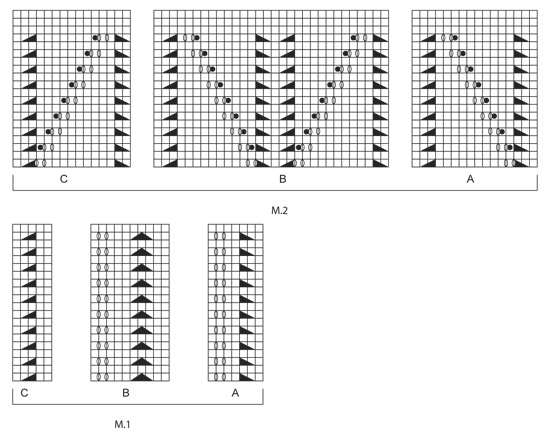
Bonjour! Je tricote la section M2 et je me questionne à savoir si les 2mailles ens. à la fin du rang doivent être faites ou si c’était seulement pour le 1er rang? Devons-nous déplacer les marqueurs comme à la première section? Merci de votre aide! Hélène
17.02.2019 - 18:12DROPS Design answered:
Bonjour Hélène, lisez tous les rangs des diagrammes de droite à gauche en commençant en bas, le nombre de jetés total du rang viendra compenser le nombre de diminutions du même rang (le nbe de mailles reste le même). Au rang suivant sur l'envers, n'hésitez pas à déplacer vos marqueurs pour délimiter chaque motif que les diminutions soient toujours bien alignées les unes au-dessus des autres. Bon tricot!
18.02.2019 - 10:31
![]() Hélène wrote:
Hélène wrote:
Bonjour! On indique à la section M1A 7 mailles mais une fois tricotée, il y a 8 mailles. Est-ce une erreur? Merci de votre aide, Hélène
12.02.2019 - 18:25DROPS Design answered:
Bonjour Hélène, aucunement: on diminue 1 m dans A, mais on fait 2 jetés (= 1 diminution, 2 augmentations), dans B, on diminue 2 m et on fait 2 jetés (= 2 diminutions, 2 augmentations), dans C, on diminue 1 m (= 1 diminution) = on a bien un total de 4 diminutions compensées par 4 augmentations, suivez le conseil de la réponse précédente pour bien conserver votre bon nombre de mailles dans chaque diagramme. Bon tricot!
13.02.2019 - 09:01
![]() Hélène wrote:
Hélène wrote:
Bonjour! J’ai une question pour vous à savoir à la section M1C on indique 5 mailles mais lorsqu’on l’a tricote il n’en reste que 4 mailles. Donc, au rang de retour, je n’ai plus que 127 mailles (2mendr,2mens,1mendr=4mailles) et au rang suivant à l’endroit il me manque cette maille pour tricoter les grilles. Merci beaucoup pour votre aide!
12.02.2019 - 17:09DROPS Design answered:
Bonjour Hélène, le nombre de mailles ne doit pas changer quand on tricote M.1: on diminue au total 4 mailles dans M.1A,B et C et on fait 4 jetés, c'est-à-dire que chaque diminution sera compensée par un jeté. Le nombre de mailles doit rester le même dans chaque diagramme, utilisez des marqueurs pour séparer les différents motifs A, B et C et sur l'envers, replacez vos marqueurs pour qu'il y ait toujours le même nombre de mailles dans chaque diagramme. Ainsi, au rang suivant sur l'endroit, le nombre de mailles tombera de nouveau juste. Bon tricot!
13.02.2019 - 08:59
![]() Hélène wrote:
Hélène wrote:
Bonjour! J’aimerais savoir si nous devons tourner notre travail tout de suite après avoir fait les nopes sur l’endroit ou terminer le rang sur l’endroit et après tricoter le rang sur l’envers pour tricoter ces sept mailles ensemble? Merci de votre attention,
03.01.2019 - 16:39DROPS Design answered:
Bonjour Hélène, chaque nope se tricote sur 2 rangs: on tricote d'abord 7 fois la même maille, on tourne, on tricote ces 7 m ens à l'envers, on tourne et on continue le rang comme dans le diagramme. Bon tricot!
04.01.2019 - 11:58
![]() Hélène wrote:
Hélène wrote:
Bonjour! J’aimerais savoir si vous avez une vidéo concernant le grafting sur point mousse car il semble que ce soit différent du grafting sur point de jersey? Merci de votre attention.
02.12.2018 - 01:29DROPS Design answered:
Bonjour Hélène, le grafting sur du point mousse se fait de la même façon que sur du jersey, en prenant les 2 pièces sur l'endroit (le dernier rang de chacune de ces 2 parties est tricoté sur l'envers). Bon assemblage!
03.12.2018 - 09:19
![]() Hélène wrote:
Hélène wrote:
Bonjour! Merci de me répondre si rapidement mais je me permets d’insister dans la légende il manque les deux symboles. Ces derniers sont décrits mais il manque le dessin les représentant. Si vous vérifiez , il y a deux cases blanches. Merci et au plaisir de vous lire,
10.07.2018 - 14:24DROPS Design answered:
Bonjour Hélène, nous pouvons voir ces symboles dans la légende et dans les diagrammes, essayez d'actualiser votre page après avoir nettoyé les cookies/votre cache, c'est peut-être juste un bug passager de visualisation. Bon tricot!
10.07.2018 - 14:42
![]() Hélène wrote:
Hélène wrote:
Bonjour! Je remarque que dans la légende des diagrammes il manque le dessin de deux opérations, soit le surjet simple et le jeté. Suis-je dans l’erreur? Merci!
10.07.2018 - 01:14DROPS Design answered:
Bonjour Hélène, sauf erreur, tous les symboles du diagramme sont bien dans la légende, le surjet simple vient en 2ème position (= glisser 1 m à l'end, 1 m end, passer la m glissée par-dessus la m tricotée) et le jeté se trouve juste après. Bon tricot!
10.07.2018 - 08:48
![]() Beata wrote:
Beata wrote:
Witam. Czy ten szal mozna dziergac w jednej czesci zamiast w dwoch? Wtedy wzor ukladalby sie w jedna strone.
12.02.2018 - 12:30DROPS Design answered:
Witam, oczywiście. Wszystko zależy od efektu, który chcemy otrzymać. Miłej pracy!
12.02.2018 - 14:39
|
|||||||||||||||||||
Soft Spring#softspringshawl |
|||||||||||||||||||
 |
 |
||||||||||||||||||
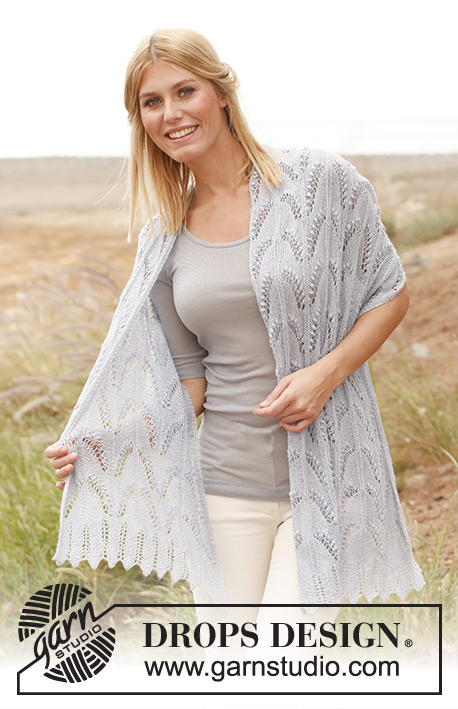
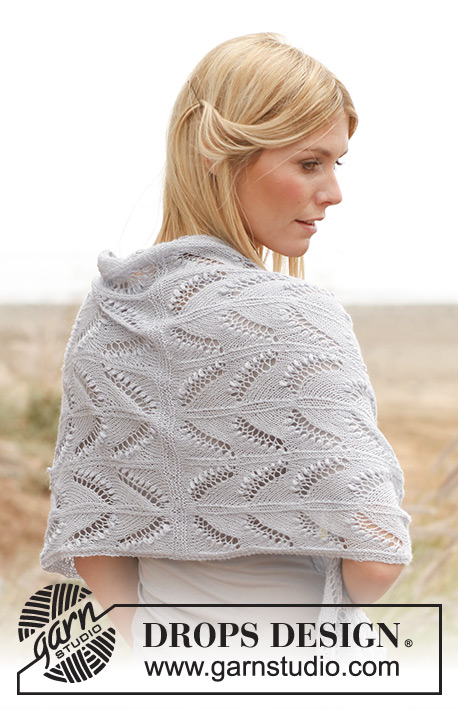
Knitted DROPS shawl with lace pattern and bobbles in ”Lace”.
DROPS 138-14 |
|||||||||||||||||||
|
KNITTING GAUGE: This garment is to be soaked and blocked/stretched to size afterwards so the knitting gauge is not that important. But to get a sense of whether you are working too loose/tight, work a test on needle size 3.5 mm / US 4 in stockinette st and get approx. 23 sts x 30 rows = 10 x 10 cm / 4" x 4". GARTER ST (back and forth on needle): K all rows. PATTERN: See diagrams M.1 and M.2. Diagram shows all rows in the pattern seen from RS. BOBBLE: Row 1 (RS): Work 7 sts in 1 st as follows: * K 1, 1 YO *, repeat from *-* a total of 3 times and finish with K 1 = 7 sts. It is important to work the sts loosely (approx. 1 cm / ⅜" long). Row 2 (WS): P these 7 sts tog. It will be difficult to work the sts from 1st row tog if they are too short and too tight. --------------------------------------------------------- SHAWL: Cast on 128 sts on needle size 3.5 mm / US 4 with Lace. K 1 row from WS. Work next row as follows: 3 sts in GARTER ST, diagram M.1A 1 time, diagram M.1B 11 times, diagram M.1C 1 time, 3 sts in garter st. Continue until M.1 has been work 1 time vertically. Now work 4 rows in stockinette st with 3 sts in garter st in each side. Work next row as follows: 3 sts in garter st, diagram M.2A 1 time, diagram M.2B 3 times, diagram M.2C 1 time, K 2 tog (on next row this st is one of the 3 edge sts in garter st), 2 sts in garter st = 127 sts. Continue with pattern and 3 sts in garter st in the sides until piece measures approx. 80 cm / 31½", make sure that one full repetition of diagram M.2 has been finished. Then work 4 rows in garter st over all sts. Put all sts on a stitch holder. Work another part the same way. ASSEMBLY: Sew the loose sts from the 2 parts tog st by st with grafting/kitchener sts. BLOCKING: Place the shawl in lukewarm water until it is soaking wet. Carefully squeeze the water out of the shawl - do not twist the shawl - then roll the shawl in a towel and squeeze to remove more water - the shawl will now only be moist. Place the shawl on a carpet or mattress - carefully stretch it out to size and fasten it with pins. Leave to dry. Repeat the process when the garment has been washed. |
|||||||||||||||||||
Diagram explanations |
|||||||||||||||||||
|
|||||||||||||||||||
 |
|||||||||||||||||||
Have you finished this pattern?Tag your pictures with #dropspattern #softspringshawl or submit them to the #dropsfan gallery. Do you need help with this pattern?You'll find 19 tutorial videos, a Comments/Questions area and more by visiting the pattern on garnstudio.com. © 1982-2026 DROPS Design A/S. We reserve all rights. This document, including all its sub-sections, has copyrights. Read more about what you can do with our patterns at the bottom of each pattern on our site. |
|||||||||||||||||||


With over 40 years in knitting and crochet design, DROPS Design offers one of the most extensive collections of free patterns on the internet - translated to 17 languages. As of today we count 325 catalogs and 12298 patterns - 12288 of which are translated into English (US/in).
We work hard to bring you the best knitting and crochet have to offer, inspiration and advice as well as great quality yarns at incredible prices! Would you like to use our patterns for other than personal use? You can read what you are allowed to do in the Copyright text at the bottom of all our patterns. Happy crafting!
Post a comment to pattern DROPS 138-14
We would love to hear what you have to say about this pattern!
If you want to leave a question, please make sure you select the correct category in the form below, to speed up the answering process. Required fields are marked *.