DROPS Muskat
DROPS Muskat
100% Cotton
from 2.80 $ /50g
DROPS Vivaldi
DROPS Vivaldi
56% Mohair, 30% Polyamide, 14% Wool
Discontinued
find alternatives
DROPS SS24

Pink Sands

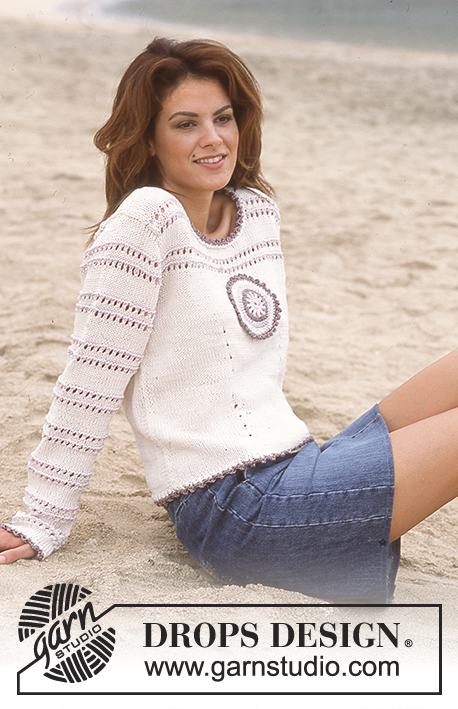
Knitted oversized pullover in DROPS Muskat and Vivaldi or Brushed Alpaca Silk

DROPS 77-25
Sizes: S - M - L - XL - XXL

Finished bust measurements: 118-126-132-140-148 cm
[46.5" - 49⅝" - 52" - 55⅛" - 58.25"]

Materials: DROPS MUSKAT from Garnstudio
350-400-400-450-500 gr nr 10, peach (yarn group B)

and use: DROPS VIVALDI from Garnstudio (yarn group C)
150-200-200-200-250 gr nr 06, off white.

or use: DROPS BRUSHED ALPACA SILK from Garnstudio (yarn group C)
150-200-200-200-250 gr nr 01, off white

DROPS 4.5 mm [US 7] and 6 mm [US 10] needles, or sizes needed to obtain correct gauge.
DROPS 4.5 mm [US 7] short circular needles (for the neck), or size needed to obtain correct gauge.

-------------------------------------------------------

Alternative Yarn – See how to change yarns here
Yarn Groups A to F – Use the same pattern and change the yarn here
Yarn usage using an alternative yarn – Use our yarn converter here

-------------------------------------------------------

DROPS Muskat
DROPS Muskat
100% Cotton
from 2.80 $ /50g
DROPS Vivaldi
DROPS Vivaldi
56% Mohair, 30% Polyamide, 14% Wool
Discontinued
find alternatives

Pattern instructions

NOTE: This pattern is written in American English. All measurements in charts are in cm. For conversion from inches to cm - click here. There are different terms for crocheting in American and British English. If this pattern includes crochet, click for "crochet terms" here. For this pattern in British English, please click here.
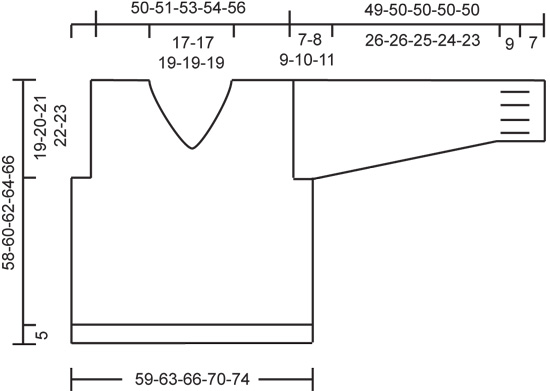
Gauge: 14 sts x 19 rows with 1 strand Muskat + 1 strand Vivaldi or 1 strand Brushed Alpaca Silk = 10 x 10 cm/ 4" x 4" on larger needles in stockinette st.

Rib:
Row 1: * K 2, P 4 *, repeat from * - *.
Row 2: * P 2, K 4 *, repeat from * - *.

Garter st, when knitting flat: Knit all sts, all rows.
______________________________________________

Front:
Cast on 86-92-98-104-110 sts on smaller needles with 1 strand Muskat + 1 strand Vivaldi or 1 strand Brushed Alpaca Silk. Knit rib for 5 cm, keeping 1 st at each edge in garter st.
Change to larger needles and stockinette st, decreasing 2-2-4-4-4 sts evenly distributed on the 1st row = 84-90-94-100-106 sts.
When the piece measures 39-40-41-42-43 cm bind off 7-9-10-12-14 sts at each side for armhole = 70-72-74-76-78 sts.
When the piece measures 40-42-44-46-48 cm shape V-neck.
Divide the piece at center front and put half the sts on a st holder = 35-36-37-38-39 sts.
Then dec 1 st at the neck edge every other row 12-12-13-13-13 times = 23-24-24-25-26 sts remain on shoulder.
Bind off when the piece measures 58-60-62-64-66 cm.
Put sts back on needles and knit the second side the same.

Back:
Cast on and knit the same as the front.
Bind off for armholes as on front.
When the piece measures 56-58-60-62-64 cm bind off the center 22-22-24-24-24 sts for the neck.
On the next row dec 1 st at each neck edge = 23-24-24-25-26 sts remain on each shoulder.
Bind off when the piece measures 58-60-62-64-66 cm.

Sleeve:
Cast on 38-38-38-44-44 sts on smaller needles with 1 strand Muskat + 1 strand Vivaldi or 1 strand Brushed Alpaca Silk.
Knit 4 rows rib, keeping 1 st at each edge in garter st.
Change to larger needles and stockinette st.
When the piece measures 7 cm, change back to smaller needles and knit rib, keeping 1 st at each edge in garter st.
When the piece measures 16 cm change back to larger needles and knit stockinette st to finished measurements.
At the same time when the piece measures 17 cm inc 1 st at each side every 4-3-2.5-3-2.5 cm a total of 7-9-10-8-9 times = 52-56-58-60-62 sts.
When sleeve measures 42-42-41-40-39 cm put a marker at each side (to mark where sleeves will be sewn into armhole).
Continue until the piece measures 47-48-48-48-48 cm, then bind off 5 sts at each side every other row 2 times = 32-36-38-40-42 sts. The piece measures approx. 49-50-50-50-50 cm, bind off the remaining sts.

Assembly: Sew shoulder seams.

Neckband: Pick up 88 or 94 sts (divisible by 6 + 4) around the neck on smaller short circular needles with 1 strand Muskat + 1 strand Vivaldi or 1 strand Brushed Alpaca Silk - start at center front.
Knit rib back and forth from center front keeping 1 st in garter st and begin and end rib with K 2 (seen from the right side).
When the rib measures 2.5 cm bind off all sts in rib. Lay right side of neckband over left at center front and stitch in place.
Sew side seams using edge sts as seam allowance.Sew sleeves up to the markers and sew in sleeves.

Diagram

All measurements in charts are in cm.

diagram measurements
Do you have a question? See a list of frequently asked questions (FAQ)

Knitting tension is what determines the final measurements of your work, and is usually measured per 10 x 10 cm. It is provided like so: number of stitches in width x number of rows in height - eg: 19 stitches x 26 rows = 10 x 10 cm.

The knitting tension is very individual; some people knit/crochet loosely while others work tightly. You adjust the knitting tension with the needle size, which is why the suggested needle size only serve as a guide! You need to adjust this (up or down) to ensure that YOUR knitting tension matches the knitting tension provided in the pattern. If you work with a different knitting tension than provided you will have a different yarn consumption, and your work will have different measurements than what the pattern suggests.

The knitting tension also determines which yarns can replace each other. As long as you achieve the same knitting tension you can replace one yarn with another.

See DROPS lesson: How to measure your tension/gauge

See DROPS video: How to make a gauge tension swatch

The required amount of yarn is provided in grams, eg: 450 g. To calculate how many balls you’ll need you first need to know how many grams are in 1 ball (25g, 50g or 100g). This information is available if you click on the individual yarn quality on our pages. Divide the amount required with the amount of each ball. For example, if each ball is 50g (the most common amount), the calculation will be as follows: 450 / 50 = 9 balls.

The important thing when changing from one yarn to another is that the knitting/crochet tension remains the same. This is so that the measurements of the finished piece will be the same as on the sketch provided. It is easier to achieve the same knitting tension using yarns from the same yarn group. It is also possible to work with multiple strands of a thinner yarn to achieve the knitting tension of a thicker one. Please try our yarn converter. We recommend you to always work a test swatch.

Please NOTE: when changing yarn the garment might have a different look and feel to the garment in the photo, due to individual properties and qualities of each yarn.

See DROPS lesson: Can I use a different yarn than the one mentioned in the pattern?

All our yarns are categorised into yarn groups (from A to F) according to thickness and knitting tension – group A contains the thinnest yarns and group F the thickest. This makes it easier for you to find alternative yarns to our patterns, should you wish to switch yarn. All yarns within the same group have a similar knitting tension and can easily replace each other. However, different yarn qualities have different structures and properties which will give the finished work a unique look and feel.

Click here for an overview of the yarns in each yarn group

At the top of all our patterns you’ll find a link to our yarn converter, which is a helpful tool should you wish to use a different yarn than suggested. By filling in the yarn quality you wish to replace, the amount (in your size) and number of strands, the converter will present good alternative yarns with the same knitting tension. Additionally it will tell you how much you’ll require in the new qualities and whether you’ll need to work with multiple strands. Most skeins are 50g (some are 25g or 100g).

If the pattern is worked with multiple colours, every colour will have to be converted separately. Similarly, if the pattern is worked with several strands of different yarns (for example 1 strand Alpaca and 1 strand Kid-Silk) you will have to find alternatives for each, individually.

Click here to see our yarn converter

Since different yarns have different qualities and textures we have chosen to keep the original yarn in our patterns. However, you can easily find options among our available qualities by using our yarn converter, or simply pick a yarn from the same yarn group.

It is possible that some retailers still have discontinued yarns in stock, or that someone has a few skeins at home that they would like to find patterns for.

The yarn converter will provide both alternative yarn as well as required amount in the new quality.

If you think it's hard to decide what size to make, it can be a good idea to measure a garment you own already and like the size of. Then you can pick the size by comparing those measures with the ones available in the pattern's size chart.

You'll find the size chart at the bottom of the pattern.

See DROPS lesson: How to read size chart

The needle size provided in the pattern serves only as a guide, the important thing is to follow the knitting tension. And since knitting tension is very individual, you will have to adjust the needle size to ensure that YOUR tension is the same as in the pattern – maybe you’ll have to adjust 1, or even 2 needle sizes, up or down to achieve the correct tension. For this, we recommend that you work test swatches.

Should you work with a different knitting tension than the one provided, the measurements of the finished garment might deviate from the measurement sketch.

See DROPS lesson: How to measure your tension/gauge

See DROPS video: How to make a gauge tension swatch

Working a garment top-down provides more flexibility and room for personal adjustment. For example it is easier to try the garment on while working, as well as making adjustments to length of yoke and shoulder caps.

The instructions are carefully explaining every step, in the correct order. Diagrams are adjusted to the knitting direction and are worked as usual.

The diagram depicts all rows/rounds, and every stitch seen from the right side. It is read from bottom to top, from right to left. 1 square = 1 stitch.

When working back and forth, every other row is worked from the right side and every other row is worked from the wrong side. When working from the wrong side, the diagram will have to be worked reversed: from left to right, knit stitches are purled, purl stitches are knit etc.

When working in the round every round is worked from the right side and the diagram are worked from right to left on all rounds.

See DROPS lesson: How to read knitting diagrams

The diagram depicts all rows/rounds, and every stitch seen from the right side. It is worked from bottom to top, from right to left.

When working back and forth every other row is worked from the right side: from right to left and every other row is worked from the wrong side: from left to right.

When working in the round, every row in the diagram are worked from the right side, from right to left.

When working a circular diagram you start in the middle and work your way outwards, counter clockwise, row by row.

The rows usually start with a given number of chain stitches (equivalent to the height of the following stitch), this will either be depicted in the diagram or explained in the pattern.

See DROPS lesson: How to read crochet diagrams

Instructions for working several diagrams after each other on the same row/round, will often be written like so: “work A.1, A.2, A.3 a total of 0-0-2-3-4 times". This means you work A.1 once, then A.2 is worked once, and A.3 is repeated (in width) the number of times provided for your size – in this case like so: S = 0 times, M = 0 times, L=2 times, XL= 3 times and XXL = 4 times.

The diagrams are worked as usual: begin with the first row in A.1, then work the first row in A.2 etc.

See DROPS lesson: How to read knitting diagrams

See DROPS lesson: How to read crochet diagrams

The total width of the garment (from wrist-to-wrist) will be larger in the larger sizes, despite the actual sleeves being shorter. The larger sizes have longer sleeve caps and wider shoulders, so there will be a good fit in all sizes.

The measurement sketch/schematic drawing provides information regarding the full length of the garment. If it’s a jumper or a jacket the length is measured from the highest point on the shoulder (usually closest to the neckline), and straight down to the bottom of the garment. It is NOT measured from the tip of shoulder. Similarly, the length of yoke is measured from the highest point on the shoulder and down to where yoke is split into body and sleeves.

See DROPS lesson: How to read a schematic drawing

Diagrams are often repeated on the round or in height. 1 repeat is the diagram the way it appears in the pattern. If it says to work 5 repeats of A.1 in the round, then you work A.1 a total of 5 times after/next to each other in the round. If it says to work 2 repeats of A.1 vertically/in height you work the entire diagram once, then begin again at the start and work the entire diagram one more time.

Chain stitches are slightly narrower than other stitches and to avoid working the cast-on edge too tight, we simply chain more stitches to begin with. The stitch count will be adjusted on the following row to fit the pattern and measurement sketch.

The rib edge is more elastic and will contract slightly compared to, for example, stocking stitch. By increasing before the rib edge, you avoid a visible difference in width between the rib edge and the rest of the body.

It’s very easy to cast off too tightly, and by making yarn overs while casting off (and simultaneously casting these off) you avoid a too tight cast off edge.

See DROPS video: How to bind off with yarn overs (yo)

To achieve an even increase (or decrease) you can increase on, for example: every 3rd and 4th row alternately, like so: work 2 rows and increase on the 3rd row, work 3 rows and increase on the 4th. Repeat this until the increase is complete.

See DROPS lesson: Increase or decrease 1 st on every 3rd and 4th row alternately

Should you prefer to work in the round instead of back and forth, you may of course adjust the pattern. You’ll need to add steeks mid-front (usually 5 stitches), and follow the instructions. When you would normally turn and work from the wrong side, simply work across the steek and continue in the round. At the end you’ll cut the piece open, pick up stitches to work bands, and cover the cut edges.

See DROPS video: How to knit steeks and cut open

Should you prefer to work back and forth instead of in the round, you may of course adjust the pattern so you work the pieces separately and then assemble them at the end. Divide the stitches for the body in 2, add 1 edge stitch in each side (for sewing) and work the front and back pieces separately.

See DROPS lesson: Can I adapt a pattern for circular needles into straight needles?

Pattern repeats can vary slightly in the different sizes, in order to get the correct proportions. If you’re not working the exact same size as the garment in the photo, yours might deviate slightly. This has been carefully developed and adjusted so that the complete impression of the garment is the same in all sizes.

Make sure to follow instructions and diagrams for your size!

If you have found a pattern you like which is available in women’s size it’s not very difficult to convert it to men’s size. The biggest difference will be the length of sleeves and body. Start working on the women size that you think would fit across the chest. The additional length will be worked right before you cast off for the armhole/sleeve cap. If the pattern is worked top-down you can add the length right after the armhole or before the first decrease on sleeve.

Regarding additional yarn amount, this will depend on how much length you add, but it is better with a skein too many than too few.

All yarns will have excess fibres (from production) that might come off as lint or shedding. Brushed yarns (ie hairier yarns) have more of these loose, excess fibres, causing more shedding.

Shedding also depends on what is worn under or over the garment, and whether this pulls at the yarn fibres. It’s therefore not possible to guarantee that there will be no shedding

Below are some tips on how to get the best result when working with hairier yarns:

1. When the garment is finished (before you wash it) shake it vigorously so the looser hairs come off. NOTE: do NOT use a lint roller, brush or any method that pulls at the yarn.

2. Place the garment in a plastic bag and put it in your freezer - the temperature will cause the fibres to become less attached to each other, and excess fibres will come off easier.

3. Leave in the freezer for a few hours before taking it out and shaking it again.

4. Wash the garment according to the instructions on the yarn label.

Pilling is a natural process that happens to even the most exclusive of fibers. It's a natural sign of wear and tear that is hard to avoid, and that is most visible in high friction areas of your garment like a sweater's arms and cuffs.

You can make your garment look as new by removing the pilling, using a fabric comb or a pill/lint remover.

Still can't find the answer you need? Then scroll down and leave your question so one of our experts can try to help you. This will be done normally within 5 to 10 working days.
In the meantime, you can read the questions and answers that others have left to this pattern or join the DROPS Workshop on Facebook to get help from fellow knitters/crocheters!

You might also like...

Post a comment to pattern DROPS 77-25

We would love to hear what you have to say about this pattern!

If you want to leave a question, please make sure you select the correct category in the form below, to speed up the answering process. Required fields are marked *.

Comments / Questions (15)

country flag Else Barbro Wattenberg Tveitan wrote:

Hei. Er det en grunn til at genseren skal strikkes i for og bakstykket, og ikke i et stykke, altså hel bol? På forhånd tusen takk for svar.

18.03.2024 - 10:58

DROPS Design answered:

Hej Else, du må meget gerne strikke den rundt på rundpind :)

19.03.2024 - 10:58

country flag Cryns wrote:

Puis je faire ce modèle avec laine drops AIR et combien de pelotes dans ce cas pour la taille L merci

26.12.2020 - 16:32

DROPS Design answered:

Bonjour Mme Cyns, ce modèle se tricote avec 1 fil du groupe B (= Muskat) et 1 fil du groupe C (= Vivaldi, que l'on peut remplacer par 2 fils Kid-Silk ou 1 fil Brushed Alpaca Silk) - Vous pourrez utiliser Air - exemples de modèles avec 14 m = 10 cm - ou d'autres alternatives au choix, en fonction de la texture souhaitée, pensez à toujours bien faire votre échantillon pour vérifier autant la tension que la texture. Voir aussi ici. Bon tricot!

04.01.2021 - 08:47

country flag Manon Hendry wrote:

I cannot find any of the wool recommended wool here. What brand and kind of wool can I substitute? Thank you

10.03.2020 - 20:46

DROPS Design answered:

Dear Manon, firstly, under the materials you have the yarn converter, where you can see the recommended yarns to substitute. Also, you can use the yarn groups of the yarns in the pattern for reference when searching for other yarns, in this case it's yarn group B and C. Happy knitting!

10.03.2020 - 23:34

country flag Laetitia wrote:

Bonjour, puis je faire ce modèle avec des aiguilles droites ? Merci

20.11.2019 - 08:44

DROPS Design answered:

Bonjour Laetitia, tout à fait, ce modèle se tricote en différentes parties assemblées entre elles à la fin; en allers et retours sur aiguille circulaire pour avoir plus de place pour toutes les mailles. Vous trouverez ici plus d'infos générales sur les ouvrages sur aiguilles circulaires. Bon tricot!

20.11.2019 - 09:47

country flag Manon Tessier wrote:

Bonjour , puis-je faire ce modèle avec de la laine musckat seulement et si oui dois-je en commander plus et combien . Merci

21.08.2018 - 03:32

DROPS Design answered:

Bonjour Mme Tessier, vous n'auriez pas le bon résultat, car on tricote ici les 2 qualités ensemble. Vivaldi n'est plus disponible, mais vous pouvez la remplacer par Brushed Alpaca Silk. Vous trouverez ici des infos complémentaires sur les alternatives. Bon tricot!

03.09.2018 - 15:04

country flag Manon Tessier wrote:

Bonjour , puis-je faire ce modèle avec la laine musckat seulement et dois-je prendre plus de laine musckat pour le faire . Merci

21.08.2018 - 03:30

country flag Wille wrote:

Ik wil even aangeven dat ik voor de trui, maat X, 100 gram meer Muskat nodig had dan aangegeven staat. Ik brei normaal, denk ik. Misschien hebben anderen hier iets aan.

13.03.2018 - 18:07

country flag Wille wrote:

Deze trui wordt gebreid met 1 draad Muskat en 1 draad Vivaldi. Als ik wil breien met Alaska, een enkele draad dus, heb ik dan dezelfde hoeveel heid nodig als voor de Muskat, dus 350-400-450-500 gr?

16.02.2018 - 17:25

DROPS Design answered:

Hallo Wille, Als je deze trui met 1 draad Alaska breit, kom je op een andere stekenverhouding uit, waardoor je meer bollen nodig zult hebben, tenzij je bewust de stekenverhouding zo houd als in het patroon (dus met te grote naalden breit). Waarschijnlijk heb je dus meer bollen nodig. Het handigst is om even vergelijkbare patronen te bekijken die alleen met Alaska gemaakt zijn en op basis daarvan een schatting te maken. Vraag je verkooppunt of je de bollen die je overhoudt weer in kan leveren.

18.02.2018 - 14:51

country flag Paola wrote:

Abbiate pazienza, se ho capito bene x la cucitura della manica, quando l affianchero alla parte davanti e dietro x cucirla mi mancheranno ovviamente dei punti per cui, saltando maglie durante la cucitura, non resta troppo tesa? Grazie e complimenti x la vostra velocità nel rispondere Saluti Paola

12.05.2016 - 17:38

DROPS Design answered:

Buonasera Paola. Sfruttando la forma della parte superiore della manica, dovrebbe riuscire a cucirla senza che questa tiri troppo. Le può essere di aiuto imbastirla prima. Buon lavoro !

12.05.2016 - 18:04

country flag Paola wrote:

Una domanda. Probabilmente sto perdendo un passaggio. Non capisco la realizzazione della manica; per la taglia xxl ad esempio se arrivo in fondo alla manica con 42 m., (quindi circa 30 cm), queste non corrispondono però ai 23 cm della distanza tra scalfo e spalla che per due fa 46 cm. Scusate tanto e grazie già in anticipo per la vostra disponibilità paola

12.05.2016 - 13:36

DROPS Design answered:

Buongiorno Paola. La manica viene lavorata quasi per intero su tutte le m. Solo negli ultimi 4 ferri vengono intrecciate le m per arrivare a 42 m. Questo serve per dare un leggero garbo nella parte superiore della manica e per poterla cucire correttamente al davanti / dietro. Buon Lavoro!

12.05.2016 - 13:52