DROPS Andes
DROPS Andes
65% Wool, 35% Alpaca
from 6.60 $ /100g
Get the yarn to make this pattern from 59.40$.

The yarn cost is calculated from the pattern’s smallest size and the yarn’s cheapest product type. Looking for an even better price? You might find it on the DROPS Deals!

DROPS Super Sale

Aurora

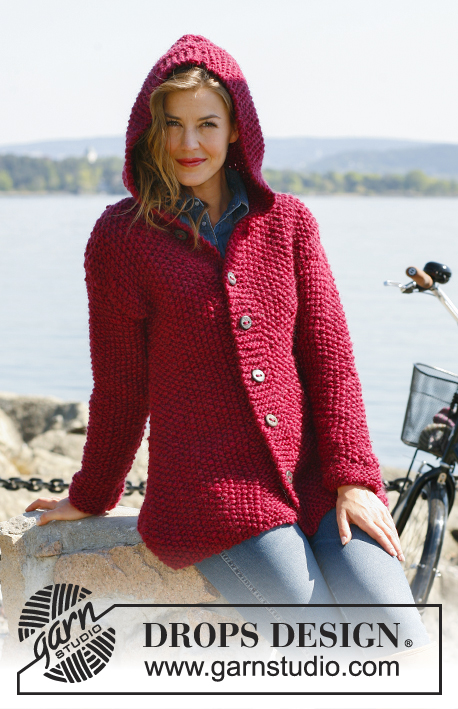
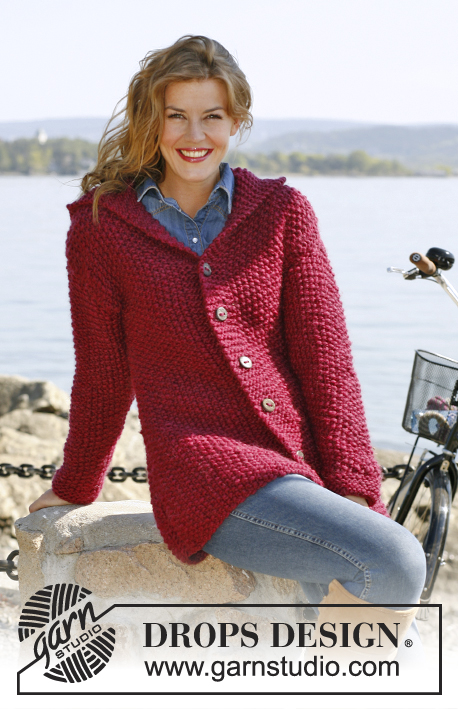
Knitted DROPS jacket in seed st with hood in ”Andes” or ”Snow”. Size: S - XXXL

DROPS 132-9
DROPS design: Pattern no EE-365
Yarn group: E
--------------------------------------------------------
Size: S - M - L - XL - XXL - XXXL
Finished measurements:
Bust: 84-94-102-112-124-134 cm / 33''-37''-40''-44''-48¾''-52¾''
Full length: 72-74-76-78-80-82 cm / 28 3/8''-29 1/8''-30''-30 3/4''-31½''-32¼''

Materials: DROPS ANDES from Garnstudio
Color no 3946, red:
800-900-1000-1100-1200-1300 g

DROPS STRAIGHT NEEDLES size 10 mm / US 15 - or size needed to get 9 sts x 18 rows in seed st = 10 x 10 cm / 4'' x 4''.

DROPS Dark buffelhorn button no 536: 6 pieces

-------------------------------------------------------

Alternative Yarn – See how to change yarns here
Yarn Groups A to F – Use the same pattern and change the yarn here
Yarn usage using an alternative yarn – Use our yarn converter here

-------------------------------------------------------

DROPS Andes
DROPS Andes
65% Wool, 35% Alpaca
from 6.60 $ /100g
Get the yarn to make this pattern from 59.40$.

The yarn cost is calculated from the pattern’s smallest size and the yarn’s cheapest product type. Looking for an even better price? You might find it on the DROPS Deals!

DROPS Super Sale

SAVE 30% on 6 cotton favorites!
Valid until 04.12.2024

Pattern instructions

NOTE: This pattern is written in American English. All measurements in charts are in cm. For conversion from inches to cm - click here. There are different terms for crocheting in American and British English. If this pattern includes crochet, click for "crochet terms" here. For this pattern in British English, please click here.
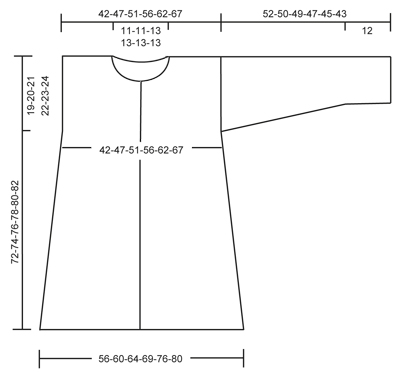
SEED ST:
1st row: * K 1, P 1 *, repeat from *-*.
2nd row: K over P and P over K. Repeat 2nd row.

GARTER ST (back and forth on needle): K all rows.

MEASURING TIP:
Because of the weight of the garment all measurements must be done by holding the piece up otherwise the garment will be too long when worn.

BUTTON HOLES:
bind off for button holes on right front band.1 button hole = K 3rd and 4th st from mid front tog, then make 1 YO. Bind off for button holes when piece measures:
SIZE S: 19, 28, 37, 46, 55 and 64 cm / 7½",11",14½",18",21½" and 25 1/4"
SIZE M: 21, 30, 39, 48, 57 and 66 cm / 8 1/4",11 3/4",15 1/4",19",22½" and 26"
SIZE L: 23, 32, 41, 50, 59 and 68 cm / 9",12½",16 1/8",15 3/4",23 1/4" and 26 3/4"
SIZE XL: 20, 30, 40, 50, 60 and 70 cm / 8",11 3/4",15 3/4",19 3/4",23 5/8" and 27½"
SIZE XXL: 22, 32, 42, 52, 62 and 72 cm / 8 3/4",12½",16½",20½",24 3/8" and 28 3/8"
SIZE XXXL: 24, 34, 44, 54, 64 and 74 cm / 9½",13 3/8",17 1/4",21 1/4",25 1/4" and 29 1/8"

KNITTING TIP (applies to hood):
To avoid holes in the transitions where sts for neck were slipped on a stitch holder, pick up the yarn between 2 sts and work this strand tog with 1st st on row.
--------------------------------------------------------

BACK PIECE:
Worked back and forth on needle.
Cast on 50-54-58-62-68-72 sts on needle size 10 mm / US 15 with Andes. Work in SEED ST - see explanation above! REMEMBER THE GAUGE! When piece measures 8 cm / 3 1/8'' - READ MEASURING TIP - dec 1 st in each side. Repeat dec every 8 cm / 3 1/8'' a total of 6 times = 38-42-46-50-56-60 sts. When piece measures 53-54-55-56-57-58 cm / 21''-21¼''-21 5/8''-22''-22½''-22¾'', insert 1 marker in each side (marks where armhole starts). When piece measures 70-72-74-76-78-80 cm / 27½''-28 3/8''-29 1/8''-30''-30¾''-31½, bind off the middle 8-8-10-10-10-10 sts for neck and finish each shoulder separately. Then bind off 1 st on next row from neck = 14-16-17-19-22-24 sts. Bind off when piece measures 72-74-76-78-80-82 cm / 28 3/8''-29 1/8''-30''-30 3/4''-31½''-32¼''.

LEFT FRONT PIECE:
Worked back and forth on needle.
Cast on 30-32-34-36-39-41 sts (includes 7 band sts towards mid front) on needle size 10 mm / US 15 with Andes. Work in GARTER ST - see explanation above - over the 7 band sts towards mid front and Seed st over the remaining sts. When piece measures 8 cm / 3 1/8'', beg to dec in the side as on back piece = 24-26-28-30-33-35 sts. When piece measures 53-54-55-56-57-58 cm / 21''-21¼''-21 5/8''-22''-22½''-22¾'', insert 1 marker in the side (marks where armhole starts). Continue to work until piece measures 66-68-70-72-74-76 cm / 26''-26¾''-27½''-28 3/8''-29 1/8''-30''. Now slip sts on beg of every row from neck on 1 stitch holder (after they have been worked to avoid cutting the thread) as follows: 7 sts 1 time and 1 st 3-3-4-4-4-4 times = 14-16-17-19-22-24 sts remain on shoulder. Bind off when piece measures 72-74-76-78-80-82 cm / 28 3/8''-29 1/8''-30''-30 3/4''-31½''-32¼''.

RIGHT FRONT PIECE:
Cast on and work as left front piece but reversed. In addition bind off for BUTTON HOLES on band - see explanation above!

SLEEVE:
Worked back and forth on needle. Cast on 24-24-26-26-28-28 sts on needle size 10 mm / US 15 with Andes. Work 8 rows in Garter st, continue in Seed st. At the same time when piece measures 12 cm / 4¾'', inc 1 st in each side. Repeat inc every 8-7-7-5-5-4 cm / 3 1/8"-2 3/4"-2 3/4"-2"-2"-1½" a total of 5-6-6-7-7-8 times = 34-36-38-40-42-44 sts.
When piece measures 52-50-49-47-45-43 cm / 20½"-19 3/4"-19 1/4"-18½"-17 3/4"-17", loosely bind off all sts. NOTE: Shorter measurements in the larger sizes because of wider shoulder width.

ASSEMBLY:
Sew the shoulder seams. Sew in sleeves – see markers on front and back piece for where the sleeves should start. Sew sleeve and side seam in one, sew tog edge to edge in front loop of outermost st to avoid a chunky seam. Sew on buttons.

HOOD:
Pick up approx. 35 to 42 sts around the neck (including sts on stitch holders at the front) on needle size 10 mm / US 15 with Andes. K 1 row from WS while AT THE SAME TIME working to avoid holes in the transitions at the front of neck – READ KNITTING TIP.
Then work 8 rows in Garter st. On next row from RS, inc evenly to 48-50-52-54-56-58 sts. NOTE: Do not inc over the outermost 7 sts in each side (= front bands). Continue in Garter st over the outermost 7 sts in each side and Seed st over the remaining sts until hood measures 47-47-48-48-49-49 cm / 18½"-18½"-19"-19"-19 1/4"-19 1/4", bind off. Fold the hood double and sew it tog at the top, sew edge to edge to avoid a chunky seam.


Diagram

All measurements in charts are in cm.

diagram measurements
Do you have a question? See a list of frequently asked questions (FAQ)

Knitting tension is what determines the final measurements of your work, and is usually measured per 10 x 10 cm. It is provided like so: number of stitches in width x number of rows in height - eg: 19 stitches x 26 rows = 10 x 10 cm.

The knitting tension is very individual; some people knit/crochet loosely while others work tightly. You adjust the knitting tension with the needle size, which is why the suggested needle size only serve as a guide! You need to adjust this (up or down) to ensure that YOUR knitting tension matches the knitting tension provided in the pattern. If you work with a different knitting tension than provided you will have a different yarn consumption, and your work will have different measurements than what the pattern suggests.

The knitting tension also determines which yarns can replace each other. As long as you achieve the same knitting tension you can replace one yarn with another.

See DROPS lesson: How to measure your tension/gauge

See DROPS video: How to make a gauge tension swatch

The required amount of yarn is provided in grams, eg: 450 g. To calculate how many balls you’ll need you first need to know how many grams are in 1 ball (25g, 50g or 100g). This information is available if you click on the individual yarn quality on our pages. Divide the amount required with the amount of each ball. For example, if each ball is 50g (the most common amount), the calculation will be as follows: 450 / 50 = 9 balls.

The important thing when changing from one yarn to another is that the knitting/crochet tension remains the same. This is so that the measurements of the finished piece will be the same as on the sketch provided. It is easier to achieve the same knitting tension using yarns from the same yarn group. It is also possible to work with multiple strands of a thinner yarn to achieve the knitting tension of a thicker one. Please try our yarn converter. We recommend you to always work a test swatch.

Please NOTE: when changing yarn the garment might have a different look and feel to the garment in the photo, due to individual properties and qualities of each yarn.

See DROPS lesson: Can I use a different yarn than the one mentioned in the pattern?

All our yarns are categorised into yarn groups (from A to F) according to thickness and knitting tension – group A contains the thinnest yarns and group F the thickest. This makes it easier for you to find alternative yarns to our patterns, should you wish to switch yarn. All yarns within the same group have a similar knitting tension and can easily replace each other. However, different yarn qualities have different structures and properties which will give the finished work a unique look and feel.

Click here for an overview of the yarns in each yarn group

At the top of all our patterns you’ll find a link to our yarn converter, which is a helpful tool should you wish to use a different yarn than suggested. By filling in the yarn quality you wish to replace, the amount (in your size) and number of strands, the converter will present good alternative yarns with the same knitting tension. Additionally it will tell you how much you’ll require in the new qualities and whether you’ll need to work with multiple strands. Most skeins are 50g (some are 25g or 100g).

If the pattern is worked with multiple colours, every colour will have to be converted separately. Similarly, if the pattern is worked with several strands of different yarns (for example 1 strand Alpaca and 1 strand Kid-Silk) you will have to find alternatives for each, individually.

Click here to see our yarn converter

Since different yarns have different qualities and textures we have chosen to keep the original yarn in our patterns. However, you can easily find options among our available qualities by using our yarn converter, or simply pick a yarn from the same yarn group.

It is possible that some retailers still have discontinued yarns in stock, or that someone has a few skeins at home that they would like to find patterns for.

The yarn converter will provide both alternative yarn as well as required amount in the new quality.

If you think it's hard to decide what size to make, it can be a good idea to measure a garment you own already and like the size of. Then you can pick the size by comparing those measures with the ones available in the pattern's size chart.

You'll find the size chart at the bottom of the pattern.

See DROPS lesson: How to read size chart

The needle size provided in the pattern serves only as a guide, the important thing is to follow the knitting tension. And since knitting tension is very individual, you will have to adjust the needle size to ensure that YOUR tension is the same as in the pattern – maybe you’ll have to adjust 1, or even 2 needle sizes, up or down to achieve the correct tension. For this, we recommend that you work test swatches.

Should you work with a different knitting tension than the one provided, the measurements of the finished garment might deviate from the measurement sketch.

See DROPS lesson: How to measure your tension/gauge

See DROPS video: How to make a gauge tension swatch

Working a garment top-down provides more flexibility and room for personal adjustment. For example it is easier to try the garment on while working, as well as making adjustments to length of yoke and shoulder caps.

The instructions are carefully explaining every step, in the correct order. Diagrams are adjusted to the knitting direction and are worked as usual.

The diagram depicts all rows/rounds, and every stitch seen from the right side. It is read from bottom to top, from right to left. 1 square = 1 stitch.

When working back and forth, every other row is worked from the right side and every other row is worked from the wrong side. When working from the wrong side, the diagram will have to be worked reversed: from left to right, knit stitches are purled, purl stitches are knit etc.

When working in the round every round is worked from the right side and the diagram are worked from right to left on all rounds.

See DROPS lesson: How to read knitting diagrams

The diagram depicts all rows/rounds, and every stitch seen from the right side. It is worked from bottom to top, from right to left.

When working back and forth every other row is worked from the right side: from right to left and every other row is worked from the wrong side: from left to right.

When working in the round, every row in the diagram are worked from the right side, from right to left.

When working a circular diagram you start in the middle and work your way outwards, counter clockwise, row by row.

The rows usually start with a given number of chain stitches (equivalent to the height of the following stitch), this will either be depicted in the diagram or explained in the pattern.

See DROPS lesson: How to read crochet diagrams

Instructions for working several diagrams after each other on the same row/round, will often be written like so: “work A.1, A.2, A.3 a total of 0-0-2-3-4 times". This means you work A.1 once, then A.2 is worked once, and A.3 is repeated (in width) the number of times provided for your size – in this case like so: S = 0 times, M = 0 times, L=2 times, XL= 3 times and XXL = 4 times.

The diagrams are worked as usual: begin with the first row in A.1, then work the first row in A.2 etc.

See DROPS lesson: How to read knitting diagrams

See DROPS lesson: How to read crochet diagrams

The total width of the garment (from wrist-to-wrist) will be larger in the larger sizes, despite the actual sleeves being shorter. The larger sizes have longer sleeve caps and wider shoulders, so there will be a good fit in all sizes.

The measurement sketch/schematic drawing provides information regarding the full length of the garment. If it’s a jumper or a jacket the length is measured from the highest point on the shoulder (usually closest to the neckline), and straight down to the bottom of the garment. It is NOT measured from the tip of shoulder. Similarly, the length of yoke is measured from the highest point on the shoulder and down to where yoke is split into body and sleeves.

See DROPS lesson: How to read a schematic drawing

Diagrams are often repeated on the round or in height. 1 repeat is the diagram the way it appears in the pattern. If it says to work 5 repeats of A.1 in the round, then you work A.1 a total of 5 times after/next to each other in the round. If it says to work 2 repeats of A.1 vertically/in height you work the entire diagram once, then begin again at the start and work the entire diagram one more time.

Chain stitches are slightly narrower than other stitches and to avoid working the cast-on edge too tight, we simply chain more stitches to begin with. The stitch count will be adjusted on the following row to fit the pattern and measurement sketch.

The rib edge is more elastic and will contract slightly compared to, for example, stocking stitch. By increasing before the rib edge, you avoid a visible difference in width between the rib edge and the rest of the body.

It’s very easy to cast off too tightly, and by making yarn overs while casting off (and simultaneously casting these off) you avoid a too tight cast off edge.

See DROPS video: How to bind off with yarn overs (yo)

To achieve an even increase (or decrease) you can increase on, for example: every 3rd and 4th row alternately, like so: work 2 rows and increase on the 3rd row, work 3 rows and increase on the 4th. Repeat this until the increase is complete.

See DROPS lesson: Increase or decrease 1 st on every 3rd and 4th row alternately

Should you prefer to work in the round instead of back and forth, you may of course adjust the pattern. You’ll need to add steeks mid-front (usually 5 stitches), and follow the instructions. When you would normally turn and work from the wrong side, simply work across the steek and continue in the round. At the end you’ll cut the piece open, pick up stitches to work bands, and cover the cut edges.

See DROPS video: How to knit steeks and cut open

Should you prefer to work back and forth instead of in the round, you may of course adjust the pattern so you work the pieces separately and then assemble them at the end. Divide the stitches for the body in 2, add 1 edge stitch in each side (for sewing) and work the front and back pieces separately.

See DROPS lesson: Can I adapt a pattern for circular needles into straight needles?

Pattern repeats can vary slightly in the different sizes, in order to get the correct proportions. If you’re not working the exact same size as the garment in the photo, yours might deviate slightly. This has been carefully developed and adjusted so that the complete impression of the garment is the same in all sizes.

Make sure to follow instructions and diagrams for your size!

If you have found a pattern you like which is available in women’s size it’s not very difficult to convert it to men’s size. The biggest difference will be the length of sleeves and body. Start working on the women size that you think would fit across the chest. The additional length will be worked right before you cast off for the armhole/sleeve cap. If the pattern is worked top-down you can add the length right after the armhole or before the first decrease on sleeve.

Regarding additional yarn amount, this will depend on how much length you add, but it is better with a skein too many than too few.

All yarns will have excess fibres (from production) that might come off as lint or shedding. Brushed yarns (ie hairier yarns) have more of these loose, excess fibres, causing more shedding.

Shedding also depends on what is worn under or over the garment, and whether this pulls at the yarn fibres. It’s therefore not possible to guarantee that there will be no shedding

Below are some tips on how to get the best result when working with hairier yarns:

1. When the garment is finished (before you wash it) shake it vigorously so the looser hairs come off. NOTE: do NOT use a lint roller, brush or any method that pulls at the yarn.

2. Place the garment in a plastic bag and put it in your freezer - the temperature will cause the fibres to become less attached to each other, and excess fibres will come off easier.

3. Leave in the freezer for a few hours before taking it out and shaking it again.

4. Wash the garment according to the instructions on the yarn label.

Pilling is a natural process that happens to even the most exclusive of fibers. It's a natural sign of wear and tear that is hard to avoid, and that is most visible in high friction areas of your garment like a sweater's arms and cuffs.

You can make your garment look as new by removing the pilling, using a fabric comb or a pill/lint remover.

Still can't find the answer you need? Then scroll down and leave your question so one of our experts can try to help you. This will be done normally within 5 to 10 working days.
In the meantime, you can read the questions and answers that others have left to this pattern or join the DROPS Workshop on Facebook to get help from fellow knitters/crocheters!

Post a comment to pattern DROPS 132-9

We would love to hear what you have to say about this pattern!

If you want to leave a question, please make sure you select the correct category in the form below, to speed up the answering process. Required fields are marked *.

Comments / Questions (64)

country flag Rosemarie Olivebring wrote:

Denna var väldigt rolig och enkel att sticka. Härligt garn! 😊

14.03.2024 - 07:09

country flag Barbara Boyer wrote:

I have knitted this cardigan and as a beginner found the pattern clear and easy to follow. I am delighted with the result

07.02.2023 - 14:31

country flag Maureen Pinwill wrote:

I have knitted this delightful jacket with Drops Andes Dark Brown Yarn. I am absolutely delighted with the finished garment. Congratulations to the designer. It is so cosy and warm. I am sure I will knit another in a different colour.

01.12.2022 - 19:07

country flag Batia wrote:

How can i buy wool ? beacuse i can't find the place in your web site. i would like to order 10 pices of DROPS Andes "misty rose" . thx for your help.

31.08.2022 - 14:05

DROPS Design answered:

Dear Batia, you will find the list of DROPS Stores shipping worldwide here - click on the desired store to open their website and place your order there. Don't hesitate to contact them per mail for any further information. Happy knitting!

31.08.2022 - 15:08

country flag Helen Goodson wrote:

When slipping the stitches onto a stitch holder towards the end on the left and right front pieces are the first 7 stitches slipped from the garter stitch rows (where the button holes are) or from the moss stitch side ?

18.02.2022 - 10:12

DROPS Design answered:

Dear Mrs Goodson, on left front piece, work the first 7 sts (then the first stitch) at the beginning of a row from wrong side then slip them/it on a thread; on right front piece, work the first 7 (then the first stitch) at the beginning of a row from right sdie and then slip them/it on a thread - so that you don't need to cut yarn. The first 7 sts from RS/WS are the 7 front band sts, then slip the next 3 or 4 sts (see size) = sts in moss stitch. When working hood, you will then knit up these stitches on both front pieces. Happy knitting!

18.02.2022 - 14:21

country flag Hanneke wrote:

Ik ben een vest aan het breien ,nu staat er bij de voorpanden zet steken op aan het begin van iedere naald langs de hals op een hulpdraad geen idee hoe ik dat moet doen

14.01.2022 - 16:52

DROPS Design answered:

Dag Hanneke,

Misschien heb je wat aan deze video:

21.01.2022 - 09:55

country flag Sandra wrote:

Ya llevo los 70 cm de la espalda para talla S y no se cómo seguir con las disminuciones del cuello, no entiendo bien el final :(

22.01.2021 - 22:56

DROPS Design answered:

Ver la respuesta abajo.

23.01.2021 - 20:12

country flag Sandra wrote:

Hola! Podríais resolverme la siguientes dudas? En la explicación final de la espalda que dice: En una vuelta se rematan para el cuello 8 pts al volver otros 8pts la siguiente vuelta 10pts y así sucesivamente? O solo una vez 8pts de ida y vuelta o sea 16 pts (para la tallaS). Por otra parte dice “rematar 1pts en la vta a partir del cuello= ¿¿14 veces de ida? Gracias por vuestra atención!

19.01.2021 - 23:45

DROPS Design answered:

Hola Sandra. Los patrones de DROPS están preparados para las tallas S-XXXL. Si hay varios números, significa que el primer número es para la talla S, el 2º para la talla M, etc. Si hay solo un número, entonces es igual para todas las tallas. En tu caso, en la espalda para el escote hay que cerrar primero 8 puntos y después 1 punto a cada lado en el escote (un total de 10 puntos), cada hombro se termina por separado. Los 14 puntos son los puntos restantes para el hombro.

23.01.2021 - 20:10

country flag Derock wrote:

Bonjour, j'aurai voulu tricoter la capuche séparément puis la coudre mais je ne sais pas combien de mailles je dois monter en taille m ? Merci à vous et bravo pour vos superbes modèles

17.01.2021 - 13:53

DROPS Design answered:

Bonjour Mme Derock, les mailles de la capuche doivent être relevées, et le nombre va varier en fonction de votre tension en hauteur notamment - vous pouvez peut-être essayez de mesurer la longueur de l'encolure et de calculer ainsi le nombre de mailles qu'il vous faudra. Bon tricot!

18.01.2021 - 09:52

country flag Jacqueline Spencer wrote:

I would like to receive this pattern

13.11.2020 - 19:23

DROPS Design answered:

Dear Mrs Spencer, you can print this pattern for free clicking on the printer icon. Happy knitting!

16.11.2020 - 10:58