
Popular categories
Looking for a yarn?


Comments / Questions (113)
![]() Kitty wrote:
Kitty wrote:
Tager ud efter opsmriften 9x 2 masker Strikkefastheden passr Efter 13 cm taget ud 9 gange men arbejdet måler kun 18 cm? Hvad gør jeg så?
27.02.2026 - 11:54
![]() Mette wrote:
Mette wrote:
Jeg har et spørgsmål til ribbens placering på benene. På grund af udtagningerne foran kommer det ikke til at passe med, at indtagningerne i benene følger omgangens start, hvis ribben fortsat skal sidde i siden. Kan det passe, at man skal forskyde indtagningerne, så de ikke ligger der, hvor omgangen starter?
17.02.2026 - 23:42DROPS Design answered:
Hei Mette. Ribben skal fortsatt sitte i siden. Når beina skal strikkes settes det1 merke på begynnelsen av omgangen, det blir da innsiden av benet, så start her når 1. ben skal strikkes. mvh DROPS Design
23.02.2026 - 15:21
![]() Kathrin wrote:
Kathrin wrote:
Hallo, ist es richtig, dass nur vorn Zunahmen erfolgen? Passt dann ein Windelpopo hinein?
13.02.2026 - 14:49DROPS Design answered:
Liebe Kathrin, ja, das ist richtig so. Es sollte hinten trotzdem genug Platz sein - durch das Rippenmuster ist die Hose ja auch dehnfähig. Viel Spaß beim Stricken!
18.02.2026 - 23:15
![]() Margrethe wrote:
Margrethe wrote:
Hei! Jeg har et spørsmål økningene foran. Det står « økes det 1 m på hver side av de 3 midterste m foran - øk ved å hente opp m fra forrige omg og strikk denne rett». Hvis jeg tar opp tråden fra forrige omgang og strikker denne rett blir det «hull» i strikketøyet. Jeg har løst det med å strikke vridd-rett, og vekslet mellom å øke høyre og venstre på hver side av de tre maskene. Er dette riktig eller gjør jeg det feil?
31.12.2025 - 15:57DROPS Design answered:
Hei Margrethe. Om du henter tråden bakfra og strikker i bakserste maskebue blir det hull, strikker du i fremste maskebue (nærmest deg) blir det ikke hull. Henter du tråden forfra kan du strikke den vridd (= ikke hull). Om du henter tråden bakfra og strikker i fremste maskebue, kan du gjøre dette ved hver økning. Om du har gjort det vekselsvis høyre/venstre og du syns det fungerer for deg /pent nok, kan du gjøre det. mvh DROPS Design
12.01.2026 - 11:33
![]() Lisbeth wrote:
Lisbeth wrote:
Fårstår ikke indtagningen når man skifter til pinde nr. 4,5 efter jeg har strikket 9 cm vrangbord. Hvordan skal dette forståes?
18.10.2025 - 13:25DROPS Design answered:
Hei Lisbeth. Når du skal strikke glattstrikk over 39-41-43 (49-51 ) masker skal det samtidig felles 6-6-6 (8-8) masker jevnt fordelt. I f.eks str. 1/3 mnd kan du strikke slik: Strikk 5 masker, strikk 2 masker sammen. *Strikk 4 masker, strikk 2 masker sammen* 3 ganger *Strikk 5 masker, strikk 2 masker sammen* 2 ganger . Du har nå felt 6 masker jevnt fordelt. Bruk gjerne vår nye øke/felle kalkulator (ikonet nederst til høyre). Strikk det samme når det skal felles på den andre siden også. mvh DROPS Design
20.10.2025 - 13:38
![]() Rebecka wrote:
Rebecka wrote:
Hej! Jag stickar storlek 62/68. När jag ska börja öka innan benen har jag 100 maskor på stickorna. Efter att ha ökat 9 gånger på vardera sida av markering på vartannat varv har jag många fler maskor än 118 som det står i beskrivningen. Vad gör jag för fel? Mvh Rebecka
14.10.2025 - 20:43DROPS Design answered:
Hej Rebecka. Du ökar 1 maska på varje sida av de 3 mittersta maskorna mitt fram (maskan med markör är alltså den mittersta av dessa 3 maskor). Det blir alltså 2 ökade maskor per gång du ökar. Du gör ökningen på vartannat varv, totalt 9 gånger. 100+(9x2)=118 m. Mvh DROPS Design
15.10.2025 - 14:10
![]() Birgit wrote:
Birgit wrote:
Warum wird das Muster 1 Lieben, 1 re. Auf der einen Seite 4x wiederholt und auf der anderen Seite nur 3x ? Ist dann doch nicht gleichmäßig ……. Bitte um Rückantwort
04.10.2025 - 10:48DROPS Design answered:
Liebe Birgit, der Rundenbeginn ist an der Seite in der Mitte des Rippenmusters. Nach dem Bündchen stricken Sie am Rundenbeginn 8 M im Rippenmuster (= 4 x 1 M re/1M li), dann glatt rechts, dann 14 Maschen im Rippenmuster (= 7 x 1 M re/1 M li), wieder glatt rechts und am Ende der Runde 6 Maschen im Rippenmuster (= 3 x 1 M re/, 1 M li). Mit den Maschen vom Anfang sind das dann auch 14 Maschen im Rippenmuster. Gutes Gelingen weiterhin!
24.10.2025 - 10:59
![]() Emmanuelle wrote:
Emmanuelle wrote:
Bonjour , Merci pour votre réponse rapide. J’ai le bon nombre de mailles lorsque je commence la jambe : 58 qui se répartissent ainsi : 15 mailles de côtes , 26 mailles pour le devant et 17 mailles pour l’arriere . Je ne comprends pas ou je dois placer le marqueur qui m’indiquera ensuite ou faire les diminutions.Entre les 26 mailles avant et 17 mailles arrière ou au milieu de ces 43 mailles ?
02.10.2025 - 11:07DROPS Design answered:
Bonjour Emmanuelle, le marqueur doit être placé entre les mailles du dos et celles du devant, côté intérieur de la jambe = c'est également le milieu des tours, soit entre les 26 m du devant et les 17 m du dos. Bon tricot!
02.10.2025 - 17:18
![]() Emmanuelle wrote:
Emmanuelle wrote:
Bonjour , Quand je commence une jambe , j’ai 58 mailles dont 15 mailles de côtes mais j.ai plus de mailles pour le devant que pour l’arrière.Est-ce normal ? Je ne comprends pas ou je dois placer le marqueur ? Au milieu des 3 mailles rabattues ou au milieu des mailles totales ? Merci par avance pour votre réponse . cordialement, Emmanuelle
02.10.2025 - 06:01DROPS Design answered:
Bonjour Emmanuelle, vous devez avoir le même nombre de mailles pour chaque jambe, si vous avez bien les 122 mailles à la fin des augmentations, rabattez bien les 3 m au milieu du devant + les 3 m au milieu du dos pour avoir 58 m pour chaque jambe (58x2 + 2x3)=122. Bon tricot!
02.10.2025 - 08:53
![]() Dominika wrote:
Dominika wrote:
Dzień dobry, czy mogliby Państwo trochę dokładniej opisać jak zamykać te trzy oczka? Czy tutaj chodzi o przerobienie 4 oczek razem na prawo? Czy jakiś inny sposób? W nast. okrążeniu zamknąć 3 o. środk. na środku przodu i 3 o. na środku tyłu (lub oczko z markerem + 1 o. z każdej strony tego oczka)
01.10.2025 - 10:58DROPS Design answered:
Witaj Dominiko, zamknij te oczka tak jakbyś kończyła robótkę, zobacz video TUTAJ. Pozdrawiamy!
01.10.2025 - 14:50
|
|
DROPS Baby 20-10 |
|
 |
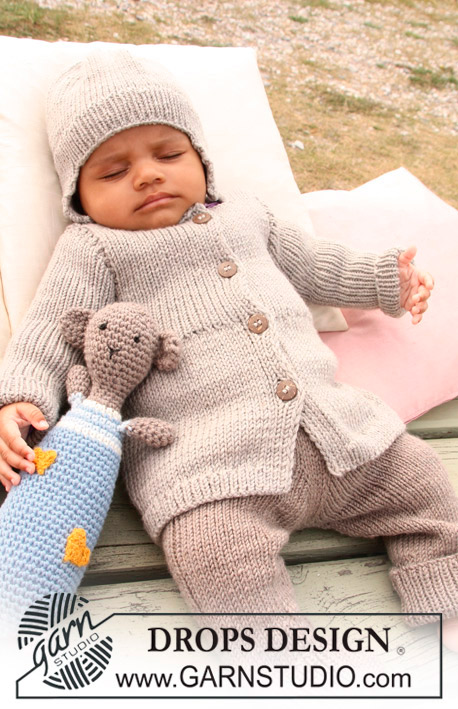 |
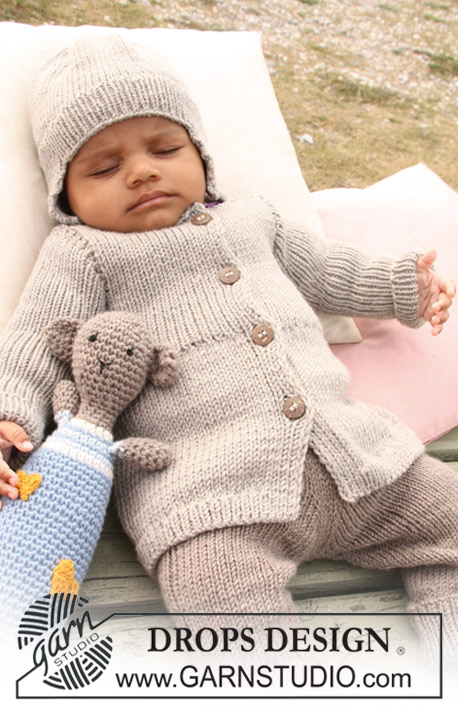
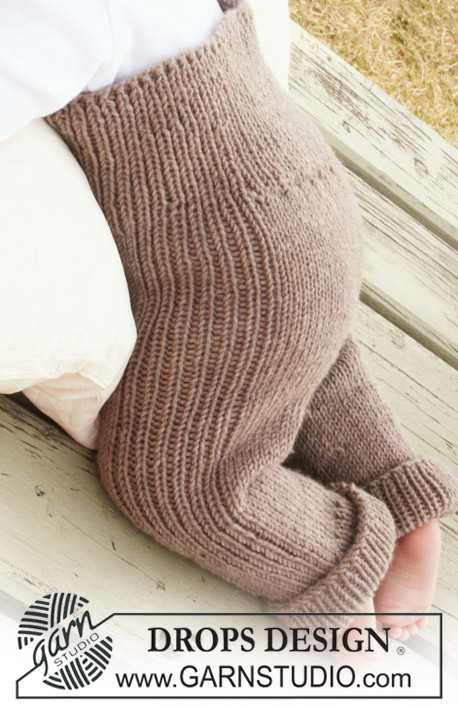
Knitted pants in with rib for baby and children in DROPS Merino Extra Fine
DROPS Baby 20-10 |
|
|
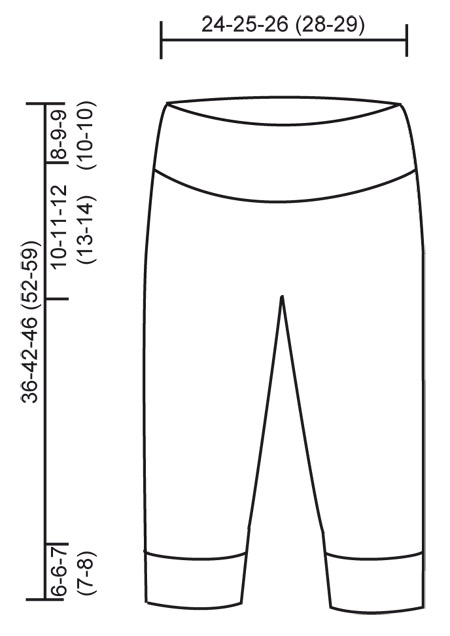
PANTS: DECREASING TIP: Dec as follows before marker: K2 tog. Dec as follows after marker: slip 1 st as if to K, K1, psso. --------------------------------------------------------- --------------------------------------------------------- PANTS: Worked in the round on needle from waist down. Cast on 110-114-118 (130-134) sts on circular needle size 3.5 mm / US 4 with light brown mix. Work rib, K1/P1 for 8-9-9 (10-10) cm / 3⅛"-3½"-3½" (4"-4"). Change to circular needle size 4.5 mm / US 7 and work next round as follows: * K1, P1 *, repeat from *-* a total of 4 times, work stockinette st on the next 39-41-43 (49-51) sts AT THE SAME TIME dec 6-6-6 (8-8) sts evenly = 33-35-37 (41-43) sts stockinette st, * P1, K1 *, repeat from *-* a total of 7 times, P1, stockinette st on the next 41-43-45 (51-53) sts AT THE SAME TIME dec 8-8-8 (10-10) sts evenly = 33-35-37 (41-43) sts stockinette st, * P1, K1 *, repeat from *-* a total of 3 times and finish with P1. There are now 96-100-104 (112-116) sts on needle. Insert 1 marker in the middle st at front and 1 marker in the middle st at back (= 47-49-51 (55-57) sts between sts with markers). Continue in the round in stockinette st and 15 sts in rib each side. REMEMBER THE GAUGE! When piece measures 11-13-14 (16-17) cm / 4⅜"-5⅛"-5½" (6¼"-6¾") inc 1 st each side of the 3 middle sts at front - inc by picking up st from previous round and K this. Repeat the inc on every other round a total of 9-9-9 (10-10) times = 114-118-122 (132-136) sts. On next round bind off the 3 middle sts at front and the 3 middle sts at back (i.e. st with marker and 1 st each side of this st) and work each leg separately. Piece measures approx 18-20-21 (23-24) cm / 7"-8"-8¼" (9"-9½"). Slip the 54-56-58 (63-65) sts for one leg on a stitch holder and the 54-56-58 (63-65) sts for the other leg on double pointed needles size 4.5 mm / US 7. LEG: Continue in stockinette st in the round with 15 sts rib on the outside of leg as before – insert a marker at beg of round = inside of leg. When leg measures 2-2-2 (3-3) cm / ¾"-¾"-¾" (1⅛"-1⅛") dec 1 st on each side of marker – SEE DECREASING TIP! Repeat the dec on every 2-3-3.5 (4-5.5) cm / ¾"-1⅛"-1¼" (1½"-2¼") a total of 5 times = 44-46-48 (53-55) sts. When leg measures 12-16-18 (22-27) cm / 4¾"-6¼"-7" (8¾"-10⅝") change to double pointed needles size 3.5 mm / US 4. Work 1 round stockinette st, AT THE SAME TIME inc 4-4-6 (5-5) sts evenly – NOTE! Do not inc on rib sts at the side = 48-50-54 (58-60) sts. Continue in rib, K1/P1 in the round on all sts (make sure rib fits rib at the side). When leg measures 18-22-25 (29-35) cm / 7"-8¾"-9¾" (11⅜"-13¾") (pants measure a total of 36-42-46 (52-59) cm / 14¼"-16½"-18" (20½"-23¼") from the waist) bind off LOOSELY with K over K and P over P. Work the other leg in the same way. ASSEMBLY: Sew opening between legs. |
|
 |
|
Have you finished this pattern?Tag your pictures with #dropspattern or submit them to the #dropsfan gallery. Do you need help with this pattern?You'll find 8 tutorial videos, a Comments/Questions area and more by visiting the pattern on garnstudio.com. © 1982-2026 DROPS Design A/S. We reserve all rights. This document, including all its sub-sections, has copyrights. Read more about what you can do with our patterns at the bottom of each pattern on our site. |
|


With over 40 years in knitting and crochet design, DROPS Design offers one of the most extensive collections of free patterns on the internet - translated to 17 languages. As of today we count 324 catalogs and 12252 patterns - 12242 of which are translated into English (US/in).
We work hard to bring you the best knitting and crochet have to offer, inspiration and advice as well as great quality yarns at incredible prices! Would you like to use our patterns for other than personal use? You can read what you are allowed to do in the Copyright text at the bottom of all our patterns. Happy crafting!
Post a comment to pattern DROPS Baby 20-10
We would love to hear what you have to say about this pattern!
If you want to leave a question, please make sure you select the correct category in the form below, to speed up the answering process. Required fields are marked *.