Bamboo Breeze

DROPS waistcoat in garter st with shortened rows in ”Delight”. Size S to XXL.

DROPS 121-17
DROPS design: Pattern no DE-022
--------------------------------------------------------
Size: S/M - L/XL - XL/XXL
Finished measurements:
Bust: 88-104-128 cm / 34½"-41"-50½"
Full length: 60-64-68 cm / 23½"-25¼"-26¾"

Materials: DROPS DELIGHT from Garnstudio
350-400-500 g color no 08, green/beige

DROPS CIRCULAR NEEDLE (80 cm / 32") size 3 mm/US 2or3 - or size needed to get 24 sts x 48 rows in garter st = 10 x 10 cm / 4" x 4".

-------------------------------------------------------

Alternative Yarn – See how to change yarns here
Yarn Groups A to F – Use the same pattern and change the yarn here
Yarn usage using an alternative yarn – Use our yarn converter here

-------------------------------------------------------

Pattern instructions

NOTE: This pattern is written in American English. All measurements in charts are in cm. For conversion from inches to cm - click here. There are different terms for crocheting in American and British English. If this pattern includes crochet, click for "crochet terms" here. For this pattern in British English, please click here.
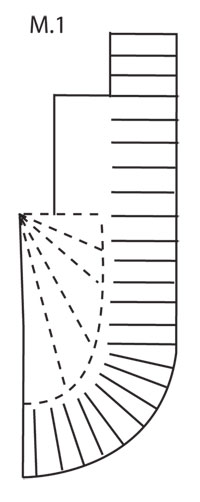
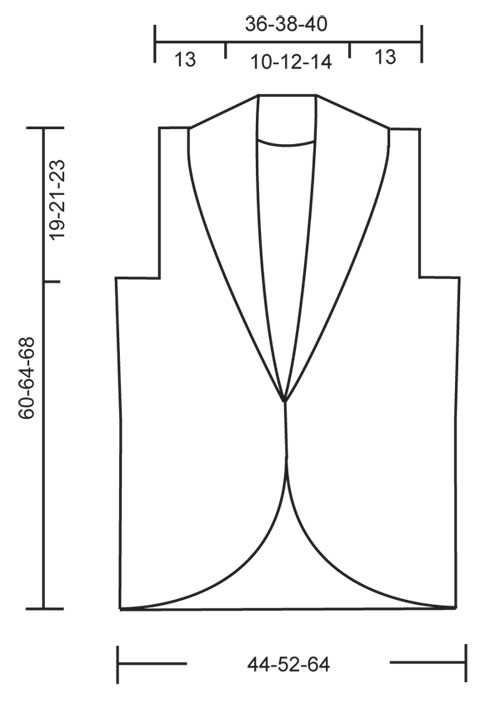
GARTER ST (back and forth on needle): K all rows.

PATTERN: M.1 shows the shortened rows on front piece.
--------------------------------------------------------

BACK PIECE:
Worked from side to side on circular needle. Cast on 98-104-109 sts on circular needle size 3 mm / US 2or3 with Delight. Work 4 rows GARTER ST – see above! Continue with shortened rows as follows with start from RS: * Work stockinette st back and forth on 14 sts, stockinette st back and forth on 28 sts, stockinette st back and forth on 48 sts, stockinette st back and forth on 28 sts, stockinette st back and forth on 14 sts, K 8 rows back and forth on all sts *, repeat from *-*, 1 repeat = 8 rows at the top, 18 rows at the bottom. AT THE SAME TIME when you have worked 20-34-56 rows garter st on all sts (piece measures approx 4-7-12 cm / 1½"-2¾"-4¾" measured where shortest) cast on 46-50-55 new sts at the end of row from RS for shoulder = 144-154-164 sts. REMEMBER THE GAUGE! Now measure piece from here. Continue in garter st and shortened rows in stockinette st until piece measures 13 cm / 5⅛" (= 8 repeats = 64 rows garter st). On next row from WS bind off the first 5 sts for neck = 139-149-159 sts. Continue in pattern. When piece measures 23-25-27 cm / 9"-9¾"-10⅝" (10-12-14 cm / 4"-4¾"-5½" from where sts were bind off for neck = 48-56-68 rows garter st = 6-7-8.5 repeats) cast on 5 new sts at the end of next row from RS = 144-154-164 sts. When piece measures 36-38-40 cm / 14¼"-15"-15¾" (same no of garter st rows before and after neck) bind off the first 46-50-55 sts from WS = 98-104-109 sts. Bind off the remaining sts after the same no of rows as on the other side (adjust to after a full repeat + 4 rows garter st on all sts, including shortened rows).

RIGHT FRONT PIECE:
Beg at the side and work towards front edge, then up towards shoulder and neck. Work shortened rows on sts towards front edge (A) and at the side (B) simultaneously.
READ ALL OF THIS SECTION BEFORE CONTINUING!
Cast on 98-104-109 sts on needle size 3 mm / US 2or3 with Delight. Insert a marker after 48 sts – from RS. Work 4 rows garter st. Continue with shortened rows towards front edge as follows with start from RS: * Work stockinette st back and forth on 14 sts, stockinette st back and forth on 28 sts, stockinette st back and forth on 48 sts, stockinette st back and forth on 28 sts, stockinette st back and forth on 14 sts, K 8 rows back and forth on all sts *, repeat from *-*. SEE M.1 – these are shortened rows A.

AT THE SAME TIME when working the 8 rows back and forth on all sts:
from RS K tog the first 2 sts after marker, and repeat the dec on every 2nd-4th-4th row a total of 36-32-23 times.

AT THE SAME TIME when working the 8 rows back and forth on all sts, also work shortened rows to curve the front piece. Work shortened rows on the last 50-56-61 sts on needle (i.e. sts after marker) as follows:
NOTE! Because of the dec after marker, the 50-56-61 sts with shortened rows will dec as you go along.
Row 1/2: work row until 2-2-4 sts remain, turn piece and work return row.
Row 3/4: work row until 5-5-7 sts remain, turn piece and work return row.
Row 5/6: work row until 8-8-10 sts remain, turn piece and work return row.
Row 7/8: work row until 11-11-13 sts remain, turn piece and work return row.
For each time the 8 rows are K back and forth on all sts continue these shortened rows after marker by working on 3 sts less each time until 3 sts remain. (NOTE! Next time these 8 rows are repeated work row until 14-14-16 sts remain on row 1 (not 2-2-4 sts) etc). When only 3 sts remain work 2 rows on all sts after marker. There is now 1 repeat with shortened rows, repeat this repeat a total of 5 times. SEE M.1 – these are shortened rows B.
NOW MEASURE PIECE FROM HERE!

After all dec there are 62-72-86 sts left on needle. On next row from WS bind off 10-16-28 sts at beg of row for armhole = 52-56-58 sts. Continue with shortened rows as before on the first 48 sts, work remaining sts in garter st. When piece measures 19-21-23 cm / 7½"-8¼"-9" bind off the first 31 sts from WS for shoulder = 21-25-27 sts left on collar.
Continue with garter st and shortened rows in stockinette st on these sts as before, until collar measures 7-8-9 cm / 2¾"-3⅛"-3½" where shortest. Bind off.

LEFT FRONT PIECE:
Like right front piece but mirrored.

ASSEMBLY:
Sew shoulder seams. Sew side seams. Sew collar tog mid back and sew to back piece.

This pattern has been corrected.

Updated online: 14.09.2010
RIGHT FRONT PIECE:

...............AT THE SAME TIME when working the 8 rows back and forth on all sts:
from RS K tog the first 2 sts after marker, and repeat the dec on every 2nd-4th-4th row a total of 36-32-23 times.

...............AT THE SAME TIME when working the 8 rows back and forth on all sts, also work shortened rows to curve the front piece.

...............For each time the 8 rows are K back and forth on all sts continue these shortened rows after marker by working on 3 sts less each time until 3 sts remain.
Updated online: 17.11.2010
NOW MEASURE PIECE FROM HERE!
... Continue with garter st and shortened rows in stockinette st on these sts as before, until collar measures 7-8-9 cm / 2 3/4"-3 1/8"-3½" where shortest. Bind off.

Diagram

All measurements in charts are in cm.

symbols = Shortened rows A
symbols = Shortened rows B
diagram
diagram
Do you have a question? See a list of frequently asked questions (FAQ)

Knitting tension is what determines the final measurements of your work, and is usually measured per 10 x 10 cm. It is provided like so: number of stitches in width x number of rows in height - eg: 19 stitches x 26 rows = 10 x 10 cm.

The knitting tension is very individual; some people knit/crochet loosely while others work tightly. You adjust the knitting tension with the needle size, which is why the suggested needle size only serve as a guide! You need to adjust this (up or down) to ensure that YOUR knitting tension matches the knitting tension provided in the pattern. If you work with a different knitting tension than provided you will have a different yarn consumption, and your work will have different measurements than what the pattern suggests.

The knitting tension also determines which yarns can replace each other. As long as you achieve the same knitting tension you can replace one yarn with another.

See DROPS lesson: How to measure your tension/gauge

See DROPS video: How to make a gauge tension swatch

The required amount of yarn is provided in grams, eg: 450 g. To calculate how many balls you’ll need you first need to know how many grams are in 1 ball (25g, 50g or 100g). This information is available if you click on the individual yarn quality on our pages. Divide the amount required with the amount of each ball. For example, if each ball is 50g (the most common amount), the calculation will be as follows: 450 / 50 = 9 balls.

The important thing when changing from one yarn to another is that the knitting/crochet tension remains the same. This is so that the measurements of the finished piece will be the same as on the sketch provided. It is easier to achieve the same knitting tension using yarns from the same yarn group. It is also possible to work with multiple strands of a thinner yarn to achieve the knitting tension of a thicker one. Please try our yarn converter. We recommend you to always work a test swatch.

Please NOTE: when changing yarn the garment might have a different look and feel to the garment in the photo, due to individual properties and qualities of each yarn.

See DROPS lesson: Can I use a different yarn than the one mentioned in the pattern?

All our yarns are categorised into yarn groups (from A to F) according to thickness and knitting tension – group A contains the thinnest yarns and group F the thickest. This makes it easier for you to find alternative yarns to our patterns, should you wish to switch yarn. All yarns within the same group have a similar knitting tension and can easily replace each other. However, different yarn qualities have different structures and properties which will give the finished work a unique look and feel.

Click here for an overview of the yarns in each yarn group

At the top of all our patterns you’ll find a link to our yarn converter, which is a helpful tool should you wish to use a different yarn than suggested. By filling in the yarn quality you wish to replace, the amount (in your size) and number of strands, the converter will present good alternative yarns with the same knitting tension. Additionally it will tell you how much you’ll require in the new qualities and whether you’ll need to work with multiple strands. Most skeins are 50g (some are 25g or 100g).

If the pattern is worked with multiple colours, every colour will have to be converted separately. Similarly, if the pattern is worked with several strands of different yarns (for example 1 strand Alpaca and 1 strand Kid-Silk) you will have to find alternatives for each, individually.

Click here to see our yarn converter

Since different yarns have different qualities and textures we have chosen to keep the original yarn in our patterns. However, you can easily find options among our available qualities by using our yarn converter, or simply pick a yarn from the same yarn group.

It is possible that some retailers still have discontinued yarns in stock, or that someone has a few skeins at home that they would like to find patterns for.

The yarn converter will provide both alternative yarn as well as required amount in the new quality.

If you think it's hard to decide what size to make, it can be a good idea to measure a garment you own already and like the size of. Then you can pick the size by comparing those measures with the ones available in the pattern's size chart.

You'll find the size chart at the bottom of the pattern.

See DROPS lesson: How to read size chart

The needle size provided in the pattern serves only as a guide, the important thing is to follow the knitting tension. And since knitting tension is very individual, you will have to adjust the needle size to ensure that YOUR tension is the same as in the pattern – maybe you’ll have to adjust 1, or even 2 needle sizes, up or down to achieve the correct tension. For this, we recommend that you work test swatches.

Should you work with a different knitting tension than the one provided, the measurements of the finished garment might deviate from the measurement sketch.

See DROPS lesson: How to measure your tension/gauge

See DROPS video: How to make a gauge tension swatch

Working a garment top-down provides more flexibility and room for personal adjustment. For example it is easier to try the garment on while working, as well as making adjustments to length of yoke and shoulder caps.

The instructions are carefully explaining every step, in the correct order. Diagrams are adjusted to the knitting direction and are worked as usual.

The diagram depicts all rows/rounds, and every stitch seen from the right side. It is read from bottom to top, from right to left. 1 square = 1 stitch.

When working back and forth, every other row is worked from the right side and every other row is worked from the wrong side. When working from the wrong side, the diagram will have to be worked reversed: from left to right, knit stitches are purled, purl stitches are knit etc.

When working in the round every round is worked from the right side and the diagram are worked from right to left on all rounds.

See DROPS lesson: How to read knitting diagrams

The diagram depicts all rows/rounds, and every stitch seen from the right side. It is worked from bottom to top, from right to left.

When working back and forth every other row is worked from the right side: from right to left and every other row is worked from the wrong side: from left to right.

When working in the round, every row in the diagram are worked from the right side, from right to left.

When working a circular diagram you start in the middle and work your way outwards, counter clockwise, row by row.

The rows usually start with a given number of chain stitches (equivalent to the height of the following stitch), this will either be depicted in the diagram or explained in the pattern.

See DROPS lesson: How to read crochet diagrams

Instructions for working several diagrams after each other on the same row/round, will often be written like so: “work A.1, A.2, A.3 a total of 0-0-2-3-4 times". This means you work A.1 once, then A.2 is worked once, and A.3 is repeated (in width) the number of times provided for your size – in this case like so: S = 0 times, M = 0 times, L=2 times, XL= 3 times and XXL = 4 times.

The diagrams are worked as usual: begin with the first row in A.1, then work the first row in A.2 etc.

See DROPS lesson: How to read knitting diagrams

See DROPS lesson: How to read crochet diagrams

The total width of the garment (from wrist-to-wrist) will be larger in the larger sizes, despite the actual sleeves being shorter. The larger sizes have longer sleeve caps and wider shoulders, so there will be a good fit in all sizes.

The measurement sketch/schematic drawing provides information regarding the full length of the garment. If it’s a jumper or a jacket the length is measured from the highest point on the shoulder (usually closest to the neckline), and straight down to the bottom of the garment. It is NOT measured from the tip of shoulder. Similarly, the length of yoke is measured from the highest point on the shoulder and down to where yoke is split into body and sleeves.

See DROPS lesson: How to read a schematic drawing

Diagrams are often repeated on the round or in height. 1 repeat is the diagram the way it appears in the pattern. If it says to work 5 repeats of A.1 in the round, then you work A.1 a total of 5 times after/next to each other in the round. If it says to work 2 repeats of A.1 vertically/in height you work the entire diagram once, then begin again at the start and work the entire diagram one more time.

Chain stitches are slightly narrower than other stitches and to avoid working the cast-on edge too tight, we simply chain more stitches to begin with. The stitch count will be adjusted on the following row to fit the pattern and measurement sketch.

The rib edge is more elastic and will contract slightly compared to, for example, stocking stitch. By increasing before the rib edge, you avoid a visible difference in width between the rib edge and the rest of the body.

It’s very easy to cast off too tightly, and by making yarn overs while casting off (and simultaneously casting these off) you avoid a too tight cast off edge.

See DROPS video: How to bind off with yarn overs (yo)

To achieve an even increase (or decrease) you can increase on, for example: every 3rd and 4th row alternately, like so: work 2 rows and increase on the 3rd row, work 3 rows and increase on the 4th. Repeat this until the increase is complete.

See DROPS lesson: Increase or decrease 1 st on every 3rd and 4th row alternately

Should you prefer to work in the round instead of back and forth, you may of course adjust the pattern. You’ll need to add steeks mid-front (usually 5 stitches), and follow the instructions. When you would normally turn and work from the wrong side, simply work across the steek and continue in the round. At the end you’ll cut the piece open, pick up stitches to work bands, and cover the cut edges.

See DROPS video: How to knit steeks and cut open

Should you prefer to work back and forth instead of in the round, you may of course adjust the pattern so you work the pieces separately and then assemble them at the end. Divide the stitches for the body in 2, add 1 edge stitch in each side (for sewing) and work the front and back pieces separately.

See DROPS lesson: Can I adapt a pattern for circular needles into straight needles?

Pattern repeats can vary slightly in the different sizes, in order to get the correct proportions. If you’re not working the exact same size as the garment in the photo, yours might deviate slightly. This has been carefully developed and adjusted so that the complete impression of the garment is the same in all sizes.

Make sure to follow instructions and diagrams for your size!

If you have found a pattern you like which is available in women’s size it’s not very difficult to convert it to men’s size. The biggest difference will be the length of sleeves and body. Start working on the women size that you think would fit across the chest. The additional length will be worked right before you cast off for the armhole/sleeve cap. If the pattern is worked top-down you can add the length right after the armhole or before the first decrease on sleeve.

Regarding additional yarn amount, this will depend on how much length you add, but it is better with a skein too many than too few.

All yarns will have excess fibres (from production) that might come off as lint or shedding. Brushed yarns (ie hairier yarns) have more of these loose, excess fibres, causing more shedding.

Shedding also depends on what is worn under or over the garment, and whether this pulls at the yarn fibres. It’s therefore not possible to guarantee that there will be no shedding

Below are some tips on how to get the best result when working with hairier yarns:

1. When the garment is finished (before you wash it) shake it vigorously so the looser hairs come off. NOTE: do NOT use a lint roller, brush or any method that pulls at the yarn.

2. Place the garment in a plastic bag and put it in your freezer - the temperature will cause the fibres to become less attached to each other, and excess fibres will come off easier.

3. Leave in the freezer for a few hours before taking it out and shaking it again.

4. Wash the garment according to the instructions on the yarn label.

Pilling is a natural process that happens to even the most exclusive of fibers. It's a natural sign of wear and tear that is hard to avoid, and that is most visible in high friction areas of your garment like a sweater's arms and cuffs.

You can make your garment look as new by removing the pilling, using a fabric comb or a pill/lint remover.

Still can't find the answer you need? Then scroll down and leave your question so one of our experts can try to help you. This will be done normally within 5 to 10 working days.
In the meantime, you can read the questions and answers that others have left to this pattern or join the DROPS Workshop on Facebook to get help from fellow knitters/crocheters!

Post a comment to pattern DROPS 121-17

We would love to hear what you have to say about this pattern!

If you want to leave a question, please make sure you select the correct category in the form below, to speed up the answering process. Required fields are marked *.

Comments / Questions (67)

country flag Jacqueline Lamontagne wrote:

Il y a une erreur de traduction en français. Devant droit diminution Répéter ces diminutions 36-32-23 fois au total tous les 2-2-4 rangs alors que dans les autres langues c’est: au total tous les 2-4-4 rangs

02.03.2020 - 14:53

DROPS Design answered:

Bonjour Mme Lamontagne et merci pour votre retour, la correction a été faite. Bon tricot!

02.03.2020 - 15:24

Anne wrote:

Je tricote la taille S. Apres avoir monte les 46 mailles pour l'epaule, je ne comprends pas a quel endroit du rang je recommence les rgs raccourcis?

25.08.2018 - 20:57

DROPS Design answered:

Bonjour Anne, après avoir monté les 46 m de l'épaule, vous continuez les rangs raccourcis comme avant, ils doivent se trouver en bas du dos. Vous aurez juste davantage de mailles après les rangs raccourcis pour le haut du dos. Bon tricot!

05.09.2018 - 14:15

country flag Heidi wrote:

Ich habe die Weste gestrickt (in Drops Delight), aber leider rollen sich die Ränder so sehr auf, wie ich das eigentlich nur bei glatt rechts kenne. Auf dem Foto sehen die Ränder sehr glatt aus. Gibt es da einen Trick? Ich habe schon versucht die Ränder unter einem Tuch zu bügeln, aber das hatte keinen Effekt. Hat jemand Rat?

07.07.2017 - 10:20

DROPS Design answered:

Liebe Heidi, Sie können die Jacke mit Stecknadeln auf einer geeigneten Unterlage spannen, anfeuchten (z.B. mit einer Sprühflasche für Blumen) und trocknen lassen, danach entfernen Sie die Stecknadeln, dann sollte sich der Rand nicht mehr rollen.

07.07.2017 - 11:47

country flag Anita wrote:

Jeg har strikket ryggen, der er blevet rigtig flot. Forstykket vildt mig problemer! Jeg forstår simpelt hen ikke hvordan jeg kan vende og strikke tilbage over de otte pinde!! Er det ikke otte gennemgående pinde over alle maskerne, alså også på de 48 masker der er strikket første forkortede stykke. Hvis der skal strikkes hen til på både lige og ulige pinde kommer man jo ikke hen over de 48 masker?? Jeg er forvirret😢

17.05.2015 - 14:32

DROPS Design answered:

Nej det er forkortede pinde, gør som der står i opskriften og se systemet her:

DROPS Knitting Tutorial: How to knit short rows in garter st - basic from Garnstudio Drops design on Vimeo.

18.05.2015 - 09:09

country flag Joelle wrote:

Je vois qu'il y a un onglet "corrections" pour ce modèle…  Pouvez-vous me préciser si les explications du modèle sont rectifiées ? (les corrections étant là pour les catalogues uniquement). Merci d'avance

08.04.2014 - 19:00

DROPS Design answered:

Bonjour Joëlle, lorsqu'une correction est faite, elle est ajoutée systématiquement dans les explications en ligne, ainsi quand vous les imprimez du site, elles sont justes. Les corrections figurent également sous l'onglet "correction" pour que vous puissiez éventuellement juste les imprimer si vous avez le catalogue. Bon tricot!

09.04.2014 - 09:25

country flag Astar wrote:

Mir ist leider auch schleierhaft, wie ich das linke Vorderteil "spiegelverkehrt" stricken soll... die verkürzten Reihen können ja nur von einer Richtung aus gestrickt werden... da stehe ich ganz fürchterlich auf dem Schlauch. Für eine "auf links" umgeschriebene Anleitung des rechten Vorderteiles wäre ich wirklich sehr dankbar!

30.01.2014 - 08:21

DROPS Design answered:

Liebe Astar, verkürzte R können von verschiedenen Richtungen gestrickt werden. Bitte schauen Sie zunächst alle unsere Tutorialvideos an und wenn Sie dann noch Fragen haben, wenden Sie sich bitte an Ihren DROPS Laden, in dem Sie die Wolle gekauft haben.

31.01.2014 - 08:40

country flag Chris Roderick wrote:

Cannot get this right on right front, tried twice. After decreases have too many stitches on.

05.04.2013 - 16:57

DROPS Design answered:

Dear Mrs Roderick, you may ask for some help by your Drops retailer. Just do not hesitate to ask them. Happy knitting!

06.04.2013 - 10:45

country flag Sinikka Laihinen wrote:

Hei ! Olen saanut langat suoraan teiltä. Ja nyt on ongelma. Miten etupuolet kasvatetaan olkaa kohti. Ohjeessa lukee vain, että päätetään silmukat kädentietä varten ja jatketaan olkaa kohti, miten? Terv. Sinikka Laihinen

01.04.2013 - 16:56

DROPS Design answered:

Kun olet päättänyt s:t kädentietä varten, jatkat lyhennettyjä kerroksia kuten aiemmin. Lopuksi tehdään sitten vielä kaulus ohjeen mukaan.

03.04.2013 - 14:24

country flag Sinikka Laihinen wrote:

Nyt en ymmärrä...neulotaanko nämä 4-13 silmukkaa uudelleen vähentäen niin että jäljelle jää 3 s.Ja sitten seuraavilla kerroksilla jätetään 16 s. ja vähennetään niitä kolmeen? sinikka Laihinen

23.03.2013 - 18:42

DROPS Design answered:

Silmukoita ei kavenneta, vaan työhön neulotaan lyhennettyjä kerroksia. Eli joka kerralla neulotaan 3 s vähemmän, ennen kuin työtä käännetään.

03.04.2013 - 14:23

country flag Bertha J Evans wrote:

Have been working on this pattern 121-17 made back. having difficulty with right front! Just ripped back .where begin K tog, decreases start! Very confused. Please help

30.01.2013 - 16:39