
Popular categories
Looking for a yarn?


Comments / Questions (28)
![]() Christiane Obermann wrote:
Christiane Obermann wrote:
Hallo, ich würde die Jacke gerne in Größe 48 stricken. Wieviel Maschen müsste ich mehr anschlagen. Kann ich das mit der Maschenprobe selber ausrechnen? Und wieviel mehr an Material würde ich brauchen? Danke Christiane
25.03.2026 - 08:38
![]() Saskia Van Der Linden wrote:
Saskia Van Der Linden wrote:
Ik begrijp alles behalve: Zet ## st op met rondbreinld 4.5 mm en brei Patroon 1, met 5 st aan weerskanten in ribbelst tot de vereiste afmetingen voor de knoopbies VRAAG - patroon M1 is toch een ribbelsteek? de 5 steken aan weerszijden, het boord, zijn tochh ook in ribbelsteek? - brei tot de vereiste afmetingen voor de knoopbies? Geen idee, vereiste afmetingen? Hoeveel cm moet ik patroon 1 breien? Of voeg foto's toe, met de patroon-letters op de foto.
26.12.2025 - 19:38DROPS Design answered:
Dag Saskia,
Het stond niet duidelijk beschreven en ik heb deze eerste zinnen een beetje veranderd. 'brei tot de vereiste afmetingen voor de knoopbies' heb ik eruit gehaald. Je breit eerst patroon 1, wisselt naar een dikkere naald en dan patroon 2. Je hebt steeds 5 biessteken aan elke kant. Hopelijk is het zo duidelijk.
27.12.2025 - 11:59
![]() Florence wrote:
Florence wrote:
Hi, please help me understand the pattern . M1 : une maille sur deux est une maille endroit, l'autre envers ? Ou 1 rang sur deux ? Merci !
27.10.2025 - 09:04DROPS Design answered:
Bonjour Florence, suivez bien la légende des symboles en fonction de votre rang/côté de l'ouvrage, ainsi M.1 se tricote en commençant par le 1er rang sur l'envers, et on va donc tricoter: 1 rang endroit sur l'envers, 1 rang endroit sur l'endroit, 1 rang endroit sur l'envers et 1 rang endroit sur l'endroit = 2 côtes mousse. Bon tricot!
28.10.2025 - 19:19
![]() Carmelita wrote:
Carmelita wrote:
Beste, Wordt de vest van onder naar boven gebreid? Wat is de totale lengte van de vest? Groetjes Carmelita
19.10.2025 - 16:54DROPS Design answered:
Hi Carmelita, the jacket is knitted bottom-up. The total lenght is 74-76-78-80-82 cm (see your size). Happy knitting!
19.10.2025 - 17:47
![]() Kathrin wrote:
Kathrin wrote:
Hallo, Ich habe die Wolle heute bekommen, aber reicht die Wolle wirklich aus? Kommt mir für eine lange Jacke viel zu wenig vor
20.08.2025 - 19:08DROPS Design answered:
Liebe Kathrin, sollte Ihre Maschenprobe stimmen, dann sollten Sie genügend Bomull-Lin haben. - weitere Hinweise haben wir noch nicht gehabt. Viel Spaß beim Stricken!
22.08.2025 - 16:50
![]() Jorien Vossen wrote:
Jorien Vossen wrote:
Bij patroon 78-26 van Drops kan ik het telpatroon niet meer terugvinden. Kan iemand mij hierbij helpen? B v d, Jorien
09.06.2025 - 18:29DROPS Design answered:
Dag Jorien,
Het telpatroon staat onderaan de beschrijving van het patroon.
13.06.2025 - 22:09
![]() Jorien Vossen wrote:
Jorien Vossen wrote:
Met veel plezier werk ik aan het vest nr: drops 78-26 Het patroon las ik steeds af van mijn iPad. Nu ik aan de mouw wil beginnen kan ik het telpatroon nergens meer terugvinden ! Ook niet als ik het opnieuw download. Kan iemand mij hiermee helpen? Bij voorbaat dank 🙏
09.06.2025 - 18:24DROPS Design answered:
Dag Jorien,
Je hebt een opmerking geplaatst bij het patroon dat je zoekt. Je zou hem dan dus ook online kunnen bekijken. Als je naar garnstudio.com gaat en dan zoekt op het patroonnummer (78-26), dan zou je er moeten komen.
13.06.2025 - 22:11
![]() Sunny wrote:
Sunny wrote:
Hallöchen. Mich würde interessieren, ob das Diagramm in Hin und Rückreihen gezeigt wird oder nur in Hinreihen?
10.04.2025 - 08:38DROPS Design answered:
Liebe Sunny, alle Reihen sind im Diagram gezeichnet, dh die Hin- sowie die Rückreihen; mehr über Diagramme lesen Sie hier. Viel Spaß beim Stricken!
10.04.2025 - 10:05
![]() Karin Schröder Jakobsson wrote:
Karin Schröder Jakobsson wrote:
Det här förstår jag inte - det verkar som armlängden är längst på minsta storleken. Är siffrorna felvända? m. När arb mäter 46-44-43-42-40 cm avm 6 m mitt under ärmen, och det stickas färdigt fram och tillbaka på st. Sedan avm för ärmkulle i varje sida på vartannat v: 2 m 2-1-1-1-1 ggr och 1 m 6-9-11-12-14 ggr, sedan avm 2 m i varje sida till arb mäter 55 cm, till sist avm 3 m 1 gång i varje sida. Arb mäter ca 56 cm, maska av de resterande m.
13.03.2025 - 19:50DROPS Design answered:
Hej Karin, jo det stemmer, ærmerne er kortere i de større størrelser da bredden på for og bagstykke er bredere. Du finder mere information på FAQ :)
14.03.2025 - 14:28
![]() Pitkä Ruskea Nahkaremmi 150cm wrote:
Pitkä Ruskea Nahkaremmi 150cm wrote:
Neulemallissa on pitkä ruskea nahkaremmi 150cm. Saako sellaisen tilattua teiltä. Mikä on tuotekoodi?
30.11.2024 - 11:01DROPS Design answered:
Valitettavasti valikoimassamme ei ole nahkaremmejä. Voit tarkistaa, löytyisikö vastaavanlaisia remmejä käsityölikkeistä.
03.12.2024 - 17:56
|
||||||||||||||||
DROPS 78-26 |
||||||||||||||||
|
|
||||||||||||||||
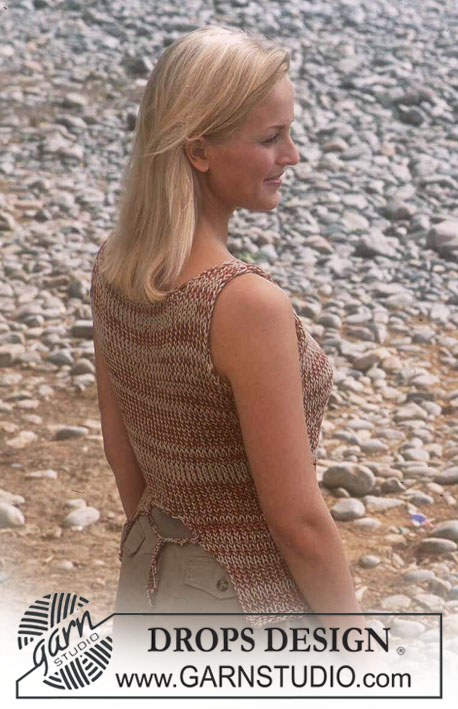
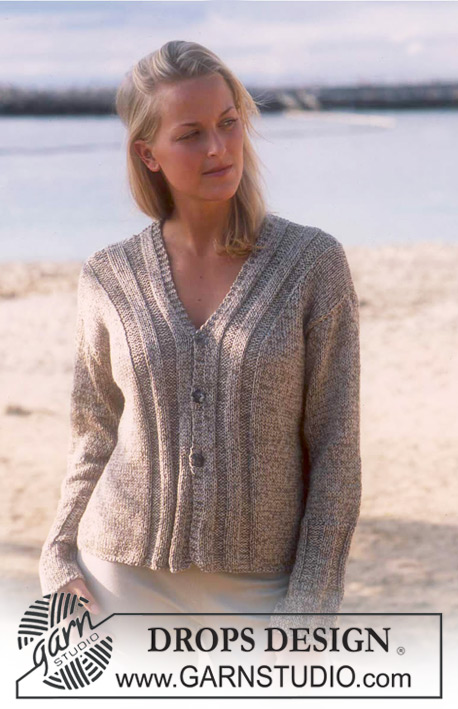
DROPS Cardigan in Bomull-Lin. Crocheted hat in Safran
DROPS 78-26 |
||||||||||||||||
|
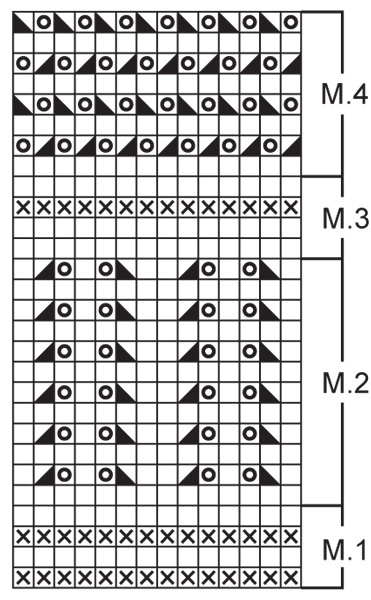
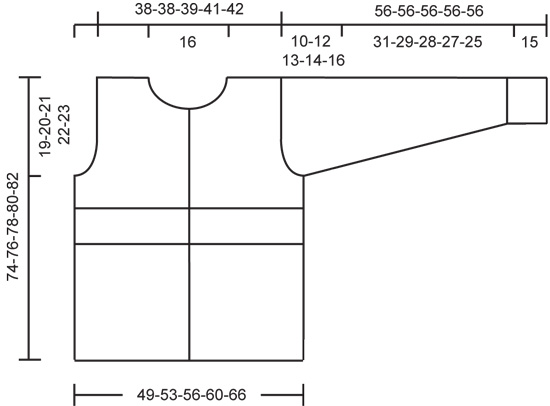
CARDIGAN: Gauge: Stockinette st and Patterns 1-3: 18 sts x 24 rows on larger needles = 10 x 10 cm. Pattern 4: approx. 15 sts on larger needles = 10 cm in width. Pattern: See chart. The patterns are indicated on the right side of the chart (M.1 = Pattern 1, M.2 = Pattern 2, etc.) The pattern is seen from the right side. Garter st, when knitting flat: Knit all sts, all rows. Buttonhole: Make buttonholes along right button band. 1 buttonhole = K tog the 3rd and 4th sts from center front edge, yo. Make buttonholes when the piece measures: Size S: 20, 29, 38, 47, 56 and 65 cm. Size M: 22, 31, 40, 49, 58 and 67 cm. Size L: 24, 33, 42, 51, 60 and 69 cm. Size XL: 26, 35, 44, 53, 62 and 71 cm. Size XXL: 28, 37, 46, 55, 64 and 73 cm. Body: Cast on 185-199-213-227-248 sts on smaller circular needles and knit Pattern 1, keeping 5 sts at each side in garter st throughout for buttonbands (row 1 = wrong side). Change to larger circular needles and Pattern 2 - make buttonholes along right buttonband - see instructions above. When the piece measures 33-34-35-36-37 cm knit Pattern 3 - on the last row of Pattern 3 dec 29-31-35-37-40 sts evenly distributed on the row (do not dec over buttonbands) = 156-168-178-190-208 sts. Repeat Pattern 4 until the piece measures 44-45-46-47-48 cm, then knit Pattern 3 again, increasing 29-31-35-37-40 sts evenly distributed on the 2nd row (do not inc over buttonbands) = 185-199-213-227-248 sts. After Pattern 3 continue with stockinette st to finished measurements. When the piece measures 55-56-57-58-59 cm knit the next row as follows (right side row): 45-48-51-55-60 sts (= right front), bind off 6-8-8-8-8 sts for armhole, 83-87-95-101-112 sts (= back), bind off 6-8-8-8-8 sts for armhole, 45-48-51-55-60 sts (= left front). Knit each piece separately. Left front: = 45-48-51-55-60 sts. Bind off for armhole at the side every other row: 3 sts 1-1-1-1-2 times, 2 sts 0-1-3-4-5 times and 1 st 4-4-3-3-2 times = 38-39-39-41-42 sts. When the piece measures 66-68-70-72-74 cm put 8 sts at the center front edge on a st holder for the neck. Then bind off for the neck every other row: 3 sts 1 time, 2 sts 2 times and 1 st 3-4-3-4-4 times = 20-20-21-22-23 sts remain on shoulder. Bind off the remaining sts when the piece measures 74-76-78-80-82 cm. Right front: = 45-48-51-55-60 sts. Knit the same as left front, reversing shaping - make buttonholes along buttonband. Back: = 83-87-95-101-112 sts. Bind off for armhole at each side as on front = 69-69-71-73-76 sts remain on needles. When the piece measures 72-74-76-78-80 cm bind off the center 27-27-27-27-28 sts for the neck. On the next row dec 1 st at each neck edge = 20-20-21-22-23 sts remain on each shoulder. Bind off all sts when the piece measures 74-76-78-80-82 cm. Sleeve: Read entire section before knitting. Cast on 42-42-42-49-49 sts on smaller double-pointed needles; join and place a marker at the join. Knit Pattern 1. Change to larger double-pointed needles and repeat Pattern 2 until the piece measures 15 cm. Then knit Pattern 3 one time, then knit stockinette st to finished measurements. At the same time when the piece measures 16 cm inc 1 st at each side of marker every 3.5-2.5-2-2-1.5 cm a total of 9-11-13-12-14 times = 60-64-68-73-77 sts. When the piece measures 46-44-43-42-40 cm bind off 3 sts each side of marker, and knit back and forth on needles. Then bind off for sleeve cap at each side every other row: 2 sts 2-1-1-1-1 times and 1 st 6-9-11-12-14 times, then bind off 2 sts at each side until the piece measures 55 cm, then bind off 3 sts at each side 1 time. The piece measures approx. 56 cm, bind off the remaining sts. Assembly: Sew shoulder seams. Neckband: Pick up approx. 80-90 sts around the neck (incl. sts from st holders) on smaller circular needles; knit 3 rows garter st (round 1 = wrong side), then bind off. Sew in sleeves and sew on buttons. Thread a leather cord through the top row of Pattern 4. HAT: Sizes: one-size Materials: Garnstudio SAFRAN, 100% Egyptian cotton, 50 g/160 m./174 yards 50 gr nr 22, brown. Alternate yarns: * Garnstudio SILKE, 100% silk, 50 g./200 m./218 yards * Garnstudio SILKE-TWEED, 52% silk, 48% lambswool, 50 g./200 m./218 yards * Garnstudio COTTON-VISCOSE, 54% Egyptian cotton, 46% viscose, 50 g./110 m./120 yards DROPS 3.5 mm [US ] crochet hook, or size needed to obtain correct gauge. Crochet gauge: 20 sts in width = approx. 10 cm. Hat: Ch 7 and join together into a ring with 1 sl st. Round 1: ch 4, * 1 dc, ch 1 *, repeat from * - * a total of 7 times, finish with 1 sl st in the 3rd ch at start of row (= 8 dc). Round 2: ch 3, 1 dc in ch-loop, * ch 2, 2 dc in the next ch-loop *, repeat from * - *, finish with ch 2 and 1 sl st in 3rd ch at start of row (= 8 dc-groups). Round 3: ch 6, * 2 dc in the next ch-loop, ch 3 *, repeat from * - * a total of 7 times, finish with 1 dc in last ch-loop and 1 sl st in 3rd ch at start of row. Round 4: ch 3, 1 dc in ch-loop, ch 1, 2 dc in the same ch-loop, * ch 1, in the next ch-loop: 2 dc, ch 1 and 2 dc *, repeat from * - * a total of 7 times, finish with ch 1 and 1 sl st in 3rd ch at start of row. Round 5: ch 5, * 2 dc in the next ch-loop, ch 2 *, repeat from * - * a total of 15 times, finish with 1 dc in last ch-loop and 1 sl st in 3rd ch at start of row (= 16 dc). Round 6: ch 3, 1 dc in ch-loop, * ch 3, 2 dc in the next ch-loop *, repeat from * - * a total of 15 times, finish with ch 3 and 1 sl st in 3rd ch at start of row (= 16 dc). Round 7: ch 4, * in the next ch-loop: 2 dc, ch 1, 2 dc and ch 1 *, repeat from * - * a total of 15 times, finish in last ch-loop with 2 dc, ch 1, 1 dc and 1 sl st in 3rd ch at start of row. Round 8: ch 3, 1 dc in ch-loop, * ch 2, 2 dc in the next ch-loop *, repeat from * - * a total of 32 times, finish with ch 2 and 1 sl st in 3rd ch at start of row. Round 9: ch 5, * 2 dc in the next ch-loop, ch 2 *, repeat from * - *, finish with 1 dc in last ch-loop and 1 sl st in 3rd ch at start of row. Round 10: ch 3, 1 dc in ch-loop, * ch 2, 2 dc in the next ch-loop *, repeat from * - *, finish with ch 2 and 1 sl st in 3rd ch at start of row. Repeat rows 9 and 10 rows until the piece measures 13-14 cm from center. Continue as follows: 1 sc in each dc and 1 sc in each ch-loop from previous row. Then work 3 rows sc. Finish as follows: * ch 3, 1 sc in 1st ch (= 1 picot), skip over 1 sc from previous row and 1 sl st in the next sc *, repeat from * - * around hat, cut yarn and fasten. |
||||||||||||||||
Diagram explanations |
||||||||||||||||
|
||||||||||||||||
 |
||||||||||||||||
 |
||||||||||||||||
Have you finished this pattern?Tag your pictures with #dropspattern or submit them to the #dropsfan gallery. Do you need help with this pattern?You'll find 27 tutorial videos, a Comments/Questions area and more by visiting the pattern on garnstudio.com. © 1982-2026 DROPS Design A/S. We reserve all rights. This document, including all its sub-sections, has copyrights. Read more about what you can do with our patterns at the bottom of each pattern on our site. |
||||||||||||||||


With over 40 years in knitting and crochet design, DROPS Design offers one of the most extensive collections of free patterns on the internet - translated to 17 languages. As of today we count 325 catalogs and 12298 patterns - 12288 of which are translated into English (US/in).
We work hard to bring you the best knitting and crochet have to offer, inspiration and advice as well as great quality yarns at incredible prices! Would you like to use our patterns for other than personal use? You can read what you are allowed to do in the Copyright text at the bottom of all our patterns. Happy crafting!
Post a comment to pattern DROPS 78-26
We would love to hear what you have to say about this pattern!
If you want to leave a question, please make sure you select the correct category in the form below, to speed up the answering process. Required fields are marked *.